So, as promised, a series of posts to illustrate the way I go about painting British line infantry, in the form of a tutorial as with the previous post on French line infantry.
Both these types are liable to form the bulk of any Peninsular War collection and so will probably be the most useful reference. As with the French tutorial I will capture the information in a more user friendly PDF for download at the end.
First thing to say is that I am illustrating a Buff faced battalion here, which in common with most similarly faced regiments would tend to have buff coloured turn-backs and additionally cross-belts and trousers, particularly for parade or best wear. I am of the opinion that campaign conditions would have probably caused trousers to become the normal "hotch potch" arrangement, but that cross-belts would have more likely to have been buff than the more common white seen worn by other facing colour regiments. I will provide alternative colour arrangements for regiments with white accoutrements as we go.
The next thing to say is I like to experiment with different ideas and colours, and for this work I picked up one of the new Humbrol acrylic matt black to try out against my trusty Vallejo. I have been away for a week and thinking I had prepared the black ready to use noticed the glossiness on drying.
Humbrol black needs a really thorough stirring to overcome this tendency and explains a slight sheen on some of the models prior to me spotting it and rectifying the problem. I will deal with it as we go and I don't think it is a major problem and needless to say it will be back to Vallejo for me in future.
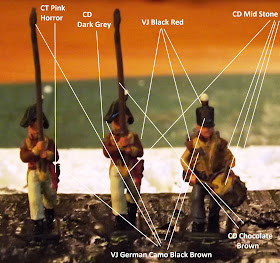
So the first of the three stages requires a block painting job and the models illustrate the basic colours so applied. The code is VJ = Vallejo, CD = Coat d'Arms, H = Humbrol, CT = Citadel
The battalion I am working on is the 61st Foot with buff facings and silver lace. My principle reference for the uniform details is Franklin's "British Napoleonic Uniforms".
Most of the colour choices should be fairly obvious and so I have not duplicated them across all the pictures, save to say that British drums tended to have a panel on the front in the battalion facing colour with an appropriate coat of arms, with the rest of the drum in a varnished wood. Thus I have done my drum with the mid stone to the front and chocolate brown to the rear parts with a dark grey applied to the chords.
Note this stage is a basic block painting step and thus I have not picked out certain straps, lace and buttons with a base shade yet, preferring to leave them until after highlighting the bulk of the uniform. I just prefer doing it that way.
Again I am experimenting with different ideas, one of which is to prepare my horses using the Citadel washes to see if I can achieve a lighter shading overall.
So if I was working on a non buff faced regiment, turn-backs and belts would be Vallejo buff for the base coat.
So there we have the basics done, and next I will apply the first highlight colours. If you have any questions on the work, just drop me a comment.


Good tutorial thanks for posting .
ReplyDeleteRegards Gavin .
Thanks Gavin. It's been a while since I painted British infantry so I am having to find my way around the figures again. Makes a nice change after all that blue!
DeleteGood stuff Jonathan!
ReplyDelete