Wednesday, 7 April 2021

All at Sea - Completing the Heavy Weight Punch, Three British Three-Deckers added to the Trafalgar Collection


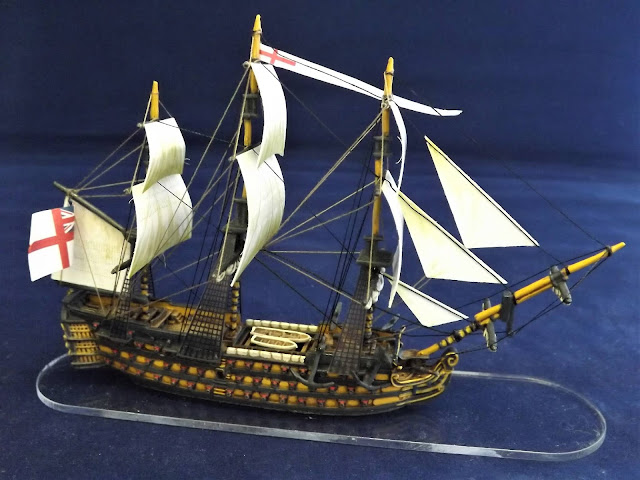
The last three models to complete the collection of British ships of the line and indeed for the collection as a whole are these three British generic three-deckers, designed in this case to bring the British line up to include seven of these types including the Victory and Royal Sovereign.


As a little twist in the work to complete this collection these last three models were not constructed without some little issues to overcome, with new anchors needed from my spares box because of missing flukes and the odd weakly cast bowsprit that broke off on fitting and needed some brass rod to pin it back securely, finally firmed up under the secure hold of the standing rigging.


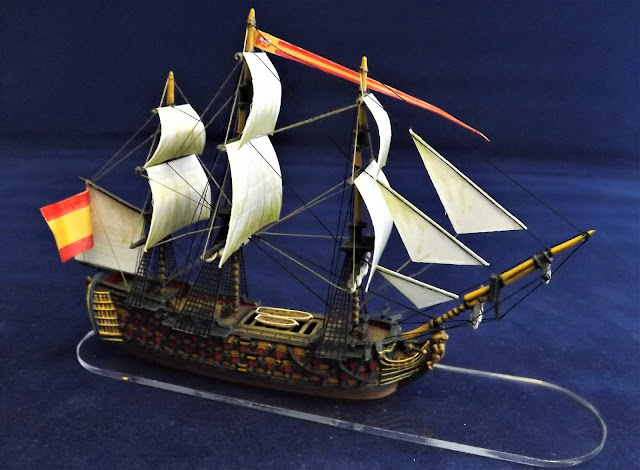
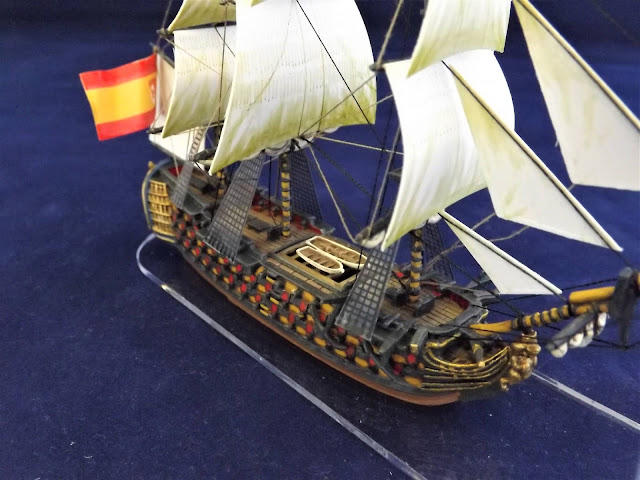
As with my look at the Spanish first-rate last week designed to represent the Rayo in my final line ups, these three models have been kept completely generic and will suffice the need to represent other British first and second rates in other actions and scenarios I plan to play going forward.

The distribution of British three-deckers among the two British columns

Also as discussed in my March post looking at the other recently built British generic three-decker, these models positioned throughout the two British attack columns really deliver a punch/counter-punch option for the British player, for breaking in among the ships of  the Combined Fleet and fending of any attempts to aid the centre and rear from Dumanoir's van squadron.

All at Sea - British Generic First/Second Rate


With the collection of models now built I have turned my attention more fully to producing a game with them taking into account the size of the scenario and the models to be used, with the rules of play pretty much sorted together with the additions needed to capture the feel of a Trafalgar game and so this Easter Weekend has allowed me time to pull together various ideas around additional rules, ship records, signal books, table plans and general game markers and ship number labels.

Ship base numbers, colour coded and designed to go discreetly 
under the stern quarters (British, French & Spanish)

I plan to maintain the minimalist look of the ship bases, thus hopefully not distracting the eye away from the models on the table by too many over powering labels and tokens, so in the end have settled for just a small colour coded ship number to fix to the base that is easily removed, should I choose.

My experience playing Carnage & Glory revealed the ease of play, numbered bases allows when there are lots of units on the table and colour provides another quick reference to help players identify their own side.

A quick glance at part of the C-in-C's master record sheet below shows the ship numbers for each model and their respective commander, his flag-ship and his identifying signal pennant for addressing specific signals to his command, rather than the fleet as a whole, with signals addressed to individual ships enabled with their number.

Part of the British Fleet's Order of Battle record sheet for recording damage to the fleet as a whole 

In many ways, this aspect of game planning is as much fun as constructing the models in that it is another part of creating the game you are hoping to produce and as with the look of the table and models, the play aids and rules add to help put the players in the cabins of the commanders and an aspect of the hobby I really enjoy.


After lots of thought and consideration, I feel happy I now have the rules, 'Kiss Me Hardy'  sorted out to run the game and have pulled together various additions to them from over the years, published in the Lardy Specials, to produce a more 'joined up' presentation of them, for us to use in our games, including a few additions from other sets that I hope will tweak them for the better without changing them too far and losing the game play that characterises them, with play-testing allowing that to be judged and to keep what works and ditch what doesn't. 


Why KMH you may ask, particularly if these are not a set you would tend to use? Well I and the chaps at club are very familiar with them, they have been used to play Trafalgar for the Lardy 2005 Commemorative game which has helped enormously in planning my own take on it, and the chit mechanic of activation is an aspect of Lardy rules that have become a part of the way I like to see a game run with the unpredictability it produces and potential challenges it can throw at players trying to manage them.

Strike Test and Struck Ship Game Markers

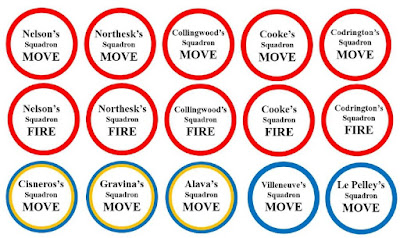
Trafalgar Activation Chit Labels

The other key aspect is that they produce a game that contains the granularity of detail between the various ships and commanders whilst also allowing reasonably fast play that, if the 2005 game is anything to go by, will allow a game to play through over six to eight hours, thus filling a full day's gaming and giving that all to important level of detail that captures the story of the battle we are trying to recreate.

Finally the scale of Kiss Me Hardy is ideal for playing the game with 1:700th models in that they are scaled at 1:900th thus the one inch to 25-yards is perfect for models built around one to 20-yards and the difference being negligible means the rules can work to their centimetre set up and give game turns equivalent to two minutes of real time action. 

My playthrough of the Leeward Line Scenario earlier this year gave a cameo look at how a larger game could look, playing the full battle

Ok, so at this scale you will need a lot of ocean to play Trafalgar but then the intention here was always to play in the 'Grand Manner' with the size of table designed to complement the models and capture the grandeur of the scene of battle as observed at midday on the 21st October 1805.

The other aspect of going large in naval that really appeals is that a large table helps to offset the 'helicopter-view' of the respective commanders by making the battle spread out and somewhat localising each commanders observations as to what is happening in the overall battle and help provide a little more of that fog-of-war experienced by Nelson and Villeneuve reliant on regular reports from subordinates to know what was going on along the line of battle at any particular time.


If as I hope we can build a method of play around a big battle such as Trafalgar that makes for a great player experience then it might be fun to run these kind of games on a regular schedule opening it up to others who might like to spend some time in glorious Devon playing naval wargames and making a much needed contribution to an appropriate charity whilst having a fun day wargaming.


Anyway that is all down the line and first things first are much more mundane with the next jobs on the 'To-Do List' that include budgeting for extra table cloths to cover the expanse of table space needed to play the game and create the look of this titanic naval clash together with pulling together ideas around storage boxes and trays to be able to transport the models securely as required. 

In the meantime I will also start to make additions to this collection going forward which will enable other interesting large actions from this era to be played, with Cape St Vincent, Camperdown and Copenhagen being others that appeal with a few additions of some at anchor options to facilitate some of the smaller squadron clashes, such as First Algeciras and The Nile - what fun!


So this post concludes the completion of the large fighting ships at Trafalgar. In the final post looking at the models built for this collection I will feature the small ships at Trafalgar, that had a key role to play, namely the British schooner Pickle, cutter Entreprenante and the French brigs Argus and Furet.

Also coming up, Steve and I have been battling away in the Second Punic War and our first game is coming to a conclusion, so I will put together a summary post of our play and first impressions of this vintage card-driven-game.

Saturday, 3 April 2021

Far Distant Ships, New Fast Play Tactical Rules for Fleet Actions in the Age of Sail - David Manley


Those of us interested in Age of Sail naval wargaming have no doubt been aware of an impending new set of fleet action rules from David Manley who has authored a few sets in his time, most notably for this theme, 'Form Line of Battle which deals with the subject at a detailed squadron, individual ship level.

His new set of rules 'Far Distant Ships' shifts the focus upwards very much towards the Admiral/Commodore level with the rules directed towards the issues of higher command in a larger action and are described in the introduction thus;

'The aim of these rules has been to develop a quick play set for recreating fleet actions in the Age of Sail. with big battles resolved in 2-3 hours or less. Players take the role of fleet admirals such as Nelson, de Grasse and Gravina. As such the focus of the rules is on command and control rather than the minutiae of ship design, although the system does allow for a good degree of differentiation between ships within a particular ship type or rate. Command is exercised at Squadron level, with the players issuing orders to each squadron in their command, which must be obeyed unless new orders are transmitted by signal – not a perfect process and so the players must be aware of their own abilities, those of their subordinates as well as the environment when attempting to execute their battle plans, as a missed signal may cause confusion and disaster, or let a defeated enemy slip through one’s fingers.'

With my own current project now moving into working up suitable rules to produce my Trafalgar game a lot of the ideas David has included in this set around fleet management are very much part of my own considerations and from a first read through of the set I purchased from Wargames Vault this morning will likely influence those games.


The rules are designed primarily around 1:2400 scale models but can be adapted for the large models simply by changing the game scale from centimetres to inches and incorporate systems to facilitate signalling, formations and command and control for really big battles involving large numbers of ships. 

If these are the kind of games you are interested in playing then you might want to check these rules out available through Wargames Vault for just £7.50/$10.37

Wargame Vault - Far Distant Ships

Friday, 2 April 2021

All at Sea - Spanish 100-gun Rayo (The Lightning)

 The Lightning - Carlos Parrilla Penagos

This Friday, probably appropriately on 'April Fool's Day' 2021, the Trafalgar collection was finished and the last six models added to the collection.

The last Spanish ship needed to complete the forty ships of the Franco-Spanish Combined fleet was a three decker designed to fill the requirement of the Spanish 100-gun Rayo or 'Lightning' which began her career as an 80-gun 3rd rate ship in 1749, making her, with her fifty-six years of service, the oldest ship to take part in the Battle of Trafalgar, but also with her later refit in 1803 to having a third upper deck built, allowing her to carry 100 guns but leaving her, with her original two gallery stern quarters, as a bit of an anomaly and not your usual looking Spanish first rate.
 
The Rayo as she looked on completion as an 80-gun Spanish third-rate

This explains why I left the building of the model to represent the Rayo to last as my options were to work with the generic Warlord Spanish first-rate model or to modify the Spanish 80-gun scratch-build I worked on last year, by adding a similar upper deck but retaining the two galleried stern quarters.

In the end I decided to operate to the principal I established at the start of the project, namely to produce a collection of models that would together achieve an overall look to the table-top battle I was looking to model and not necessarily have an exact representation of every ship that took part.

This principal also works well with plans to add to the collection to do other large battles of the era and so looking to, at some stage, recreate the forces at Cape St Vincent in 1797, I will only require another nine Spanish 3rd rates and four more first rates to produce the Spanish fleet and this model will work very well as one of those Spanish first rates that took part.

The fortieth model to be added to the Combined Fleet part of the collection will stand in very well for the Rayo as well as a typical Spanish 112-gun option for other actions

The Rayo or as she was originally named, the San Pedro, was designed by Juan Jorge and built by Pedro de Torres, being laid down in Havana in 1748 and like many of the fine Spanish ships built there was completed in the finest tropical hard-woods, launching on the 28th June 1749.

Her original armament as an 80-gun ship consisted of 30 x 24-pounder long guns on her lower deck, 32 x 18-pdrs on her upper deck and 18 x 18 pounders arrayed on her quarter deck and forecastle.

The plan of the Rayo after her 1803 refit to a Spanish first-rate

As with most of the large ships built in Havana she was destined to set sail for home soon after completion, but due to several unforeseen delays she didn't make the passage to Cadiz until 1752 arriving in Cadiz on the 30th April that year.

The ship would continue her service career operating out of Cadiz, receiving a set of taller masts in 1757, operating from Cartagena from 1765, and then to El Ferrol from 1774 before being placed in ordinary in Cadiz in 1777 having received three full careening's in the previous six years indicating her time at see fouling her bottom. 


In 1779 she was back in service operating with Admiral Cordova's fleet in the Atlantic and English Channel approaches as Spain allied with France against Britain during the American War of Independence, taking part in the destruction of the British convoy of fifty-one ships bound for India and the West Indies on 9th August 1780, later taking part in the assault and siege of Gibraltar in September 1782 and seeing action in the running engagement off Cape Spartel in October of that year as Cordova failed to prevent British Admiral Howe from running the Spanish blockade with his newly coppered ships and relieving the beleaguered garrison.


Following the end of the American War, Rayo was in action in 1784 taking part in the punitive action of the second bombardment of Algiers between 12th and 21st July leading eventually to the Dey of Algiers negotiating with Spain and agreeing to cease further acts of piracy in the area.

The Capture of British Captain Colnett, July 1789 of the Argonaut, by the Spanish who were seeking to impose sovereignty over trading rights along the whole western seaboard of the Americas

By April 1785 the Rayo was back in ordinary in Cadiz, only to be refitted and prepared for service in 1790 as tensions rose between Britain and Spain over the Nootka Sound crisis as the two nations raised naval forces that put to sea and threatened naval action in response to the impasse, however by December, following a climb down by the Spanish she was back in ordinary 


On the 12th May 1804, with hostilities between Spain and Britain recommenced, the Rayo was refitted for the coming struggle with a third deck added and a new copper bottom carried out under the instruction of marine engineer Honorato de Bouyon.

Honorato de Bouyon and Serze - Naval Museum, Madrid
Naval Engineer

However despite the best efforts of the Spanish naval command in Cadiz, the minutes of the Combined Fleet Council of War, held on the Bucentaure, reported on the 8th October 1805 that the Rayo was one of three ships described as 

'fitted out in haste and barely out of the dockyard, can in extreme necessity put to sea with the Fleet but that they are by no means in a state to render the service in action of which they will be capable when they are completely organised.'

The new 100-gun Rayo could at least boast a much heavier armament that in her original incarnation and at Trafalgar she would carry 30 x 36 pounder long guns on her lower deck, 32 x 24-pdrs on her middle deck, 30 x 8-pdrs on her upper deck and an array of 4 x 4-pdr howitzers and 4 x 28-pdr carronades on her upper works.


At Trafalgar Rayo would be under the command of Commodore Don Enrique Macdonell, an Irishman who left his country to fight against the British at the age of eighteen, initially joining the Spanish Army, and the Regimento de Hibernia, with which he served at the siege of Gibraltar before transferring to the navy.

Commodore Enrique Macdonell
https://commons.wikimedia.org/wiki/File:Mac_Don.jpg

Having spent time serving with the Swedish navy, Macdonell was, at the request of Admiral Gravina pulled out of retirement to command the Rayo at Trafalgar, making him, with his eight previous active commands one of the most experienced Spanish captains in the battle.


However, as the only first rate in Admiral Dumanoir's van squadron, she spent the first two hours of the battle sailing away from the action until turning with the van at about 2.00pm to go to the assistance of the centre.

It would seem though that the Rayo, along with several other ships, then turned away to the east without any serious engagement with the enemy, only too well illustrated by her staggeringly light casualties of four killed and fourteen wounded, with some sources alleging that she was the only ship at Trafalgar not to fire a single shot.


Some redemption for the honour of the ship was garnered after the battle when she joined the sortie by ships under the command of Commodore Cosmao in the Pluton to set out in the middle of the gale on the 23rd October to recover some of the captured ships, although this was thwarted by ten British ships in close attendance and saw the Rayo narrowly avoid wrecking herself as she dropped all her anchors and rolled her masts over the side to avoid destruction on a lee shore.

The Gale after Trafalgar - Thomas Butterworth (National Maritime Museum)
Likely depicting the sortie by Franco-Spanish ships seen here trying to secure British prizes off Cadiz during the gale that followed on the 23rd October 1805 in which the Rayo participated

Her respite was however short-lived as the next day Macdonell was forced to surrender his ship to the British 74-gun Donnegal, which missing Trafalgar was on the way to Gibraltar for water, and then two days later the Rayo was finally driven ashore with her British prize crew taken prisoner but with the ship burnt on Admiral Collingwood's orders.

Sources referred to in this post:
The Trafalgar Companion - Mark Adkin

Next up in the final showcase reviews for this project I will take a look at the 'Wooden Walls of England' as the last three British three-deckers are completed and the small ships of Trafalgar, including HMS Pickle and Entreprenante, and Steve M and I have been battling away in the Second Punic War playing Hannibal on Vassal, update to follow.

Tuesday, 30 March 2021

Flank Attack at Ventosa , Battle of Vimeiro 1808 - Tiny Wars Played Indoors

 
Mr Bill Slavin, host of the blog 'Tiny Wars Played Indoors', has continued with his adventures into the early years of British involvement in the Peninsular War with his playing of the third scenario from the O'er the Hills scenario book, picking up where he left off in the last game he played, by taking a look at the fighting that occurred out on the British left flank at the Battle of Vimeiro, 21st August 1808 around Ventosa Farm.


This scenario recreates the uncoordinated attack by General Junot's flank columns as the French commander sought to draw in British reserves with his frontal attack at Vimeiro Hill as his flank columns exploited in behind the British ridge line position and was first play-tested to be included in the O'er the Hills book by Steve M and me back in December 2017, where the uncertain arrival and set up of the French columns really emphasised the replay potential of this scenario with one game likely to be quite different from another depending on the slight element of chance that the French arrival could offer better opportunities than those that occurred historically and that the players could make good use of any advantage.


https://standtogames.co.uk/shop/ols/products/oer-the-hills-rules

In addition, this part of the battle was written about by a participant in the fighting there, which I covered in my account of 'A Soldier in the 71st' and is also captured in the header to this post as the wounded piper of the 71st Highlanders piped his comrades into battle.

If you are catching up with this series of games played by Bill you can follow the links below to his previous two postings covering Vimeiro Hill and Rolica that preceded this game.


As with his previous games, the scenario is brought to life with Bill's great tables together with the games being fought in glorious 28mm and the pictures that accompany his report are a delight.

Bill Slavin's representation of Ventosa Farm and the forces arrayed on the hill around the position

As with the previous games, it is really interesting for me to see how these scenarios translate when played by others and the games they generate when compared with our own play-test games and in this case illustrating the potential for the French to have a better day than was the actual case, which keeps it interesting for both parties.

General Solignac's columns close in on Ventosa Farm, little suspecting the British lines awaiting them on the other side of the hill

The Ventosa farmstead is a significant piece of terrain in this little action, allowing the French to anchor their position if not carefully dealt with by the British commander and if the French can withstand the likely British assault on their position allow their follow up column which includes French dragoons to severely embarrass any overcommitted British attack.

French voltigeurs are hard pressed by British counterattacks

Having fought as the British commander in our run through of this scenario and having had the threat  of French cavalry getting in among my extended British lines as French columns bore down in their wake, I read Bill's account of his game with great interest and well remember the adrenalin rush of some of our critical die rolls when reading his account

If you would like to find out how Bill's game turned out and his thoughts about the scenario then just follow the link below for his post and more pictures like those featured here.


Enjoy 
JJ

Friday, 26 March 2021

All at Sea - Trafalgar Project Update, The Last Six, Plus the Royal Armouries Model of Agincourt

The work has been busy, busy, busy, in JJ's shipyard as the last six ships in the Trafalgar collection rolled down the slips this weekend ready to be fitted out with rigging and sails prior to sea trials.

Needless to say, the proverbial bunting is out and the band of the Royal Marines is busy practicing by the hard as the project moves into the next stage of planning and preparation with game plans, table designs and rules well into the pre-playing stages as the club prepares to resume normal service hopefully later in the year.


Yesterday, I took a slight break from work on the collection to celebrate a family birthday and to enjoy an hour on Zoom watching a presentation from the Royal Armouries team in Leeds and the team, including the Perry twins, involved in the production of the Agincourt model produced in 2015 as part of the 600th anniversary commemorations.


The model is a truly stunning piece of work and the chaps went through the process of pulling a static model like this together, including the latest historical research that underpinned the final look, ranging from how many men took part, how many fought on foot, the best understanding of the choreography of the events, to how to capture the look of tens of thousands of medieval fighting men closely bunched together on terrain that even used soil samples from the actual battlefield to better inform the colours used for the ground work of the chewed up ploughed fields.

If you missed this presentation the chaps at the Royal Armouries recorded it for YouTube and you catch it here in the link below;


Anyway after that pleasant distraction from all things nautical, it was back to work, putting in the finishing touches to the last Spanish, and three British three-deckers and the smallest vessels present at Trafalgar, HM Cutter Entreprenant, and HM Schooner Pickle which will go through the rigging process this weekend and into next week.


Once these last models are finished, I will showcase them with a bit of history behind the final look before showcasing the total collection that started to come together in October 2019.

More anon 
JJ

Saturday, 20 March 2021

Hannibal, Rome vs Carthage on Vassal

 
I was expecting to be well into reporting our most recent Vassal adventure, namely the Vae Victrix magazine game by Fred Bey, Eylau 1807, sadly that was not to be as after two nights of struggling with a very clumsy module, not to mention a very ill-defined rules translation, we gave up and decided to play another Avalon Hill classic, Hannibal, Rome vs Carthage which came out way back when, soon after the release of its precursor, We the People.

These first card driven games really revolutionised the way we played boardgames back in the late eighties and early nineties, bringing as they did a great way of combining the historical context and events that characterised a particular theme in the cards that could also be used to generate movement.

To a modern audience card driven games (CDG's) probably seem so normal but I remember them being very much a new and rather strange way of playing an historical war-board game and the idea was not universally greeted with enthusiasm in all quarters, we however loved them and continue to do so.

Having not picked up Hannibal on its release, it was a gap in my collection that I was keen to fill and at Xmas, Carolyn got me a first edition copy which I am looking forward to playing face to face, but in the meantime Steve and I decided to try out the Vassal module and got started this week.

The game has gone through some changes since its launch but its basic layout and appearance has remained constant with the classic components of political control markers, military combat unit counters and key generals being the principal components seen displayed on a lovely point-to-point map with of course some classic artwork adorning the cards that players use to generate play.

A gorgeous map from our Vassal game of Hannibal shows off well the cockpit of war in the Western Mediterranean between Carthage and Rome in the Second Punic War, with the positions midway through turn two or 217 BC, with the game set to progress through hopefully to 202 BC captured in nine turns of play with variable card hands starting at seven per player and ending up with nine as the war escalates.

Being very familiar with We the People and Washington's War the learning curve for both Steve and me getting to grips with Hannibal wasn't quite so steep as it is with other less familiar games and so we both got into happily removing and replacing political control markers from the map as revolts broke out in Celtiberia, Corsica and Sardinia, whilst we also started to build up our forces, whilst getting our heads around slightly more unfamiliar game concepts such as the use of elephants in battle and the difficulties of siege operations, as Hannibal tromped off towards the Alps and I (being Rome) had to deal with a revolt in Syracuse, which is proving rather difficult to suppress.

Proconsul Publius Scipio has just landed on the Iberian coast at Malaca (bottom left of map) with his 5SP Proconsular Roman army, but Hasdrubal with his standing force of two Carthaginian strength points up the road at Novo Carthago (New Carthage) is planning a reception committee!

However the Romans do at least have something in common with the British in Washington's War, namely a good control of the seas and so after being made Proconsul at the end of turn one, 216 BC, Publius Scipio promptly took ship with a five point Roman army to land in the Punic recruiting heartland of Iberia at the pretty coastal town of Malaca, hoping to cause a bit of mischief in the process.

This while Hannibal was busy losing elephants and men to attrition has he forced marched off through the Alps bound for mainland Italy, easily skirting around the garrison Scipio had left at Massilia (modern day French Riviera) before his setting off to Spain.

In anticipation of a possible Hannibalic incursion into Italy the Senate handily went and voted for Fabius Maximus to take up a Consular position in 217 BC and he now commands the home army at Rome of 8 Strength Points and given his undoubted abilities at running away, may well find himself taking up the vacancy of Proconsul.

Oh dear, how sad, never mind, as a famous old drill sergeant used to say!
Publius Scipio and his army is no more and Hannibal with his 5SP army is in Gallia ready to advance into mainland Italy. Well now we'll see what these Romans are made of.

Oh yes, did I not mention that there was a vacancy going for the role of Roman Proconsul, ever since Proconsul Publius Scipio's excursion to Spain never got past the ports at Malaca as his Proconsular army got stomped on by Hasdrubal who promptly raised an army of four strength points to match that of the Roman's 5 SP but also brought three extra strength points of Spanish allies together with his undoubted military skills, (3 strategy rating vs 2 for Scipio) and despite losing the initiative after the first round of battle and not getting it back, dismissively dealt with every one of the seven strategy cards Scipio threw at him to win the battle, losing two SP to the Roman's one but cutting the remaining four down in the resultant rout back to the beaches.

The Battle of Malaca 217 BC Hasdrubal beats Proconsul Scipio
despite losing more troops in the fighting causes the Roman army
to break and run back to boats, cutting them down to a man

So, we are very much enjoying our excursion to the Punic Wars with all the fun that card driven games offer in terms of the unexpected and with the feeling that you are never really in control of events, no matter how well things seem to be going.

All to play for and with about four card plays still remaining in turn 2, we'll see how well Steve's Carthaginian offensive proceeds in the next report.

Wednesday, 17 March 2021

All at Sea - British Generic First/Second Rate Ship of the Line

Hold the Line - Richard Grenville
HMS's Victory, Temeraire and Neptune provide the punch to the head of Nelson's weather column attack
 
The final model built as part of my penultimate group build of six models was one of the five generic British three-deckers to put alongside the named models of HMS Victory and Royal Sovereign together with the first of these five built at the same time, in March last year.

The first of my generic three-deckers added last March, loosely designed to represent HMS Neptune, hence the figurehead.


Given the limited options in terms of figureheads and a cast stern gallery I decided early on to have these models represent the other British three-deckers generically and thus allow their use in other scenarios where similar ships were required, whilst retaining the look of the Trafalgar ships they would represent, namely Britannia 100-guns, Dreadnought, Neptune, Prince and Temeraire all 98-guns.


I looked at the development of the 90-gun and later 98-gun second-rate ships in my April 2020 post (link above) and the British preference for these three deck ships over the Franco-Spanish preference to build similarly armed two-deck 80-gun large third rates.


As mentioned in a previous post, the British fleet at Trafalgar found itself at a significant disadvantage in numbers of third rate two-deckers to the Combined Fleet, twenty-eight against seventeen, and with six of the twenty-eight being the excellent 80-gun option.


This advantage would be partially offset by the British three-deckers, with seven such vessels versus the four Spanish first rates, although the proportion of the number of ships involved was about equal with the British force making up 11% of Nelson's fleet, to the 12% the Spanish three-deckers represented of the Combined Fleet, but with the British 100-gun first rates outgunned by the Santisima Trinidad 136-guns, Santa Anna 112-guns  and Principe de Asturias 112-guns.


Of course, numbers of ships and guns are not the only consideration when assessing the merits of both fleets when also taking into account the tactical and command abilities that could and often did make up for any lack of numbers.


The fact is the large British three-deckers with their highly motivated and able crews allowed Nelson and Collingwood to place these ships as strongpoints throughout their respective squadrons, ideal for either battering their way into the line of the Combined fleet as exemplified with Nelson frontloading his column with Victory, Neptune and Temeraire, smashing his way into the centre of Villeneuve's squadron to knock him out of the fight; or with Britannia, Prince and Dreadnought further back in the column able to make their presence felt in the latter stages of the fight, able to add their fire to overcome any resistance or to help ward off succour from the Allied van.

British first and second-rates distribution in the two attack columns


These British three-deckers should add an imposing threat of intent to my British columns and make any Allied commanders draw breath as these leviathans close in.


So the final build in the project  will feature another three of these big British ships, alongside the Spanish Rayo of 100-guns and the two British small ships, Pickle and Entreprenant.

Postscript:
The Trafalgar Project took another step forward this week as I got my first COVID jab on Monday and joined half the population in the South West of England to have had their first vaccination and have my second booked for early June so the prospect of being able to get back to social wargaming took another significant step forward.

Many thanks to the volunteers at the West Point, Exeter, Vaccination Centre and to Hamish Marshall, former BBC Spotlight News journalist who was working with the meet and greet party at the gate and who directed me to the car-park, and also to the Astra-Zeneca/Oxford Vaccine research and development team who put in the work with all those marvellous volunteer patients to produce a working vaccine in record time to allow the world to resume our lives with a semblance of normality despite having now to get used to living permanently with a new virus threat around the globe.

Personally, I felt a bit rough for 48 hours following the jab, with flu-like symptoms, so at least I know it was working, but am now getting back to normal with just a slightly tender upper left arm, so at least the painting can continue; so as always, onwards and upwards.

Sources referred to in this post:
The Trafalgar Companion - Mark Adkin