Showing posts with label O-Group. Show all posts

Friday, 14 June 2024

Normandy 8th - 9th June 1944, 'Operation Perch', Advance Inland - 'O' Group.


Summer has officially arrived here in 'Blighty', though you might not have guessed it given the rather disappointing weather consisting of a continuation of the April spring showers mixed in with temperatures that don't exactly encourage the shorts and T-shirts.

This summer, I and longstanding wargaming pals made the pilgrimage to Chez-Chas in deepest darkest North Devon to play yet another major clash of arms that are the headlines of historical human conflict, that has over the years been occasionally interspersed with the odd bit of classical Tolkienian fantasy, as well as to enjoy some convivial relaxed banter and the occasional beverage to wet the whistle.

A Blast from the Past - Previous Summer Games at Chez-Chaz.
JJ's Wargames, 2013 - Battle of Balaclava
JJ's Wargames, 2014 - Deus Vult, March to Tiberius
JJ's Wargames, 2015 - Battle of the Imjin River 1951 - Chain of Command
JJ's Wargames, 2017 - Battle of Numistro 210BC
JJ's Wargames, 2022 - The First Battle of Tannenberg or Battle of Grunwald 1410 - Swordpoint

However in this, the eightieth anniversary year of D-Day, it would have been remiss of us not to celebrate the achievements of 'The Greatest Generation' by turning the pages back to the dark days of 1944 when hope was beginning to rise that the nightmare of an Axis victory was fading beyond sight and that the Blue Birds would indeed fly over the white cliffs of Dover once again at the dawn of a new world free from tyranny.

Operation Perch was a British offensive during the early stages of the Battle of Normandy which took place from the 7th to the 14th of June 1944. The operation was intended to encircle and seize the German occupied city of Caen, which was a D-Day objective for the British 3rd Infantry Division in the early phases of Operation Overlord.

Original plan for the Perch Operation in June 1944 before it has been changed - Map by MattMoissa
Note our game battle area just north of Tilly-sur-Seulles.

German units were rushed to Normandy to contain the invasion. The I SS-Panzer Corps consisted of the Panzer-Lehr-Division, one of the strongest divisions in the German army, the 12th SS-Panzer Division Hitlerjugend and the 21st Panzer Division.

The leading elements of the Panzer-Lehr Division arrived during the night of 9 June at Tilly-sur-Seulles, having lost up to 200 vehicles to aerial attacks during its 90 mi (140 km) drive from Chartres, having been diverted from facing the British I Corps north of Caen due to the success of the 50th Northumbrian Division. Parts of the 12th SS-Panzer Division, the 21st Panzer Division and the remains of the 716th Static Infantry Division were moved to Caen, facing I Corps. 

Our battle area in detail with the River Seulles to the west table edge

Overview
Our game was designed to represent the advance on Villers-Bocage. In particular points 102 and 103.

View of the battle area from the south east on the German side of the table

Game Set Up
The table will be 12' x 5 '. Allies will set up on North table edge (12' length). Germans South table edge.

Victory Conditions
Allies are attackers.
Game length, until one side orders a withdraw (4 FUBAR) for each table.
Victor is the side that collects most victory points.

A similar view from the German side of the table but from the south west beyond the River Seulles and the village of Chouain held by remnants of the 352nd Division

Allies will consist of four players.
Player 1, C-in-C, (Chas), in overall command. Dice for orders and allocates orders. 
Also responsible for allocating reinforcement and artillery support.

Player 2, (Andy), Battalion Commander, DLI Left side (East). 
Player 3, (John), Battalion Commander, Dorsets Right side (West). 
Player 4, (JJ), Reconnaissance and Tank Commander, 4/7 Dragoon Guards & 21st Lancers. 


British Forces


8th Durham Light Infantry with 61st Reconnaissance and 21st Lancers. (West Table)


1st Dorset Regiment with 4/7 Dragoon Guards (East Table)
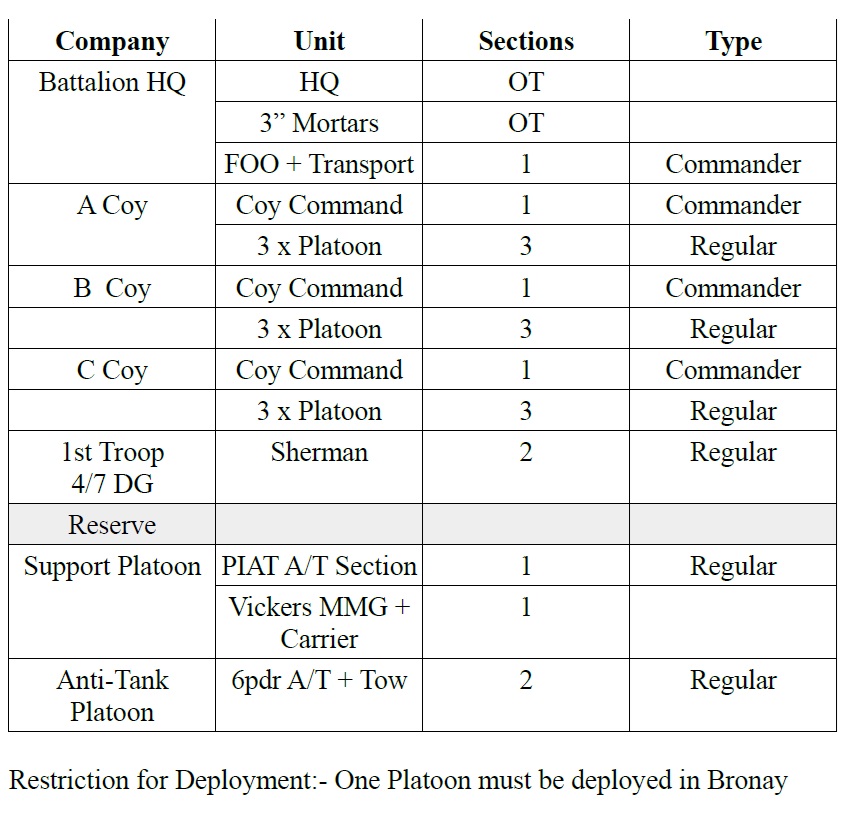

Divisional Reserves (2 HQ Orders)


Germans will consist of three players
Player 1, C-in- C, (Vince), in overall command. Dice for orders and allocates orders.
Also responsible for allocating reinforcement and artillery support. In addition will control Tank force.

Player 2, (Steve M.), Battalion Commander, Panzer Lehr and 352nd Inf, Division, Left side (West).
Player 3, (Clive), Battalion Commander 12th SS Hitlerjugend Panzer Division, Right side (East).


German Force


Panzer Lehr (II/902 Panzer Grenadiers), Elements Kampfgruppe
Meyer (352nd Division). (West Table)


12 SS Recce Btn and III/26SS Panzer Grenadiers. (East Table)


Divisional Reserves (2 HQ Orders)


With the briefing complete, time to look at the terrain before gathering into O-Group meetings to discuss and agree the plans of attack and defence.

So our game set up is as you see above and we gave ourselves a full day to play, with a quick pre-game briefing about the objectives and game house-keeping before we separated off into our respective teams to discuss the plan, with me joining Andy and John in the British O-Group and my role to provide armoured support to effectively shoot the infantry I was supporting onto their respective targets.

The British plan drawn up with first phase line and objectives together with battalion and company boundaries.

As the map above shows we sorted out the respective battalion boundaries and the first phase line to be achieved and a plan to push forward a strong line of forward patrols including recce groups for the 21st Lancers with their supporting Bren carrier teams and Daimler and Humber armoured cars to add a bit of stiffening out on the right flank beyond the River Seulles, which Andy leading the Durham Light Infantry intended to use to refuse the right flank and focus on taking Hill 103.

First things first as the various company headquarters units get set up prior to the placement of forward patrols.

Only too well aware of the vulnerability of the Sherman to just about any German anti-tank capability I made it quite clear to my infantry colonels that my 'tankies' would not be expected to press on towards cover without it being adequately controlled by forward patrols, and that such cover once controlled would be vital for my armour to take up a secure position from which to bring their fire to bear on enemy points of resistance as they were encountered.

With company HQ's positioned the two sides start to mark out their forward line of advance as the first patrol groups are pushed forward 

So the methodical game that O-Group produces began as the British and German screens met in the wake of the British pre-assault artillery barrage that left the German 12SS Panzergrenadier company of the German right hesitant in the first turn and the German force less one platoon to use in the upcoming battle.

Sherman tanks of the 4/7 Dragoon Guards like debutants at their coming out ball, cautiously advance onto the table in the wake of the infantry and recce patrol groups.

Slowly but surely the British forward patrols supported by their closest infantry and eventually my tanks and armoured cars pushed the German forward line back and the first strongpoints containing their infantry and heavy weapons began to reveal themselves, all this against a back drop of continuous German sniper attacks that attempted to stymie the British advance on key terrain features.

German patrols move out to meet their British counterparts providing potential jump off points for deploying main force units.

The game O-Group produces is very evocative of the British infantry attacks recounted in the histories of the fighting in Normandy with the 'Tommies' leaning in to their creeping artillery barrage hoping to get onto their phase line objectives and take advantage of any German disruption, whilst the tanks hover in the background taking out tough resistance points and heavy machine guns; with both sides popping away with snipers and mortars, all against a bigger backdrop of getting the initiative and maintaining it particularly at those critical moments when units are in position to make a final assault but needing to get the jump off ahead of any enemy pre-emptive action to stop it, usually in the next turn of play.

With British briefing making it clear that any ground beyond six inches onto the table had to be assumed to be hostile the approach towards features such as woods was made carefully, with the tanks here waiting for the trees ahead to be scouted out for potential ambush groups.

Little moments of drama highlighted the play as on the German right flank they revealed their teeth against the British supporting tanks taking out two troops of Shermans in rapid succession as the attack went in against Le Hamel and Panzerschreck and PaK 40 fire left multiple burning hulks around the hamlet, but seeing the Dorsets move into the buildings and mopping up the final pockets of resistance to use the village as a jump off point for the push on towards Christot.
 
As the first objectives were reached on the battalion phase lines, platoon sized groups started to deploy in preparation for the assault, however snipers and machineguns took their toll as the markers indicate.

Suddenly as the British tanks pressed their support to shoot the infantry onto the first target, the village of Le Hamel, an SS Pak 40 team opened fire from the hedgerows out on the company boundary.

In the centre, the age old lesson for the infantry of not getting close to tanks, which inevitably draw German artillery barrages was proven to good effect, as German 105mm howitzers pummelled a platoon of Durhams, a squadron of Dragoon Guards Shermans and a company command post too closely grouped around covering terrain, which left everyone somewhat chastened and much wiser in the need to spread out.

First blood to the Pak crew

The 'tankies' were soon drawing fire as German forward units attempted to denude the 'Tommies' of their armoured support.

The SS infantry in Le Hamel fought doggedly to resist the attack of the Dorsets, taking out another Dragoon Guard tank with a Panzerschreck deployed in the hamlet ahead.

Whilst on the British right flank the Sherman tank showed what an excellent gun it had in the short 75mm for dealing with German infantry as a similar squadron closed in on two platoons of 352nd infantry supported by HMG's lining the River Seulle attempting to flank fire on the Durhams assaulting Hill 103, to find themselves quickly decimated by direct high explosive fire.

Meanwhile on the British extreme right, the 21st Lancers reconnaissance teams were battling with elements of the 352nd Infantry Division as they attempted to pin enemy units on that side of the river as the DLI advanced on Hill 103; and their Bren carriers and Daimler armoured cars were kept very busy laying down suppressive fire.


By lunch time the British had just about got control of their first phase line leaving all to play for in the afternoon session as both sides pushed or resisted to secure a final victory.

The fighting was a grinding battle of attrition with British pressure forcing German infantry and their attached assets to deploy to try and push the attacks back, with no 'big cats' encountered as the British fed in their armour to shoot the infantry forward.

The Durhams were now in a position to launch an attack on Hill 103 using their artillery support to wear down Panzer Lehr hunkered down on its crest and in the tree line below, whilst 352nd Infantry attempted to intervene with harassing fire from Chouain and Le Pont Roc bridging the River Seulles.

Panzer Lehr grenadiers were prompted to deploy into the tree line at the foot of Hill 103 as the Durhams with tank support closed in taking heavy German artillery fire on the approach.

The Dorsets were also ready in their acquired jump of point at Le Hamel to push up the road to Cristot with supporting armour, but with much caution in the British camp that the Germans had still not had to call on any armour support themselves.

With the fall of Le Hamel in the afternoon, the British were able to use the village as a forward jump off point to press the attack up the road towards Christot, a key objective for the operation. British forward armour has just been dispatched by a Panther in ambush, forcing the deployment of yet more armoured reserves to counter it including a firefly troop.

When the Panzers made their debut it was with some gusto as a 12th SS Panther platoon deployed in bocage to the right of Christot and quickly dispatched two troops of Dragoon Guard Shermans as the remains of the SS infantry fell back towards the edge of the town.

The forward units of British armour finally provoked an anticipated response as the reeling SS Panzer Grenadiers were covered in their withdrawal by a Panther that took appropriate action to stymie British advances

It was at this point that I had to make my apologies and head home, but fear not, for I was later updated on the final stages of our big-battle.

The attack on Christot was somewhat stymied by the 12th SS Panther zug, but to compensate for this setback the Dorsets pushed on nearer the centre to liberate the village of Audrieu under cover of a smoke barrage, taking out an MMG and capturing prisoners.
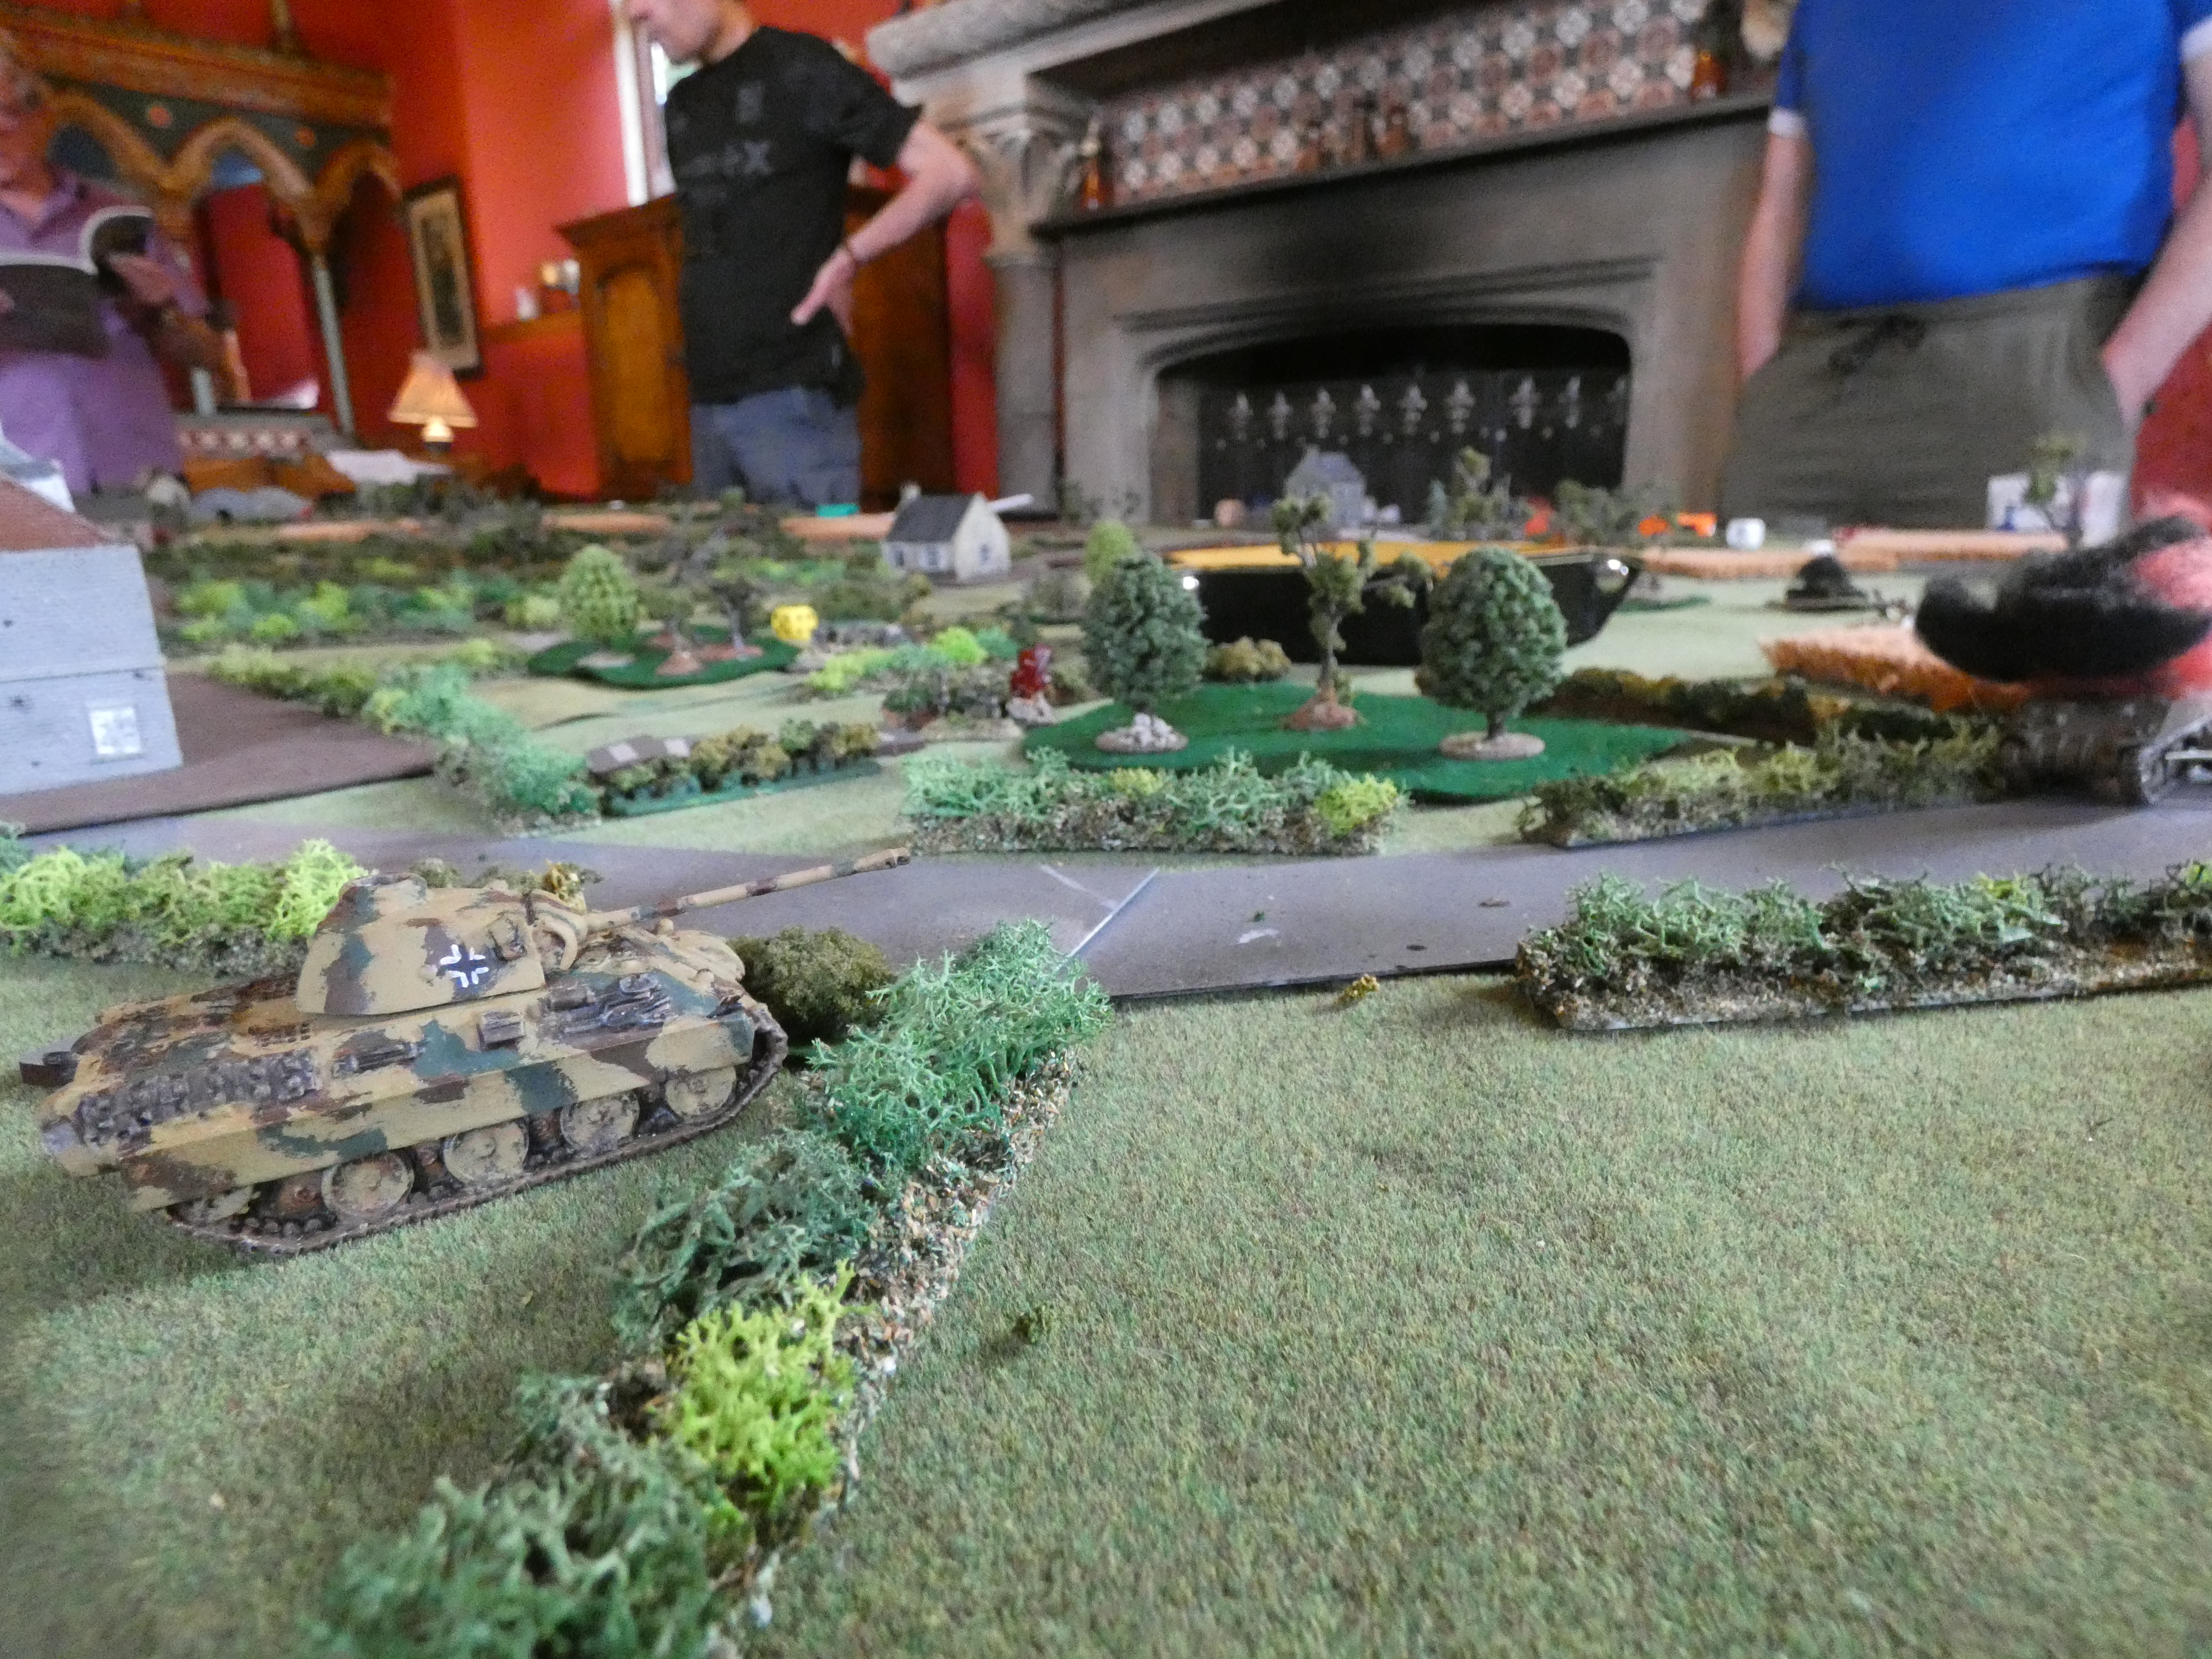
A big cat, by no means the biggest, makes its presence felt, as the approaches to Christot is littered with burning Sherman tanks.

On the British right flank the Durhams continued to batter Panzer Lehr taking out two platoons of grenadiers in quick succession and with a forward platoon of Durhams managing to liberate Le Haut d'Audrieu, taking punishment for their temerity but holding on and taking prisoners.


In the final analysis, despite dogged and determined German resistance and with the capture of the villages mentioned, together with accumulated FUBARs and prisoners taken, the British managed to secure enough victory points to claim overall victory, which is just as it should be for a D-Day eightieth anniversary game.

I really enjoyed playing O-Group, with this only the second time I have played them since taking part in a playtest reported about here on JJ's, and they have a large following in the Devon Wargames Group and it is easy to see why as Dave Brown has produced a solid set of rules that nicely capture the feel of a WWII land battle at this level of command. 

However the best outcome from our game was the day we enjoyed regressing from the old-codgers quite a few of us are now, to the boys we once were, simply enjoying a day with the toys on the table and celebrating what's so good about our hobby, namely good fellowship, good times wrapped up in a respect for history and the endeavours of others less fortunate than us.


I have tried to capture what it's like to participate in a game like this and the relaxed style of play that characterises the way our games go, and present some video clips from our day to better illustrate the play we had using O-Group. 

Thank you to Chas and Clive, who did the heavy lifting in pulling our game together and to them and Vince, Steve M, Andy and John for creating all the fun, and another game to add to our North Devon catalogue.

Wednesday, 11 August 2021

'O' Group, First Play, First Impressions


I had a very nice change to my week this week, following an invitation from an old friend Mr Steve L to join him at his with other friends Ian and my regular gaming pal Steve M to have Ian and Steve L take us through the delights of the new battalion level and above WWII set of rules, 'O' Group written by Mr David Brown and published by the Too Fat Lardies (TFL) as part of their Reisswitz Press stable of rules.

It was not very long ago that my wargaming diet revolved around WWII almost at the expense of other periods, and I find my hobby tends to see me going through these period specific phases where I will focus very intently on the period/era at hand which allows me to develop a seriously useful collection of models around that theme whilst also getting an education at a serious depth of knowledge around it, that may well and often does cover a period of a few years, before the 'Eye of Sauron' inevitably casts its gaze upon another period of interest and I'm off down another rabbit hole for a few years.

Thus with my focus very much on Age of Sail at the moment and with my Augustus to Aurelian 28mm Romano Dacians, my Sharpe Practice AWI 28mm Mohawk Valley collection and my yet to be started Coat of Steel 28mm Wars of the Roses collection to be addressed next, WWII, for which I have a very large and broad Normandy period collection of 15mm, mainly Battlefront models completed, is by no means front and centre in the focus of the 'great eye'.

This fact probably explains my not jumping onto the bandwagon of interest that has followed the publication of 'O' Group and the fact that having gamed at this command-level and above previously, before moving down the command chain via PBI (Poor Bloody Infantry) from Peter Pig, IABSM (I Aint Been Shot Mum) by the Lardies both battalion level and arriving at Chain of Command also by the Lardies at Company level, I was not that grabbed by this seemingly higher level set. 

So I was interested in the rules when Steve invited me to have a go with them but more so in spending time playing with the chaps, a luxury that has been denied us for a very long time.

I should say that my post is intended to give a first impression and overview of the game O-Group produces and not an in-depth description of the method of play which after just one game is beyond my abilities anyway and a quick search of the net together with the link to the TFL play series of videos will do a much better job.

Our table, at game-end, that depicts the demo-scenario in the rules focussed around the Normandy battle of Charnwood, the Allied assault to take the northern part of Caen just after D-Day

Knowing I would be playing O-Group for the first time on Monday, I took a bit of time over the preceding weekend to familiarise myself with their playing by watching two thirds of the first TFL video playthrough with Richard and Dave illustrating the basics, which even with my small introduction proved to be most useful in speeding up progress on the 'learning curve' and well done to the chaps for producing these videos as part of the launch.

The video link at the bottom of the page should go through to the first video in a series of four if you haven't seen them and are interested in knowing more.

My German Battalion HQ off table with the medium mortar platoon close by, together with my stack of platoon order chits, next to my two battalion orders, as indicated by the black die, and my single heavy artillery 'stonk' recorded on my yellow die. The village 'BUA' (built up area) ahead on the nearby road was a primary objective for the British and was occupied by my reserve company down to a single platoon after the initial British barrage and my artillery/mortar OP.

For any new players to O-Group, but those familiar with Chain of Command, the play mechanism will seem very familiar especially as Combat Patrol markers start to move forward from respective start lines to stake out the ground for the opposing forces to deploy and start to dispute key terrain objectives in preparation for gaining ascendancy or repelling attacks in any given area of the battlefield.

All the activity of moving patrols, deploying and firing by troops, bringing on reserve formations, laying down artillery fire means spending order chits and using battalion orders which though separate in the way they are produced from turn to turn perform exactly the same function, though battalion level orders held between turns contribute to one side or the other gaining the advantage or initiative allowing that side to choose to go first or second in the turn.
 
Rather similar to Chain of Command, O-Group uses 'Combat Patrol' markers, here showing blue German and green British, to move out from the respective line and stake out the ground providing that fog of war effect by facilitating potential 'jump off points' for new troops brought to the table from reserve. One key point on the German right flank was a village/farm BUA with a German Combat Patrol in occupation and with platoons deployed wither side and the Company Commander set up in the orchards behind.

The first command decision each side quickly grasped was the decision to lay down a mortar or artillery strike, as its use was restricted to that first command only. After that it was all about prioritising what had to be done with the orders available.

At the start of the game with minimal contact between opposing forces, and movement and deployment decisions predominating, the game seems very simple with an over abundance of order chits. The situation of the play at this stage left both Steve and myself questioning the attraction of the game as decision making was relatively straight forward.

However first impressions can be deceiving and the game O-Group produces rewards patience as the forces deploy and close on key battlefield terrain, the decision making process becomes more intense as situations develop demanding priority and the need for the senior commander, you, to decide what must happen over and above equally pressing demands for orders.

The empty battlefield starts to fill up as Combat Patrol markers start to morph into platoons, with the German platoon on the wall indicative of the way the game replicates the various formations with each base of the three seen above representing the squads or sections of 8 to 10 men in the command

Suddenly the wealth of orders doesn't seem quite so abundant as more and more decision points in the game occur and Steve and I found ourselves scanning the table, assessing each critical combat point, and deciding where to prioritise the limited pool of orders to get the 'biggest bang for the buck' as the saying goes.

Reserve company HQ takes up residence in the key village BUA with the artillery OP in residence at the local church, more specifically its tower.

In addition to the stress points caused by the order decisions, we all noticed how the advantage and momentum for one side or the other could quickly change based on the outcomes of the order decisions taken and the results of the combat generated.

At one point early in our game, British platoons were advancing in force on key positions with German troops looking to deploy off combat patrol markers, which once done required the gaining of the initiative to get their fire in first, hopefully cause significant casualties and combine their fire with mortars and the dreaded sniper attack.

Suddenly a combination of those factors combined in the space of a turn to completely change the position on the German right flank where three British platoons opposed one German, that they had decimated in their early assault fire, to be suddenly faced by two other German platoons in cover supported by attached heavy machine guns, sniper support and a mortar barrage that left just one British platoon on the original start line with the other two reeling back to it having lost four sections and gained a FUBAR (loss of command dice rolled to generate future orders) for their efforts.

Sherman tanks cautiously advance like new season debutants introduced to the dance floor, only too aware of lurking German anti-tank capability, which has just been revealed as my Panther on overwatch, making best use of its ridgeline hull down position to see out below, causes a 'double-shock' hit on the lead troop of Firefly's

The table quickly generated the key battles in specific areas and with infantry in close range and forced to group in support of one another, mortar and artillery started to drop from both sides, with the firing generated increasing the casualty count of removed bases.

I mentioned the dreaded German sniper which is the only deployment the player concerned (me in this case) doesn't need to use an order for and who is able to quite literally pop up anywhere, make his attack with three d6, and disappear just as quick without risk of return fire.

All success die results usually resolve around 4+ on a d6 and thus it was not unknown for my sniper to cause three hits on a platoon which is an automatic 'Suppression' and stops that platoon from firing until at least one hit is rallied off. Subsequent hits on such a target can cause base losses and thus the sniper together with my mortars became a key component for setting up target priorities for my infantry looking to fire in support of these attacks made at the start of my initiative. In addition the sniper became very useful for causing base losses on British platoons still Suppressed from the previous turn.

I eventually lost my sniper when towards the end of the game I contrived to throw three misses which is the only way for the unit to be removed from the game.

A battalion reserve formation, my platoon of Panther tanks got on to a neighbouring hill and performed its role perfectly, acting as the ultimate in overwatch capability for the infantry fighting below, knocking out advancing enemy tanks and engaging enemy infantry with HE and machinegun fire.

In the latter stages both sides pushed their armour up to try and turn the tide of battle or maintain the advantage and we managed to play through some long range sniping shots between the Panther placed on a hill in overwatch and a Firefly troop leading its platoon down the main road trying to close up with the infantry ahead to lend a hand in the infantry battle.

The Panther managed to score an early hit causing a couple of shock on the lead Firefly which promptly missed in its return fire to then be hit again with a damaging hit that knocked it out.

The modelling of tank combat all seemed familiar with the usual assessment of gun versus armour versus tactical and quality factors to come up with a total negative or positive dice modifier to resolve the effects on a hit table that also decides if the target is obscured when the shot was made or in plain sight. 

The key battle around the left flank village with the German infantry company firmly in control, if a little battered after its fight with the Tommies, the best of which are to left with a Supressed platoon lining the wall and the rest of the Company beyond, in a shattered state of withdrawal after our battle. A burning troop of Fireflies blocks the road to their left, as other tanks shelter to their rear in the woods.

The game generated the typical Normandy slug-fest among the hedges with the Germans grimly holding on as the British lines closed in.

Both Steve and I enjoyed O-Group and the decision points it generates and the game prompted lots of discussion around how well it would play in other theatres, the rule mods we had in mind about Battalion orders being needed to be spent to bring on Battalion support platoons, to the seemingly powerful sniper and to limiting HE capability for Pak 40 AT guns to just one or two rounds of fire.


In addition I don't think we played the game in a way that showed its full potential, such as getting to use British platoon smoke tactics to launch assaults on key German positions and that might have reduced the effect of sniping attacks as well as helping the British to get onto their targets.

At present there seems to be little in the way of scenarios for the game which will no doubt be rectified in time but the scale of the game made me immediately think of the Battlefront Scenario resource that would seem ready made for adapting to O-Group

Fire and Fury - Battlefront Scenarios

Earlier this week I referred in another post about my marker for a good set of rules as being how intuitive they are to play thus speeding up the learning process of moving from unconsciously-incompetent to unconsciously-competent and I think Dave Brown has done a good job with these rules to make that process quicker with a skilful application of the 4+ die rule for success helping greatly and a far simpler but just as demanding Combat Patrol/Jump Off system as pioneered by Chain of Command.

In terms of my other rules assessment tool of simulation versus game against fun or tedious to play I think I rate O-Group as high on the fun score and slightly towards game over simulation, primarily because of the greater compromises needed on ground scale, figure scale, ranges that this level of game requires, off set by its application to some solid historical scenarios where I think the rules will still model the combat quite well in spite of those compromises and still provide those golden moments of sheer fun as turning points happen and the drama it creates.

So as I wrote to Steve L and Ian in a post game email to the chaps thanking them for their hospitality, you can put me down as an O-Group admirer and happy to play anytime, now where did I put those sloops?