Saturday, 14 November 2020

All at Sea - Spanish Third Rates of Renown (San Justo)


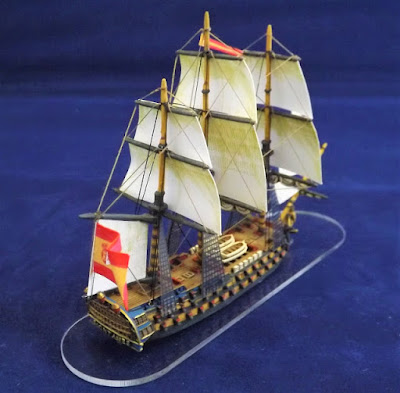
As with the French 74-gun Argonaute previously covered, it seems to me that the choice of the San Justo as a Spanish 'Third Rate of Renown' is an interesting one on the part of Warlord Games. 

I suppose the definition of renown being 'known about' or 'fame' might be stretched a bit to cover the service career of the San Justo, but when included as part of a group of ships that include Bellerophon, Tonnant and Formidable, it becomes challenging to imagine what the criteria was for this title and in certain cases I started to wonder if Warlord were stretching the definition to include 'infamous' as well.

Anyway, whatever the criteria for her inclusion, the San Justo enjoyed a long service career in the Armada Espanola from her launch on the 11th November 1779 at the Cartagena naval yard as the last of the five ships of the San Joaquin class, all built in the same yard and designed by Francisco Gautier.


Commissioning and joining the fleet on the 16th November under her first commander Captain Francisco Urreiztieta she joined the squadron under the command of Admiral Don Juan de Langara operating from Cartagena as part of Spanish efforts to block British access to Gibraltar, as Spain sought to take advantage of the Royal Navy's overstretched resources committed to the American War of Independence; the fortress rock was under siege by Spanish forces and it would be the cause of San Justo's initiation into battle when she formed part of Langara's squadron that met Admiral Sir George Rodney's fleet escorting a British relief convoy to the beleaguered British fortress in The First Battle of Cape St Vincent, otherwise known as the 'Moonlight Battle' fought on the 16th January 1780.
   
The Moonlight Battle of Cape St Vincent 16th January 1780 - Richard Paton
Admiral Rodney's fleet in 'general chase' as Spanish Admiral Langara attempted to break contact off Cape St Vincent, showing the moment the Santo Domingo exploded during the early stages of the battle, with the lack of any formation that a chase brings about clearly visible in this picture. 

With the two groups spotting each other at about 13.00 on the 16th January just south of Cape St Vincent and preparing to offer battle, Langara suddenly realised the size of Rodney's fleet, eighteen ships of the line against nine Spanish, and decided to attempt to break contact making use of the hazy weather accompanied by occasional squalls. 

However Rodney ordered a general chase, with ships pursuing at the best speed they could make irrespective of formation and after two hours managed to engage the rearmost Spanish ship, the Santo Domingo, at 16.00 which blew up after a forty minute engagement with HMS Edgar, Marlborough and Ajax with the loss of all but one of her crew.

Admiral Juan de Langara y Huarte

The chase would continue into the night and see a further four Spanish ships captured and another two captured and lost, with one of them being destroyed by the British after finding it to be too heavily damaged and the other retaken by its Spanish crew and sailing into Cadiz, with the Spanish force suffering the loss of 2,500 men killed, wounded or captured to the the British losing just 134 killed, wounded and captured and the supply convoy safely escorted into Gibraltar on the 19th January.

The San Justo, although not listed in Langara's order of battle, is reported in Beatson's Naval and Military Memoirs as escaping with light damage from the action and entered Cadiz with the other survivors of Langara's squadron.


Following repairs to the ship, San Justo she was assigned to the Spanish main fleet under Admiral Luis de Cordova and would be under his command for the rest of the American War of Independence seeing action on the 9th of August 1780 as the British overstretch finally paid dividends and Cordova's fleet was able to capture the majority of ships in a British outbound convoy from Portsmouth of sixty-three merchant ships carrying supplies and stores together with troops bound for the West Indies.

The British convoy of sixty-three ships is taken by Cordova's Spanish fleet 9th August 1780 losing fifty-five captured.

Driving off the small British escort of one 74-gun ship and two frigates, Cordova's thirty-one ships and six frigates easily rounded up the stricken convoy with just five of the merchantmen and the three warships getting away.

Admiral Luis de Cordova y Cordova
https://commons.wikimedia.org/wiki/File:LuisDeC%C3%B3rdovaYC%C3%B3rdovaCapit%C3%A1nGeneralDeLaRealArmada.jpg

Following a period of escort work herself, the San Justo together with the Spanish fleet headed north and a year later in August 1781 was operating in consort with the French fleet under Admiral Luc Urbain de Bouexic Comte de Guichon in the English Channel as the Bourbon alliance threatened to initiate an invasion of the British Isles, but with those plans coming to nought, was back in Cadiz a year later.


By 1782 the American War on land was drawing to a close but the naval war between the European powers was reaching a climax as the Royal Navy gradually gained ascendancy in its struggle to maintain a strong British negotiating position at the upcoming peace talks.

Relief of Gibraltar by Earl Howe 11th October 1782 - Richard Paton
HMS Victory is seen at centre, Lord Howe's flagship, escorting the British relief convoy into Gibraltar with the Franco Spanish fleet at anchor in the background in Algeciras Bay.

For Spain that struggle was still very much focussed around the repossession of Gibraltar and its efforts to starve the British garrison into submission, leading to San Justo and the thirty-four ship Spanish fleet under Cordova clash with yet another British relief convoy escorted by an equally sized British fleet under Admiral Richard Howe and the ensuing Battle of Cape Spartel.


Howe wishing to avoid battle and making best use of his newest advantage over his enemies, namely coppered ships was able to dictate the terms of the limited fighting as his ships were able to outrun Cordova's, despite the Spanish having the wind gauge, thus enabling the convoy to get under the protective guns of the Rock and allowing the British fleet to disengage the next day to return to British waters.

No precise details of specific ships casualties are recorded for the Spanish but with just 276 killed and wounded on the British side and 360 on the Spanish from the long range gunnery exchanges, San Justo and her comrades were very likely lightly affected.


With the end of the American War in 1783, San Justo was sent to El Ferrol where she was disarmed and put in ordinary but was hastily rearmed and made ready for possible conflict in 1790 with the Nootka Sound Crisis and the Anglo-Spanish dispute over trading and navigation rights on the Pacific West Coast of North America, that saw both countries organise their naval forces for a possible conflict over the issue and thus seeing the respective fleets already in an advanced state of readiness with the events in France that would culminate in the French Revolutionary War of 1793.


With Britain and Spain in alliance at the start of the war, San Justo under Captain Francisco Ordonez was part of the Anglo-Spanish fleet that entered Toulon in November 1793, back under the command of Admiral Langara operating with the Spanish Mediterranean squadron..

The chaos of the Allied retreat from Toulon in 1793 is well illustrated in this picture with the Allied fleet that included the San Justo preparing to depart from the bay in the background

The San Justo would continue her assignment with the Spanish Mediterranean Squadron throughout the French Revolutionary War and a change of alliance from Britain to France, operating from Cartagena and Cadiz, until sent back to El Ferrol in 1802 after the Peace of Amiens, to be put back in ordinary.

With the resumption of war in 1803, Spain was preparing to re-join the conflict with Britain and rearming her navy, which would see the San Justo back in Cadiz in January 1805 being careened and coppered and from where she would join Admiral Pierre Villeneuve's Combined Fleet that sailed the following October prior to the Battle of Trafalgar.

The approximate position of the San Justo at the Battle of Trafalgar at just after midday on the 21st October 1805

At Trafalgar the San Justo would be under the command of Captain Don Miguel Gaston who was born in 1776 in Cartagena de Indias, in the modern day Republic of Columbia,  and had previously served aboard the San Isidro 74-guns in the early 1790's as well as being a former student of hydrographcs at Cadiz.

Hold the Line - Anthony Cowland
https://www.argc-art.com/sail-and-tall-ships
 HMS Victory and Temeraire race each other towards the Allied line at Trafalgar, with the latter reportedly taking fire from San Justo as she closed.

During the battle, the San Justo was part of the Allied Centre and at one point directly astern and leeward of Admiral Villeneuve's flagship Redoutable, opening fire on HMS Temeraire as she bore down on the Allied line, however the Spanish ship's involvement in the later exchanges seems to have been very limited as, despite being at the centre of the action, she would escape the battle with slight damage to her hull and masts and just seven wounded, the lowest number of casualties in the Combined Fleet and with only two ships in the British fleet, Polyphemus and Prince having fewer losses.

Admiral Frederic Gravina author of the after battle report below that makes mention of the
San Justo, among others of the Allied fleet that 'drove off the Enemy'

The state of the San Justo seems rather to cast doubt on the after-battle report from Spanish Admiral Gravina who appears to have missed the report of San Justo's casualties and damage when he describes her role in the battle;

'It wanted eight minutes to noon when an English three-decker broke through the centre of our line, being seconded in this manoeuvre by the Vessels which followed in its wake. The other leading ships of the enemy's columns did the same. One of them passed down our rear, a third laid herself between the Achille and the Ildefonso, and from this moment the action was nothing but so many sanguinary single combats within pistol-shot: the greater part of them being between the whole of the Enemy's Fleet and half of ours; several boardings necessarily took place. 

I do not possess the data requisite for giving your Highness a detailed and particular account of these single fights, nor can I speak with certainty of the movements of the Van, which, I am informed, tacked at the commencement of the battle in order to support those who were assailed. I can, however, confidently assure you that every ship, French as well as Spanish, which fought in my sight, performed its duty to the untmost, and that this Ship, after a terrific contest of four hours with three or four of the Enemy's Vessels, its rigging destroyed, its sails shot through , its masts and topmasts riddled, and every respect in a most deplorable condition, was most seasonably relieved by the San Justo, a Spanish, and the Neptune, a French ship, which junction drove off the Enemy, and enabled the Rayo, the Montanes, the Asis, and the San Leandro, all of which had suffered severely, to unite with the other French ships, that were just as bad a plight.

As soon as this vessel found itself free of the Enemy, it directed the ships which had joined company to assist such vessels as were in need of their aid, and at nightfall, the cannonade having ceased on both sides, the Themis frigate was ordered to tow us towards Cadiz bay.'

It would appear that Captain Gaston may have sought to set the record a little straighter over the performance of his ship at Trafalgar, going to great efforts after the battle to stress his crew's lack of training which might explain the discretion implied by the damage and casualties his ship suffered.

Indeed the state of preparedness of the San Justo might also be gauged by the comment from Admiral Villeneuve on the 8th of October when he had inspected the ship, stating it was one of three Spanish ships that 'were barely out of the dockyard'.

Following Trafalgar and the subsequent estrangement of the Franco-Spanish alliance in 1808, San Justo would continue to serve throughout the remainder of the Napoleonic War taking part in the defence of Cadiz during the French siege of 1809 and escorting and moving supplies and specie from the Spanish colonies in support of the war effort against Napoleon, with the ship ending her service in the breakers yard in 1824.


At Trafalgar San Justo was armed with 28 x 24-pounder long guns on her lower deck, 30 x 18-pdrs on her upper deck, 12 x 8-pdrs on her quarterdeck and 6 x 8-pdrs on her forecastle, together with 1 x 32-pdr howitzer and 6 x 28-pdr carronades.

Her crew numbers were above compliment with 694 men of which 427 were naval personnel, 207 infantry and 60 marine artillerymen.

Sources consulted for this post:
The Trafalgar Companion - Mark Adkins
The Battle of Trafalgar - Geoffrey Bennett


Next up: Steve and I finished our most recent game of Unhappy King Charles on Vassal and I have a post covering our thoughts about the game, another book review covering the Battle of Copenhagen in 1801 and the final Third Rate of Renown, looking at the Spanish 80-gun Argonauta.

Wednesday, 11 November 2020

A History of the Royal Navy, The Napoleonic Wars - Martin Robson


The Royal Navy of the French Revolutionary and Napoleonic Wars has not been front and centre of my focus with my previous collections of age of sail models, with my attention more drawn to the American War of Independence and particularly the interesting naval campaign fought between Hughes and Suffren, a period I will no doubt come back to in time.

Thus with my attention very much on the later period, with this current collection of 1:700th models, I have featured many recent book reviews that have been important in my reading to better inform the collection and the games I plan to run with it.

Perhaps the most fundamental understanding for anyone interested in sea warfare in this period is a solid grounding in the history of the most powerful naval force in history that came to pre-eminence at this time with a wealth of leadership talent and the ability to win and keep on winning even in the face of the occasional defeat and, at a time when great land powers were vying for the control of Europe, the Royal Navy was establishing Great Britain as the preeminent power at sea, paving the way for the largest empire the world has ever seen.

The British East Indiaman Warley  - Robert Salmon
The Warley is seen here in 1804 the same year she participated in the Battle of Pulo Aura taking part in the action of the 15th February that year when Commodore Dance bluffed Admiral Linois with his French raiding squadron in the Straits of Malacca that he faced British naval ships of the line rather than Indiamen. As well as defending the home island from invasion being its primary directive, protecting British trade, an imperative for a maritime nation was a key role for the Royal Navy

Dr Martin Robson is a specialist in British grand strategy, maritime global conflict and the Royal Navy during the age of sail, being a member of the Corbett Centre for Maritime Policy Studies, Defence Studies Department, Kings College London at the Joint Services Command and Staff College and is also a friend of mine who likes to roll a few bones with the Devon Wargames Group when time permits and is a thoroughly nice chap.


I have to say that before reading this history, I had a reasonable grounding in most of the campaigns, battles and personalities involved in this remarkable time in history, but my motive to reacquaint myself with much of the content was to get a clearer understanding of some the lesser known actions and campaigns in the post Trafalgar period as Napoleon sought to interfere with British trade whilst seeking new opportunities to acquire ships to contest the control of the Royal Navy again in open battle. 

In addition, to really grasp what the Royal Navy was about in this period I wanted to better understand the strategic imperatives put upon the force and what the numbers say about the outcome in terms of ships and men lost to themselves and the various enemies encountered and the effects of war on British maritime trade alongside that of her enemies.

Thus it was surprising to find this remarkable little book produced in association with the National Museum of the Royal Navy and part of a chronological series covering the history of the force from 1660 which as Martin Robson observes in his acknowledgements was a significant challenge to put 22 years of conflict into 70,000 words, but I was very impressed with the level of detail achieved in the face of that challenging remit. 

The brig-sloop HMS Childers is fired at and hit by shore guns on the approach to Brest 2nd January 1793 - National Maritime Museum.

In his 'Introduction' to the book the author explains that the period of warfare that characterised the French Revolution and Napoleonic wars is neatly encapsulated, with the shots fired at and hitting brig-sloop HMS Childers from a land battery commanding the entrance to Brest on the 2nd January 1793, followed by a declaration of war on Britain a month later by the French Revolutionary government on the 1st February; to its end twenty-two years later between 6 and 7 am on the 15th July 1815 as a barge came alongside HMS Bellerophon off the French port of Rochefort to deliver the Emperor Napoleon with his formal surrender to Captain Frederick Lewis Maitland, later declaring; 

'If it had not been for you English, I should have been Emperor of the East. But wherever there is water to float a ship, we are sure to find you in our way.'

The Emperor Napoleon's barge comes alongside HMS Bellerophon off Rochefort 15th July 1815.

The quote from Napoleon is highlighted for the nugget of truth it reveals in that the Royal Navy was primarily responsible for Napoleon's downfall in that it facilitated Britain's ultimate success in the wars and that to judge success or failure you need to carefully compare the outcomes with British war aims.

First and foremost, Britain had a primarily defensive objective in Europe that did not include occupation of territory, the restoration of the Bourbon monarchy or the defeat of France militarily and a restoration of order in that country.

The simple British war objective was driven by the French occupation and control of the Low Countries, modern day Belgium and Holland and the ports of Antwerp and Flushing which was a 'standing menace to England's safety' in terms of proximity for any French invasion fleet and negated the effectiveness of the fleet in the Western Approaches, which points to the attention this area was given by British military expeditions in 1809 and 1813-15 and why the independence of the Low Countries was the principle British war aim in Europe, and would continue to be so in the next global conflict of World War One against a different dominant European power.

The two other key areas of interest to Britain in Europe concerned free trade and access to European ports primarily in the Baltic, a major source of naval stores and a place to offer support to one of her principle allies, Russia, whilst also looking to control French influence in southern Europe and being able to support her other key ally, Austria, as well as Russia via the Mediterranean.

As the Introduction chapter highlights, Britain was on the periphery and not part of the European system and thus with her small professional army she would need to utilize diplomacy and money to organize her Continental allies to help secure her interests which involved her development as an Atlantic empire based on maritime commerce with her possessions in Canada, the West Indies and the East protected by the Royal Navy.

Thus, as the author points out, it was the Royal Navy that prevented a French invasion and it was the Royal Navy that negated French and Spanish naval power to facilitate the maritime trade and economic strength needed to subsidise allies in pursuit of Britain's interests on land.

From this succinct analysis the chapter closes with the proposition that the Royal Navy's war can be seen in two distinct phases, namely that between 1793 and 1805, characterised principally with blockade duties intermixed with occasional large fleet battles that allowed the Royal Navy to gain command of the seas and allowing Britain to sustain her own maritime trade whilst attacking that of her enemies, thus keeping Britain in the war.

The Battle of Trafalgar, 21st October 1805 - Nicholas Pocock.
 Trafalgar a pivotal battle in naval history in so many ways, but also in terms of clearly delineating the shift to the second stage of the Royal Navy's war between 1795 to 1815. 

Following Trafalgar, the naval war was more about reaping the rewards that control of the sea gave in terms of maintaining a close blockade whilst projecting British power around the globe that would allow Britain to shape her demands in the inevitable peace talks that would form a post war settlement.

Thus the book sets out its stall to assess the contribution made by the Royal Navy to Britain's rise to global superpower status in 1815 and what follows in the nine chapters covering the history of the period is a neatly segmented walk through the key events, battles and personalities involved always looking at the contribution made to the guiding war aims outlined in the introduction.

The summary to the walk through of the battles and actions of the period, which I found pacey and informative, is then pulled back to the original set up, namely to consider the success of the Royal Navy in terms of those national war aims with some fascinating statistics outlining the results of twenty-two years of warfare.

Thus in conclusion, in those twenty-two years the Royal Navy fought and won six major battlefleet actions, and in among the dozen or so squadron and multiple single ship and cutting out actions, escorted thousands of British merchant ships, attacked enemy commerce and facilitated at least sixty-eight major amphibious operations, hauling guns overland, and putting supplies and ammunition ashore.

In the process it suffered the loss of 6,500 men in combat, 13,000 to shipwreck and fire, and between 70-80,000 men lost to sickness, disease and accidents on board.

By 1815 the Royal Navy was at its zenith in terms of strength and power with 884 warships, possessing in tonnage 609,300 tons more than the rest of the world's warship tonnage put together.

During the war the Royal Navy lost 166 warships to enemy action, but in return captured or destroyed 712 French, 196 Spanish, 172 Dutch, 85 Danish, 17 American, 15 Turkish and 4 Russian ships amounting to a grand total of 1,201 enemy warships.

In terms of British trade, in 1793 British exports and re-exports amounted to £20.4 million and imports to £19.3 million, which by 1814 had grown to £70.3 million and £80.8 million respectively, with trade to the British West Indies doubling in that period and with the British merchant fleet becoming the carrier of choice rising from 18,068 ships registered at 1,986,000 tons in 1793 to 21,869 ships at 2,478,000 tons in 1814.

When the American government declared war in 1812, the Royal Navy had to respond to yet another demand on its power to allow Britain to maintain the status quo in terms of her territorial possessions in North America whilst defending her maritime interests in support of her European war aims. The statistics again are compelling with regard to the Royal Navy's success with British merchant tonnage protected against the attentions of the American cruisers and privateers rising from 20,637 ships, 2,263,000 tons in 1812 to 21,449 ships, 2,414,000 tons in 1814, this accompanied by the destruction of the American merchant fleet on the global shipping routes reduced from its high point in 1812 with a tonnage of 667,999 involved in foreign trade to just 56,626 tons by 1814, leaping back to 700,000 tons in 1815. 

The Bombardment of Algiers, 27th August 1816 - George Chambers senior
The attack on Algiers by Sir Edward Pellew, then Lord Exmouth, was unfinished business left over from the 'Great War' and underlined the role of the Royal Navy post war for the next one-hundred years, of securing British overseas trade and clearing the seas of marauders and pirates rather than engaging in major fleet actions. 

The naval war effectively bankrupted the American economy with its stranglehold on American trade seeing American imports declining from $78,778,540 in 1812 to just $12,967,849 in 1814, to bounce back in 1815 and the peace to $85,356,680 and thus responsible for the collapse in tax revenue raised on import duties and thus allowing Britain to shape the war and control its outcome.

Britain's trade balance also contributed to her war aims of supporting her allies in spite of spiralling war costs that saw her provide £60 million to her allies during the wars with £2,156,513 to Prussia that made sure Blucher's army was able and ready to make its timely appearance at Waterloo (Lucy Worsley, please note), all due to maritime security through British sea power.

This book is a great reference source of all the campaigns conducted by the Royal Navy in this period  and liberally sprinkled with clear maps together with period illustrations to support the text leads the reader through, chronologically the various actions.

However as the author points out in the Introduction, this volume can in no way encompass all the aspects of such a dense period of activity and thus he makes clear he does not include detail on developments in ship design, social conditions and administrative reform, highlighting 'A History of the Royal Navy: The Age of Sail' by Andrew Baines for a deeper look at those subjects and I would echo that in terms of looking in more detail at the individual campaigns covered, that specific books on them will only add to the outline of events given here, for example the Grey-Jervis expedition of 1794 has all the key statistics and principle events covered in two pages, but for students of that specific campaign I would also recommend 'By Fire and Bayonet' by Steve Brown as highlighted in my review of his book back in February


Martin Robson's book is a great reference work covering the activities of the Royal Navy's war at sea from 1793 to 1815 in a very readable way and I really enjoyed it and the pointers it gives to further research into lesser known campaigns of the period plus loads of background to any campaign ideas for the age of sail naval wargamer.

A History of the Royal Navy, The Napoleonic Wars by Martin Robson is 273 pages containing the following:

Introduction: 'Wherever there is water to float a ship, we are sure to find you in our way.'
Chapter 1: Home Waters, 1793-1802
Chapter 2: The Mediterranean, 1793-1802
Chapter 3: The Global War, 1793-1802
Chapter 4: The Invasion Threat, 1802-1805
Chapter 5: The Battle of Trafalgar, 1805
Chapter 6: Home Waters and the Baltic, 1805-15
Chapter 7: The Mediterranean and the Peninsular War, 1805-15
Chapter 8: Economic Warfare, 1805-15
Chapter 9: The War of 1812
Epilogue: Algiers 1816
Conclusion: 'Lords of the Sea'

Notes
Biliography
Index

Additionally there are two tables detailing the number of ships at specific times, fifty six illustrations and battle maps plus eight colour plates.

There are five strategic maps covering the Atlantic, Caribbean, Europe, the Mediterranean and the Far East

The book is hard cover and has a recommended retail price of £30 and at the time of writing Amazon have it on for £28.50 including delivery costs.

Saturday, 7 November 2020

All at Sea - Spanish Third Rates of Renown (Monarca)

Monarca, in the foreground, strikes her colours at Trafalgar to HMS Tonnant - Nicholas Pocock

The Monarca 74-gun ship of the line begins this series of posts looking at the Spanish third rates of renown.

Another design by the Spanish naval architect, Romero Landa, as part of the four ship Montanes class, and covered in my posts looking at the Montanes and Neptuno.

Montanes
http://jjwargames.blogspot.com/2020/07/all-at-sea-on-stocks-in-jjs-dockyard_15.html

Neptuno
http://jjwargames.blogspot.com/2020/07/all-at-sea-on-stocks-in-jjs-dockyard_31.html

Monarca was ordered in 1791 and built and launched at El Ferrol on the 17th March 1794, undergoing proving trials in the autumn of that year alongside her sister ship Montanes under her first commander Captain Don Jose Justo Salcedo y Arauco who took command of the ship in July.

Captain Don Jose Justo Salcedo y Arauco

The trial comparison cruises conducted with Montanes between the Azores and Cadiz, escorting Atlantic convoys would see Monarca refitted with new masts and sails before joining Admiral Juan de Langara's squadron in December 1794 in support of the fortified Catalan town of Roses on the Costa Brava then under siege by the French, until it surrendered the following February but not before the garrison of three-hundred men were successfully evacuated by the Spanish navy, with the Peace of Basle ending the war with France signed in July 1795.


With war declared against Britain on the 19th August 1795 and the signing of the Treaty of San Ildefonso allying herself with France, Monarca would be assigned to escorting treasure convoys from Havana and Vera Cruz to Cadiz, until returning to El Ferrol in 1798 for much needed repairs.

Sunset in Ferrol - Carlos Parilla Penagos
https://www.carlosparrillapenagos.es/pintura-naval/
With the castle of San Felipe seen on the right, a Spanish 3rd rate ship enters El Ferol, the port where the similarly rated Monarca was launched and from where she operated from for much of the time from 1798.

El Ferrol would become the base of operations for Monarca from 1798 to the Peace of Amiens in 1802 coperating with the French squadrons operating out of Rochefort and Brest when able to avoid the British blockade and with the peace, Monarca would end the French Revolutionary War in the port, careened and disarmed, not returning to operations until November 1804 with the declaration of war against Britain on the 14th December.


On the 13th August 1805, Monarca left El Ferrol bound for Cadiz as part of Vice Admiral Pierre Villeneuve's Combined fleet and under the command of Captain Don Teodoro de Argumosa, who had seen action at the Battle of Cape St Vincent in command of the San Isidro 74-guns, where he had exchanged fire with Captains Nelson and Collingwood commanding HMS Captain and Excellent respectively.

Thus it was that after a short stay in Cadiz, Monarca sailed with the Combined fleet on the 20th October in spite of enemy frigates seen the previous day as half the fleet struggled to get out of the harbour leaving the other half to exit the next morning in worsening weather, heavy seas, rain squalls and a wind veering to south-south-west, rising to almost gale force as the fleet headed into the Straits of Gibraltar.


Originally part of the van squadron under Vice Admiral Alava in the flagship Santa Anna 112-guns along with Indomptable 80-guns, Forgeux  and Pluton 74-guns, the squadron would be the rear as Villeneuve reversed the course of the fleet back to Cadiz as the British bore down on his line of battle ensuring she would be in the centre of the action with Vice Admiral Collingwood's lee column.

The Battle of Trafalgar 1805, just after noon, showing the approximate position of Monarca in rear squadron.

The first British ship to engage the Monarca was HMS Mars under Captain George Duff who attempted to pass between her and the stern of the French 74-gun Forgueux, but soon found the gap closed by the French 74-gun Pluton, that had increased sail to pass Monarca and close the gap on Mars not before the British ship fired a close range broadside into the Monarca  which bore away under the fire

HMS Mars covered in my post from April
http://jjwargames.blogspot.com/2020/04/all-at-sea-on-stocks-in-jjs-dockyard_19.html

The next British ship to come up behind HMS Mars was Captain Charles Tyler's HMS Tonnant which managed to pass the Monarca and pour in her double shotted port broadside before stern raking the Pluton and bow raking the 74-gun Algeciras.

HMS Tonnant covered in my post from October
http://jjwargames.blogspot.com/2020/10/all-at-sea-british-third-rates-of_10.html

The first broadside from Tonnant was quickly followed by a second and appears to have been a crippling blow, badly damaging her fore and crossjack yards, bringing down her mizzenmast and causing Captain Argumosa to order his crew to cease fire and to haul down his colours earning the dubious honour of being the first Allied ship to surrender at Trafalgar.


However as the Tonnant sailed on and no attempt was made to board Monarca and take possession of her, Argumosa raised his colours again, but it seems likely that, with the extensive damage and heavy casualties suffered, the fight had been knocked out of Monarca and she surrendered later in the battle after receiving further hits from HMS Bellrophon which sent across a party of Royal Marines to take control of the ship.

HMS Bellerophon, centre exchanges broadsides with the already battered Monarca to left and the Montanes, to right as the French Aigle hoves into range ahead.

The Monaraca had suffered one of the highest total fatalities of any ship in the Combined Fleet with 101 killed together with a further 154 wounded, one of only eight ships to have fatalities into three digits, but it was perhaps the extensive damage caused to her hull and rigging that convinced Vice Admiral Collingwood that the ship could not be saved as a prize and she was thus burnt and deliberately wrecked on the 26th October.


At Trafalgar, the Monarca was armed with 28 x 24-pounder long guns on the lower deck, 30 x 18-pdrs on the upper deck, 12 x 8-pdrs on the quarterdeck and 4 x 8-pdrs on her forecastle.


She had an over strength crew of 667 men which included 370 naval personnel, 253 infantry (45% of the men onboard) and 54 marine artillery.

Sources consulted for this post:
The Trafalgar Companion - Mark Adkins
The Battle of Trafalgar - Geoffrey Bennett

Next up: I have a review of A History of the Royal Navy in the Napoleonic Wars by Martin Robson, the next Spanish third rate of renown, San Justo and a look at Unhappy King Charles the most recent game Steve M and I have been playing on Vassal.

Wednesday, 4 November 2020

Mr Madison's War, The Incredible War of 1812 - Vassal Game Three


With two games already under our belt and a growing appreciation of what this game has to offer in strategic options, Steve and I were really keen to dive straight back in for a third game of Mr Madison's War with a quick die roll to determine sides for this game at the end of our last, and with me taking command of His Majesty's forces in North America.

This time, from our previous play experience, we were both aware of the opportunities and threats each side had to contend with and even though our war began within about two card draws, thus with little in the way of pre-war manoeuvring, it also started fairly conservatively with both of us keeping careful track of each others naval build up on each of the lakes through late 1812 and early 1813 with the Americans opting to take an early initiative by securing Lake Huron by sending the US brig Adams into the lake surrendering the initiative to the British on Lake Erie with the advantage pressed home by British card play that removed some US Schooners.

Meanwhile tension was increasing around Lake Ontario with an early build up of British troops marched rapidly down from Quebec to reinforce Kingston and threaten Sackets Harbour before the defences were complete at both towns, whilst also taking control of Ogdensburg on the St Lawrence to prevent the US Schooners reinforcing the US squadron, that prompted troops in Albany to be rapidly sent off to the American lakeside base at Sackets to prevent any attacks from the British troops gathered in the area.

The situation just before winter attrition end 1812 and the American offensive has started with the Niagara frontier unlocked by Harrison and Renesselaer, but with Yeo securing Lake Ontario

The Americans attempted to get control of Lake Ontario but were utterly defeated by Yeo's squadron just as they launched a corresponding offensive on the Niagara front with Scott and Renesselaer teeming up to launch a left-right attack on Forts Erie and Niagara that had Brock marching between both rapidly trying to hold the front but finally being ejected from both and driven off to Burlington with the obvious threat to York requiring General Drummond to come rapidly to his support with reinforcements.

However the American offensive had thrown the British defence out of balance with General Prevost required to leave Quebec with reinforcements for the St Lawrence line and to hold Kingston, leaving Rottenburg to manage the Champlain front with a growing threat from Wilkinson and the second draught of US reinforcements.

Thus by the close of 1813 the American highwater mark had been achieved with some great card combinations of American frigate victories and Harrisons offensive on the Niagara only offset by Yeo's victory on Lake Ontario but leaving the Americans with 15 victory points in the bag.

By the early part of 1814, the British have pulled the US Victory Point total back to eight points but now having US General Brown sat on their supply line from Quebec at Fort Preston leaving Kingston, York and Amhurstburg out of supply.

Things continued in the wrong direction for British fortunes as General Brown directed his activities towards Sackets only held at bay by Drummond rapidly returning from Burlington with the few troops he could gather up near York, but not enough to stop Brown skirting along the St Lawrence and capturing Fort Prescot, cutting the vital British supply line down the river to Upper Canada.

The cockpit of the war focussed on Lake Ontario and each end of it with the US ground forces victorious but with Yeo 'Lord of the Lake'.

The careful use of British cards to play events such as the Shannon v Chesapeake naval victory and the capture of Lake Erie by Commodore Barclay as General Proctor held back the US troops in Detroit, helped to drag back the victory point total to eight, but 1814 looked desperate for British hopes despite the massive reinforcements expected, certainly if Steve managed to get the Treaty of Ghent card and heaven forbid the Battle of New Orleans.

War's end, and Brock still holds out in York despite two attempts to take the town by Harrison sat outside with his big stack of troops. Meanwhile British redcoats occupy both sides of Lake Champlain with British boats controlling the water. More importantly, from a British perspective, the Americans could only get another two points in the closing half of 1814.

Thus with 1814 looming the British faced a tough choice as to how to proceed to keep the Americans under ten or less victory points, namely whether to march down the St Lawrence and try to shift General Brown before the Upper Canada and Niagara fronts collapsed due to lack of supply or to try and offset the likely effects by launching a rapid offensive along the shores of Lake Champlain and towards Albany, taking the lake and the towns near it for the victory points.

As I expected Steve brought Harrison up from the Niagara front and drove Brock back to York and attacked the town, fortunately fortified but now cut off reducing Brock and his force to half strength.

Amazingly and utterly unexpectedly Brock beat off two assaults on the Provincial capital as Rottenburg and Prevost brought the British Peninsular veterans down to Lake Champlain in support of Commodore Downie who took control of the lake.

The cockpit of the war in 1814 proved to be driven by the British offensive towards Albany,
relieving some of the pressure on York and Kingston.

Wilkinson and Macdonough were driven south in the British offensive as captured American towns were occupied and the threat to Albany was enough to force Steve to commit valuable action points to this front rather than Niagara or Detroit and with me holding the New Orleans card and the Treaty of Ghent card staying in the deck, the war came to an inevitable end with Steve's Americans held to ten points advantage.

What a game to finish on with cut and thrust from both sides throughout, never knowing what opportunities the next phase of card play would throw up  and with Steve putting together a brilliant American offensive at both ends of Lake Ontario, with Yeo and Braddock resisting the tide of American success long enough to allow a final British offensive on Lake Champlain pull the war back intime for the final peace negotiations.

I really like this game a lot with loads of historic data points and an order of battle mirrored with beautiful graphics and map all tied in with the best part of a card driven game, namely never having one game the same as another due to the random effects of the card draw.

Next up with Vassal, Steve and I will be trying out another card driven game, this time set in the English Civil War, Unhappy King Charles.

In addition to Vassal, the Spanish third rates of renown are reviewed starting with the Montanes class 74-gun Monarca and I will post my thoughts about 'A History of the Royal Navy, The Napoleonic Wars.

Saturday, 31 October 2020

All at Sea, French Third Rates of Renown (Indomptable)

Not exactly the Indomptable, but a good excuse to display the amazing talent of French marine artist Antoine Roux and his contemporary rendition of a French third rate of the period seen off Marseilles.  

The French third rate ship of the line Indomptable was an 80-gun Tonnant class ship designed by, yes you've guessed it, Jacques-Noel Sane, laid down at Brest in 1788 and launched on the 20th December 1790.

Indomptable's first commander was the newly promoted Captain Etienne Eustache Bruix in January 1793 

On the 1st January 1793 she came under the command of the newly promoted Captain Etienne Eustache Bruix who would later go on to promotion as an Admiral to command part of the expedition to Ireland in 1796 and activities in the Mediterranean before assuming command of the Boulogne Invasion Flotilla in 1805.

The Indomptable's first taste of action would be the following year as part of Rear Admiral Villaret Joyeuse's Grand Fleet sailing from Brest during the Glorious First of June campaign under the command of Captain Lamesle and being one of the last two ships at the rear of the French line on the 29th May was engaged by HMS Barfleur 90-guns which left Indomptable so badly battered that only a dockyard refit would fix the damage.

The Battle of the First of June, 1794 - Robert Dodd (Royal Museums Greenwich)

It was the arrival of the three ships of Rear Admiral Nielly's squadron (Sans Pareil 80-guns, Trajan and Temeraire each 74-guns) that evening, that allowed the dismasted Indomptable to be sent back to Brest with the Mont Blanc 74-guns for urgent repairs, and thus missing the battle on the 1st June.
 

In December 1796 Indomptable would be under the command of Commodore Jacques Bedout and one of the seventeen French ships of the line detailed to escort General Lazare Hoche's expedition to Ireland.

Commodore Jacques Bedout commanded the Indomptable
during the Irish Expedition, December 1796

Setting sail from Brest on December 15th the French fleet was almost immediately scattered due to a combination of bad weather, poor seamanship and the attentions of British frigates and by the last week of December was in full retreat having failed to land a single soldier in Ireland and with total French losses amounting to 12 ships captured or destroyed and over 2,000 men drowned.

One of the twelve ships lost in the disastrous French expedition to Ireland in 1796 was the French 74-gun Le Droits de l'Homme coloured aquatint engraved by Robert Dodd after his own original  published by I Brydon February 1798. - National Maritime Museum 

In 1801, Indomptable was part of the Mediterranean Squadron based in Toulon and involved in First Consul Napoleon's plans to salvage his expedition to Egypt, following the almost total destruction of the French fleet in the Mediterranean by Rear Admiral Nelson at Aboukir Bay in August 1798.

The Formidable, sister ship to Indompatable
http://jjwargames.blogspot.com/2020/10/all-at-sea-french-third-rates-of-renown_25.html

As covered in my post looking at Indomptable's sister ship, Formidable, Indomptable formed part of Rear Admiral Linois's squadron that attempted to join with other French and Spanish warships gathered in Cadiz to commence operations against British naval forces in the Mediterranean together with plans to invade Lisbon or Alexandria with a convoy of French troops.

First Battle of Algeciras, 6th July 1801 - From The Naval History of Great Britain by William James

An outline of the Algeciras campaign can be read in the link above to my post covering the history of Formidable, suffice to say that the Indomptable under her commander, Captain Augustin Moncousu, took her place as the third ship at anchor under the guns of Algeciras in the first battle on the 6th July 1801.

The British attack was immediate, if somewhat piecemeal due to the light winds, with Rear Admiral Saumarez's ships attacking as they arrived to drop anchor close by, but the aggressive intent had the effect to cause Linois to order his ships to cut their cables and drift in closer to the shore and the protection from the Spanish guns.

Indomptable came under fire from HMS Audacious 74-guns, with the British ship ending up anchoring at long range, but when Indomptable complied with the signal to cut her cable, she ended up drifting out of control and grounding with her bow facing out to sea.

Saumarez responded to the French move by cutting his own cable aboard HMS Caesar 80-guns to wear past the becalmed HMS Audacious and take position on the vulnerable bow of Indomptable, raking the French ship, later to be joined by Audacious only adding to the misery she endured under the close damaging fire.

However the British were also suffering from the combined fire from the French ships and the Spanish coast batteries and gunboats and Saumarez was forced to withdraw leaving the stranded and struck HMS Hannibal 74-guns but also a badly battered Indomptable that had suffered the most number of men killed among the French ships with 63 men dead, including her captain and another 97 wounded, 160 casualties in all.

In the Second Battle of Algeciras that followed just six days later the Indomptable under her new commander Captain Claude Touffet was not part of the rear of the Combined Fleet that sailed for Cadiz and thus arrived unscathed from the night battle that ensued and an account of that fighting can be followed in my post covering Formidable also in the link above.

Like her sister ship Formidable the Indomptable would serve out the rest of the French Revolutionary War at Toulon as part of Vice Admiral Latouche Treville's Mediterranean Squadron and like her sister, form part of Vice Admiral Villeneuve's squadron that would break out from that port on the 30th March 1805 being part of Rear Admiral Dumanoir's second division (Formidable 80-guns flagship, Indomptable 80-guns, Swiftsure, Scipion and Intrepide each 74-guns).

Later in September, Villeneuve would report that Indomptable was a;

'Fine ship, sailing well, but having a very bad crew and very weak (through sickness and lack of good seamen).'  

As part of the first group of Allied ships to break out with Admiral Villeneuve in what would later become known as the Trafalgar campaign she sailed to the West Indies and on the return voyage would with the rest of the squadron meet with Vice Admiral Sir Robert Calder's squadron off Cape Finisterre on the 22nd July 1805.

Admiral Sir Robert Calder's Action off Cape Finisterre 23rd July 1805 - William Anderson
Calder's flagship, Prince of Wales, the British three decker at the centre of the picture, opens fire with other ships in the British line on Villeneuve's French squadron blurred by the fog that characterised this inconclusive fight. (Royal Museums Greenwich).

It was the quartermaster aboard Indomptable that spotted Calder's ships that saw the start of the inconclusive action fought in a fog that minimised the casualties but left Villeneuve happy to make it into El Ferrol on the Spanish coast having lost two ships and just over 1800 men in killed, wounded and captured, with Indomptable coming off lightly with just one man killed and one wounded.

By October 1805, Villeneuve and his Combined Fleet were gathered in Cadiz prior to sailing for their moment in history and the great naval battle of Cape Trafalgar fought on the 21st with the Indomptable sailing in the van under the command of Spanish Vice Admiral Alava aboard his flagship Santa Ana.

Battle of Trafalgar, showing position of Indomptable at approximately 12.00, adapted from

However Villeneuve reversed course, to head back to Cadiz having wore around at 08.00 fearing Nelson was attempting to attack his rear and cut him off from the Spanish port, and with Spanish Admiral Gravina out ahead of the van with his 'Squadron of Observation', Indomptable would find herself pretty much at the centre of the gaggle of ships that composed the line of battle that awaited the two British columns that bore down on them at midday as squadron positions were reversed.

HMS Royal Sovereign is isolated among three enemy ships as she breaks the Allied line, raking the Santa Ana to the left and the Forgueux to the right whilst taking fire from Indomptable dead ahead - Anthony Cowland
https://www.argc-art.com/gallery-maritime?product_id=53&route=product%2Fproduct

Under the command of Captain Jean Joseph Hubert she opened fire on the Royal Sovereign 100-guns as she led the British lee column and as she broke through the Allied line, engaging her steadily as the British flagship went alongside the Santa Ana 112-guns.

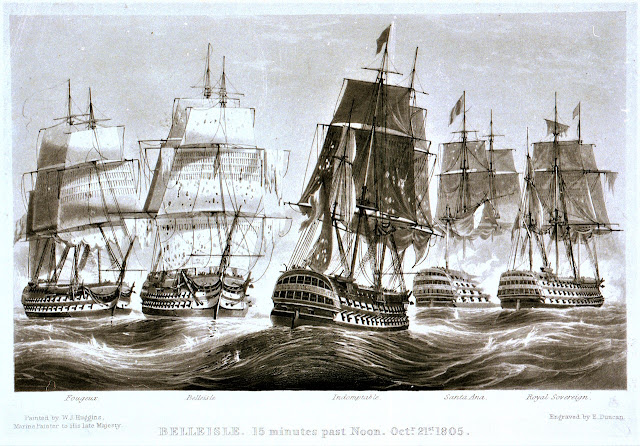
Close behind the Royal Sovereign was HMS Belleisle 74-guns under the command of Captain William Hargood, breaking the Allied line at about 12.20 approaching the same gap between the Santa Ana and the Forgueux, suffering some twenty to thirty casualties on the gun decks as the order went out to 'Stand to your guns!' whilst delivering raking broadsides to Santa Ana and Forgueux as she passed through and bearing down on Indomptable.

This illustration captures the moment as HMS Belleisle (second from the left) breaks the Allied line at 12.15 with Forgueux (far left) about to collide on her starboard quarter as she turns to pass the stern of the Indomptable in the centre of the picture whilst Santa Anna and HMS Royal Sovereign exchange broadsides (far right)

However as the Belleisle burst though the line amid clouds of billowing gun smoke the hull of the Forgueux loomed on the starboard quarter as the British ship attempted to steer for the stern of Indomptable. Second Lieutenant Paul Nicolas, Royal Marines aboard Belleisle described the moment;

'At this critical period, while steering for the stern of L'Indomptable (our masts and yards and sails hanging in the utmost confusion over our heads), which continued a most galling raking fire upon us, the Forgueux being on our starboard quarter, and the Spanish San Justo (? Probably means the Santa Anna) on our larboard bow, the Master earnestly addressed the Captain.

'Shall we go through sir?' Go through by . . . . .' was his energetic reply. 'There's your ship, sir (Indomptable), place me close alongside her.'

Our opponent defeated this manoeuvre by bearing away in a parallel course with us within pistol shot.'

With a shuddering concussion the bowsprit of the Forgueux plunged over the deck of the Belleisle, swinging her on the opposite course and locking the two ships together broadside to broadside as the Indomptable drifted away, not before firing a final broadside into the Belleisle.

Later in the battle Indomptable exchanged broadsides with HMS Revenge and although having suffered damage to her hull, masts, spars and rigging, she was able to sail away from the battle without needing a tow.

However having escaped the battle the ship would be wrecked in Cadiz harbour on the 24th October, after rescuing survivors from the Bucentaure that was also a total loss, only to slip her cable and end up on rocks herself, with most of her crew including Captain Hubert lost and just 2 officers and 178 seamen and soldiers surviving.


At Trafalgar L'Indomptable was armed with 30 x 36-pounder long guns on her lower deck, 32 x 24-pdr guns on her upper deck, 12 x 12-pdr guns on her quarterdeck, 6 x 12pdr guns on her forecastle and 6 x 36-pdr carronades on her poop.

At the time of the battle her crew was over strength in numbers but under strength in seamen with 887 crew, of which 580 were naval personnel, 247 infantry and 60 marine artillery.

Sources consulted in this post:
The Trafalgar Companion - Mark Adkins
The Battle of Trafalgar - Geoffrey Bennett
French Warships in the Age of Sail, 1786-1862 - Rif Winfield

Next Up: Mr Madison's War, Game Three on Vassal, a book review and we take a look at the Spanish Third Rates of Renown starting with Monarca.