
 |
| Detail from the famous picture of the Battle of Isandlwana held in the National Army Museum, London and painted by Charles Edwin Fripp |
The Zulu king, Cetshweyo kaMapande is quoted observing British involvement in South Africa as;
"First Comes the trader, then the missionary, then the Red Soldier!"
On Friday 29th March, I spent a very pleasant day in the company of friends, Mr Steve and Mike C travelling up to 'the Smoke' to listen to to Mr "Zulu War", Ian Knight present at the National Army Museum (NAM) an overview of how the British and the Zulu's view the war one hundred and forty years later and fifty-five years after the release of the British feature film 'Zulu' portraying events at the Battle of Rorke's Drift.
https://www.nam.ac.uk/whats-on/then-red-soldier-zulu-war-140-years
The 29th of March was an historic day to choose for the presentation, not for all the hot air being given off by various parties in and around the mother of Parliaments, but for the fact that it was the anniversary of the Battle of Khambula that started about 13.30 that day in 1879, and recently mentioned in my previous post looking at Taunton and its association with the 13th Somerset Light Infantry who took part in the battle.
https://jjwargames.blogspot.com/2019/02/taunton-historic-county-town-and-home.html
Battle of Khambula, 29th March, 1879
Before reporting on the details of our visit to the NAM and more particularly Ian Knight's presentation I should say I have had a long interest in the Anglo-Zulu War and always enjoy playing the period, perhaps more than any other of the British Colonial periods, but have never owned a collection of figures.
Fortunately I have several friends in the Devon Wargames Group with a similar love for the period who do have some great collections in 28mm and I have played in most of the games run at the club and featured on the DWG club blog and here on JJ's.
Devon Wargames Group - Zulu Posts
JJ's Wargames - Zulu Posts
One particularly memorable game was using my mate, Nathan's, glorious collection of figures for our game replaying the defence of Rorke's Drift.
Sadly Nathan wasn't able to join us yesterday so I hope he enjoys listening to the recording I sent him and this post summarising the day.
Ian Knight has established himself as one of the leading experts on the Anglo-Zulu War of 1879 with forty books to his name of which I have three, and very good they are.
In addition he is regularly featured on TV documentaries covering the subject and in 2000 took part in the first archaeological excavation of the famous battlefield at Isandlwana.

Ian began his talk by referring to the historical significance of the day and a look at some of the interesting aspects of the second major battle of the war fought exactly one hundred and forty years previously, namely the Battle of Khambula in which 2,000 British Imperial troops under the command of Colonel Evelyn Wood VC, held their ground and fought off an attack by about 20,000 Zulu warriors.

Ian described accounts from British soldiers on the day saying how they had observed the approach of the Zulu army over the hills and valleys beyond their camp for up to four or five hours after daybreak and describing the unnerving feeling that the Zulu army was forming up in the shape of a giant nut cracker in which they appeared to be the nut!
As the battle unfolded British soldiers remembered how, over the noise of the Zulu battle cry so memorably captured in the two British films, the soldiers could hear individual Zulu warriors calling out to them from the massed ranks.
On enquiring with their Boer translators what the Zulus were calling out, they were told that they were shouting;
The arrival of the British on the cape was a response to the wider war against Napoleon and the need for the Royal Navy to secure its routes to India and the far east that had to pass via the Cape of Storms at the tip of the continent of Africa.
Battle of Blaauwberg
The white settlers at the time were of mainly Dutch heritage who had arrived in the cape at the end of the 17th century principally to service port facilities for the Dutch marine operating with the Dutch East Indies.
The fall of the Dutch republic to Napoleon and the establishment of the Kingdom of Holland led to British forces landing at the cape in 1806 and defeating the Dutch forces at the Battle of Blaauwburg resulting in the colony coming under British control.
The British retained that hold after the conclusion of the Napoleonic war and, as Dutch colonists sought freedom from British oversight by settling further and further into the interior, gradually saw British 'mission creep' as the Imperial representatives saw their role in following this emigration in an effort to assert wider control over the area as a whole.
First contact with the Zulus was in 1824 at Port Natal by ex RN Lieutenant Francis George Farewell, who, following meetings with the Zulu king Shaka, established a trading post there soon after and by 1843 the town had grown to include the outlying territory into the new colony of Natal.
Fifty-five years after its setting up, the British trading post and colony, Natal, pressed firmly against the frontier of the Zulu nation and its territories with, as Ian explained, a generally amicable trading arrangement, if leaving the Zulus a little concerned about a growing British influence in the region.
As with other examples of British colonial activities in places like India, the presence of an independent sovereign people capable of asserting a military response never sat well with Imperial authorities in a neighbouring territory keen to assert their superiority and better still control; and the Zulu's soon found themselves subject to this reality when the new British High Commissioner for Southern Africa, Sir Henry Bartle Edward Frere had concluded that to bring into being a British controlled confederation of the South African territories and peoples, an engineered confrontation with the Zulus was necessary.
Other pressures that influenced British thinking were several and varied from the Boer's setting off to establish their own independent republic, other rebellions by native populations requiring military intervention, to the discovery of major diamond deposits at Kimberly, all combining to drive a desire to get a firmer control of the area.
Once the decision had been taken to cause a confrontation with the Zulus, the implementation of that decision was then handed over to the army under the command of Lieutenant General Frederick Augustus Thesiger, 2nd Baron Chelmsford KCB, commander of British Imperial forces in the colony.
Ian Knight's description of Chelmsford is of an experienced and capable General Officer if lacking somewhat in imagination, with recent success and experience in the territory conducting the Ninth Cape Frontier War.
He was somewhat forced to adapt to a political situation that saw the war declared without Frere alerting London to his intentions, hoping to see the conflict started and finished before any political authorisation from home could interfere with his plans.
Thus the forces available to Chelmsford at the start of the campaign (eight regular infantry battalions, 800 men each and two batteries of artillery) were not ideal in terms of the numbers of regular troops, operating in broken terrain against a very mobile enemy, in a major war against the Zulus, however a feeling of quality and weaponry compensating for numbers no doubt influenced thinking to pressing on with what was available.
It was this situation that decided Chelmsford to split his army into three principle columns each with a core of regular infantry backed up by other auxiliary units invading into Zululand and converging at the Zulu capital of Ulundi.
The invasion started on the 11th January 1879 and Ian Knight referred to Chelmsford's bad luck, in that the month had seen particularly heavy rains flooding the dongas and putting the rivers into high spate, making his movements even more difficult than planned. It was this weather that slowed the approach of Chelmsford's army and allowed the Zulus more time to muster in readiness to oppose his troops.
The Zulu reaction to this invasion was one of surprised resignation, following a short period of negotiation attempts by them in an effort to avoid war and a gradual realisation that the British did not want a negotiated settlement.
The Zulu army was described as a 30,000 strong part-time citizen army or militia with men having to deliver military service to the king by joining one of the Zulu regiments in which they served during war, a sort of part time national service.
They were principally armed with shield and stabbing spear, with a greater proportion of warriors than previously carrying outdated and badly maintained firearms and were highly motivated looking to, as Ian Knight quoted one Zulu as telling him, 'be ready to chase the burglars out'.
Lord Chelmsford accompanied and commanded the main Imperial column which arrived at Isandlwana on the 20th January from which he immediately went off, accompanied by his staff and eight mounted infantry escort, to reconnoitre for the Zulu main army which had been reported to be in the vicinity.
Ian Knight speculated what might have happened had the British commander found them and have been taken with such a small escort but Chelmsford returned to the camp at Isandlwana intending to move on the next day, thus not ordering any defences to be constructed.
On the evening of the 20th other Imperial troops discovered the Zulu main army and a dispatch was delivered to Lord Chelmsford at 2am on the 21st January informing him of this discovery and he immediately set out, before dawn, with about half his force in pursuit looking to force a confrontation and potentially surprise the Zulus.
In the camp at Isandlwana were left about 1700 troops, and although Chelmsford's information was correct he failed to intercept the Zulu army who slipped past his advance and fall on the camp, having manoeuvred behind a range of hills near it before launching their attack.
Battle of Isandlwana
The battle and its results are well known and Ian Knight took a bit of time to refer to Fripp's stirring portrait of the last stand at Isandwana held by the museum, pointing out that Fripp was in Zululand at the closing stages of the war and knew enough about the realities of the fighting and the terrain to depict a very realistic painting of the hand to hand combat depicted in it.
Points highlighted were the total lack of officers present, suggesting an underlying message that this was the last stand of the common soldier due to the 'stuff up' of the officers commanding them.
The drummer boy shown pointing out from the portrait appears to be aged about eleven or twelve when in reality the average age of drummers at Isandlwana was twenty-four.
Of the 1700 troops present, only four hundred escaped, mainly African auxiliaries who avoided the closing wings of the Zulu army but who are reported to have fought solidly beside their British allies throughout the battle. Only one hundred white men escaped the carnage.
One interesting fact about the battle that was luridly portrayed in the film 'Zulu Dawn' and was asked about in questions to Ian afterwards was the reported habit of the Zulus to cut open the bellies of the fallen British soldiers.
Apparently this did happen, as the African heat caused the bodies to swell up and the Zulus believed that this was the spirit of the dead soldier looking to leave the body and that unless they aided that release they would be haunted by the dead man's spirit.
The battle was very costly to the Zulus leaving them with a thousand dead warriors and an estimated further thousand who would die after the battle from wounds received, prompting King Cetshwayo to exclaim that a spear had been plunged into the belly of the Zulu nation.
With the successful defence of Rorke's Drift immediately after Isandlwana and the battle of Khambula two months later leaving another thousand Zulu warriors killed the first phase of the war effectively ended leaving both sides exhausted but with the British determined to successfully end the war by committing a large reinforcement to the region.
On the 4th July 1879 the war ended with the British army defeating the Zulus before the Royal Kraal at Ulundi with a display of disciplined musketry defeating the brave Zulu charges against their square and concluded by the Zulus chased from the field by the 17th Lancers of Balaclava fame.
The Zulus are rightly proud of their dramatic victory at Isandlwana and the 'bloody nose' delivered to the British empire with the battle seen very much as a defining moment in Zulu history and giving greater definition to the Zulus as a people to this day.
In Britain it seems, in the time following withdrawal from Empire, the battle is seen more as a deserved result of Imperial hubris, with the bravery of the common British soldier shining out in the defence of Rorke's Drift representing all that is best about the nation when the back is against the wall and it is down to the ordinary soldier to put things right.
A thoroughly interesting presentation was concluded with some questions and answers together with a book signing highlighting Ian's most recent title on the Battle of Isandlwana linked at the bottom of this post, but Ian generously autographed the title I brought with me on the day covering the battle at Rorke's Drift
Following the talk, Mike, Steve and I set off for a quick look at the NAM galleries in the the new look museum building about which I will report about in a separate post, but for completeness I thought I should include my other pictures of Fripps famous picture, and the Zulu War items held by the museum.

Zulu Rising - Amazon
Thank you to Ian Knight for a very interesting and well delivered presentation and to Mike and Mr Steve for their company on the day, on what was a great day out and one to remember.
https://www.nam.ac.uk/whats-on/then-red-soldier-zulu-war-140-years
 |
| The closing stages of the Battle of Khambula and the 13th Somersets driving the Zulu attack back into the ravine. My picture of the original work seen in the Taunton Museum last November. |
The 29th of March was an historic day to choose for the presentation, not for all the hot air being given off by various parties in and around the mother of Parliaments, but for the fact that it was the anniversary of the Battle of Khambula that started about 13.30 that day in 1879, and recently mentioned in my previous post looking at Taunton and its association with the 13th Somerset Light Infantry who took part in the battle.
 |
| King Cetshweyo's pipe and the VC awarded to Major William Knox Leet VC for rescuing a fellow officer in the battle, as pictured in Taunton. |
https://jjwargames.blogspot.com/2019/02/taunton-historic-county-town-and-home.html
Battle of Khambula, 29th March, 1879
Before reporting on the details of our visit to the NAM and more particularly Ian Knight's presentation I should say I have had a long interest in the Anglo-Zulu War and always enjoy playing the period, perhaps more than any other of the British Colonial periods, but have never owned a collection of figures.
 |
| Zulus on the attack in one of Chas's big warm up games played at the DWG in recent years |
Fortunately I have several friends in the Devon Wargames Group with a similar love for the period who do have some great collections in 28mm and I have played in most of the games run at the club and featured on the DWG club blog and here on JJ's.
 |
| Replicating the camp at Khambula, the Red Soldiers prepare to present arms. |
Devon Wargames Group - Zulu Posts
JJ's Wargames - Zulu Posts
One particularly memorable game was using my mate, Nathan's, glorious collection of figures for our game replaying the defence of Rorke's Drift.
 |
| Nathan's lovely rendition of Rorke's Drift where we had all the characters in action and film quotations aplenty. |
Sadly Nathan wasn't able to join us yesterday so I hope he enjoys listening to the recording I sent him and this post summarising the day.
Ian Knight has established himself as one of the leading experts on the Anglo-Zulu War of 1879 with forty books to his name of which I have three, and very good they are.
In addition he is regularly featured on TV documentaries covering the subject and in 2000 took part in the first archaeological excavation of the famous battlefield at Isandlwana.

Ian began his talk by referring to the historical significance of the day and a look at some of the interesting aspects of the second major battle of the war fought exactly one hundred and forty years previously, namely the Battle of Khambula in which 2,000 British Imperial troops under the command of Colonel Evelyn Wood VC, held their ground and fought off an attack by about 20,000 Zulu warriors.

Ian described accounts from British soldiers on the day saying how they had observed the approach of the Zulu army over the hills and valleys beyond their camp for up to four or five hours after daybreak and describing the unnerving feeling that the Zulu army was forming up in the shape of a giant nut cracker in which they appeared to be the nut!
As the battle unfolded British soldiers remembered how, over the noise of the Zulu battle cry so memorably captured in the two British films, the soldiers could hear individual Zulu warriors calling out to them from the massed ranks.
 |
| The Boys from Isandlwana, if those recently acquired rifles are anything to go by. - The Perry artwork on their lovely plastic 28mm range of figures |
On enquiring with their Boer translators what the Zulus were calling out, they were told that they were shouting;
"We are the boys from Isandlwana!"
A chilling thought to remember that Isandlwana had only been fought just two months before on the 22nd January and was very fresh in all the soldiers minds.
Ian then went on to consider why it was that the Battle of Isandlwana still captures the imagination so powerfully even to this day, and what that says about our views and thoughts about the war itself.
Interestingly the famous picture of the last stand at Isandlwana held in the NAM and pictured by me on our visit, with a close up of it on the header to this post, is the most sought after and enquired about artifact in the museum's collection.
The battle was the most most costly single day action fought during the Victorian era, putting aside more bloodier engagements such as the retreat from Kabul in 1842 which was fought over a period of weeks, and Isadlwana stands at the top of British Imperial "Stuff Ups" greater than Spion Kop (Great Boer War), Majuba Hill (1st Boer War) and the Charge of the Light Brigade (Crimean War).
In addition the battle caused a great deal of agonised reflection at the time which has endured over the years since, in that this was a modern army for that time, defeated by an army carrying shields and spears designed for close combat, leading to the thought, "What did we do wrong to suffer this kind of loss".
Ian pointed out that more modern academic thinking now views the battle rather as a great Zulu victory based on what they did right rather than a great British defeat and what was done wrong.
I have to say that I rather lean towards a combination of the two schools of thought that readily accepts that the Zulus played to their strengths in the battle and that once they gained the initiative, never let it go, but that Lord Chelmsford's command of his forces left a lot to be desired and displays a possible arrogance and contempt for the Zulu army combined with a an almost flagrant misapplication of the basic principles of war, namely concentration of forces and good intelligence and reconnaissance of and about the enemy faced.
The fact that the Zulus themselves paid a heavy price for their victory in inviting a massive Imperial response in terms of reinforcements together with their casualties suffered in the battle and their lack of success after it seems to underline that better management may well have produced a less costly success, and their I think lies the basis for an excellent historical debate on the merits or not of Lord Chelmsford's command.
Ian then went on to look at the history of British involvement in South Africa that led up to the war in 1879 and rather jokingly suggested that, as with a lot of British history, it was something that could arguably be blamed on the French!
 |
| The two protagonists in 1879, Zulu King Cetshweyo and High Commissioner Sir Henry Bartle Edward Frere sent to South Africa in 1877 to 'sort things out!' |
The arrival of the British on the cape was a response to the wider war against Napoleon and the need for the Royal Navy to secure its routes to India and the far east that had to pass via the Cape of Storms at the tip of the continent of Africa.
Battle of Blaauwberg
The white settlers at the time were of mainly Dutch heritage who had arrived in the cape at the end of the 17th century principally to service port facilities for the Dutch marine operating with the Dutch East Indies.
The fall of the Dutch republic to Napoleon and the establishment of the Kingdom of Holland led to British forces landing at the cape in 1806 and defeating the Dutch forces at the Battle of Blaauwburg resulting in the colony coming under British control.
 |
| Cape Colony, South Africa from a map of 1809 |
The British retained that hold after the conclusion of the Napoleonic war and, as Dutch colonists sought freedom from British oversight by settling further and further into the interior, gradually saw British 'mission creep' as the Imperial representatives saw their role in following this emigration in an effort to assert wider control over the area as a whole.
First contact with the Zulus was in 1824 at Port Natal by ex RN Lieutenant Francis George Farewell, who, following meetings with the Zulu king Shaka, established a trading post there soon after and by 1843 the town had grown to include the outlying territory into the new colony of Natal.
Fifty-five years after its setting up, the British trading post and colony, Natal, pressed firmly against the frontier of the Zulu nation and its territories with, as Ian explained, a generally amicable trading arrangement, if leaving the Zulus a little concerned about a growing British influence in the region.
 |
| Francis George Farewell |
As with other examples of British colonial activities in places like India, the presence of an independent sovereign people capable of asserting a military response never sat well with Imperial authorities in a neighbouring territory keen to assert their superiority and better still control; and the Zulu's soon found themselves subject to this reality when the new British High Commissioner for Southern Africa, Sir Henry Bartle Edward Frere had concluded that to bring into being a British controlled confederation of the South African territories and peoples, an engineered confrontation with the Zulus was necessary.
Other pressures that influenced British thinking were several and varied from the Boer's setting off to establish their own independent republic, other rebellions by native populations requiring military intervention, to the discovery of major diamond deposits at Kimberly, all combining to drive a desire to get a firmer control of the area.
 |
| Lieutenant General Lord Chelmsford an establishment figure, experienced but unimaginative commander whom Ian Knight felt sympathy for, in the situation he faced. |
Once the decision had been taken to cause a confrontation with the Zulus, the implementation of that decision was then handed over to the army under the command of Lieutenant General Frederick Augustus Thesiger, 2nd Baron Chelmsford KCB, commander of British Imperial forces in the colony.
Ian Knight's description of Chelmsford is of an experienced and capable General Officer if lacking somewhat in imagination, with recent success and experience in the territory conducting the Ninth Cape Frontier War.
 |
| Britain was the great world power in 1879, exemplified by its army carrying the latest Martini-Henry breech loading rifles. Ian Knight's recent pictures of British reenactors in South Africa in January for the 140th anniversary commemoration of Isandlwana |
He was somewhat forced to adapt to a political situation that saw the war declared without Frere alerting London to his intentions, hoping to see the conflict started and finished before any political authorisation from home could interfere with his plans.
 |
| Map illustrating the columns arranged by Chelmsford for his invasion of Zululand in January 1879, with No. III column advancing on Ulundi via Rorke's Drift and Isandlwana. |
Thus the forces available to Chelmsford at the start of the campaign (eight regular infantry battalions, 800 men each and two batteries of artillery) were not ideal in terms of the numbers of regular troops, operating in broken terrain against a very mobile enemy, in a major war against the Zulus, however a feeling of quality and weaponry compensating for numbers no doubt influenced thinking to pressing on with what was available.
It was this situation that decided Chelmsford to split his army into three principle columns each with a core of regular infantry backed up by other auxiliary units invading into Zululand and converging at the Zulu capital of Ulundi.
The invasion started on the 11th January 1879 and Ian Knight referred to Chelmsford's bad luck, in that the month had seen particularly heavy rains flooding the dongas and putting the rivers into high spate, making his movements even more difficult than planned. It was this weather that slowed the approach of Chelmsford's army and allowed the Zulus more time to muster in readiness to oppose his troops.
 |
| A recent picture of the Isandlwana battlefield, showing the range of hills in the background behind which the Zulu army formed up to assault the British camp on the slopes of the famous mountain to the left. Chelmsford set off with his ambush force early in the morning of the battle to the right of picture to confront the Zulus who he missed as they had already moved to their new position ready to attack the other half of his army left at Isandwana. |
The Zulu reaction to this invasion was one of surprised resignation, following a short period of negotiation attempts by them in an effort to avoid war and a gradual realisation that the British did not want a negotiated settlement.
The Zulu army was described as a 30,000 strong part-time citizen army or militia with men having to deliver military service to the king by joining one of the Zulu regiments in which they served during war, a sort of part time national service.
They were principally armed with shield and stabbing spear, with a greater proportion of warriors than previously carrying outdated and badly maintained firearms and were highly motivated looking to, as Ian Knight quoted one Zulu as telling him, 'be ready to chase the burglars out'.
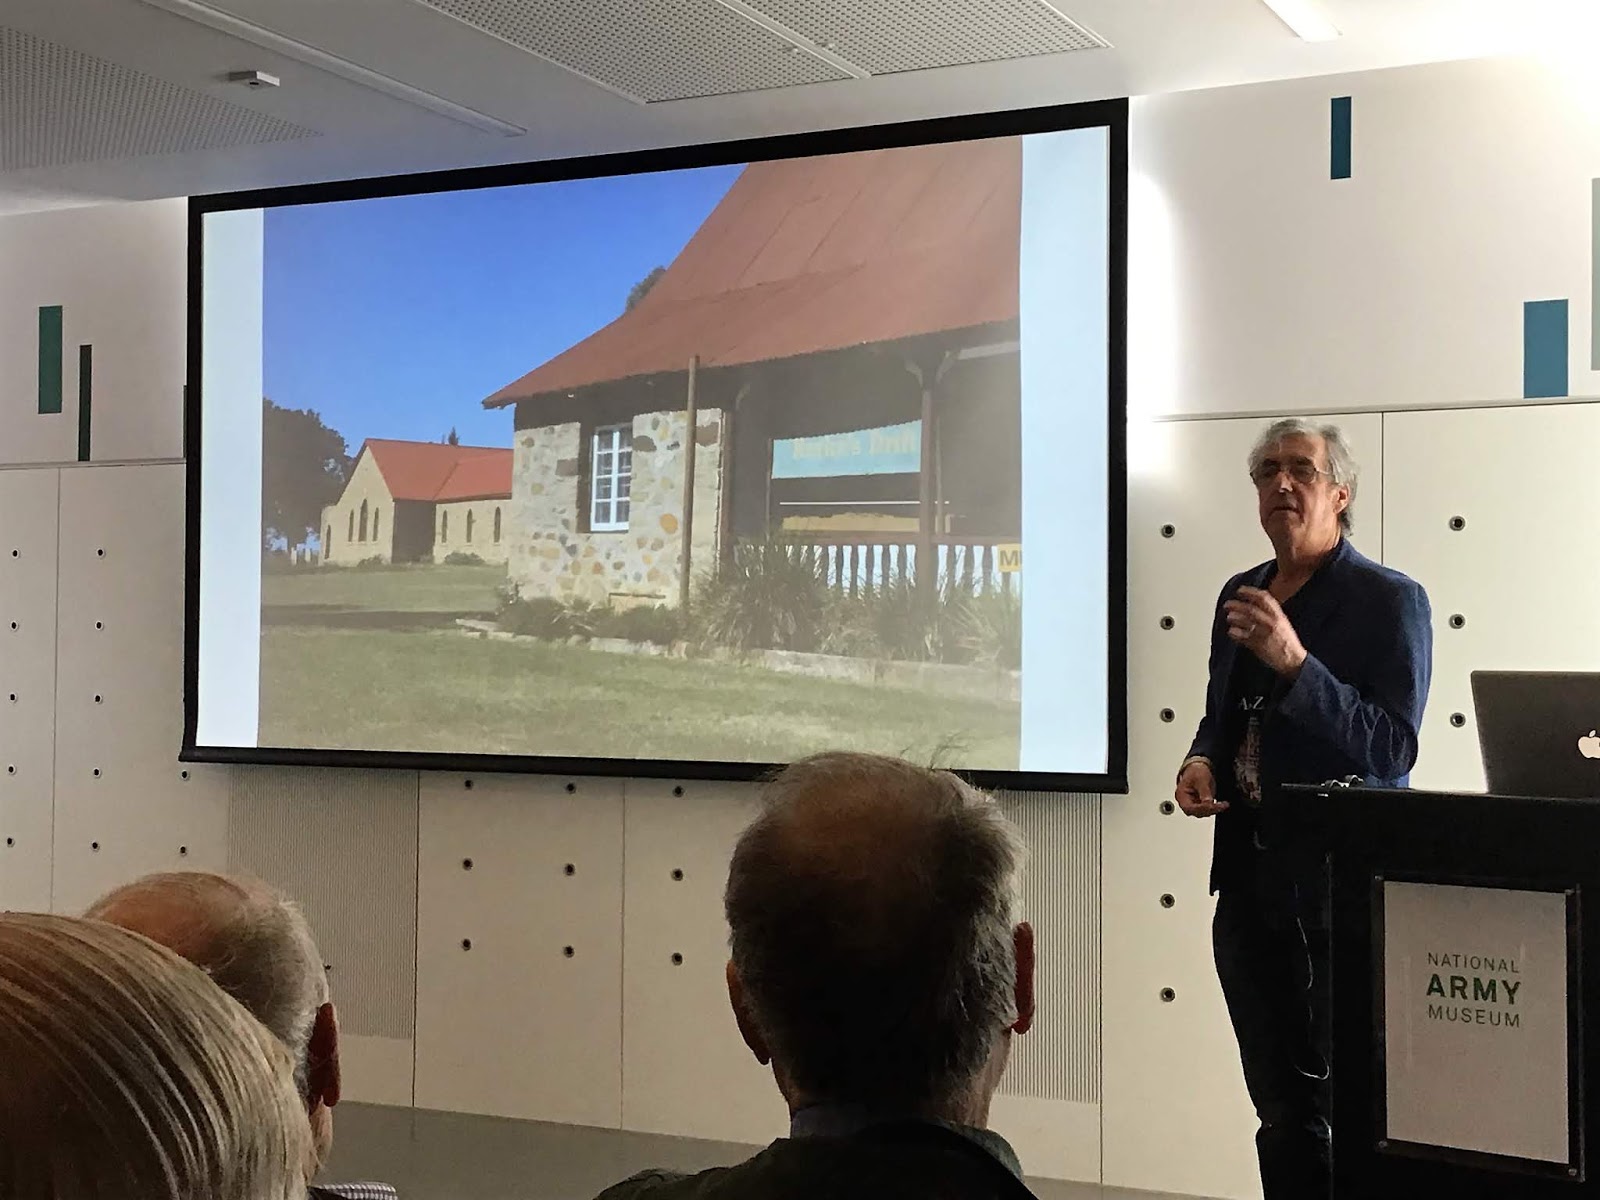 |
| Rorkes Drift today. The successful defence of this river crossing was the ray of light in a dismal situation that saved Chelmsford's command long enough for him to recover the situation, but although rewarded with high office and awards, he would never command in the field again after the Zulu war. |
Lord Chelmsford accompanied and commanded the main Imperial column which arrived at Isandlwana on the 20th January from which he immediately went off, accompanied by his staff and eight mounted infantry escort, to reconnoitre for the Zulu main army which had been reported to be in the vicinity.
Ian Knight speculated what might have happened had the British commander found them and have been taken with such a small escort but Chelmsford returned to the camp at Isandlwana intending to move on the next day, thus not ordering any defences to be constructed.
On the evening of the 20th other Imperial troops discovered the Zulu main army and a dispatch was delivered to Lord Chelmsford at 2am on the 21st January informing him of this discovery and he immediately set out, before dawn, with about half his force in pursuit looking to force a confrontation and potentially surprise the Zulus.
In the camp at Isandlwana were left about 1700 troops, and although Chelmsford's information was correct he failed to intercept the Zulu army who slipped past his advance and fall on the camp, having manoeuvred behind a range of hills near it before launching their attack.
Battle of Isandlwana
 |
| The fighting at Rorke's Drift lasted from 4pm on the 22nd January, until 2am on the 23rd January 1879 with the Zulus withdrawing at dawn. Around 150 Imperial troops successfully defended the missionary buildings against 3,500 Zulu warriors and somewhat redeemed Chelmsford's failed campaign, and also demonstrated Zulu weaknesses against steady British firepower. |
The battle and its results are well known and Ian Knight took a bit of time to refer to Fripp's stirring portrait of the last stand at Isandwana held by the museum, pointing out that Fripp was in Zululand at the closing stages of the war and knew enough about the realities of the fighting and the terrain to depict a very realistic painting of the hand to hand combat depicted in it.
Points highlighted were the total lack of officers present, suggesting an underlying message that this was the last stand of the common soldier due to the 'stuff up' of the officers commanding them.
The drummer boy shown pointing out from the portrait appears to be aged about eleven or twelve when in reality the average age of drummers at Isandlwana was twenty-four.
Of the 1700 troops present, only four hundred escaped, mainly African auxiliaries who avoided the closing wings of the Zulu army but who are reported to have fought solidly beside their British allies throughout the battle. Only one hundred white men escaped the carnage.
One interesting fact about the battle that was luridly portrayed in the film 'Zulu Dawn' and was asked about in questions to Ian afterwards was the reported habit of the Zulus to cut open the bellies of the fallen British soldiers.
Apparently this did happen, as the African heat caused the bodies to swell up and the Zulus believed that this was the spirit of the dead soldier looking to leave the body and that unless they aided that release they would be haunted by the dead man's spirit.
 |
| 'Face your front, mark your target', the British reenactment group, 'The Diehards' go through their drills this January in South Africa. |
The battle was very costly to the Zulus leaving them with a thousand dead warriors and an estimated further thousand who would die after the battle from wounds received, prompting King Cetshwayo to exclaim that a spear had been plunged into the belly of the Zulu nation.
With the successful defence of Rorke's Drift immediately after Isandlwana and the battle of Khambula two months later leaving another thousand Zulu warriors killed the first phase of the war effectively ended leaving both sides exhausted but with the British determined to successfully end the war by committing a large reinforcement to the region.
On the 4th July 1879 the war ended with the British army defeating the Zulus before the Royal Kraal at Ulundi with a display of disciplined musketry defeating the brave Zulu charges against their square and concluded by the Zulus chased from the field by the 17th Lancers of Balaclava fame.
 |
| Zulu dignitaries pictured by Ian Knight at the recent 140th commemoration of the Battle of Isandlwana with King Goodwill Zwelithini kaBhekuzulu seen right and Prince Mangosuthu Buthelezi who played King Cetshweyo in the film Zulu, now aged 92. |
The Zulus are rightly proud of their dramatic victory at Isandlwana and the 'bloody nose' delivered to the British empire with the battle seen very much as a defining moment in Zulu history and giving greater definition to the Zulus as a people to this day.
In Britain it seems, in the time following withdrawal from Empire, the battle is seen more as a deserved result of Imperial hubris, with the bravery of the common British soldier shining out in the defence of Rorke's Drift representing all that is best about the nation when the back is against the wall and it is down to the ordinary soldier to put things right.
It seems that the Zulu War forms a growing bond between the British and the Zulus formed around our common history born out of conflict most recently commemorated this January in South Africa attended by the King Goodwill kaBhekuzulu and Prince Buthelezi, with the King due to visit Brecon in South Wales, the home of the 24th South Wales Borderers in July this year where hopefully JJ's South Wales correspondent, Mr Steve, will send us a report.
Perhaps one-hundred and forty years after the conclusion of the Anglo-Zulu War the shots are really still echoing out from history but I know that the film Zulu will still be the nation's firm favourite Christmas viewing in many households for years to come, reinforcing that bond still further.
 |
| My copy of 'Nothing Remains but to Fight', signed by Ian on the day |
 |
| Ian seen on the back of my book on one of his very many trips to the battle sites |
A thoroughly interesting presentation was concluded with some questions and answers together with a book signing highlighting Ian's most recent title on the Battle of Isandlwana linked at the bottom of this post, but Ian generously autographed the title I brought with me on the day covering the battle at Rorke's Drift
 |
| Ian's signature appropriately opposite the pictures of two of the heroes of Rorkes Drift, Chard and Bromhead. |
Following the talk, Mike, Steve and I set off for a quick look at the NAM galleries in the the new look museum building about which I will report about in a separate post, but for completeness I thought I should include my other pictures of Fripps famous picture, and the Zulu War items held by the museum.
 |
| Charles Fripp's famous picture hanging in the NAM shows clearly the terrain of the battlefield and the nature of the close hand to hand fighting that occurred in the closing stages of the Battle of Isandlwana. Note the drummer boy left of centre and Ian Knight's remarks in my post. |
 |
| No quarter asked or given. Of the 1700 men present, 1300 Imperial troops were killed at Isandlwana together with a similar number of Zulus, with probably another thousand Zulu warriors dying of their wounds afterwards. |
 |
| Iconic weaponry from the Zulu War including the Martini Henry Rifle and bayonet, assegai, knobkerrie and shield, next to King Cetshweyo's walking stick. |

Zulu Rising - Amazon
Thank you to Ian Knight for a very interesting and well delivered presentation and to Mike and Mr Steve for their company on the day, on what was a great day out and one to remember.


