So over New Year I was thinking, what would be a great topic for the first post in 2024 and with the current series of posts covering the little expedition down-under, this time last year having got us to Cairns, what better than to take a look at the wonderful experience, the Australian Armour and Artillery Museum, or 'Oz Armour', is for those of us, who like nothing better than spending time getting close up and personal with military vehicles and big guns.
This is a very large collection of militaria, vehicles and guns and I wanted to make this post a comprehensive overview, but it quickly became apparent that the size of it and the number of pictures I took warranted splitting things up into two posts, with Part Two to follow looking a the German and Modern collections plus the display of small arms and uniforms.
The opportunity to visit arose with our staying close by, at Port Douglas, and with Carolyn agreeing to amuse herself by the beach, I naturally grabbed the car to make the short drive down the Cook Highway to the museum to spend the late morning and early afternoon absorbing the depth of this collection in a somewhat unexpected part of the world, it seeming rather incongruous to see Tiger and Panther tanks parked up in a giant hanger in Queensland.
In my last post, link above, I covered our arrival on this the ninth leg of our Australian leg of our four month tour across the Pacific and the anticipation for this visit only whetted by the vehicle seen below, parked up at Cairn Airport, in the markings of my Dad's old Division, Guards Armoured, a seemingly good omen that this would be a very memorable stop over, amongst many that we had already encountered on this trip.
Whilst putting this post together and reliving the visit in my mind's eye, I have to wish the chaps at the museum well as I recall the recent videos from the area showing the building seen below that houses the collection up to its foundations in water following the cyclone and massive rainfall that hit this area of Queensland just before Xmas.
I know that they had a bit of flooding in the lower gallery that houses the collection of small arms and uniforms from World War II, but as I understand were not damaged in the deluge as per the rest of the collection, which was extremely good news.
Whilst parking up outside my attention was immediately grabbed by this early mark of the Churchill tank.
I'm not sure of the Mark for this tank but it carries a 6-pounder gun, which at least makes it a Mark III or later variant, especially with the square access doors on the hull, but the rounded cast turret causes me to guess at a Mark IV, the most numerous option, despite the lack of guards over the tracks which was a common addition on later models.
Having visited some of the big armour collections in Europe including our own Bovington, many times and Saumur in France, I was not exactly sure what to expect with this collection, but I think the picture below, that greets the first time visitor on entering the massive purpose built show hall or indeed hangar, explains why my jaw dropped at the thought of spending as much time as I needed simply absorbing this amazing collection, that and getting used to the wildlife that can be seen enjoying the weather just outside.
 |
| The wildlife in these parts quickly reminds you that this is not Bovington in Dorset! |
In addition I would extend my thanks to the staff at The A.A.& A. Museum for their enthusiastic welcome, especially Alex who noting my avid interest and rapid photography very kindly took the time to give me a guided tour of the most impressive items in the collection together with the back story of how they came to be there and in a lot of cases how the chaps set about reconstructing many of the vehicles I have pictured here, with I think some sixty percent now restored back to running order.
I should add that Alex is the owner of Askari Medals, dealing in Military Service Medals and badges, covering the Boer War, WWI and WWII, link above.
 |
| The view that greets the first time visitor - let the fun begin! |
The careful reconstruction of many of the exhibits seen is wonderfully captured in one of the first to be encountered on entering the exhibition hall, with the British 6-inch howitzer seen below reconstructed from the remains of three such weapons and is indeed a tribute to the skill of those involved at the museum in the dedicated preservation of these increasingly rare military artefacts.
As the notice board explains, many of the parts used for this reconstruction were obtained at auction by farmers who used them to produce improvised farm equipment, spear into plough shears taken to its full extent, whilst others had been sat for many years on military ranges and bear the scars of their post war service.
 |
| British breech loading 6-inch howitzer |
This is a very comprehensive collection of vehicles and guns, some I had never seen before in other collections and with others unique to the collection or very specific to the Australian experience in the World Wars and Post War eras, not so completely covered as well back home, and so not knowing when I might get the chance to return, I decided to take plenty of pictures to inform my own wargaming interests and thought I would share that endeavour here for others as well; and so I have broken the post up into specific parts of the collection as I viewed them, with World War II, like many, being a primary interest of mine so receiving a greater focus.
Australian Developed and British Empire WWII Vehicles & Guns
Australian Cruiser IV Tank, Sentinel AC E1 17-Pounder
The only tank produced in quantity in Australia during World War II in response to the war in Europe and later to the the threat posed by Japan in the Pacific, the Sentinel featured a single piece cast hull, with the AC I originally armed with a 2-pounder gun, and like the Canadian RAM tank was based on the drive train, engine and lower hull of the American M3 Medium Tank.
With 2.5 inch frontal and 1.8 inch rear and side armour, the Australian tank was playing catch-up in July 1943 with the newer German tanks and the programme was ended with just sixty-five production vehicles completed with the decision taken to direct the money put into the AC production run into railway infrastructure, ready to be able to deliver the numbers of American tanks set to arrive in the country to arm the Australian tank corps.
The exhibit seen here is an AC IE hull with an AC III turret mounting a 17-pounder gun to represent the AC IV prototype seen in the wartime photo above.
The development of this model of Sentinel tank played a key role in the Allied victory in North West Europe in 1944-45, as the work by the development team to put a 17-Pounder gun into the compact turret of this medium tank informed greatly the development of the British Sherman IC and VC 'Firefly' with the Australian team helping by sharing their experience with the British design teams that developed perhaps the most potent Allied tank in that theatre.
 |
| Australian Cruiser IV Tank, Sentinel AC E1 17-Pounder |
Australian Local Pattern 2 (LP2) Carrier
Based on the British Bren Carrier No.2 Mk.1, the first Australian carrier was built at the Victorian Railway Workshops, Newport, in March 1940 and modified to Australian conditions.
 |
| Australian Local Pattern 2 (LP2) Carrier |
Initially used by the Australian army to train tank crews, and by cavalry regiments as scout vehicle's, the utility of the vehicle, as discovered by British units, was not lost on the Australians, with its adoption as a key transport vehicle for infantry battalion carrier platoons and as a liaison and reconnaissance vehicle for the artillery regiments.
Australian carriers served with Australian troops in the Middle East, Malaya, New Guinea and in the south-west Pacific.
Australian Dingo Armoured Scout Car
With only 245 of these very Australian light armoured cars being built, this is a bit of a rare beast to see.
Built by Ford Motor Company and based on their commercially available 30cwt truck chassis, it was fitted with a Marmon-Harrington all wheel drive kit and powered by a Ford V8 engine, giving it a top speed of about 50mph, but with a somewhat restricted off-road mobility due to the front axle often distorting when driving over rough ground.
 |
| Australian Dingo Armoured Scout Car |
The Dingo never saw service overseas and were phased out of production in early 1943 in favour of better types, such as the Canadian produce Lynx scout car.
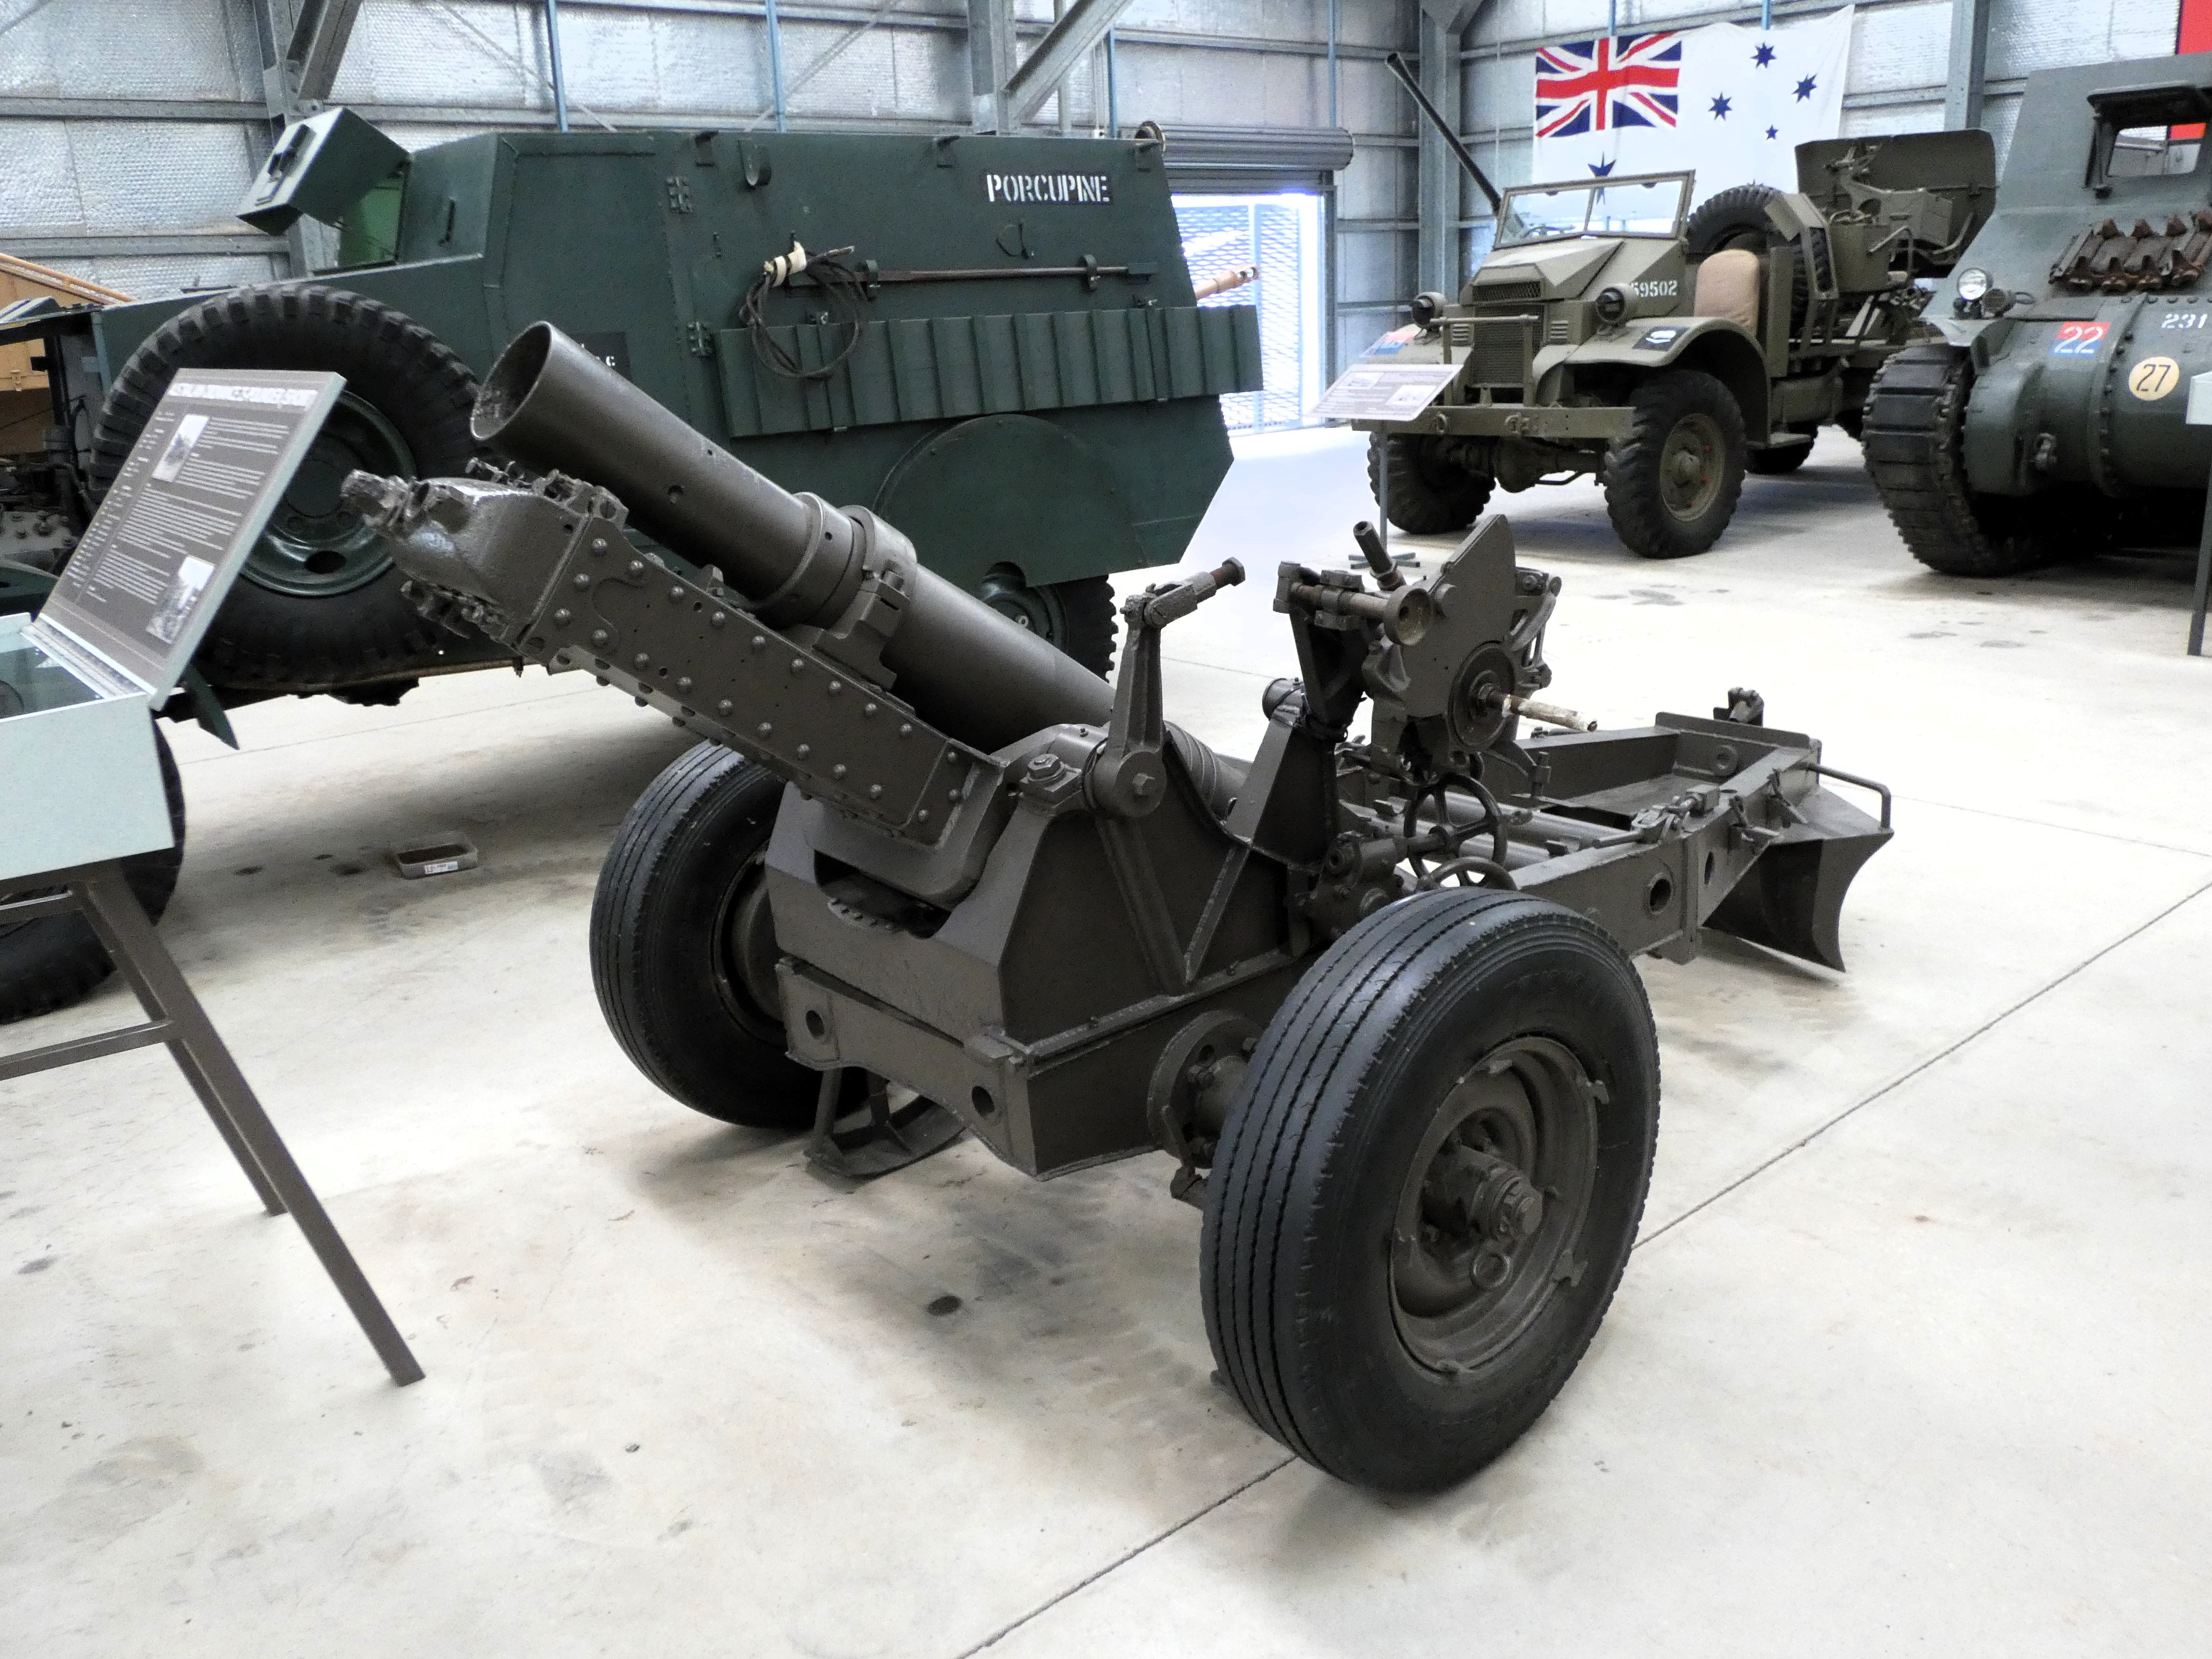
Australian Ordnance 25-Pounder (Short)
The story behind this very Australian redesign of the British QF (Quick Firing) 25-pounder field gun/howitzer is indicative of the ingenuity of Australian troops returning home from operations in the North Western Desert, to face the Japanese threatening their homeland and finding their Infantry Divisional structure, based on the British doctrine for fighting in North West Europe and extended to desert operations, totally unsuitable for jungle fighting in terrain such as that encountered in the roadless stretches of New Guinea, where many divisional vehicles could not operate and guns had to be light and easy to disassemble and reassemble for transport in aircraft or on the backs of mules.
Lacking artillery support in the early campaigns in New Guinea, the new gun was issued to units in August 1943, and would see service in New Guinea, the Solomon Islands and Borneo.
 |
| Australian Ordnance 25-Pounder (Short) |
The new guns used as many of the standard 25-pounder parts as possible, but with significant differences designed to reduce the weapon's weight, such as shortening the gun's barrel and recuperator, and making the trail lighter, whilst also retaining the same ammunition as used with the standard weapon, that saw a slight reduction in range to about 87% of that of the standard 25-pounder.
By the end of 1944, 213 of these guns had been produced, that would see the introduction of a brand new carriage with larger wheels and tyres to prevent wheel bounce encountered in the first production run, able to provide rapid artillery support to Australian infantry operating in very difficult terrain, and earning them the nickname, the 'snort' by Australian soldiers.
One aspect worth noting, and as see below, that I really appreciated seeing, whilst viewing the collection, was the presentation of the types of ammunition used by the equipment displayed, giving a marked impression of the capabilities of the weapons platform displayed.
 |
| 25-pounder armour piercing and HE rounds. |
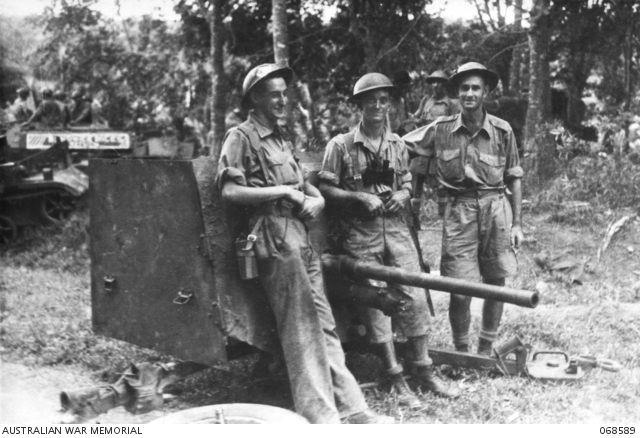
British Ordnance 2-Pounder Anti-Tank Gun
The British 2-pounder (40mm) anti-tank guns was the same gun that was mounted on British tanks in the earl years of WWII and was a very effective anti-tank weapon for that period, already proven against German tanks in France 1940 and in the Desert War against Italy and later the Afrika Korps in early 1941.
Perhaps its main weakness was the lack of an effective high explosive round, which was to prove a major problem for British tanks armed with the gun coming up against German anti-tank gun screens, particularly in North Africa, where the Besa machine guns were unable to knock these guns out and long range, a problem not overcome until heavier guns came into British service, such as the 6-pounder and US 75mm types.
Against the Japanese, as with the Italians, the lack of an HE round was less of an issue and up against comparatively weakly armoured tanks, the 2-pounder was again to prove itself very formidable, with the Australian gunners of the 13th Australian Anti-Tank Battery providing the Japanese pursuit through Malaya on their drive to Singapore a salutary lesson at a well executed ambush at Bakri, knocking out ten Type 95 Ha-Go tanks on the 15th January 1942.
 |
BAKRI, MALAYA, 1942-01-15. GUNNERS OF 13TH AUSTRALIAN ANTI-TANK BATTERY USING A 2 PDR ANTI-TANK GUN ACTION AGAINST JAPANESE TYPE 94 LIGHT TANKS AT A ROAD BLOCK. THE FORWARD TANK HAS BEEN SET ON FIRE WHILST OTHER TANKS ON THE OTHER SIDE OF ROAD BLOCK, WHICH IS A FELLED RUBBER TREE, HAVE BEEN DISABLED. TWO GUNS OF THIS BATTERY KNOCKED OUT FIVE TANKS.
https://www.awm.gov.au/collection/040367 |
 |
A two pounder Anti-Tank Gun of the 4th Anti-Tank Regiment, 8th Australian Division, AIF, directed by VX38874 Sergeant (Sgt) Charles James Parsons, of Moonee Ponds, Vic (centre), with two crew members, identified as VX56083 Gunner (Gnr) Lenard Edward Coutts and Gnr Ken Daniels, standing against their Anti-Tank Gun in a clearing near the road block at Bakri on the Muar-Parit Sulong Road.
https://www.awm.gov.au/collection/068589 |
 |
BAKRI, MALAYA, 1942-01-15. ONE OF THE TEN JAPANESE TYPE 95 HA-GO LIGHT TANKS KNOCKED OUT BY GUNNERS OF 13TH AUSTRALIAN ANTI-TANK BATTERY USING 2 PDR GUNS IN AN AMBUSH DURING A WITHDRAWAL IN MALAYA. THIS IS THE TANK SHOWN ON THE NEAR SIDE OF THE ROAD BLOCK IN PHOTO NO 040367.
https://www.awm.gov.au/collection/040370 |
The 2-pounder was introduced into Australian service in 1939, seeing service in North Africa, Syria, Greece, Malaya and New Guinea, later replaced in 1941 by the 6-pounder.
Australian Cruiser Mk. I TankThe Sentinel Tank was the Australian cruiser tank and this the Mark I (AC 1) began as a 2-pounder equipped design in November 1940, later designated Sentinel in February 1942.
On six Sentinel's survive today, with five in Australia and one in the collection at Bovington, UK.
Australian Matilda No.3 Mk. I Dozer Tank
The Infantry Tank Mark II or Matilda II was a British infantry tank that saw service in France and North Africa in the early years of WWII, where its heavy armour made it an excellent choice as a infantry support tank.
By 1942 the tank was practically obsolete when facing the heavier German tanks and ever increasing calibres of anti-tank guns, but with war against the Japanese in the Pacific, it found a new theatre where its effectiveness as an infantry support tank once again reasserted itself.
The Australian Army made extensive use of the Matilda II tank during the fighting in the jungles of the Pacific and as a result of experience gained saw a number of specialised vehicles created and based upon it that included the Matilda Dozer, seen here, Matilda Hedgehog (Rocket Projector) and Matilda Frog (Flame Thrower), with the dozer version used to level steep gradients, fill bomb craters, build river crossings and clear obstacles such as Japanese bunkers whilst under fire.
Australian Ford 2-Pounder Anti-Tank Portee
The 2-Pounder Portee was used extensively by British and Commonwealth Forces in North Africa in particular, providing a mobile platform for the gun that could enable it to fire on the move, stopping in favourable ground to fire at enemy armour before moving away to cover or to deploy the gun off the truck to give it better cover and a much lower profile.
 |
| An Australian 2-Pounder Portee on exercise in 1942 |
Canadian RAM Kangaroo Armoured Personnel Carrier
I last saw a RAM tank back in the previous October 2021 during our stay over in Vancouver standing outside the Old Drill Hall of the British Columbia Regiment, and in that post I mentioned the later development of this Canadian tank into the Kangaroo Armoured Personnel Carrier.
So it was a real treat to see this very important vehicle in the history of armoured warfare in this collection, marking as it does, a very uniquely Canadian contribution, being the first purpose built fully tracked armoured personnel carrier (APC) replacing as it did the more familiar option of half-track carriers and offering superior tactical mobility on the battlefield coupled with greater armour protection to infantry now able to accompany tanks into the attack.
 |
| A Priest Kangaroo personnel carrier of 209th Self-Propelled Battery, Royal Artillery, transports infantry of 78th Division near Conselice, Italy, April 1945. |
The utility of using APC's was first demonstrated by Canadian Lieutenant General Guy Simmonds, leading Canadian II Corps, when he initiated the use of 72 converted M7 Priest SP Guns as the first type of Kangaroo carrier, with their guns removed and the resulting aperture welded over capable of transporting twelve assault infantry, and used in Operation Totalize 8th August 1944 south of Caen in Normandy.
However despite the demonstrated success of the new APC's in reducing infantry casualties in the attack, the need for SP Gun vehicles required the development of a new approach which would lead to the adoption of the RAM tank chassis.
Most of these RAM Kangaroo's were operated by the Canadian 1st Armoured Personnel Carrier Squadron and the 49th Armoured Personnel Carrier Regiment, part of British 79th Armoured Division, better known as 'Hobart's Funnies'.
With a crew of 2, the Kangaroo could carry 8 to 10 passengers, safe within her 'pouch' as seen below.
Canadian Sexton Self Propelled Artillery Mk. II
The 25pdr SP, tracked, Sexton was a Canadian-designed self-propelled artillery vehicle of the Second World War. It was based on Canadian-built derivatives of the American M3 Lee and M4 Sherman tank chassis. Canada had set up to produce the Ram tank using the M3 chassis and Grizzly (a copy of the M4) to complement US medium tank production; when Sherman production in the US expanded and supply was no longer a problem, it was decided in 1943 to switch the Canadian production lines to produce the Sexton to give the British Army a mobile artillery gun using their 87.6 mm (3.45 in) Ordnance QF 25-pounder gun-howitzer for commonality with towed guns. The Sexton could fire either HE shell or an armour-piercing shell. It found use in the Canadian, British, and other British Commonwealth armies, as well as other countries.
 |
| Sexton SPA of the 13th Honourable Artillery Company (HAC), the oldest regiment in the British Army, here part of 11th Armoured Division, fighting in Normandy, Netherlands and across the Rhine into Germany. |
This is Sexton S-287403, produced in early 1945 by the Montreal Locomotive Company and was the 2,115th Sexton produced from a final production run of 2,150 such vehicles.
Entering into service in March or April 1945 it was not shipped overseas as the war was reaching its end, and after service with the Portuguese Army in the 70's was returned to Canada for an 8-year full restoration in London, Ontario, before being purchased by the museum in 2019, and is displayed in the markings of 2nd vehicle, A Troop of the 19th Field Regiment, Royal Canadian Artillery, 1st Canadian Army, July 1944 to May 1945.
Canadian Lynx 2 Scout Car
At first glance, I took this to be another Daimler (Dingo) Scout Car, similar to the one shown above on display at Cairn's airport, but is in fact the Canadian derivative of that vehicle supplied to Canadian forces in WWII, the Lynx Scout Car.
A closely related vehicle, the Ford Lynx Scout Car, or "Car, Scout, Ford Mark I" was produced by Ford Canada in Windsor, Ontario. The Lynx design grafted a Dingo hull onto a chassis fitted with a conventional four-wheel drive and running gear. While the engine was much more powerful the gearbox and suspension were inferior. The type went into production in 1942 entered service in 1943.
The Lynx 2 differed from the Mk.1 in adopting the canvas roof as used on the Dingo and was fitted out with heavier duty axles and springs resulting in a slightly smaller steering ratio than Lynx 1.
By the end of 1945, 3,255 Lynxes had been produced and used to equip Armoured Car, Armoured Reconnaissance and Armoured Regiments together with use in HQ and Signals units in armoured formations.
This particular example is shown in the markings of the Australian 1st Armoured Division.
British Humber Armoured Car Mk. IV
The Humber Armoured Car was one of the most widely produced British armoured cars of the Second World War. It supplemented the Humber Light Reconnaissance Car and remained in service until the end of the war.
 |
| Humber Light Reconnaissance Car Mk IIIA of No. 2806 Armoured Car Squadron RAF Regiment near Eindhoven, the Netherlands, 1944-1945. |
This a Marl IV was equipped with the US M5 or M6 37 mm high velocity gun in place of the 15 mm Besa. The larger gun required the removal of the third crewman in the turret (the wireless operator). Turret hatches were rearranged with the new gun and crew layout. About 2,000 units built.
 |
| A battle-scarred Humber IV of the 7th Canadian Reconnaissance Regiment, 17th Duke of York's Royal Canadian Hussars in Normandy, France, 18-20 July 1944. 3rd Canadian Infantry Division. |
The exhibit below was acquired in the UK and is seen here displayed in the markings of British 11th Armoured Division and the TAC sign for the Division Armoured Recce Regiment, which was 2nd Northamptonshire Yeomanry, later the 15th/19th Kings Royal Hussars as of 8th August 1944.
British Archer Self Propelled Anti-Tank Gun
The Self Propelled 17pdr, Valentine, Mk I, Archer was a British tank destroyer of the Second World War based on the Valentine infantry tank chassis fitted with an Ordnance QF 17 pounder gun. Designed and manufactured by Vickers-Armstrong, 655 were produced between March 1943 and May 1945. It was used in north-west Europe and Italy during the war. This vehicle was unusual in that its gun faced the rear of the chassis instead of the front.
Production started in mid-1943 and the Archer entered service in October 1944. It was used in North-West Europe and (in 1945) in Italy. By the end of the war, 655 of them had been produced.
Under military doctrines prevalent in Commonwealth armies at the time, vehicles such as the Archer were "self-propelled anti-tank guns" and operated by the Royal Artillery (RA), rather than Royal Armoured Corps (RAC). This was the same for two vehicles of US origin, that were initially conceived as "tank destroyers" though not used as such by the British: the 3 in. Self-Propelled Mount M10 and 17-pdr Self-Propelled Achilles.)
 |
An Archer near Nutterden, 9 February 1945. Photo: - IWM
|
British Valentine Infantry Tank Mk. III
I have a special place in my heart for the Valentine, as it was on this tank that my Dad learnt to drive, after volunteering for service with Guards Armoured Division in 1943, then mustering and training in the UK for the planned invasion of Europe and before the division was issued Sherman V's.
I know Dad spoke fondly of the Valentine, but I think fell in love with the Sherman in comparison, being much faster and certainly more reliable, and I well remember getting a tour of the inner workings of this tank from the chaps at Bovington after I had explained my personal interest.
Designed to replace the Matilda, The Tank, Infantry, Mk III, Valentine was an infantry tank produced in the United Kingdom during World War II. More than 8,000 of the type were produced in eleven marks, plus various specialised variants, accounting for approximately a quarter of wartime British tank production.
 |
| Valentine Mk 3 in North Africa carrying infantry from a Scottish regiment |
The many variants included riveted and welded construction, petrol and diesel engines and a progressive increase in armament. It was supplied in large numbers to the USSR and built under licence in Canada. It was used extensively by the British in the North African campaign. Developed by Vickers, it proved to be both strong and reliable.
The display shows the 2-pounder rounds used by the earlier Marks including the III but the Mark VIII and the better Mark IX would would be upgraded with a turret modification to carry the 6-pounder gun in the race to keep up with heavier better armed German types.
British Matilda Mk. II Infantry Tank
The Infantry Tank Mark II, best known as the Matilda, is a British infantry tank of the Second World War.
The design began as the A12 specification in 1936, as a gun-armed counterpart to the first British infantry tank, the machine gun armed, two-man A11 Infantry Tank Mark I. The Mark I was also known as Matilda, and the larger A12 was initially known as the Matilda II or Matilda senior. The Mark I was abandoned in 1940, and from then on the A12 was almost always known simply as "the Matilda".
 |
New Zealand soldiers recapture a Matilda tank, previously captured by the Germans, and take prisoner its German crew. It had been knocked out by an anti-tank gun after an attempt to break through the Allied lines, 3 December 1941.
|
With its heavy armour, the Matilda II was an excellent infantry support tank but with somewhat limited speed and armament. It was the only British tank to serve from the start of the war to its end, although it is particularly associated with the North Africa Campaign. Only two were available for service by the outbreak of the World War II in 1939. It was replaced in front-line service by the lighter and less costly Infantry Tank Mk III Valentine beginning in late 1941.
British Churchill Infantry Tank Mk. VII
British Infantry Tank design reached its epitome with the A22 or Churchill until experience demonstrated to British tank designers the need to produce the all-round main battle tank that would eventually lead to the Centurion arriving too late to have any impact in WWII.
The Tank, Infantry, Mk IV (A22) Churchill was a British infantry tank used in the Second World War, best known for its heavy armour, large longitudinal chassis with all-around tracks with multiple bogies, its ability to climb steep slopes, and its use as the basis of many specialist vehicles. It was one of the heaviest Allied tanks of the war.
With side plate fittings indicating this particular vehicle was originally an AVRE (Armoured Vehicle Royal Engineers) for battlefield engineer support, this exhibit was acquired as a derelict wreck from a farm in New South Wales and was restored to its current condition by the museum.
The origins of the Churchill's design lay in the expectation that war in Europe might be fought in conditions similar to those of the First World War, and thus emphasised the ability to cross difficult ground. The Churchill was hurried into production in order to build up British defences against a possible German invasion. The first vehicles had flaws that had to be overcome before the Churchill was accepted for wide use. After several marks (versions) had been built, a better-armoured specification, the Mark VII, entered service with the British Army. The improved versions performed well in the later stages of the war.
The Churchill was used by British and other Commonwealth forces during the North African, Italian and North-West Europe campaigns. In addition, 344 Churchills were sent as military aid to the Soviet Union during the Second World War and more than 250 saw active service on the Eastern Front.
British QF (Quick Firing) 3.7-Inch Heavy Anti-Aircraft Gun
The QF 3.7-inch AA was Britain's primary heavy anti-aircraft gun during World War II. It was roughly the equivalent of the German Flak 8.8 cm and American 90 mm, but with a slightly larger calibre of 3.7 inches, approximately 94 mm. Production began in 1937 and it was used throughout World War II in all theatres except the Eastern Front. It remained in use after the war until AA guns were replaced by guided missiles beginning in 1957.
The gun was produced in two versions, one mobile and another fixed. The fixed mounting allowed more powerful ammunition, Mk. VI, which gave vastly increased performance. Six variants of the two designs were introduced. The gun was also used as the basis for the Ordnance QF 32-pounder anti-tank gun variant used on the Tortoise.
The gun's effective ceiling varied depending on the predictor and fuse. The Mk VI ordnance significantly increased the potential effective ceiling. The British definition of effective ceiling at the start of World War II was "that height at which a directly approaching target at 400 mph can be engaged for 20 seconds before the gun reaches 70° elevation"
Mk III Ordnance, Predictor No. 1 and Fuse No. 199 - 23,500 feet
Mk III Ordnance, Predictor No. 1 and Fuse No. 208 - 24,600 feet
Mk III Ordnance, Predictor No. 2 and Fuse No. 208 - 25,300 feet
Mk III Ordnance, Predictor N. 11 and Fuse No. 208 - 32,000 feet
Mk VI Ordnance, Predictor N. 11 and Fuse No. 208 - 45,000 feet
The 3.7 found little use as a dedicated anti-tank gun except in emergencies. There were few 3.7-equipped heavy anti-aircraft regiments in the field army and most were not subordinate to divisions where the anti-tank capability was required. The arrival of the smaller 76 mm (3-inch) calibre 17-pdr anti-tank gun finally obviated the need.
Like the rival Flak 8.8, the 3.7-inch also proved to be a useful high-velocity medium artillery piece. With the declining threat from the Luftwaffe in the later stages of the war, under-employed 3.7 units were called upon to supplement the field artillery in both the North West Europe and Italian theatres, where the accuracy and effectiveness of the 3.7 with mechanical Fuse 207 at ranges up to 20,000 yards (18,000 m) and all-round traverse was valued by artillery commanders. Using the 207 or VT fuse allowed the gunners to deliver precise airbursts above targets such as enemy batteries or mortar positions. However, repeated firing at low angles increased the wear on the gun and mounting. HAA units sometimes operated with the Army Groups Royal Artillery of medium and heavy guns, and were employed as siege artillery at the siege of Dunkirk. By the time of Operations Veritable and Plunder (the Rhine crossing) in early 1945, HAA regiments were fully integrated into corps-level fire plans.
 |
QF 3.7 inch anti-aircraft guns in Hyde Park, London in 1939.
|
British 6-Pounder Anti-Tank Gun
The Ordnance Quick-Firing 6-pounder 7 cwt, or just 6-pounder, was a British 57 mm gun, serving during the Second World War as a primary anti-tank gun of both the British and United States Army (as the 57 mm Gun M1). It was also used as the main armament for a number of armoured fighting vehicles.
Although designed before the start of the war, it did not reach service until the North African Campaign in April 1942, first seeing action in May at Gazala and having an immediate impact on the battlefield able to penetrate any enemy tank then in service. There, it replaced the 2-pounder as an anti-tank gun, allowing the 25-pounder gun-howitzer to revert to its intended artillery role.
Six pounder anti-tank guns were used by Australian troops in the Middle East, New Guinea and the islands.
 |
| A U.S. 57 mm M1 gun firing from Champs-Vauverts gate in Saint-Malo |
The 6-pounder was followed into production by the next generation British anti-tank gun, the Ordnance QF 17-pounder, which came into use from February 1943. As a smaller and more manoeuvrable gun, the 6-pounder continued to be used by the British Army for the rest of World War II and for about 20 years afterwards.
British 17-Pounder Mk. II "Pheasant" & Ordnance QF Anti-Tank Gun
Also known by the 17/25 pounder designation, a stop-gap measure named Pheasant mated the 17 pounder gun with a modified 25 pounder carriage. This enabled the gun to be pressed into service before its own carriage design was ready.
The Ordnance Quick-Firing 17-pounder (or just 17-pdr) was a 76.2 mm (3 inch) gun developed by the United Kingdom during World War II. It was used as an anti-tank gun on its own carriage, as well as equipping a number of British tanks. Used with the APDS shot, it was capable of defeating all but the thickest armour on German tanks. It was used to "up-gun" some foreign-built vehicles in British service, notably to produce the Sherman Firefly variant of the US M4 Sherman tank, giving British tank units the ability to hold their own against their German counterparts.
 |
| A British 'Pheasant' 17-pdr anti-tank gun in action on the Medenine front in Tunisia, 11 March 1943. |
The Pheasant first saw action in February 1943, with the first 100 prototypes mounted on the 25-pounder carriage, with the majority converted over to the new carriage as they became available.

The 17-pounder used the following ammunition types:
- Armour Piercing Capped (APC) Armour Piercing Capped was a basic AP shell used with field guns, but was not used when the 17pdr was mounted in the Sherman Firefly tank.
- Armour Piercing, Capped, Ballistic Capped (APCBC) Armour Piercing, Capped, Ballistic Capped ammunition could penetrate 163 mm of armour at 500 metres and 150 mm at 1000 m.
- Armour-piercing discarding sabot (APDS) Armour-piercing discarding sabot could penetrate 256 mm of armour at 500 m and 233 mm at 1000 m, and allowing it in theory to penetrate the armour of even the German Tiger II heavy tank. Most sources are in agreement that APDS was not available on D-Day itself, but reached Normandy in increasing amounts by the end of June or early July 1944. It was available for the breakout battle from Normandy and the advance to the Netherlands and Germany. The weight of the enclosed shot, excluding the enclosing sabot, was 7.7 lb (3.5 kg).

- High Explosive (HE) The HE shells for the 17-pounder had smaller bursting charges (Mk 1: 1.28 lbs, Mk 2: 1.06 lbs) than those for the 75mm gun used by the Sherman (M48: 1.47 lbs, Mk 1: 1.64 lbs).
- Practice, Shot Mk 10 "The components of this practice round are similar to those of Shot APCBC, except for the projectile. The projectile is made of cast iron and is uncapped. It is fitted with tracer."
APCBC ammunition was the standard ammunition for the gun, while APDS shot was used for about 6% of the average load of a 17-pounder-equipped British tank.
While offering greater penetration, the smaller (sub-calibre) tungsten core of APDS was considered to provide less accurate fire than APCBC ammunition at ranges beyond 500 yards. This was due to the much lesser visible impact of rounds that fell short, making it hard to spot the fall of shot and correct aim. The APDS was also considered to cause less damage to an enemy tank if it did penetrate the armour. After penetration the core usually disintegrated.
The 17-pounder produced a very large muzzle flash due to the large amount of propellant in its cartridges. Muzzle blast was also significant, described by crews of the anti-tank gun variant as resembling a hard slap on the chest.
Back in 2018, Steve M and I had a great day out at the Chalke Valley History Festival at which they had on display a towed 17-Pounder set up in one of the nearby fields and the owner took the time to talk about how well balanced this very big gun is on its purpose built carriage, making it a relatively simple task for a well drilled crew to manoeuvre the weapon onto a new facing should the situation demand, plus there's nothing quite like seeing these old weapons in their natural environment.
British BL (Breech Loading) 5.5-Inch Medium Gun
The BL 5.5-inch gun was a British artillery gun introduced during the middle of the Second World War to equip medium batteries.
The first units were equipped in UK in the summer of 1941 and in North Africa a year later, 20 guns equipped British and Free French batteries at El Alamein. Subsequently, it also equipped Canadian, Australian, South African, Polish and Indian regiments, and after the war, it was also used by New Zealand. In the Second World War the normal organization was a regiment of 16 guns organized into two batteries.
Initially, the 5.5 inch gun fired a 100-pound (45 kg) shell, using four charges in two cartridges to give a maximum range table muzzle velocity of 1,675 feet per second (511 m/s) and a maximum range of 16,200 yards (14,800 m).
In 1944 an 82-pound (37 kg) shell was introduced along with Charge Super giving a maximum muzzle velocity of 1,950 feet per second (590 m/s) and a range of 18,100 yards (16,600 m) yards. The new lighter shell contained 1.5 pounds (0.68 kg) more explosive and gradually replaced the older, heavier shell.
 |
5.5-inch gun firing near Vallee, Normandy, 14th August 1944. |
In addition to high explosive rounds, there were several types of chemical shells weighing between 90 and 98 pounds (41 and 44 kg) and 100-pound (45 kg) coloured smoke shells; coloured flare shells were also developed. After World War 2, only HE was used. There was no AP (armour-piercing) round for the gun but, in an emergency, gunners were taught to remove the impact fuse and fire the unfused high explosive as an AP substitute.
The normal HE fuse was No 117, a percussion, impact fuse that was introduced in 1920 and saw use until the 1960s. In late 1944, the T100 proximity fuse became available.
British QF 3.7-Inch Mountain Howitzer
Ordnance, QF 3.7-inch howitzer is a mountain gun, used by British and Commonwealth armies in the First and Second World Wars, and between the wars.
During the Second World War, the weapon equipped artillery units engaged in the North African Campaign (Tunisia), the Italian Campaign, the Kokoda Campaign, and Burma Campaign, and was also used in the Netherlands and Ruhr fighting in 1944–45 by units originally destined for mountain warfare in Greece. In the latter theatre, on occasion the gun was dismantled and manually hauled up to the upper floors of buildings to provide close support in urban fighting. A lightened version was used briefly by airborne formations.
 |
| A 3.7-inch howitzer of 158th Field Artillery Regiment, 36th Infantry Division, in action against Japanese positions south of Mawlu, Burma, 3rd November 1944. |
The howitzer has a split trail, the first British weapon to do so, which allows firing at very high angles (a useful feature in mountainous terrain). It also has a large rectangular shield to protect the crew from small-arms fire, but this was often omitted to save weight. When it was first introduced, the howitzer had two wooden wheels and was light enough be towed by two horses. Later marks have pneumatic tyres and could be towed by any light vehicle, such as the Bren Carrier or jeep.
The propellant casing had five "charge zones", but HE was restricted to no more than "charge four", to prevent premature detonation of the shell. The Australian Army did employ charge five in Papua New Guinea in emergencies – the gun crews referred to it as "O'Hara's charge".
British Ordnance ML 4.2-Inch Mortar
The Ordnance ML 4.2-inch mortar was a heavy mortar used by the British Army during and after World War II, and was a smooth-bore weapon of the Stokes pattern, designed by the Armaments Research and Development Establishment and produced by the Royal Ordnance Factories. It entered widespread British service in 1942, equipping chemical warfare companies of the Royal Engineers (RE). The Mark 3 became the standard model.
The first combat use was at Second Battle of El Alamein, when the 66th Mortar Company (RE) was attached to the Australian 24th Infantry Brigade. During the battle, 66 Mortar Company provided intense, effective supporting fire on the 24th Brigade's exposed right flank, as the infantry advanced, expending all of the 4.2-inch HE mortar ammunition in the theatre.
Around mid-1943, the Royal Engineer chemical warfare companies were disbanded as an emergency expedient and one heavy mortar company of each infantry division machine-gun battalion was equipped with the mortar. This company was organized with sixteen 4.2-inch mortars, in four platoons of four mortars each. In early 1944, divisions in Italy also held a pool of mortars for issue to other units as needed, usually troops in the divisional anti-tank regiment, some regiments even converted one or more batteries to mortars.

Ordnance ML 4.2-inch mortars were slower to reach Commonwealth forces in the Pacific and Asia. Australian Army units in the South West Pacific theatre were reportedly the first to receive them, before forces in Burma.
Both HE (9.1 kg) and smoke (10.2 kg) ammunition was used. Smoke included WP and Base Ejection, and in World War II other types for practice. Two charges were available. In World War II, both streamlined and cylindrical bombs were available. Chemical munitions included the MK I chemical mortar bomb with Mustard gas (HS or HT fillings).
The Pacific theatre of the war was obviously going to be an area I was keen to focus on with this collection, and an area not so widely covered in European collections, and I was not to be disappointed with the display of Japanese items, including small arms, artillery and of course a tank.
 |
| A good luck flag presented to Corporal Masayoshi Deura by family and friends from his hometown in the Tochigi Prefecture, northeast of Tokyo. He died on May 29th 1945 in Burma whilst on active service with the Japanese Imperial Army. |
Japanese WWII Vehicles & Guns
Japanese Type 94, 75mm Mountain Gun
This highly mobile pack artillery piece could be transported by horse or vehicle and was in service with the Japanese Army from 1935-45 and was used extensively in China and assigned to units of the Southern Expeditionary Army where it was sited in defensive positions on islands throughout the Dutch East Indies and the South Pacific Mandate, making it one of the most commonly encountered weapons by Allied Forces towards the closing stages of the war.
Based on a German Krupp design, the gun had a single piece barrel with a sliding breechblock, and its long split trail with a hydro-pneumatic recoil mechanism was based on a French Schneider design, and it could be fired with the trails opened or closed.
With a modular design construction, the gun can be broken down into eleven parts within three to five minutes for transport by animals or men, with the heaviest part weighing 210-pounds, and the weapon intended for transportation by six pack horses, or eighteen men.
Once in position it could be reassembled within ten minutes.
The Type 94 was capable of firing high explosive , armour piercing, shrapnel, chemical star, incendiary and smoke rounds.
Japanese Type 94, 37mm Anti-Tank Gun
In service from 1936 to the end of the war, the Type 94 AT Gun was typically assigned to combat infantry regiments in groups of four guns, and each manned by a squad of eleven soldiers.
It was based on the German 3.7cm PaK 36 and had, in trials, a claimed penetration capability of 20mm of armour at 1,100 yards, and 40mm at much shorter distances. In combat it proved effective against light Soviet armour, when used in the Nomonhan Incident in 1939, but was hopelessly obsolete when used against M4 Shermans in the Pacific War.
Japanese Type 92, 70mm MM Battalion Gun
In service with the Japanese Army from 1932 to 45, the Type 92 Battalion Gun was a light howitzer, used extensively in China and against Allied forces in the South Pacific and Southeast Asia.
Able to be used in the low angle direct fire mode for neutralising fortified positions, machine-gun positions and light armour the barrel could be quickly configured to near vertical with the use of a hand crank for indirect support fire.
It was designed to be pulled by a single horse, although it seems that in practice three horses were usually used, and the gun would fire an 8.37 pound shell, either high explosive, armour piercing or smoke to an effective range of about 3,060 yards, and were reportedly used with considerable effect when encountered by Allied troops.
Japanese Type 31, 75mm Mountain Gun
The Type 31 was introduced to the Imperial Japanese Army in 1898 and was first deployed in combat during the Russo-Japanese War 1904-1905.
The gun would remain in service with the Japanese to the end of World War II, firing high explosive rounds using smokeless powder cartridges capable of firing a 13-pound shell effectively out to a range of 4,700 yards, with a maximum range of 7,100 yards, and with this particular example being captured in Burma in 1944.
 |
| Another example of a Japanese Good Luck Flag. These flags were carefully folded and carried by young Japanese soldiers securely beneath their clothing for safe keeping, and were often taken as battle trophies on the death of the wearer. A growing trend has seen many of these signed flags being returned to the descendants of the soldier. |
Japanese Type 91, 105mm Light Howitzer
Introduced into service in 1931, the Type 91 10cm howitzer first saw service in China, and would see them used in large numbers during WWII with some 1,100 produced before wars end and another 100 manufactured in a motorised form.
The gun's design was based largely on the French Schneider Canon de 105mle that was evaluated by the Japanese in the late 1920's and is noticeably lighter than contemporary German and US 105mm designs of the same calibre, with this gun weighing less than standard 75mm types used in Europe during WWI.
Type 91 10 cm howitzer was used in large numbers in front line combat service from the time of the invasion of Manchuria through the Soviet-Japanese Border Wars, the Second Sino-Japanese War and in most fronts during the Pacific War. The Type 91 was typically assigned to field artillery regiments together with 75 mm field guns.
 |
| Cadets of the Imperial Japanese Army during shooting training with Type 91 10-cm-howitzer at Fuji training ground. ca. 1935 |
 |
| An interesting collection of Japanese items collected around an overgrown track in New Guinea in the 1970's. |
 |
| More Japanese military items with the 'Surrender Pass' to be shown to Allied troops when attempting to come out with hands up, probably unused if history is anything to go by. |
Japanese Type 95, Ha-Go Light Tank
Produced between 1936-43, was a light tank used by the Japanese Army and the Special Naval Landing Force in the 1930's and the World War II.
With about 2,300 of these tanks produced, they were the most numerous Japanese armoured fighting vehicle in WWII , and saw service in China, the Battle of Khalkhin Gol against the Soviets in 1939, Burma and the Pacific theatre.
The SU-100 (Samokhodnaya Ustanovka 100) is a Soviet tank destroyer armed with the D-10S 100 mm anti-tank gun in a casemate superstructure. It was used extensively during the last year of World War II and saw service for many years afterwards with the armies of Soviet allies around the world.
The SU-100 was introduced in October 1944 and quickly became popular with Soviet tank crews as its gun could penetrate virtually any German tank then in service until being outmatched by the Tiger II. The gun was excellent, being able to penetrate the Tiger I at 2 km with APCBC rounds while its APHE rounds could penetrate a max of 218 mm of armour.
The SU-100 quickly proved itself to be able to penetrate around 125 mm (4.9 in) of vertical armour from a range of 2,000 m (1.2 mi) and the sloped 80 mm (3.1 in) front armour of the German Panther from 1,500 m (0.93 mi) (with APCBC round).
The SU-100 especially saw extensive service during the last year of the war. It was used en masse in Hungary in March 1945, when Soviet forces defeated the German Operation Frühlingserwachen offensive at Lake Balaton. And although not intended for it, the SU-100 was also used in the Battle of Berlin because its gun could deal with heavy fortifications. However, its lack of a machine gun made it need aircraft and infantry support. By July 1945, 2,335 SU-100s had been built.
Russian T-70 Light Tank
The T-70 is a light tank used by the Red Army during World War II, replacing both the T-60 scout tank for reconnaissance and the T-50 light infantry tank for infantry support. The T-80 light tank was a more advanced version of the T-70 with a two-man turret—it was produced only in very small numbers when light tank production was abandoned. The T-90 self-propelled anti-aircraft gun was a prototype vehicle with twin machine guns, based on the T-70 chassis.
The T-70 was armed with a 45-mm L/46 gun Model 38 with forty-five rounds carried, and a coaxial 7.62-mm DT machine gun. The tank was operated by a driver and a commander who loaded and fired the gun. Armour thickness on the turret front was 60 mm, turret sides and rear: 35 mm, hull front and sides: 45 mm, roof and bottom: 10 mm.
On 6 July 1943, a T-70 commanded by Lieutenant B. V. Pavlovich of the 49th Guards Tank Brigade destroyed four German tanks (three medium tanks and one Panther) near the village of Pokrovka.
On 26 March 1944, Sergeant Alexander Pegov of the 3rd Guards tank army, commanding a single T-70, saw a column of approximately 18 German tanks approaching. He took an ambush position hidden by foliage and then he waited. After a German PzKpfw V “Panther” tank came within 150 to 200 metres (160 to 220 yd), the T-70 suddenly opened fire with APCR ammunition and set fire to one Panther and immobilized another. The knocked-out Panthers blocked the road while the T-70 retreated. Pegov was promoted to a lieutenant and decorated as a Hero of the Soviet Union.
.jpg) |
A T-70 light tank captured by German forces, April 1943.
|
Russian T-60 Light Tank
The T-60 scout tank was a light tank produced by the Soviet Union from 1941 to 1942. During this period, 6,292 units were built. The tank was designed to replace the obsolete T-38 amphibious scout tank and saw action during World War II.
The Kingdom of Romania used the T-60 chassis to build some locally-designed tank destroyers.
Development of the T-60 began in the first days of the German invasion. The new tank was to be a stopgap measure to restock the heavy losses suffered by the tank corps while production lines of the heavier tanks like the T-34 or the KV-1 could not provide tanks of desired reliability in desired quantities. Unlike its heavier siblings, the T-60 was designed to be produced on factories that did not have the machinery for dedicated tank production, such as the GAZ truck plant in Gorky, or the shipbuilding factory №264 in Stalingrad.
 |
T-60 from the 3rd Guards Tank Brigade. A typical late production tank with an octagonal turret hatch and driver's hatch with an angular air intake.
|
The tank was originally meant to be armed with a 12.7 mm machine gun like the T-40, but on the People's Commissar for Tank Industry Vyacheslav Malyshev's suggestion, it was up-armed by an automatic 20 mm TNSh cannon, a tank version of the ShVAK used on Soviet aircraft, since the weapon was in production in massive quantities easily to rival those of the DShK. Using an aircraft weapon on a ground vehicle presented multiple problems: the cannon easily succumbed to dust and could only penetrate 15 mm of perpendicular armour at 500 m, which proved inadequate against the newer up-armoured German tank designs, thus firmly relegating the T-60 to infantry support role.
Russian T-26 Model 1931 Twin Turret Light Tank
The T-26 series of tanks were a development of the British Vickers 6-Ton Tank and one of the most successful tank designs of the 1930's until its light armour became vulnerable to newer anti-tank guns.
Though nearly obsolete by the beginning of WWII, the T-26 was the most numerous tank in the Red Army's armoured force during the German invasion of the Soviet Union in June 1941.
T-26 model 1931, twin-turreted version armed with two DT tank machine guns. The first series-produced variant of the T-26 that was equipped with turrets differing from the initial Vickers design (Soviet turrets were higher and had an observation window).
 |
| Twin-turret T-26 (with machine-gun armament) crossing a river during combat training of the Moscow Military District forces, 1936. |
Tanks produced from 1931 to March 1932 had a riveted hull and turrets, a silencer affixed with two clamps, and lacked any cover over the air outlet window.
About 1,177 T-26 mod. 1931 tanks armed with machine guns were accepted by the Red Army, which had 1,015 such twin-turreted tanks on 1 April 1933.
The T-26 fought the Germans and their allies during the Battle of Moscow in 1941-2, the Battle of Stalingrad and the Battle of the Caucuses in 1942-3 and some tank units of the Leningrad Front used their T26's until 1944.
Soviet T-26's fought their last actions in August 1945, during the defeat of the Japanese Kwantung Army in Manchuria.
Russian T-26 Model 1933 Light Tank
The most significant change in the T-26 1933 model was the transition from a twin turret armed with machine guns, to a newly designed single turret armed with a Model 1932 (20-K) 45mm anti-tank gun which was used in a variety of Soviet Tanks and fired the same ammunition as the infantry anti-tank version.
The new turret also incorporated a bustle on the rear to accommodate a 71-TK-1 tank radio, additional storage, and a ventilation fan.
This vehicle was acquired from Spain and during the restoration work, evidence of German army tactical markings were found indicating that the vehicle had been captured and used by the Germans during WWII, and those markings are replicated here.
Russian SU-76M Self Propelled Gun
The SU-76 (Samokhodnaya Ustanovka 76) was a Soviet light self-propelled gun used during and after World War II. The SU-76 was based on a lengthened version of the T-70 light tank chassis and armed with the ZIS-3 mod. 1942 76-mm divisional field gun. Developed under the leadership of chief designer S.A. Ginzburg (1900–1943). Its quite simple construction and multipurpose combat role made it the second most produced Soviet armoured fighting vehicle of World War II, after the T-34 medium tank.
The SU-76M virtually replaced light tanks in the close support role. While its thin armour and open top made it vulnerable to anti-tank weapons and grenades, its light weight and low ground pressure gave it good manoeuvrability and low noise on the move. SU-76M was a reliable vehicle (the GAZ-203 engine unit confidently worked out not less than 350 hours without serious breakdowns). But the main advantage of light SPGs was their wide versatility.
According to table of organization and equipment of 1943, each light self-propelled gun regiment was equipped with 21 SU-76M, there were 119 such regiments in the Red Army by the end of World War II. In the end of 1944 and the beginning of 1945, 70 self-propelled gun divisions (16 SU-76M in each) were formed to be included into rifle divisions. Also 4 light self-propelled gun brigades of the Reserve of the Supreme High Command (60 SU-76M SPGs, 5 T-70 light tanks and 3 US M3A1 Scout Car armoured personnel carriers in each) were formed, starting from the first half of 1944.
This was extremely useful in urban combats like the Battle of Berlin where good teamwork between infantry and AFVs was a key to success.
Between December 1943 and May 1945, 1,885 ISU-152s were built. Mass production ceased in 1947, with 3,242 vehicles produced in total.
The ISU-152 was used for infantry and tank support in attacking fortified enemy positions in a direct-fire role, for artillery support on the battlefield in an indirect-fire role and for engagement against armoured vehicles in a direct-fire role.
This example was acquired from Bulgaria.
Russian Kharkiv Model V-2-34 Diesel Engine The Kharkiv Model V-2 was a Soviet diesel tank V12 engine designed at the Kharkiv Locomotive Factory and initially used to power the T-34 and KV tanks, but would also be used in the BT-7M, SU-85, SU-100, ISU-122 and ISU-152 Self Propelled Guns.
The power output of these engines ranged from 450-700hp but with gradual improvement later versions developed up to 1,200hp.
Russian T-34/85 Medium Tank
First deployed in 1940, the T-34 was a Soviet medium tank which had a profound and permanent effect on the fields of tank tactics and design, possessing as it did at the time of its introduction the best combination and balance of firepower, mobility, protection and ruggedness of any tank, although its initial battlefield effectiveness suffered from the unsatisfactory ergonomic layout of its crew compartment, scarcity of radios, poor optics and poor tactical employment.
The T-34 had well-sloped armour, a relatively powerful engine and wide tracks. The initial T-34 version had a powerful 76.2 mm gun, and is often called the T-34/76 (originally a World War II German designation, never used by the Red Army). In 1944, a second major version began production, the T-34-85, with a larger 85 mm gun intended to deal with newer German tanks.
Production of the T-34-85 began in January 1944 at Factory No. 112, first using the D-5T 85 mm gun, however in parallel with this, the factory also started production of the T-34-85 using the S-53 gun (later to be modified and redesignated as the ZIS-S-53 gun) began in February 1944 and it would be this improved T-34-85 that became the standard Soviet medium tank, with an uninterrupted production run until the end of the war.
The T-34-85 gave the Red Army a tank with better armour and mobility than the German Panzer IV tank and StuG III assault gun. While it could not match the armour or weapons of the heavier Panther and Tiger tanks, its improved firepower made it much more effective than earlier models, and overall it was more cost-effective than the heaviest German tanks.
In comparison with the T-34-85 program, the Germans instead chose an upgrade path based on the introduction of completely new, expensive, heavier, and more complex tanks, greatly slowing the growth of their tank production and helping the Soviets to maintain a substantial numerical superiority in tanks.
By May 1944, T-34-85 production had reached 1,200 tanks per month. In the entire war, production figures for all Panther types reached no more than 6,557, and for all Tiger types (including the Tiger I and Tiger II) 2,027. Production figures for the T-34-85 alone reached 22,559.
On 12 January 1945, a column of Tiger IIs and other tanks from 424th Heavy Panzer Battalion were involved in a short-range engagement with T-34-85 tanks near the village of Lisow. Forty T-34-85 tanks commanded by Colonel N. Zhukov were attacked by the 424th Heavy Panzer battalion, which had been reinforced by 13 Panthers. The Germans permanently lost five Tiger IIs, seven Tiger Is and five Panthers for the loss of four T-34-85 tanks burnt out.
Mariya Vasilyevna Oktyabrskaya 16 August 1905 – 15 March 1944) was a Soviet Ukrainian tank driver and mechanic who fought on the Eastern Front against Nazi Germany during World War II. After her husband was killed fighting in 1941, Oktyabrskaya sold her possessions to donate a tank for the war effort, and requested that she be allowed to drive it. She received and was trained to drive and fix a T-34 medium tank, which she named "Fighting Girlfriend".
Oktyabrskaya proved her ability and bravery in battle, and was promoted to the rank of sergeant. After she died of wounds from battle in 1944, she was posthumously made a Hero of the Soviet Union, the Soviet Union's highest honour for bravery during combat. She was the first female tank driver to be awarded the title.
Russian 76mm (Zis-3) & 85mm (D-44) Divisional Field Guns
On the initiative of Chief Artillery Designer Vasiliy Gavrilovich Grabin and without state approval, not exactly a common or often rewarded attribute in the Soviet Union, Artillery Factory No. 92 began designing the ZiS-3 at the end of 1940.
The ZiS-3 combined the light carriage from the 57 mm ZiS-2 anti-tank gun and the powerful 76.2 mm barrel from the F-22USV, the previous divisional field gun, together with an addition of a muzzle brake that reduced recoil and prevented damage to the light carriage when firing.
 |
| 76mm (Zis-3) |
A subsequent demonstration impressed Joseph Stalin, who praised the weapon as "a masterpiece of artillery systems design." The ZiS-3 underwent an official five-day acceptance trial in February 1942, and was then accepted into service as divisional field gun model 1942 (full official name).
The gun was also quite popular with the German Wehrmacht. The gun was introduced into German service as the 7,62-cm-Feldkanone 288(r) and factories were retooled to produce ammunition for it.
The ZiS-3 had good anti-armour capabilities. Its armour-piercing round could knock out any early German light and medium tank. The frontal armour of later tanks, like the Tiger I and later the Panther, however, were immune to the ZiS-3.
A ZiS-3 battery had four guns, with three batteries making a division or battalion. Independent anti-tank regiments consisted of six batteries with no divisions. A staff battery included a fire-control section.
More than 103,000 ZiS-3s were produced by the end of the war, making it the most numerous Soviet field gun during the war.
 |
| 76mm (Zis-3) left and 85mm (D-44) right |
The 85-mm divisional gun D-44 was a Soviet divisional 85-mm calibre field artillery gun was designed as the replacement for the 76 mm divisional gun M1942 (ZiS-3), but manufacturing did not commence until May 1945, and thus it did not see active service in WWII.
The barrel was developed from that of the T-34-85 tank and was capable of firing 20–25 high-explosive (HE), armor-piercing, and high-explosive antitank (HEAT) projectiles per minute.
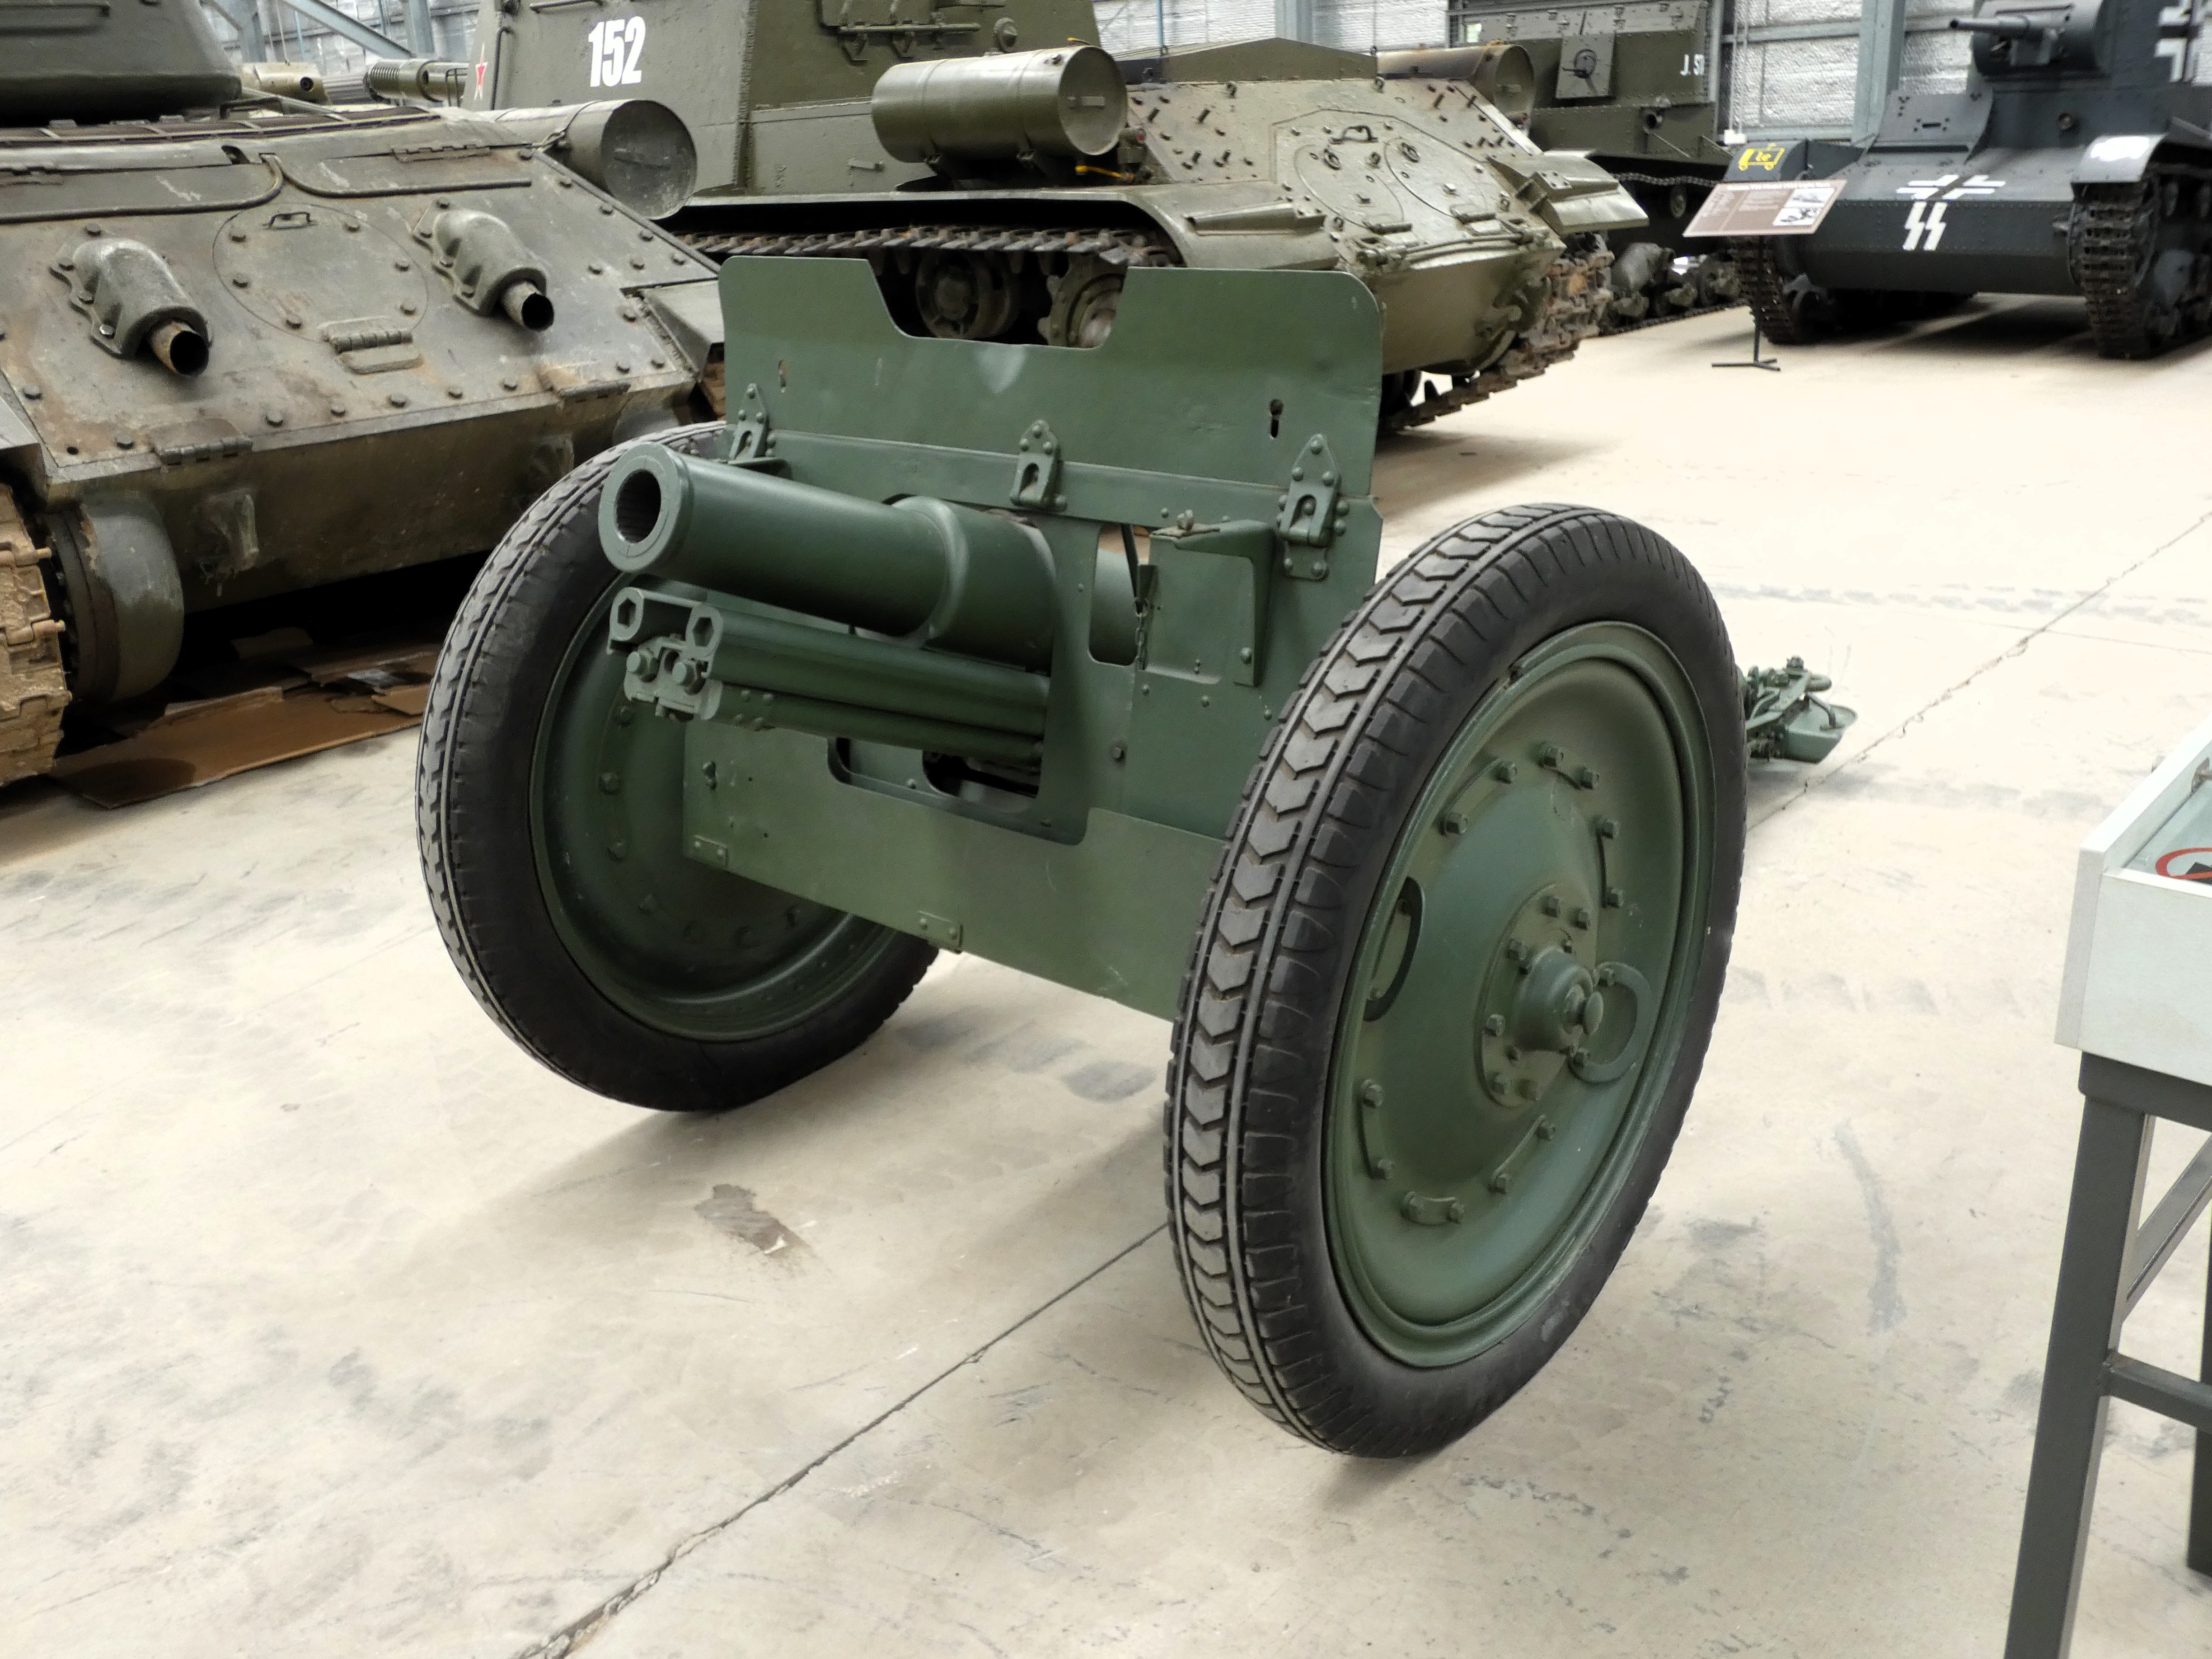
Russian 45mm Anti-Tank Gun M1937
The 45 mm anti-tank gun model 1937, nicknamed the Sorokapyatka , or "little forty-five", was a light quick-firing anti-tank gun used in the first stage of the German-Soviet War.
The gun was essentially an improved version 45 mm anti-tank gun model 1932 mounted on a 37 mm 1-K anti-tank gun chassis (itself a licensed copy of the 3.7 cm Pak 36) using modern ammunition. Other improvements comprised semi-automatic breech, sight, firing button, suspension, reliable shield mount, and movable part re-balancing.
Although both pieces were eventually modernized, resulting in the 152-mm howitzer M1909/30 and the 152-mm howitzer M1910/37 respectively, these were relatively minor upgrades which brought only limited improvement in some areas and didn't address others. It was clear that a completely new design was needed. However, at that time, the Soviets had little experience in developing modern artillery pieces and an attempted collaboration with the Germans failed because the design of the 152-mm howitzer M1931 (NG) too complex for the Soviet industry to produce efficiently, but these early failures gave Soviet developers some valuable experience.
In 1937, work started on the design of the M-10 with the first prototype completed in November. The trials revealed numerous defects in the gun construction such as insufficient upper carriage strength, leaks in the recoil buffer, unreliable suspension etc. For army tests early in 1939, an improved design with a longer barrel was presented. Another series of army tests followed from 22 December 1939 to 10 January 1940, but even before it started—on 29 September 1939—the gun was adopted as 152 mm divisional howitzer model 1938. Later, the word divisional was removed from the designation.
Unlike its eventual successor, the D-1, the M-10 was not equipped with a muzzle brake. While softening recoil and thus allowing for a lighter carriage, a muzzle brake has the disadvantage of redirecting some of the gases that escape the barrel toward the ground where they raise dust, revealing the gun position.
The tank-mounted variant, M-10T, was mounted in the KV2 Heavy Tank.
The M115 saw service in World War II, the Korean War, the Vietnam War, the Second Taiwan Strait Crisis and the Croatian War of Independence. During World War II, the M1 was towed by the Mack 7⅓ ton 6×6 truck or the M4 tractor.
This completes Part One of my overview of the A.A.& A. Museum collection, which will be followed in Part Two with a look and the World War Two German and Post War Modern equipment, together with the display of small arms and military uniforms.
The museum seems to be constantly adding new exhibits to the collection and renovating pieces to full running order as material and time permit and I have enjoyed tuning in on their Workshop Wednesday videos showing the latest activities together with full feature length restoration recordings like the one featuring the M3 Grant shown in this post which was indeed an 'Incredible Transformation' and well worth sitting down with a brew if you enjoy seeing the amazing skill and ingenuity required to bring these vehicles back from derelict range targets or farm side sources of scrap iron.
Anyway I hope you've enjoyed the first post here on JJ's for 2024 and as always more anon


.jpg)


.jpg)


.jpg)


_approach_Iwo_Jima;fig14.jpg)


