Saturday 29 May 2021

All at Sea - The Mighty French First Rate, L'Orient, Part One

 
The French 118-gun Ocean class first-rate Dauphin Royal, renamed L'Orient in 1795 was designed by Jaques Noel Sane and was the third ship to launch in a class of ten such ships built during the French Revolutionary and Napoleonic Wars; grossing a displacement of over 5,000 tons, larger than the Santisima Trinidad and alongside the Temeraire 74-gun class and Tonnant 80-gun classes of third rate ships, the Ocean 120-gun class would complete the three standardised class of French line of battle warships during that period.

Their size and powerful armament made them the perfect choice as command flagships with plenty of accommodation for an Admiral and his staff and their cost to build meant that that was the role these large warships were reserved for.

Laid down in May 1790 at Toulon, she followed the first of the class, Commerce de Marseille, built and launched in the same yard in October of that year, with the new ship, Dauphin Royal, rolling down the slips on the 20th July 1791; and by September the following year now with the 'reign of terror' underway, having gained a new name, Sans Culotte.

Rear Admiral Pierre Martin took command of the  French Mediterranean Squadron
in the wake of the withdrawal of French Royalist and Anglo-Spanish forces in December 1793
and would command at sea aboard the Sans Culotte in his first engagement with the squadron
at the Battle of Genoa in March 1795

Commissioned in August 1793, the Sans Culotte survived the Anglo-Spanish seizure and destruction of the French fleet in Toulon that same month, with her sister ship Commerce de Marseille being taken away by the Royal Navy.


With the expulsion of the Allied fleet and French Royalists in December 1793, the surviving units were repaired and made ready throughout 1794 and by May 1795 the Sans Culotte was the flagship of Rear-Admiral Pierre Martin and led the thirteen ship Toulon squadron at the Battle of Genoa or Cape Noli on the 13th and 14th of March against the British Mediterranean squadron under Vice Admiral William Hotham.

The Agamemnon (right) engages the Ca Ira (centre) at Cape Noli, 14th March 1795 - Nicholas Pocock (National Maritime Museum)
Nelson and the Agamemnon, briefly supported by HMS Captain 74-guns, fought the Ca Ira for three and half hours, closing to deliver several devastating stern rakes by weaving back and forth across the rear quarters of the French ship.

The action was indecisive and saw the brunt of the battle centre around a certain Captain Horatio Nelson in HMS Agamemnon 64-guns, as she set about the Ca Ira 80-guns, forming the rear-guard of the French line as the British began a chase when Admiral Martin attempted to break contact.

The Sans Culotte fell back in an attempt to relieve the hard pressed rear most French ships but Ca Ira and Censeur 74-guns would be taken in the British pursuit that would see the Sans Culotte lose contact with the main French fleet after Martin had transferred his flag to a frigate to better control his squadron.

The Sans Culotte would later anchor at Genoa before re-joining her squadron, and though obviously involved in the exchanges with the British van, her casualties and damage are unknown, additionally Admiral Martin would lay charges against Sans Culotte's commander, Captain Lapalisse, for failing to follow his orders but these were subsequently dismissed by a jury. 


In July 1795, Maximilien Robespierre's reign of terror was brought to a bloody end on the guillotene as he and his supporters were ousted in a coup initiating the rule of the French Directory, effectively lead by Paul Barras who had led the coup against Robespierre, before the former had sent him to the guillotine. 

This French museum model of an Ocean Class ship of the line provided inspiration for the look of my L'Orient model

With France under new management, another round of ship renaming would see the Sans Culotte change its name to the more familiar L'Orient in May 1795.


In July 1795 Admirals Martin, in his renamed flagship L'Orient and Hotham would renew their contest in the Western Mediterranean as both sides now reinforced and with Martin having to put down a mutiny in Toulon among his ships crews, the French set sail in early July, only to find themselves intercepted by Hotham's flying squadron off Cap Corse lead, of course, by Captain Nelson.

With Hotham in pursuit, the French withdrew to a safe anchorage of the Iles d 'Hyeres, but on the 13th July some of Martin’s straggling ships were caught up with, resulting in the loss of the Alcide 74-guns which blew up after the exchanges of gunfire, but despite being in a position to press his attack Hotham declined, much to the frustration of several of his ships captains, including Nelson.

The Battle of Iles de Hyres, 13th July 1795
https://commons.wikimedia.org/wiki/File:Ligurian_Sea_map.png

The Battle of Iles d 'Hyeres was the last action fought between the two sides before Spanish alliance with the French forced the British squadron to evacuate its forces from the Mediterranean in 1796 and the two navies would not come into contact in the theatre until the Battle of the Nile in 1798 when the British returned to the Mediterranean.


The year 1797 saw a complete turn around in British fortune at sea with victories over the Spanish at the Battle of Cape St Vincent on the 14th February and the Dutch at Camperdown on the 11th October, that rearranged the balance of naval power and set the environment for a British return to the Mediterranean the following year.

The timing of events couldn't have been more fortuitous as when Nelson, now Rear-Admiral of the Blue and commanding the 74-gun HMS Vanguard, left St Helens off the Isle of Wight on the 8th April 1798, escorting eleven merchantmen with naval stores for Earl St Vincent's Mediterranean fleet at Lisbon, he was himself the vanguard of naval reinforcements (two more ships of the line and three smaller vessels) for St Vincent to support the planned return.

Vice-Admiral Francois Paul Brueys d'Aigalliers - Museum of Versailles

This as Vice-Admiral Francois Paul Brueys d'Aigalliers was appointed commander in chief of the Toulon fleet, raising his flag aboard the L'Orient on the 13th April, to be joined on the 8th May by General Bonaparte at the head of 36,000 French troops, that were to be escorted by Brueys fleet; with Nelson having been ordered to sail with a squadron of British ships on the 2nd May to investigate the reported build up of French ships and troops at Toulon.


What followed was an intriguing cat and mouse chase across the Mediterranean as Nelson, without frigates to aid his search, followed reports, and his intuition most of the time, from late May, early June to track down the French fleet as it made its way first to Malta, which fell to Bonaparte's troops on June 12th as Nelson searched in vain of Cape Corse, Corsica.

With a French first-rate at anchor in Valletta's Grand Harbour, French troops take possession of Malta on June 12th 1798

With a 3,000 man French garrison left on the island, the French set course for Egypt and Alexandria on the 18th June, Nelson having discovered from Sir William Hamilton in Naples that he suspected the French had gone to Malta, which he later confirmed on the 22nd and that the French force had left in the direction of Egypt which he now suspected was their next destination.


The French progress was rather stately as unlike Nelson, Brueys was escorting several hundred troop transports and supply ships, which meant that Nelson overtook his quarry, arriving off Alexandria on the 28th June, and finding no sign of the enemy, leaving on the 30th June, missing the arrival of the French by twenty-four hours.


Thus Nelson set off to investigate the eastern Mediterranean, before heading back to Sicily, arriving off Syracuse on the 19th July and, with no word from Hamilton that the French had passed back west, and with Nelson venting his frustration at his lack of news when he wrote;

'The Devil's children have the Devil's luck. I cannot find or to this moment learn, beyond vague conjecture, where the French fleet are gone to. All my ill fortune, hitherto, has proceeded from want of frigates,'

Undaunted and determined to find his quarry, Nelson headed back into the eastern Mediterranean yet again, via Crete, Cyprus and Syria if need be in search of news of the French fleet.

Sir William Hamilton 27th March 1817 - Drawing made at Naples by Charles Grignon (National Maritime Museum.
Hamilton was British Ambassador to the Kingdom of Naples 

News finally reached Nelson on the 28th July on the Greek Peloponnese, from the Turkish governor at Koroni that the French were in Egypt and the British squadron immediately made full sail for the African coast.

In part two of this post I'll take a look at the Battle of the Nile fought on the 1st August 1798 in Aboukir Bay, when I will review my second model of L'Orient, this time at anchor, as she was on the day and night of the famous battle.


Needless to say my first interpretation shows L'Orient under full sail flying the pennant of Admiral Brueys from her mainmast and suitably arranged to allow for her presence in any of the actions mentioned from the Battle of Cape Noli in 1795 to her final campaign in 1798.

Additionally Nelson came very close to intercepting Brueys on the foggy night of the 23rd-24th June when the French reportedly heard British signal guns across the three mile gap between the opposing fleets and so a full sail L'Orient would make an ideal addition to my French fleet to fight a classic 'What if' action as Nelson spots the French escort and its large convoy the next day.
 

Sources Consulted;
Nile 1798, Nelson's first great victory - Gregory Fremont-Barnes, Osprey Campaign
French Warships in the Age of Sail, 1781-1861 - Rif Winfield & Stephen S Roberts
Nelson and the Nile - Brian Lavery

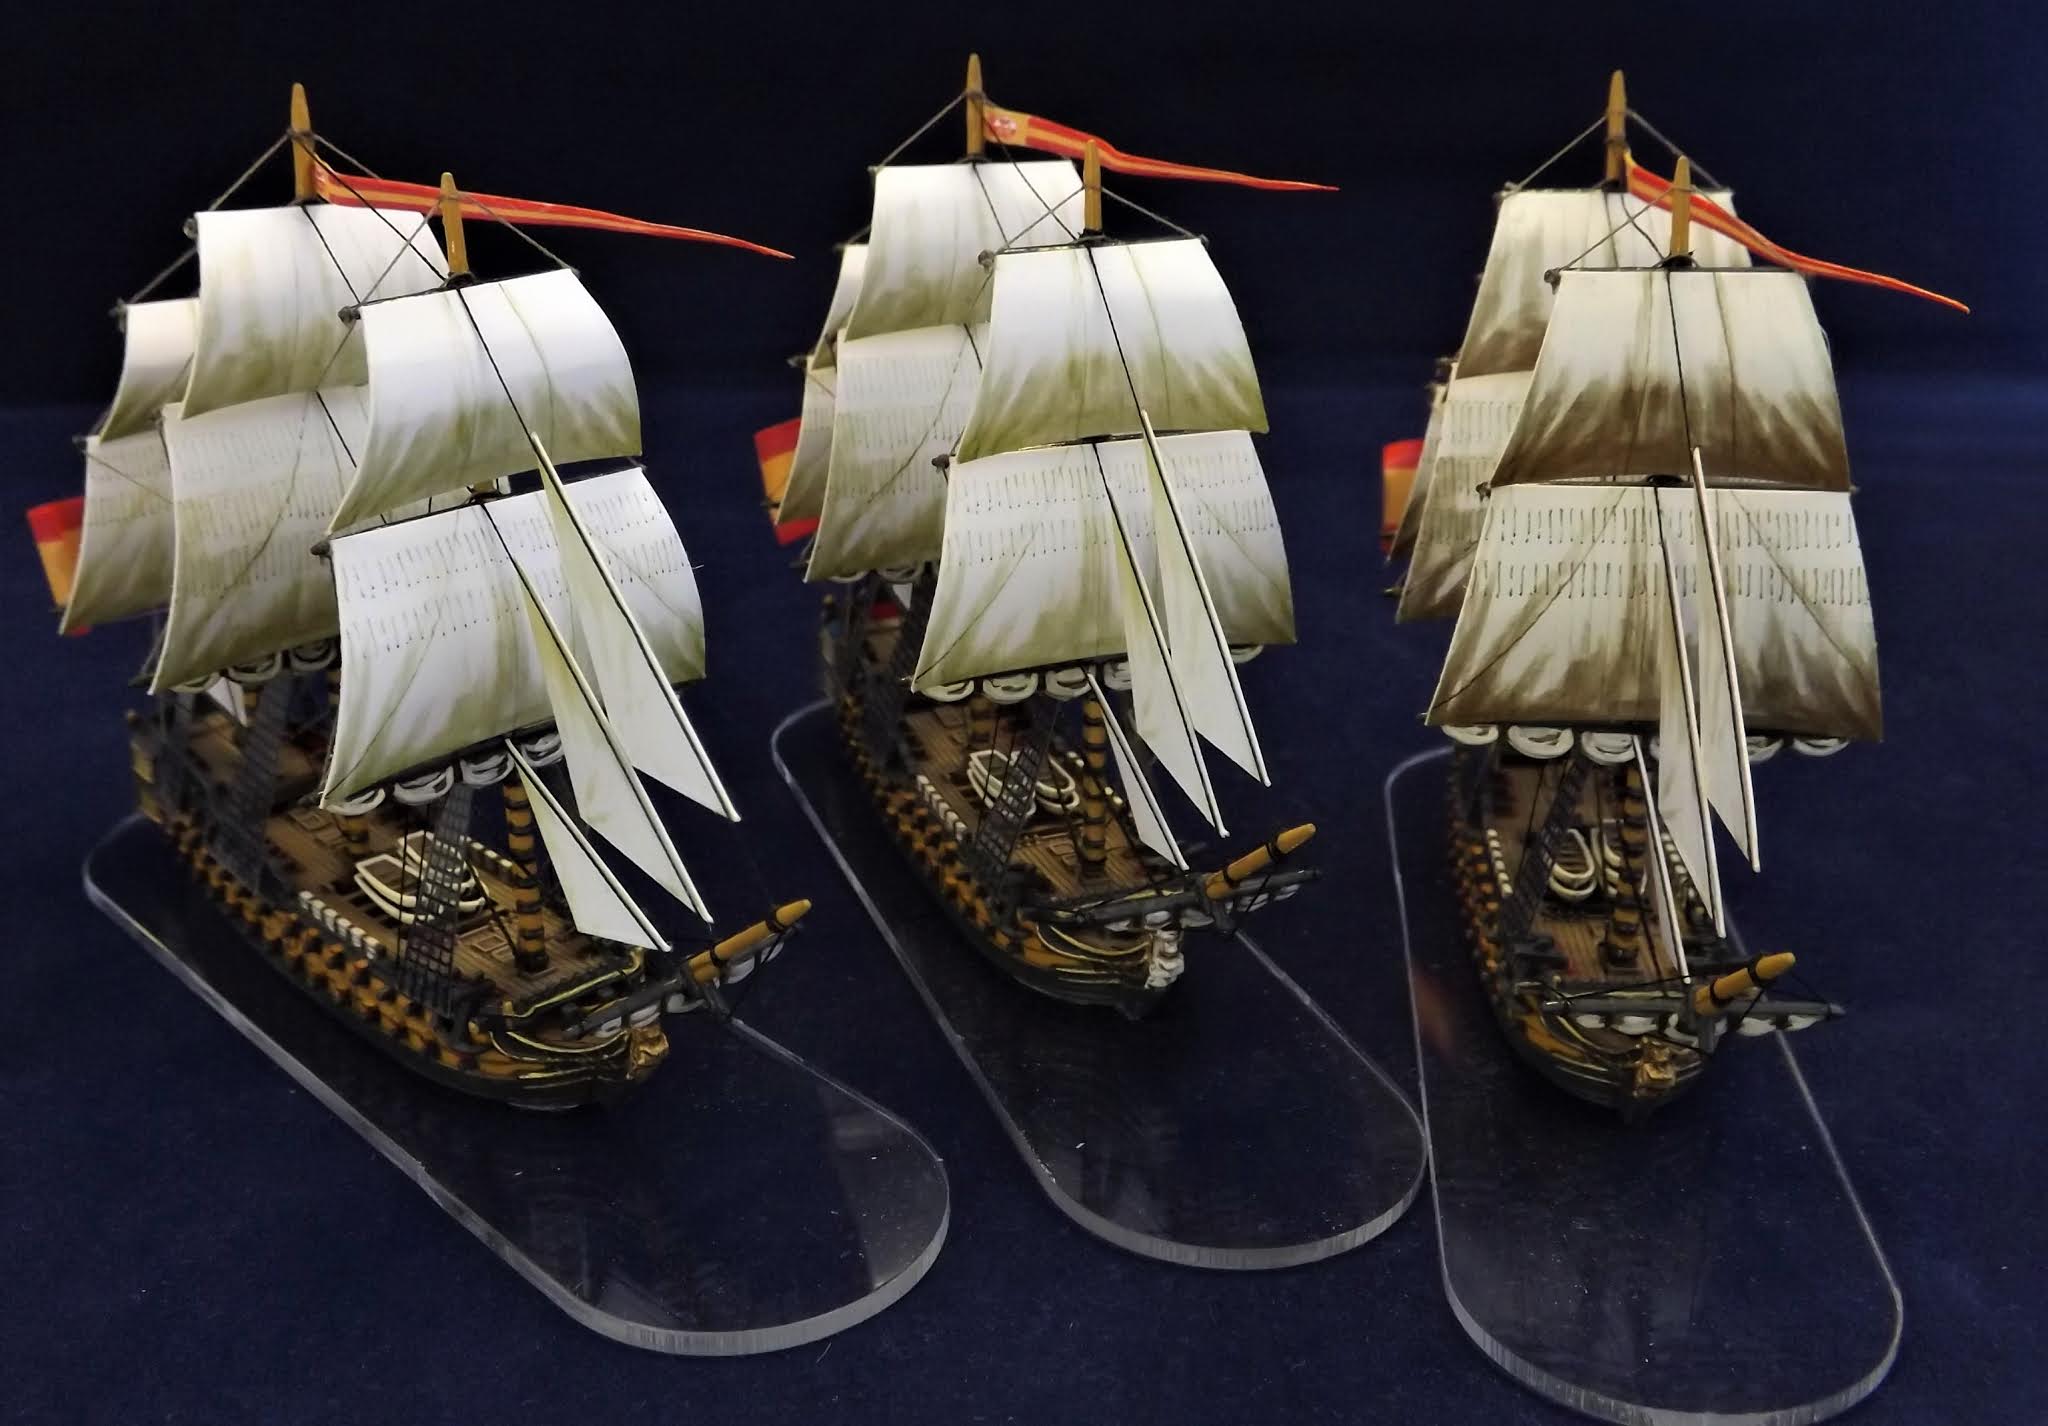
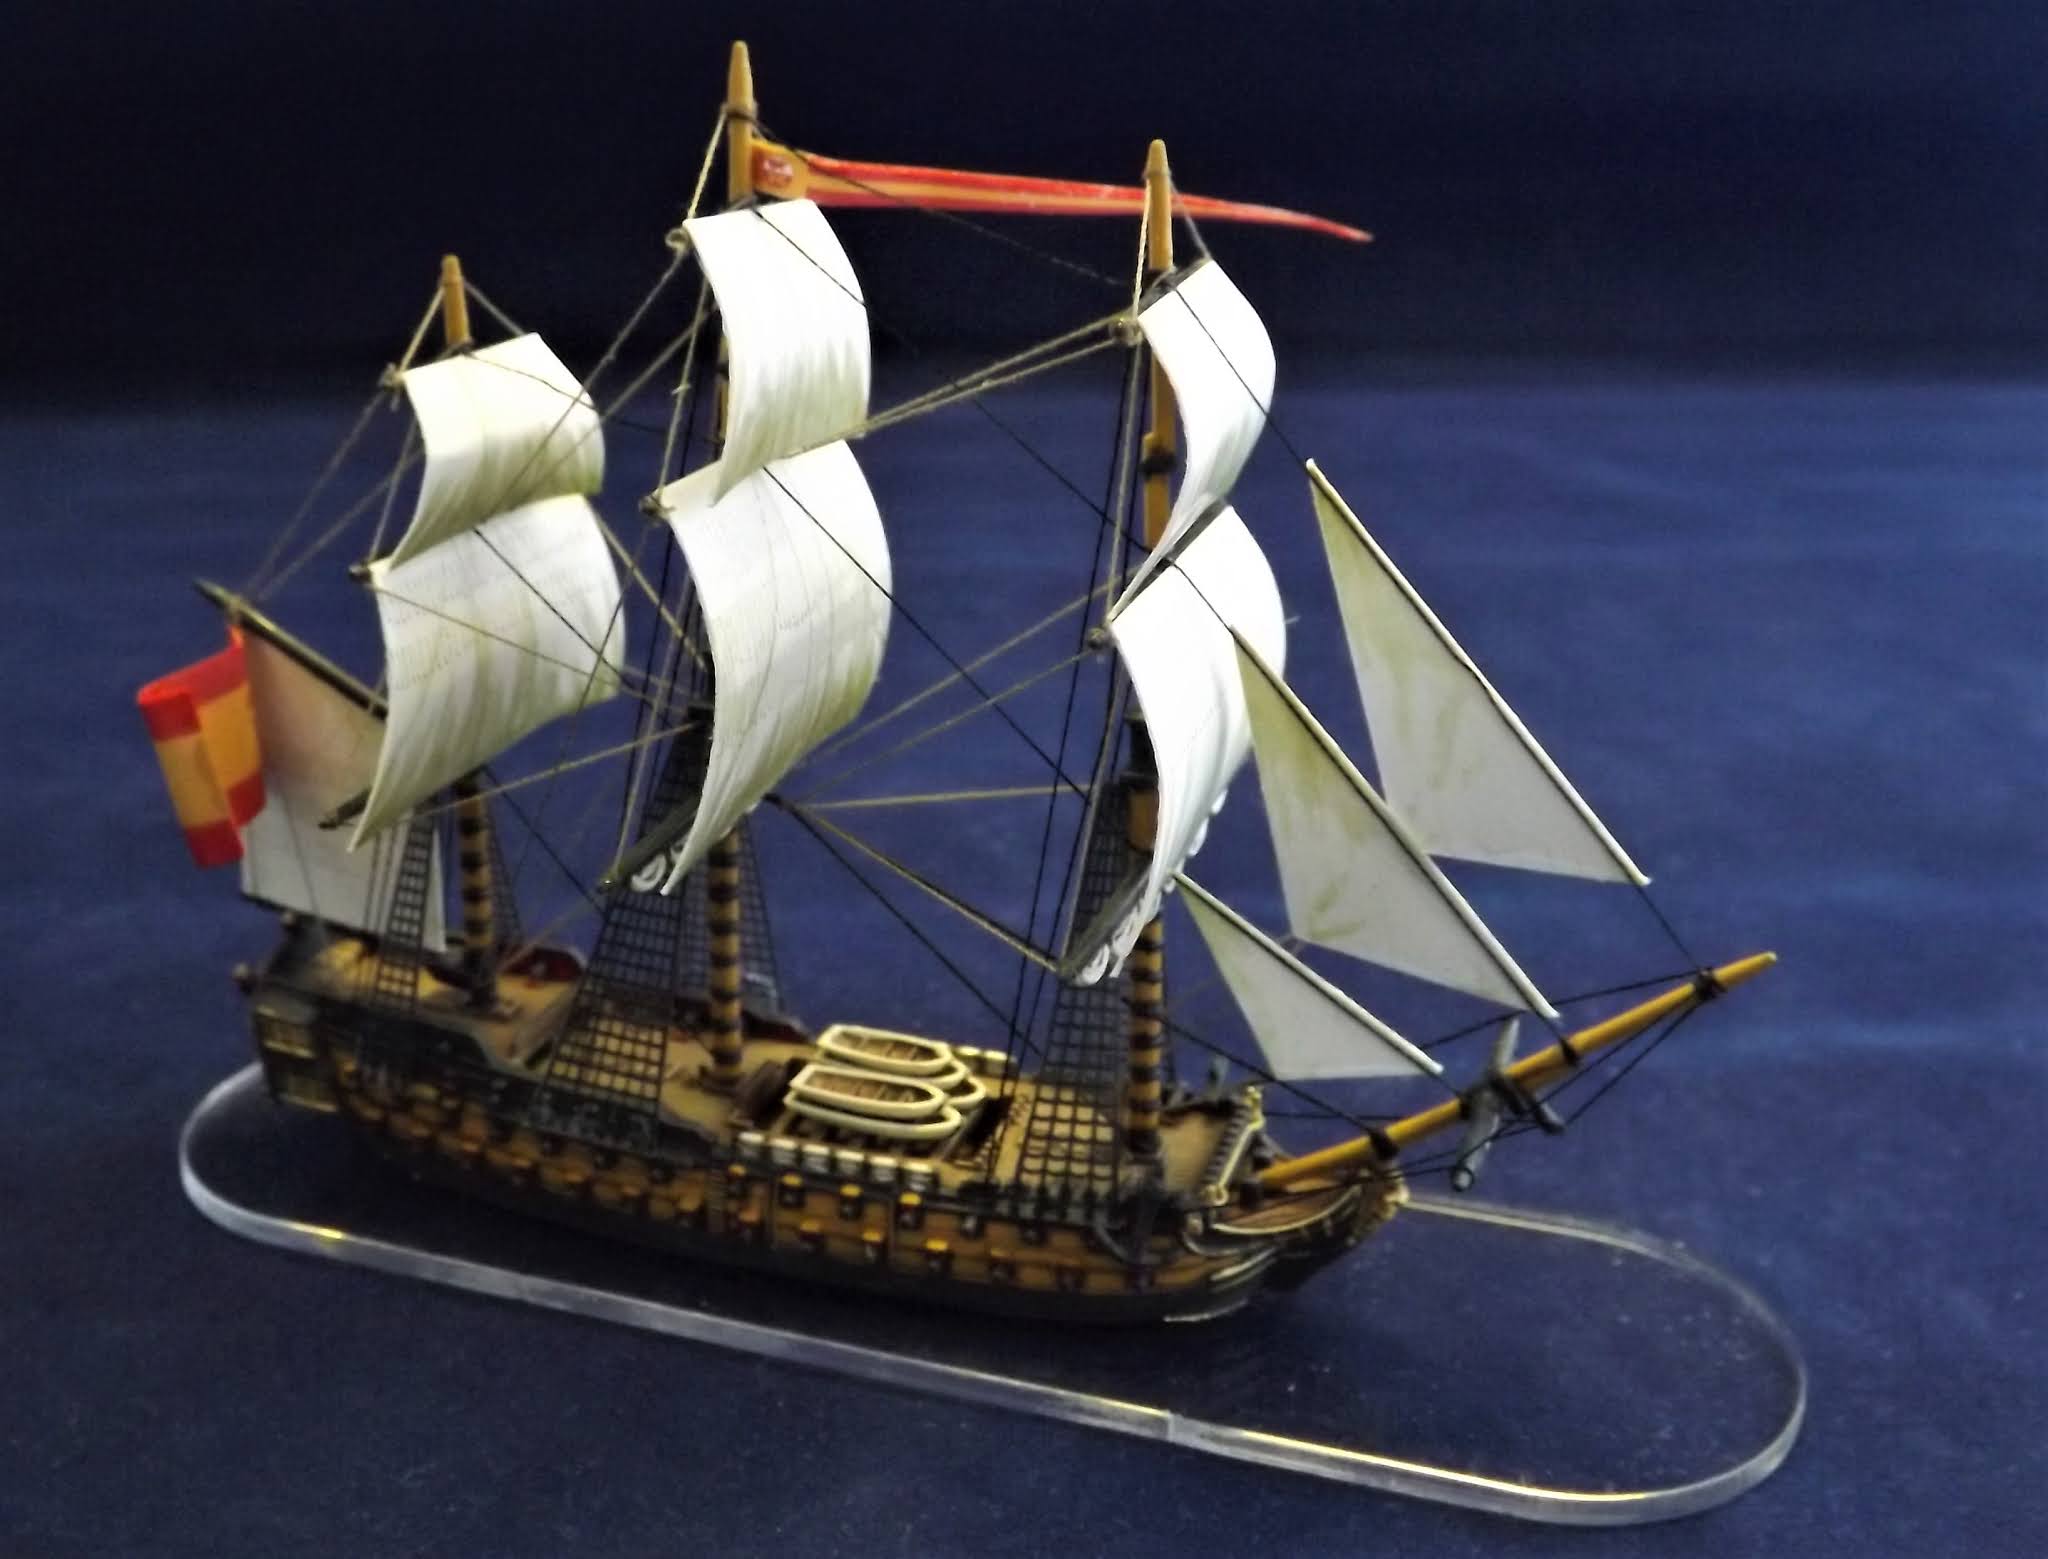
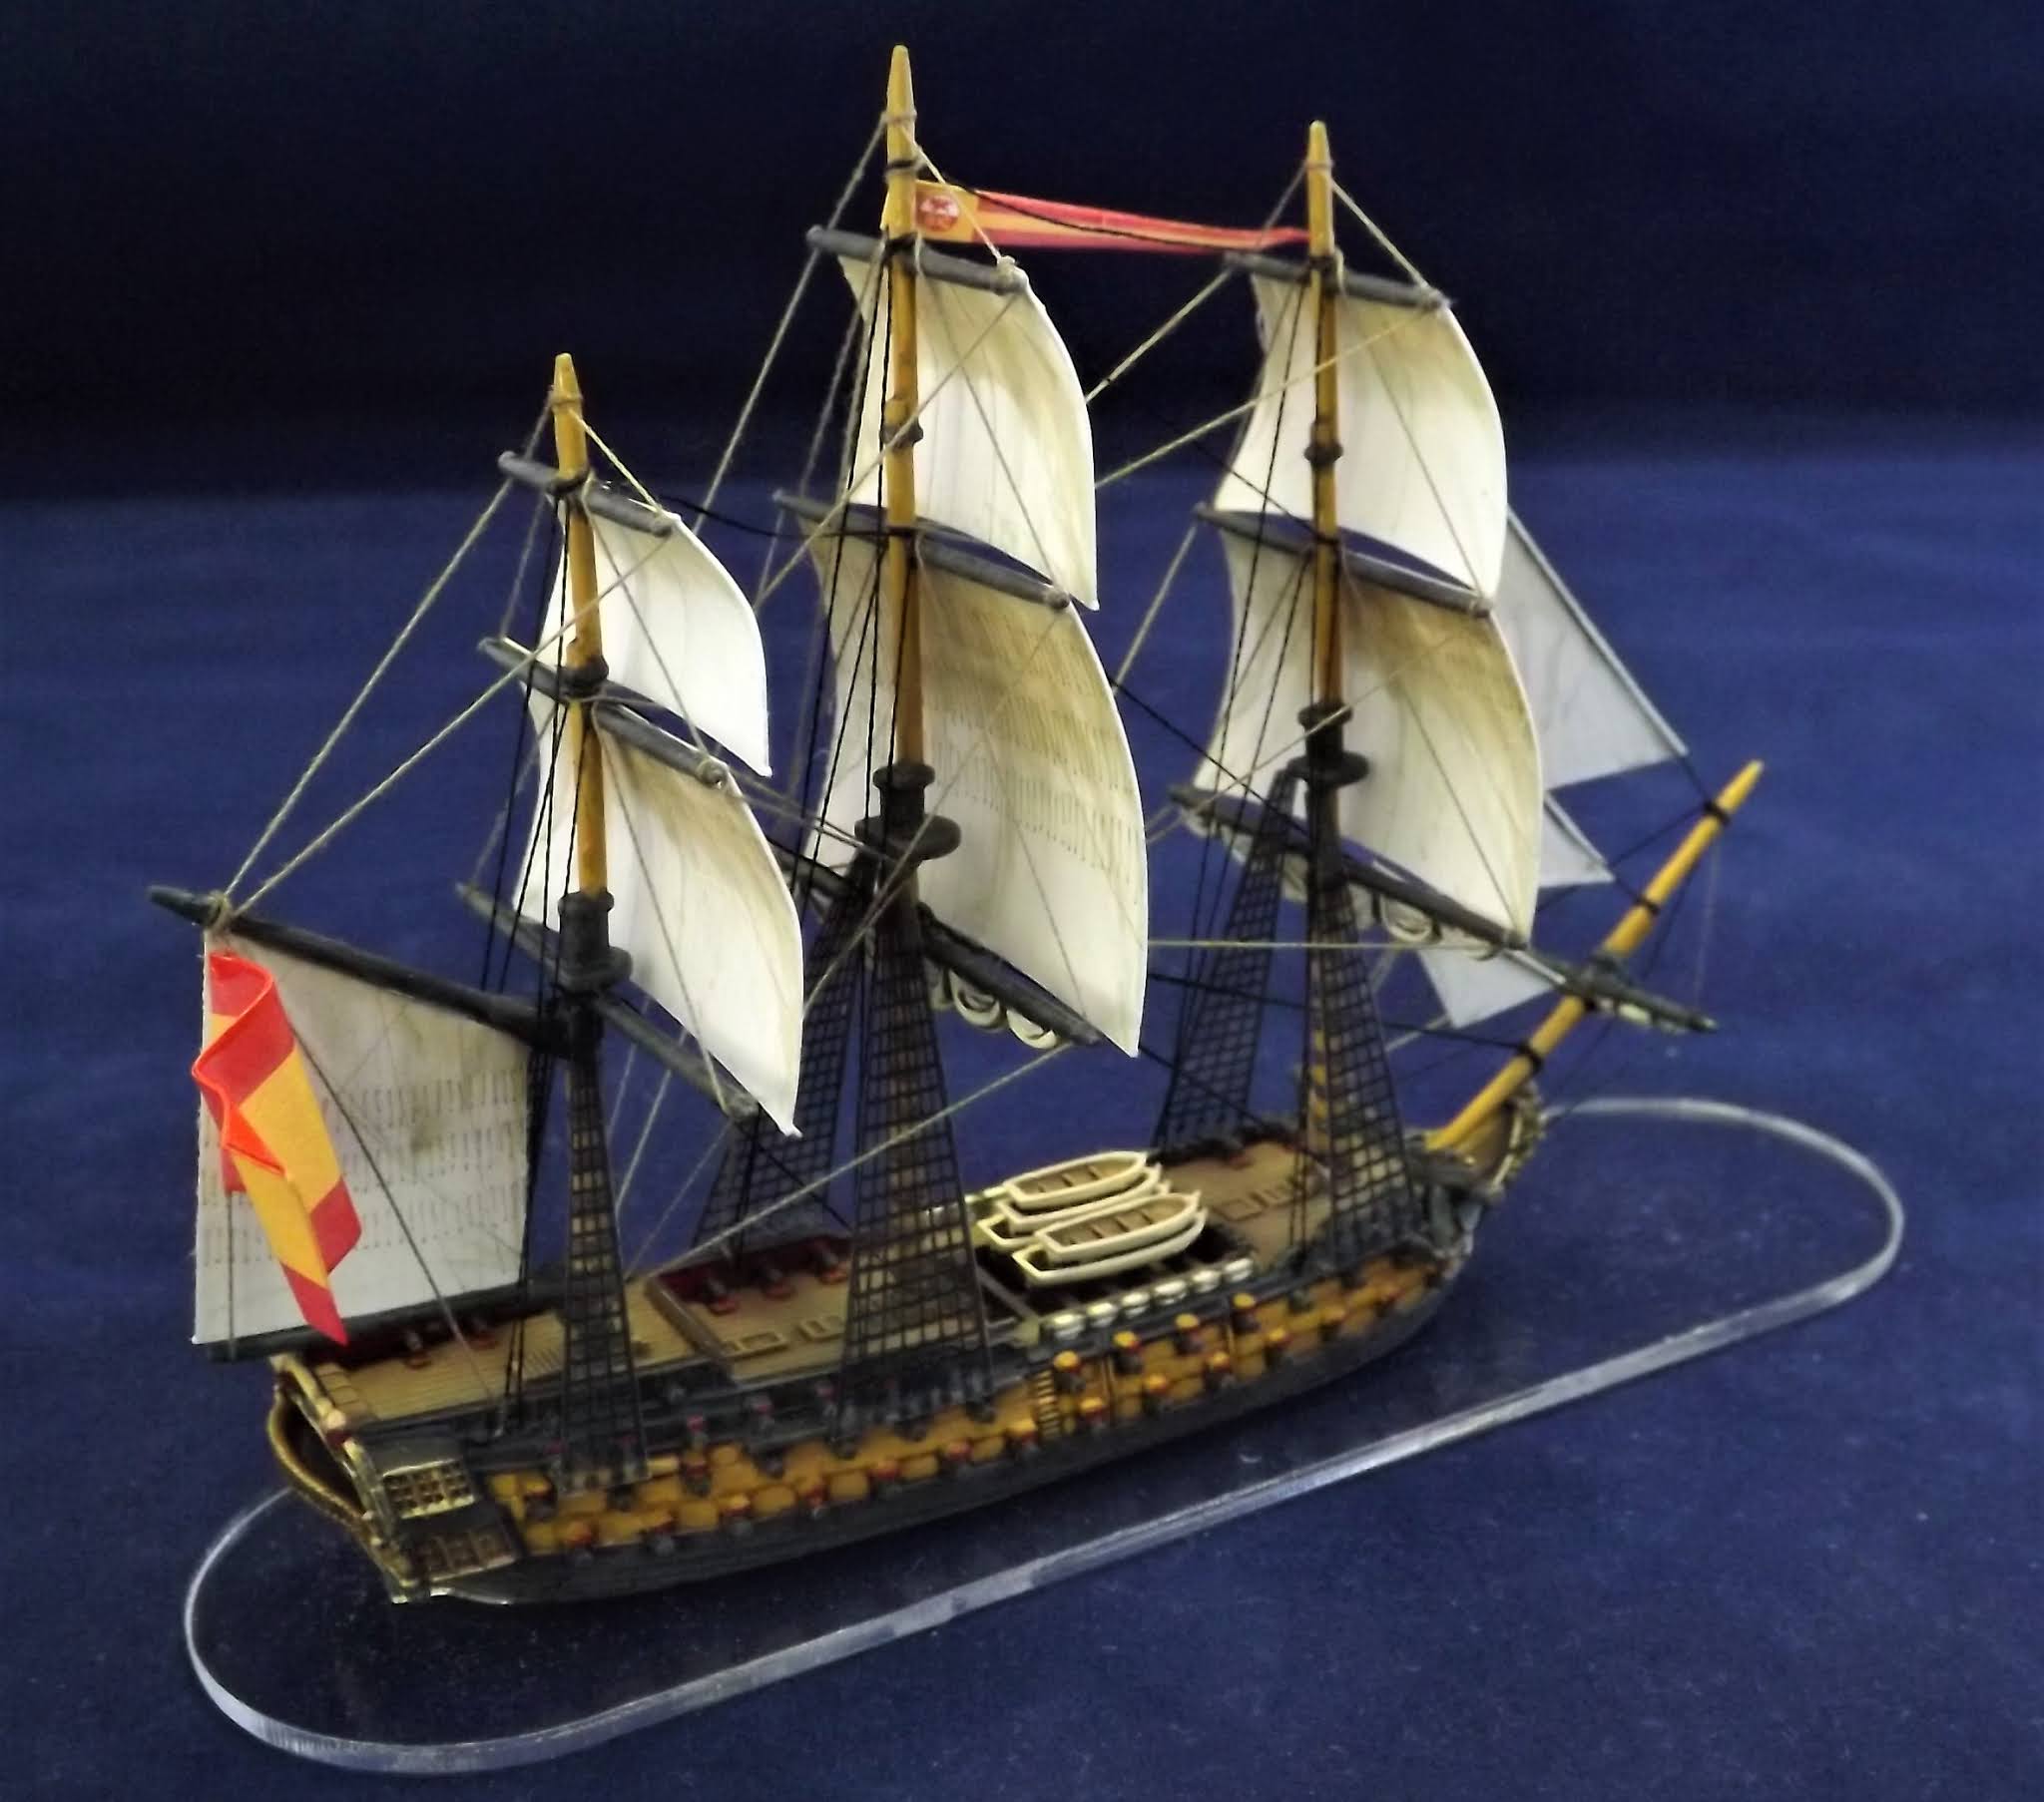
Next up: I've been in North Wales and Anglesey looking at Roman and Neolithic monuments, plus exploring the sights along the Welsh border taking in historic Ludlow and its famous castle and more blue plaques adorned to houses that you can shake a stick at, Stokesay Manor and its 12th century walls and towers, and the Telford aqueduct at Wrexham, one of the first monuments to the start of Britain's Industrial Revolution, and I've got three more Spanish 74-gun third rates to review.

Wednesday 26 May 2021

Lords of the Lake, The Naval War on Lake Ontario 1812-14 - Robert Malcomson


The cover of Lords of the Lake is a picture by Peter Rindlisbacher showing the squadron of Commodore Sir James Lucas Yeo consisting of the Royal George, Melville and Sir Sydney Smith becalmed and under tow from their boats whilst under bombardment from the guns of the US squadron, and specifically the Pike and the Sylph under the command of Commodore Isaac Chauncey during the engagement at the Genesee River, 11th September 1813.

Robert Malcomson's account of the struggle for control of Lake Ontario during the War of 1812 more than lives up to the dramatic artwork that adorns the cover of this excellent four-hundred plus page history and I found myself eagerly looking forward to to my usual bedtime read that more than upgraded my, till then, superficial knowledge of the naval war in this part of the Canadian front line during the war.

I always approach histories covering the struggle between Great Britain and the United States in the War of 1812 with a certain apprehension, given the rather jingoistic nature of a lot of the writing that has come out of both camps over the intervening centuries, preferring to get a more nuanced and balanced account looking at the war, if possible from both sides, and realistically appraising the actions and outcomes of both.

One might say that these are high standards for an historical account, from two English speaking peoples, some say separated by a common language, that bring all their misconceptions and bias based on competing accounts of history; but it seems the modern era is starting to produce these more balanced accounts and I have to say that the Canadian historians seem to have led the way in their re-telling of a war that a lot of Americans think they won, that most Canadians know they won and that most Brits have never heard of.


The first history of the war I read was 'The War of 1812 , Land Operations' by George F.G. Stanley, another Canadian historian and apparently the designer of the current Canadian flag, that I picked up from the book shop in the Canadian War Museum in Ottawa whilst touring Canada and the north east states of America whilst on honeymoon in 1988. 

The book is a thoroughly good read with plenty of maps that really brought the conflict to life for me and fired a life long interest in it since. However as its title suggests the coverage of the naval activities only really extended as far as their impact on the land war and the majority of modern titles I've read since have been similarly focussed; thus Lords of the Lake is the first specifically naval history on what was the most strategically important of the Great Lakes, Lake Ontario, that I have read and if you are interested in this war, a book I would be happy to recommend getting.

The book is broken down into six distinct parts encompassing its eighteen chapters charting life on Lake Ontario before the war and the build up to it through the various stages that came to characterise the struggle for its control that passed between the warring factions as both sides raced to gain dominance over the other whilst attempting to support their respective land forces.

Commodore Isaac Chauncey circa 1818 - Gilbert Stuart (US Naval Academy Museum)

The struggle to focus efforts on gaining dominance on the water and giving support to the army would prove to be a difficult balance for both the British and Americans with both Yeo and Chauncey becoming less and less willing to submit to the demands of the armies after experiencing the negative effects on their naval campaigns, whilst the land forces seemingly demanded more and more support to supply and move their forces from one front to another in terrain that was reliant on waterborne traffic to rapidly move armies and their supplies.

Commodore Sir James Lucas Yeo - Miniature in the Sim Comfort Collection
https://www.napoleon-series.org/military-info/Warof1812/2010/Issue13/c_Yeo.html

As the war progresses it seemed that Chauncey became slightly more protective of his fleet than Yeo and the tensions that this caused between the respective naval commanders and their army colleagues together with higher command and other naval commanders on the other lakes is captured well in Malcomson's account as he interweaves them with the military action and helps show how the naval struggle lost sight of its purpose, that of supporting the land war, at the expense of preserving naval bases and ships as a force in being. 

The fact of the matter was that Lake Ontario and its control was vital to both parties war aims in determining who would gain a dominant hold in Canadian North America with Britain on the defence for the most part and its forces under the somewhat cautious leadership of Lieutenant General Sir George Prevost that provoked much frustration among his more aggressive subordinates and managed on several occasions to seemingly snatch defeat from the jaws of victory, to the sometimes seemingly muddled leadership coming from President Maddison, his Naval Secretary, William Jones and Secretary of War, John Armstrong with their often conflicting demands to their respective subordinates only magnified by the military incompetence of the general officers leading the American troops on the Canadian front.

The ship-sloops USS General Pike and Provincial Marine Sloop Wolfe

It seems the Americans, able to focus their whole military and naval efforts on the Great Lakes and the invasion of Canada, particularly as the salt water navy became increasingly land locked under Royal Naval blockade and the crews of laid up frigates together with guns and ammunition were transferred over the relatively short route north to Sackets Harbour, had 1812 and 1813 to really make that advantage tell with Chauncy able to run rings around the Provincial Marine at the start of the war, a force more designed around transport than naval fighting and in 1813 with a fleet of vessels possessing the greater broadside weight of fire, long gun range advantage and the most powerful ship on the lake in the form of the USS General Pike.

The arrival of Yeo and his navy crew contingents helped offset the deficiencies of the Provincial Marine crews and the success of the hard pressed British, Canadian and Indian allied land forces held Chauncy at bay long enough into 1814 to allow the defeat of Napoleon in Europe to have the effect of delivering the much needed focus to the war from Britain, by which time British war weariness, Prevost's caution and the naval arms race to build bigger lake vessels, the 'Carpenters War', combined to end a pointless conflict that left both sides pretty much where they started.

I really appreciated the way the book alternated its chapters to look at the military situation from both sides at each stage of the conflict together with the stresses and strains on both Yeo and Chauncey that was obviously affecting their decisions and the impact that had on the clashes that occurred, intermixed with great descriptions of the large and small actions that took place on the open water and in among the creeks and on the shore.

The account is also well supported with illustrations of the vessels, the characters involved together with strategic and tactical maps and a copious appendix detailing the vessels that made up the opposing squadrons throughout the war on Lake Ontario at its various stages.


Whilst reading this book I picked up a second hand copy of Malcomson's previous work looking specifically at the warships built on the Great Lakes in this period which makes a great addition to the information gleaned from Lords of the Lake.

The Great Lakes in the War of 1812 make for an interesting theatre of naval operations in the age of sail and the small squadrons of small ships in the main make for very easy to build wargame collections with two forces very evenly matched.

My own current interest in 1:700th scale and Warlord Games commitment to add to their current range of Napoleonic age ships, together with a lot of brigs, schooners and cutters makes it very likely that I will build a collection around the Great Lakes theme and these books are a vital addition to my library in support of those ideas.

Lords of the Lake is 429 pages and includes the following:

Foreword
Preface
A Note about Time and Terminology

Part I - The Curtain Rises
1. "On the Banks of the Lake" - Lake Ontario Before The War.
2. "Opposing Force to Force" - War Is Declared: 18 June 1812

Part II - The Importance of Controlling the Lake, July-November 1812
3. "Our Navy... Is Worse Than Nothing" - The Failure Of The Provincial Marine: July-November 1812
4. "The Command of Lake Ontario" - Chauncey's Season Of Success: September-December 1812
5. "Our Prospects are Far... from Flattering" - Winter Projects: December 1812 - March 1813
6. "Everything Shall Be Prepared" - Planning The Campaign: February-April 1813

Part III - Fighting for Supremacy, April-November 1813
7. "Things Would Have Turned Out Better" - The Attack On York: 27 April 1813
8. "They Fought... Like Lions" - Fort George And Sackets Harbour: May 1813
9. "We Have the lake Open to Us" - The Royal Navy At Large: June-July 1813
10. "Deer, She's Gone!" - The Commodores Meet: August 1813
11. "Give the Vapouring Dog a Sound Drubbing" - Engagement At The Genesee: 11 September 1813
12. "All or None" - The Burlington Races: 28 September 1813
13. "A Mere Attendant upon the Army" - The St. Lawrence Campaign: October-November 1813

Part IV - The War of the Dockyards, November 1813 - March 1814
14. "Such a Force... May Save the Country" - British Naval Escalation: November 1813 - March 1814
15. "An Augmentation of our Naval Force" - Preparations For Sackets Harbour: November 1813 - April 1814

Part V - Conflicting Priorities, April - December 1814
16. "Wary Measures and Occasional Daring Enterprises", Actions At Oswego And Sandy Creek: April-June 1814.
17. "For God's Sake Let Me See You" - Strife Among The Senior Officers: July-November 1814.
18. "Returning Peace at Length Is Heard" - Winter Arrives And The War Ends

Appendices
A - Overview of the British and American Squadrons on Lake Ontario, 1812-1814
B - The Opposing Squadrons, Autumn 1812
C - British Gunboat Flotillas during and after 1813
D - The Opposing Squadrons, May and June 1813
E - The Opposing Squadrons, 8-11 August 1813
F - The Opposing Squadrons at the Engagement near the Genesee River, 11 September 1813
G - The Opposing Squadrons at the Burlington Races 28 September 1813
H - The Opposing Squadrons in 1814

Glossary
Endnotes
Bibliography
Index

Robert Malcomson, who sadly passed away in 2009, has written a very readable and fascinating history of this very important theatre of the War of 1812 and together with Warships of the Great Lakes make a very important addition to my library on the naval war of this period.

My copy of Lords of the Lake is the somewhat more affordable paperback edition and is currently available for between £11 to £15 at the time of writing, with the hardback edition retailing for substantially more. 

Next up: Three more Spanish 74-gun third rates join the Cape St. Vincent order of battle and the French launch the L'Orient of 118-120 guns depending on which source you prefer, plus Carolyn and I have been having fun exploring Hay-on-Wye, the Welsh border and Ancient monuments on Anglesey with Roman forts, watchtowers and Neolithic burial tombs on the list of places visited.

Saturday 22 May 2021

All at Sea - Trafalgar Battle Planning

HMS Tonnant accepts the surrender of the Monarca - Nicholas Pocock 
One of my favourite Pocock pictures of a particular incident during the Battle of Trafalgar.

I think scenario and battle planning is one of the most interesting aspects of the wargaming hobby and alongside creating the model collection for a particular era, the pulling together of a battle scenario and producing a game from it has to be for me one of the most satisfying aspects, perhaps more so than playing the game itself.

I liken it to actors becoming directors and moving from the on stage/in front of the camera role to combining the two, sometimes being in among the cast but more often directing from back stage or behind the camera.

The Battle of Trafalgar has to be one of the most written about actions in history with numerous accounts from all sides and maps compiled over the years attempting to give an idea of where the ships in each fleet were when the fighting began.

That the battle is extensively covered is a bit of a two-edged sword in that, as with all battles, no one source can ever be certain as to what was going on at any particular time across the battle as a whole. If you don't believe me, consider the comments of the Duke of Wellington when asked to give an account of his battles, of which he had a few to recount, coming up with his famous quote about battles being rather like balls (dances) in that you could only ever know what was happening in your particular part of the ballroom at any one time.

This issue is only magnified with a battle like Trafalgar with seventy three vessels spread across some nine square miles or more of open sea adding to that discrepancy between accounts and the dreaded battle map!

A period map from close to the time of the battle. Ok so far as it goes in giving a general impression of the set up but not detailed enough for our purposes.

As so often in our hobby and indeed history itself, we are left with educated guesswork and a certain amount of conjecture mixed with inevitable concessions to be able to translate a battle set up to our table, and thus I thought I would go through my basic principles for doing this.

I start, as always, with the end in mind, namely why are the forces where they are and what are they trying to achieve, so that I can work out the parameters of any given battle from the players perspective  who in an historical refight will normally be trying to do a better job than their historical counterparts but hopefully constrained with similar issues and thus forced to make choices within those constraints.

If done well these kind of scenarios can really help to illustrate the difficult choices the generals and admirals in history faced and as well as having a good time rolling bones we might also come away from the game with a lot of sympathy for our historical counterparts or not.

So the situation Trafalgar presents is of a poorly manned and trained Combined Fleet, a combination of sickness breaking out in Cadiz, losses sustained in the cruise to the West Indies and the need to bolster ships compliments with landsmen and soldiers, hoping to avoid interception and itself intercept a British convoy reported to be coming through the Gibraltar Straits before then heading to Toulon to dominate the Mediterranean after the Emperor's plan to dominate the Channel had to be postponed.

Villeneuve, the Allied commander knows his job and reputation is on the line with his replacement on the way to Cadiz from Paris and needing to score any sort of a victory to help repair his reputation in Imperial circles.

Thus to find himself and his fleet intercepted outside the Straits and thirty miles from Cadiz is not part of his plan and in desperation he has attempted to reverse course back to the Spanish port at 08.00, somewhat throwing his fleet into disorder by the manoeuvre; and its now beating against a bow wind with the British having the wind gage, thus leaving the only option to get his line in order as best he can and hope to present enough guns against a British attack he expects to come at his line with the intention of bringing on a pell-mell melee. Any attempt to flee will disorder his fleet still further and leave them to be decimated in detail, so his only hope is to so badly damage the British aloft, that he might still get most of his fleet into Cadiz and maybe take the odd British prize in a boarding action where he hopes his extra soldiers, marines and snipers in the tops will get him some compensation for his anticipated losses.
 
The map I chose to plan the game around is from Adkin's Trafalgar Companion and shows the fleets in position as the Allies opened fire on the lead British ships at 11.45am. The notes provide a convenient briefing around the situation and the scale of the map and approximate positions make this a really useful planning tool.

For the British, the sight of the Combined Fleet in its current situation is like the shark smelling blood in the water and Nelson has his battle plan well understood by his captains who feel confident in what they have to do and how to set about it.

The wind gage will allow them to choose where they will attack and look to pass between the Allied ships, whilst having the speed to close the gap on the Allied line quickly reducing the time for the Franco-Spanish gun crews to target their rigging on the way in and to deliver raking fire as they get to the leeward side of the Combined Fleet to begin battering it at close range and prevent them escaping once they have struck.

Nelson's plan focusses on the importance of Collingwood's Lee Column attacking in echelon to quickly overwhelm the rear of the Allied fleet, some twelve to fifteen ships in the rear, whilst he will look to take out the commander as soon as he can identify his ship, and so will attack in column headed for the enemy van, thus pinning it before veering towards the centre as soon as Villeneuve reveals his position.

The column approach of Nelson's Weather Column serves a two fold plan to attack and take out the Allied centre whilst having a reserve of British ships arriving in the latter stages able to support as required and to prevent any interference from the Allied van should it arrive in time.


Thus the set-up arrived at is as you see it based on the appreciation of these facts presented by Adkins in the Trafalgar Companion with a copy of his map I started to plan around based on the game scale of one inch to twenty-five yards or roughly six feet to the mile, and I have set the fleets up as the Allied fleet opens fire at 11.45am on the 21st October 1805.

My final table plan and initial set up with the five tables allowing the Combined Fleet to occupy its battle position with room ahead for the van to come about and with the furthest tables away able to allow the British to make their approach. The ships that opened fire are indicated and might make a good start point for the game.

The Adkin's map provides a good basis for a set up plan and even shows the Allied vessels that started the battle, marked as opening fire, however I needed to translate the set up into tables that would allow access to the models constrained as always by the length of the average human arm and to decide on the separation between the ships which I have set at around four to six inches or one-hundred to one-hundred and fifty yards, which is likely to open up as the Spanish find it difficult to maintain their station (as covered in Kiss Me Hardy)

Once the table plan was sorted out I needed to translate it to the table to make sure what my mind was seeing was realistic, particularly with the deployment of the Combined Fleet which is where the fighting will take place, given that they are moving slowly into a bow wind.

Thus you can see in the plan below and how the fleet will be distributed across three tables and in relation to the approach of the first British ships set up in echelon for Collingwood's Lee Column and in column and arriving later for Nelson's Weather Column.

The likely final table plan above and how it translates the Combined Fleet to the table, illustrated below in more detail. Each square on the plan is a square foot of table space, with four 10 x 5 foot mats alongside the 9 x 5 mat you see in the pictures.

An important aspect of the Combined Fleet set up was to make sure the line was spread out sufficiently within the scale distance that captures the gaps between its individual ships that the British exploited to pass between them.

In Kiss Me Hardy the Spanish will find it difficult to maintain their station and other gaps are likely to open up just as quickly as the more able French ships look to close them with not much scope for any rapid adjustments sailing into a bow wind. Likewise the British will have no such constraint's with plenty of movement options and the ability to maintain station and likely arrive in groups of ships able to support one another.


In reality the Combined Fleet set up will be one long line of models spread over twenty-three feet of table and these three pictures attempt to show the arrangement organised over my nine foot table broken into the three parts as illustrated on the planner.

The only gap in the tables will be that between the British approach tables and the Combined Fleet set up tables with British ships arriving on the latter transferred from one to the other as needed. Thus HMS Africa is shown running down the line of the Allied van and Collingwood's Royal Sovereign will likely come onto the table in front of the Allied rear sometime in the opening turn.


With the set up sorted I am now looking at the other scenario conditions principally around the parameters set up in the Too Fat Lardies scenario plan from 2005 but with adjustments to look at squadron and fleet morale as a whole.

Wargamers tend to ask their land and naval warriors to fight on far longer than their historical counterparts, willing to accept ridiculously higher casualties that would have been the case in reality.

From the accounts of the battle, this break point becomes obvious after about a couple of hours of close fighting with Allied ships starting to drift away from the action leaving comrades on the wrong side of the British line to their fate. Obviously when this becomes more general the battle dies down providing the break point where those that can, get away off table, and also providing a sense check for the players to see if the game continues or is called with outcomes assessed.


So there we are, the fleets are built, the game plan is set up, the storage and carriage boxes are organised and, as I write this post, the additional sea mats have arrived, so now we just need to sort out the time and the venue. England Expects!

Next up, I have a book review from the War of 1812, and the Spanish and French are joined by reinforcements in the form of another three Spanish 74's kitted out for Cape St Vincent and the French with the mighty L'Orient ready for her trip to the Nile.

In addition Carolyn and I are off on our first trip away after a very long winter of lockdown and headed to Shrewsbury, the Welsh borders and North Wales for a few days, so I hope to capture a look at some interesting places while we are away.

Friday 21 May 2021

JJ's Wargames - Subscribers Update (Follow It)

 
Just a quick announcement to let all the followers of JJ's Wargames know that I have added a new 'Email -Subscribe' button at the top of the page in the right hand bar that links to follow.it and is designed to replace the old 'feedburner' email alert that is stopping.

So this means that followers of the blog who get email alerts to new posts should see a change with this announcement as the blog switches seamlessly over to the new system, but also new or existing followers of JJ's Wargames might like to subscribe to the email alert allowing you to see when the blog is updated with new posts, which will be starting this weekend as I take a look at planning the Battle of Trafalgar in glorious 1:700th.

More Anon
JJ

Monday 17 May 2021

Hannibal, Rome vs Carthage on Vassal Part Two


Picking up from my post in March


Steve and I carried on with eventually two games of Hannibal at the end of which we both felt we had a good feel for the game mechanics and best play, given that the beauty of Card Driven Games (CDG's) is that you can never really come up with specific game strategies and approaches because the games can be quite different one to another based on the cards you end up getting to play.

This post report was certainly more of a challenge than previous ones because this Vassal module rather uniquely doesn't have a screen capture button to allow a record of play to be easily grabbed, so I ended up resigning myself to manually taking screen captures from saved game stages to try and illustrate how our two games ended up.

So to summarise:
Below is the map of our first game that ended up with a crushing victory to Steve playing Carthage ending with 13 provinces controlled to Rome's 5.
 
The end of Game One with Hannibal and others in control in Italy and Scipio winning in North Africa but not quickly enough. A Carthage win 13 -8

Steve played a canny game, storming into Italy with Hannibal and managing to bring most of his army plus two elephants and capitalising on P.Scipio's disastrous early attempt to invade Spain as I fumbled my way through the early moves trying to work out how this game worked.

The Italian front at the end of Game 1 with Hannibal, Hasdrubal and Mago dominating Italy and Varo and Fabius cooped up in Rome

Once Hannibal was established in the northern provinces of Italy he contented himself just to being a force in being, tying down Roman forces and generals whilst revolts broke out in Syracuse, Sicily and Corsica, which required Roman expeditions to crush and deposit the odd garrison to prevent further trouble and incursions from other Carthaginian generals.

Rome managed a brief resurgence in the middle years prior to Scipio Africanus turning up but Carthage managed to maintain its lead and then with Scipio A making heavy weather of progress in North Africa proceeded to support Hannibal with other forces that started to eat in to Italy.

Scipio A managed to beat up the Carthaginians in North Africa and get before an empty Carthage in the last year of the war but didn't have the cards or time to successfully lay siege and take the place to offset the lead that Carthage had grabbed in captured provinces. 
 
The North African front with about three more card plays to end the game. Scipio has beaten off the Carthaginians who have retreated back to Utica, and he made a dash for Carthage to try and take the city and win the war but ran out of time and cards!


Soundly chastened by my thrashing, Steve and I changed sides and I took Carthage for our second game which given the lessons learnt meant both of us were playing a better game and now just needed the right cards at the right time to put that learning to good use.

Thus Steve immediately rushed garrisons up to the passes in the Italian Alps to block Hannibal looking to do a similar job as in the first game. The plan worked and as Hannibal cautiously working his way through Liguria, Steve whacked him with several cards that saw half his army dead and all the elephants gone before he had to turn and face a Roman landing force in his rear that defeated the remnants of his army and saw Hannibal fleeing to Spain.

End of Game Two, and only one province separating the two sides with Eastern Numidia left uncontrolled winning the war for Rome

Carthage came back though, defeating two Roman ten point armies in Massilia and in Cisalpine Gaul as Hannibal regrouped and came charging back towards the Alps, this time penetrating into Italy.

Rome then turned its attentions to Sicily, or more precisely Syracuse which revolted and saw a large Roman army before its walls that spent a year laying siege to no avail and ending up decimated as Carthaginian cards repelled siege points and wore down the Roman force.

The Italian front in stalemate as Hannibal with his ten strong army and a siege train faces off Marcellus with a similar sized force but secure in Rome with plenty of allies.

The final game was a close run thing with very rarely more than two provinces in it and with Scipio A making his move against North Africa all to play for in the final years of the war as Hannibal tied down Rome's forces in Italy with a large army and siege train threatening Rome.

In the end Rome came out on top with one province in it, as Carthage reduced Scipio to just control of Western Numidia but not enough cards left to reoccupy Eastern Numidia.

The North African front as Carthage commits troops and generals to fend off Scipio A, but not quite able to keep him at bay whilst keeping control of the provinces.

So Steve came out on top in both games. Well played mate. 

We both really enjoyed Hannibal and this game is up there with our other top CDG's such as Mr Maddison's War which both of us would play at the drop of a hat. The cards really challenge the players to make the best of the situation they face, never being fully in control as 'events, dear boy, events', to quote a famous British prime minister, keep cropping up and need to be dealt with as you try to win a war - great stuff!

This Vassal module played ok but if the designer feels inclined, the addition of a screen grab button would be a useful update.

Next up, Steve and I are back in WWII North Africa as we reacquaint ourselves with an old favourite with a rather unique hidden movement system, the 1984 game from Frank Chadwick and Games Design Workshop, 8th Army: Operation Crusader, more anon.

Before that though I will be taking a look at the Trafalgar game planning, following up on my previous post that looked at terrain and storage. Then I hope to have some pictures and a post of my first trip away since the second lockdown as Carolyn and I take a break up to Shrewsbury and North Wales and enjoy our new found freedoms!

Saturday 8 May 2021

All at Sea - Cape St Vincent, Spanish Additions

The Fighting Principe de Asturias, engages the British line at the Battle of Cape St Vincent 14th February 1797.
I believe this picture is by Derek Gardner and captures the look of the Spanish ships in the Revolutionary War colours and scheme that I was trying to imitate in my recent additions.
 
With the completion of the collection to represent the various national fleets at the Battle of Trafalgar recently shown here on the blog, I have been taking a short pause to put together the necessary materials to portray the game once we are able to regather.


This has principally focussed around pulling together my ideas for the necessary storage boxes to transport the collection and also getting the number of necessary sea cloth mats to replicate the several square miles of ocean over which the battle was fought and I intend to do a post looking at those materials once I have them to show.

In the meantime I have also been putting together table plans which has meant trawling through various sources to get the general consensus as to how the two fleets were arranged at various stages of the battle to see how I want the fleets to be arranged at the start and again I will do a post looking at this really interesting aspect of the hobby, namely big-battle planning.

New additions to the Spanish collection with three third rate 74-gunners and a first rate 112-gunner added to those built for the Trafalgar line-ups.

However I considered the Trafalgar fleet build as very much a waypoint in creating the collection as a whole, looking to add additional models over time to allow other classic engagements from the era to be played out on the table, or should I say, several tables; and as outlined in the video looking at the work so far, mentioned my intention to press on with the work to complete the Spanish fleet to allow the largest collection of Spanish ships in battle to be presented, namely at the Battle of Cape St Vincent on St. Valentine’s Day, 1797.

This will see the addition of another nine Spanish third-rates and three first rates to bring the required numbers of models up to that target and work commenced almost immediately to press on with those models, of which the first four rolled down the slips and were fitted out this week, with three third-rates and a 112-gun first rate joining the collection.

These models are very much generic Spanish and not intended to represent any ship in particular and so I contented myself with applying my normal, 'Spanish-look' with plenty of gold ornamentations, red bulwarks and white and gold Castilian Lion figureheads, but also with the third-rates decked out in the Revolutionary War trim of yellow ochre strakes without the typical later chequerboard, as first used with my last batch of French third-rates for the Trafalgar build.

Once these final models are built, that will be it for my Dons, other that adding some more units to their light forces for some small actions I have in mind, and I will roll out the next additions as we go, starting with the next build which will have the mighty 118-gun French first rate, L'Orient in two versions, one with full sail and the other, of course, at anchor.

Anyway until then I present my latest additions to the Don's, with a thank you to all those who left kind comments of appreciation received here and on other forums for the Trafalgar Collection, and as often stated but nevertheless sincerely meant, they were very much appreciated.

First Rate - 112-Guns


At Cape St Vincent, the Spanish had on hand seven first rates, namely, the Santissima Trinidad 130-guns, and the Conde de Regla, Mexicano, Principe de Asturias, Purisima Concepcion, Salvador del Mundo, San Josef, each 112-guns.

With the Trafalgar collection, four such types were present if you include the rebuilt Rayo, so I will need to add another three, or should I say two with my new generic 112-gunner seen below.


The New Spanish Third Rates


As for the Spanish third rates, their line up include two 80's and one 64-gunner as at Trafalgar thus leaving me a requirement to add a further nine 74's to the eight built.


As mentioned above I intend that these eventual nine models, with the first three seen here, will have a Revolutionary War look and given that they are designed to be generic just with added variations to their paintwork around the bow, stern-galleries and bulwarks.

First - Third Rate


Second - Third Rate


Third - Third Rate


More Anon

JJ