Sunday 27 February 2022

Small Ship Actions - Devon Wargames Group

 
This weekend I 've been having lots of fun messing about with the small ships play testing some scenarios I've been working on and getting the pleasure of seeing how they play with lots of new ideas added into the rules we've been using, Kiss Me Hardy and To Covet Glory.


These historical small ship encounters are really fun to play and the detail from William James' accounts of them throw up lots of factors to try and include to challenge the players with factors their real life counterparts had to deal with before getting to grips with the enemy.


The three games were quite distinctive and recreating actions fought in the first year of the Revolutionary War with France, featuring a classic frigate duel, a chase in the Caribbean between a small packet ship and a privateer schooner flying the 'red flag', no quarter given signal, and finally a night action fought off the north coast of Spain.


With only a couple of models on the table the 1:700th scale comes into its own by providing presence, that many empty sea naval games struggle to offer when compared with terrain heavy large figure games on land.
 

However I think these small historic scenarios provide buckets of drama and in a very small way put the players on the quarter deck deciding the next order to issue to the helmsmen.

If you would like to know more and see how our games turned out then just follow the link to the club blog below.

Devon Wargames Group - Small Ship Actions 1793


Saturday 19 February 2022

Vassal Gaming To Date - Napoleon at Leipzig, 1805 Sea of Glory, Operation Battleaxe 1941, Pacific Fury Guadalcanal, 1942 & Sovereign of the Seas together with an upcoming Table-top Campaign.


So its been a while since I updated everyone on my Vassal gaming, with my last post optimistically entitled 'Part One' looking at Steve M's and my game of Napoleon at Leipzig game from OSG, which were just getting into back in September last year, see link below.

JJ's Wargames - Napoleon at Leipzig, Battle of Nations

Well lots of other stuff imposed itself on the blog content between then and now and it's only now that I've found time to sit down and review that particular game and a few others that have been played since and thought I might just do a round up of those games to get things back up to date.

So the Leipzig game proved great fun, but I'm afraid I failed to live up to the performance of the Emperor of the French, managing in my machinations of the card play to promote the Russian and Prussian Guard into the front rank of the Allied attacks south of the city after I had delayed the arrival of less able Allied troops tabled to arrive before them - doh!

The card play in the Napoleonic Battles Library Series can be a two edged sword and a cunning plan can sometimes come back to bite you!

Our Leipzig game at the close of play on the 16th October.

This proved a costly error as my Marie Louise's struggled to hold these elite troops in place as I was forced to rush Young Guard and eventually the 'Grumbler's' themselves to try and stem things.

Marshal Ney, managed a fine job imposing himself on Blucher, but all to no avail as things fell apart in the south.

In the end I was forced to capitulate at the end of the 16th October, as Steve not only forced my position in and around Connewitz with a well executed attack by Kleist and the the Prussian Guard, but also made sure the French were not going to get out of town any time soon as he bottled up my escape route by closing the causeway through Lindenau.

The key area around the south of Leipzig that cooked Napoleon's goose! This despite a masterful defence in the north by Ney giving the old warhorse Blucher a bit of a bloody nose

My centre in the south was well and truly busted with two corps demoralised after the heavy fighting in the previous two days, and the final attack on Connewitz capitalised on the hard fighting put in by the Allies during a day and a half of persistent rain that negated their superiority in artillery and forced them to take ground at the point of the bayonet. 

Well played Steve and an enjoyable game that we played through the best part of September and October and were joined in our 'game room' on a couple of our nights play by the design team that created the latest version of this classic game, which was fun sharing comments over the Vassal platform during play and having a few of our errors corrected, thanks chaps.

JJ's Wargames - Sovereign of the Seas, Compass Games

At about the same time as I was enjoying Leipzig on a Tuesday night, I was playing Sovereign of the Seas (SOTS) with Jason on a Thursday afternoon which we concluded at about the same time and I reviewed my thoughts about the game in my post looking at its wider potential for use as a table-top campaign engine, see the link above to that post.

One of our climactic battles in 1799 was the Battle of Aden, here showing the result at the end of the affair with the British triumphant. Note 'sunk' is just a game mechanic to indicate captured, taken or sometimes destroyed, with most defeated vessels being returned to the draw pot to return in future turns.

During our final rounds of play we did find a slight problem with the game and its spotting rules when fleets go looking for each other, in that part of the spotting calculations adds the number of ships in each opposing fleet to the Admiral's value, any friendly frigates nearby and either three or one die scores depending on if you are wanting to spot (1 x d6) or avoiding a contact (3 x d6). This works ok until the European player, often trying to avoid a contact, builds very large fleets that appear to negate most British attempts to find them even with Nelson on a rating of 4, especially when sitting on a lead in VPs and trying to see the campaign out.


We think we may have a fix for that problem, which I'll address at the end of the post, but decided to turn our attention to another naval war offering for the Age of Sail, namely 1805 Sea of Glory designed by Phil Fry and published by GMT.

I bought this game soon after it was published and it is a work of passion by Phil Fry and one I have been keen to play using the full campaign set up for the dramatic year of 1805, which Jason and I started just before Xmas.

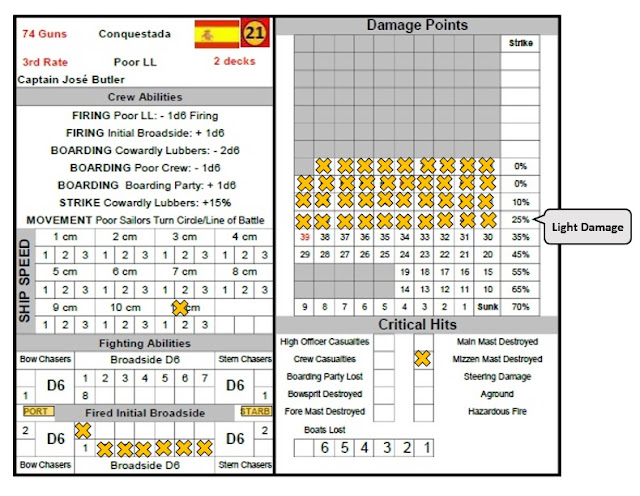
Yet to be resolved, but it's June 1805 and the Channel Squadron have intercepted a lone French 74, that escaped from Rochefort into the Bay of Biscay, with the ships deployed on the battle-board (centre right). The Mediterranean is full of British ships (frigates and squadron markers above the Balearic Islands, with another patrolling the Gibraltar Straits, that followed in the wake the French Brest squadron, after it successfully raided Alexandria and escaped into Cartagena.

The cat and mouse game that is produces is a classic war at sea campaign with Jason, playing the allies
looking for the opportunity to move his squadrons to sea at the best opportunity when British blockaders have been blown off station, and with his admiralty orders predefining the destination and objectives of his squadrons.

For myself, running the British, the first months of this game have been all about manning and repairing as many ships as I can each month, finding out what Nelson meant about not having enough frigates, and trying to get into the head of the enemy and accurately assess where certain enemy units may be heading amid a flurry of dummy blocks designed to draw my hunting squadrons of the scent. Great Stuff! 

The state of the British fleet at the end of May I 1805 with storm damaged ships, Bellerophon and Atlas, awaiting repair in Plymouth and the damaged Repulse still at sea with the Atlantic Squadron. To the far top right, quite a few ships still sit in ordinary in Plymouth and Portsmouth, awaiting fitting out and new crews brought in by the Press.

We are now into June 1805 and the first six months of play have generated French raids on Antigua and Alexandria and have seen three interceptions by the British with the Brest fleet escaping battle in the first but seeing two smaller squadrons intercepted, the first thoroughly beaten and the next, consising of just one French 74 about to be taken by the Channel squadron on patrol in the Bay of Biscay.

This is a great game and the administration side of running the fleets, dealing with damaged ships, appointing commanders to various squadrons, rotating in new ships brought out of ordinary, as well as trying to deal with the enemy is all here in this game and we are having a lot of fun with it.


With Leipzig concluded Steve and I decided to have a complete change of theme and returned to the Western Desert, this time in 1941 to play Operation Battleaxe, Wavell v Rommel, from Revolution Games, using the area system of WWII games started  by Avalon Hill with Breakout Normandy (BKN), a game we know well and love playing.

The game set up with the Empire forces yet to deploy onto the frontier, and with the Axis around and forward of Tobruk

This game has lots of similarities to BKN, but some key differences that sees a battle solution much more decisive and punishing than the often attritional battles modelled for the Normandy campaign, with the fighting often taking place in close dense terrain rather than the wide open vistas on the Western Desert.

June 16th Impulse Four: The Empire forces have pushed forward and grabbed key terrain on the frontier releasing Axis armour to come forward to deal with them.

This interesting game is one of two halves, seeing the Empire force launch its surprise offensive as the Axis focus on strangling the Tobruk defenders, only to see the taking of key victory point (VP) areas releasing the Axis armour to counterattack.

Thus the Empire commander has to decide when the point is reached to defend that terrain they hold and go firm in the face of Axis attacks to retake them, with both sides cautiously watching that their combats do not result in dangerous gaps that could allow a rapid penetration to yet more victory point areas lost.

The VP areas keep on giving once taken and thus the Axis must stop the bleed of VPs to the Empire from territory grabbed in previous turns.

The end of our first game and the Axis are defeated and forced to pull back from Tobruk losing key armoured assets in battles around Fort Capuzzo and Sidi Omar.

The game proved very entertaining and in two play throughs reached a climax by the second day of the offensive as the Axis were stung into a response as the Italians on the frontier recoiled or were destroyed in the face of British tank assaults.

However we both felt that the German panzer forces together with their anti-tank capability did not seem to be adequately reflected in the game, with poor British tank tactics, displayed by Churchill's Tiger Cubs charging massed lines of dug in 88mm and Pak 38 At guns, seemingly not captured in the combat resolution which we both struggled to match with our reading and understanding of this battle from the history books.

That said this is a nice rendition of this interesting early war desert campaign, with great graphics and other nice touches modelling this theme and made a nice change from Crusader and later offensives.


With Operation Battleaxe concluded in January, Steve and I turned to another interesting offering from Revolution Games, Pacific Fury, Guadalcanal 1942, another area based game but with an entirely different theme, focussed on the naval and land struggle between Japanese and American forces to take and hold the strategically important island of Guadalcanal in the Solomon's campaign of 1942.

The map set up for the start of Pacific Fury Guadalcanal, with both fleets ready to be deployed onto their respective operations tracks, seven boxes to be played through each of four months August to November. Henderson Field is in American hands on the Initiative Track, and the Japanese player builds task forces first, then the American player, who then deploys (sorties) onto the map first.

This game along with 1805 Sea of Glory are perhaps my favourite choices played so far since my last Vassal update and very cleverly recreates some of the issues the respective naval commanders of both sides faced in the decisions around force deployments in and around Guadalcanal in support of land units struggling to gain ascendancy and control of its vital airfield.

This game is all about anticipating what your opponent is likely to do and to try and outwit his deployments, called sorties, with those forces of your own, hence task force construction using the aircraft carriers, battleships and cruisers of the respective fleets, placed in the right order on the Operations Boxes that decides the order task forces can 'sortie onto the map is vital.

Game one, turn three, October, with the Japanese controlling Henderson, which has suffered a bombardment or air strike (indicated by a red X) and seeing the Americans needing to land troops with two transports to shift the marker two spots in their favour at the close. Oh and should a transport get sunk in the effort that shifts the marker back one in favour of the Japanese - Great Fun!  Note TFA US transports escorted by heaps of battleships and cruisers on the Operation Boxes, coming on next, set to come on last, hopefully once the Enterprise Task Force Carrier in the South Pacific Ocean has dealt with the opposition to allow an unopposed landing. Note also a Japanese TFC coming on last foreboding a carrier battle at the close. Normally during game play these opposing deployments are hidden from the opposition but shown here for illustrating game play.

Task Forces come in three flavours, Task Force Carrier (TFC must include a carrier either Fleet or Light), Task Force Bombardment (can only be composed of battleships and cruisers), Task Force Assault (TFA must include one or two transports and potentially battleships and cruisers). In addition the Japanese player has a special TFA, the Tokyo Express representing their fast destroyers able to move into Ironbottom Sound and land troops at night and departing before daylight.

TFC's can only operate in the open seas of the South Pacific Ocean and Eastern Solomon's, conducting carrier battles with enemy TFC's in their sea area and launching airstrikes against opposing groups in adjacent areas including Henderson and TFB's and TFA's they can catch in and around Ironbottom Sound. The slot is immune to such attacks and allows the Japanese a secure deployment zone from them.

Only TFB's and TFA's can enter Ironbottom Sound and The Slot, either fighting opposition task forces, bombarding Henderson and or landing troops. If at the end of a two tur combat resolution one side or the other occupies Ironbottom Sound and the force has transports, they immediately land before the force withdraws to its respective base at either Truk or Espiritu Santo.

End of November, Game One and an American Victory having fought back in October to take Henderson and hold it with two TFB's in Ironbottom Sound supported by the Hornet TFC a Japanese TFB and TFA held a bay in the slot. 

The latter operation is key to winning the game as troop landings enable the initiative marker and control of Henderson to be moved in either direction according to who landed the troops, which will always be the player who does not have control at the time and with that aspect of the game likely to change should control shift, say from the Americans to the Japanese.

Thus the other naval deployments are all about keeping or taking control of the Henderson marker, with ship losses nothing to do with victory, if the marker should lie in the control of either player at the conclusion of the November turn.

Some folks seem to struggle with that concept, but I rather think it reflects very well the position of both sides, to come out on top in this defining campaign, pretty well no matter what the cost in ships and men, with the result of this campaign shaping the direction of the Pacific War, with large numbers of major ships lost by both in the actual fighting, which would see fleet and light carriers, battleships and numerous cruisers written off the orders of battle for both sides.


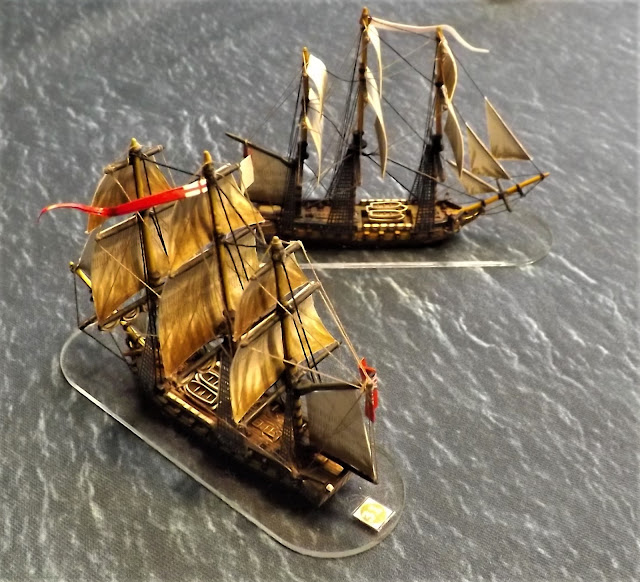
Finally Jason and I are going to start another Sovereign of the Seas game this time trying out the idea I presented in my post back in August last year to use the game as a table-top campaign battle engine, using the 1:700th collection of model ships to resolve the combats we generate in our game and translating the results back into it.

Having played the game as a straight board game we have a pretty good idea as to what it will generate in terms of engagements and the addition of bringing in players from club to fight out those engagements and then translate them back into the SOTS will, I think, make for an interesting campaign system.

In that vain I have composed some simple tweaks to facilitate such play that also sees the use of the 1805 spotting rules adapted to our SOTS game as well as the use of Kiss Me Hardy to resolve the action.


We now have a date in the diary at the end of this month to start things off in 1793 with the commencement of the French Revolutionary War and we will play the board game on Vassal with a Zoom link and an invitation to players in the club interested in playing the table-top actions to join us if they would like to follow the play, which will generate our first battles of the war.

Needless to say I will update the blog here and on the Devon Wargames Group as to our progress.

More anon 

JJ

Monday 14 February 2022

Battle of Cape St Vincent 14th February 1794 - 225th Anniversary Game at the DWG

 
At 1004, on the 14th February 1797, the day having dawned fine but misty, the British frigate La Minerve signalled that there were twenty sail, bearing south-west. This was followed at 1030 by a conclusive report, proving that the main Spanish fleet was present, when the Bonne Citoyenne signalled 'Strange sail seen are of the line'.

Admiral Sir John 'Jervie' Jervis
Aged 64, a veteran of fifty years by the time of Cape St Vincent and
a 'fighting admiral', having masterminded the naval side of the
combined operation to capture Martinique in 1794.
JJ's Wargames - By Fire and Bayonet, Grey's West Indies Campaign
A hardworking disciplinarian, expecting the same dedication from his subordinates,
but with a softer side having replaced £6 in spoiled notes at his own expense
 (five months pay) to a sailor who had left them in his washing.

As all the signals arrived on the flagship, HMS Victory, they were passed on verbally to Admiral Jervis by his Captain of the Fleet, Robert Calder, leading to a famous exchange:

'There are eight sail of the line, Sir John.'
'Very well, Sir.'
'There are twenty sail of the line, Sir John.'
'Very well, Sir.'
'There are twenty-five sail of the line, Sir John.'
'Very well, Sir.'

The hesitant Calder persisted:
'There are twenty-seven sail of the line, Sir John.'
Then adding to emphasise his point,
'Near twice our own number.'

'Enough Sir!'
came the sharp rebuke,
'The die is cast and if there are fifty sail I will go through them!'

Last Saturday I joined friends at the Devon Wargames Group to play a game that I have long wanted to have a go at running, the Battle of Cape St Vincent, the climactic battle between the navies of Great Britain and Spain fought off the Portuguese south-western cape that lends its name to the battle.

The Beatles and the Rolling Stones of their day. Sir John Jervis cleared out the 'dead wood' under his command of the Mediterranean Squadron and formed the nursery of the future commanders of the Royal Navy which helps illustrate why this British fleet was the elite in the navy of that time.

To provide background to this game I have uploaded a series of posts in recent days looking at the wider campaign situation that resulted in the battle together with my planning and preparation for the rules and the translation of the historical set up to the tabletop and if you missed those posts you can follow them in the links below.


This game is a big one when it comes to this period of naval warfare, and the challenges of size increase when you decide to play it in 1:700th, but I think when you see the models on the table, the scale offers so much in terms of the visual effect of naval gaming in the 'grand manner' to use my favourite 'Gilderism'.

The planning and prep for the game included the map work seen below which I translated on to my table at home, so I had a pretty good idea how the set up should look, but I wasn't entirely sure of the table dimensions and took along two 10 x 5 foot cloths to permit 'going large' to allow for the full deployment of the British fifteen ship approach column.


With both fleets initially operating with a bow wind, table length wasn't my concern but more so the width once the Spanish turned with the wind to try and get back to Cadiz along the approach route of the British.

In the end we set up a 12 x 6 foot table and spread both cloths over it to give as much width as the human arm could manage and a bit extra on the ends for table space for dice, rules and marker as seen below once everything was set up.

Our 12' x 6' table laid out and ready to go 

In fact the extra width allowed the British column to arrange itself along the North East corner which made bringing the new arrivals on in line ahead very straight forward.

The table seen from the south with the Spanish set up nearest to camera

Our usual club routine sees as starting setting up at about 10.30am and playing through to about 16.30 to 16.45 leaving plenty of time for a pint afterwards, but for this game we had the building opened up by 09.30, started at about 10.00 and played through until about 17.45, and had a late pint in the pub.

Bob gets our game underway as Vice Admiral Moreno aboard Principe de Asturias and getting the first movement chit out of the bag, and immediately turns to starboard in accordance with the signal received. This as Cordoba greets HMS Culloden with a ranging shot.

The first stage of an historical scenario is always interesting to see what the players will do with the positions handed to them by, in this case, Messrs. Jervis and Cordoba, and as soon as the first orders chits appeared, both commanders took the opportunity to run their signal flags aloft to inform their respective juniors of their new headings and objectives.

Likewise Cordoba and Morales in the leading group, turn onto the heading for Cadiz.

Jervis on the other hand had decided to dispatch Parker with his Van Squadron to deal with Moreno as he led the rest of the fleet towards Cordoba's approaching gaggle.. The lead British ship, Culloden has just turned onto her new heading, south, centre top of picture.

The respective  positions of the various squadron groupings that would come to characterise our recreation of this famous battle started to take shape within the first three turns as Rear-Admiral Parker had his leash slipped by Jervis and happily obeyed his signal, 'Engage the Enemy more closely' freeing him to wade in among Moreno's group of five opposing Spanish with his squadron of three, Culloden 74-guns, Blenheim and Prince George, both 98-guns.


Likewise the Spanish commander took an early decision to order a new heading for the fleet to the NW and on to Cadiz, thus bludgeoning his way through the British that were in the way, bringing on a general engagement across the battle area as the groups met earlier than in the historical fight.

The two main fleets approach as in the background Parker and Moreno's lead ships have opened fire on each other

The battle commences as Captain Troughbridge orders HMS Culloden 74-guns to open fire on Moreno's flagship, Principe de Asturias 112-guns as the Oriente 74-guns on her starboard side replies with San Firmin 74-guns close astern.

Perhaps the rather aggressive stance taken by both opposing command teams is typical of wargamers, but the need to wear down an opponent with accurate gunnery, before closing to melee or boarding as it would be known at sea, applies equally to land and sea battles of this period.

Thus the Spanish may be of poorer quality in combat terms, but there are a lot of them and the task is not to beat them all but to beat enough of them to make the others sail away in disorder, thus making it easier to defeat the trailing retreaters individually.

The map above helps show the progression of our game as the Spanish made an early change of course NE as Jervis split his squadrons to attack each group only to see the wind shift and the swell to increase as the battle developed. The most badly damaged ships at the close are illustrated with the San Fermin having struck after being boarded.

So for example, Admiral Parker found Admiral Moreno more than ready and able for the little battle that developed in the south, and although the San Fermin fell to boarding, the British prize crew soon found themselves desperately looking to get ready to defend their prize at the close because Moreno was not forced to break off and was still very much in the fight.

The Spanish have turned as Jervis splits his squadrons to tackle each of their groups

HMS Culloden in Rear-Admiral Parker's squadron (Jack) bore the brunt of the initial exchanges as born out by the damage she had taken by the close. Three gun boxes knocked out on her starboard side indicate the direction of the fire she received from Principe de Asturias. Her port (larboard battery have used their initial broadside (red box on 'PORT'), in her firing back at the line of Spanish 74's that passed her on the other tack.

In the main central battle, the decision to sail the British squadrons down either side of the Spanish gaggle meant that the lead British ships were subjected to fire from fresh enemy opponents as they moved slowly along their line, causing ever increasing levels of damage as they got nearer to the big Spanish three deckers at the back.

Yes the Spanish were suffering as well but the battle had turned into one of attrition allowing Spanish numbers to have an effect they would not have had, had the British attack simply fallen on a specific part of their gaggle, quickly disposed of several of their ships, and broken the fleet morale to resist further attacks.

The fight between Parker and Moreno developed into a separate little battle in its own right 

Moreno's flagship, shows the benefit of the sturdy three decker's ability to absorb damage, with 29 hull hits but still only well in the light damage category of the 15% morale loss level on her Damage record.

The firing becomes general and close in.

With both fleets committed to their orders the attritional battle, typical of an AWI action started to play out, only made worse from a British perspective by a change in wind further round to the north that forced the British to tack, or for those with smashed bowsprits, turn away, followed later by a 'Turning Choppy' chit that saw the test produce an increased Atlantic swell forcing the lower gun ports to close.

The San Firmin, one of the three 74's in Moreno's group bore the brunt of R. Adm. Parker's attack
and in her desperate state was an easy target for boarding, once softened up. Note both her batteries have used their initial broadsides in her desperate defence.

The effects of the swell on the gunnery was probably the worse thing to happen from a British perspective, further reducing their gunnery advantage, seeing the two-deckers gunnery dice halved and the three deckers reduced by a third.

Admiral Jervis (Lawrence) on HMS Victory 100-guns, closest to camera leads the fleet against Vice Admiral Cordoba's (Paul) main group of ships as Irresistible 74-guns and Goliath 74-guns, immediately ahead open fire.

If that wasn't bad enough, the Spanish then decided to start rolling their d10's in such away that the most outrageous critical hits were being scored against their British opponents, just as the British started to miss with their responding d10's, which saw several British masts and wheels go over the side, and unbelievably a gun-burst on one British ship causing it five damage points rather than any hurt to the enemy. 

Captain James Saumarez, commanded HMS Orion that was in the van position of Jervis's squadron as it proceeded down the starboard side of Cordoba's main group of ships exchanging fire at medium to long range in an increasing swell that forced the closing of the lower gun-ports on her starboard side.

The frigate HMS Lively 32-guns, tacks as Vice Admiral Thompson's (Steve M) squadron obey Jervis' signal to cross the Spanish and turn alongside their larboard side, under Vice Admiral Morales (David) with HMS Egmont 74-guns leading Goliath 74-guns and Thompson's flagship Britannia 100-guns following.

The reduced gunnery also affected the rate of damage being inflicted particularly at the close ranges, and in situations where potentially Spanish ships may well have struck in more normal seas, they were able to sail on with more moderate damage and continue the fight.

HMS Colossus was the second ship in Jervis' squadron behind Orion and displays a similar damage profile, all be it an unfortunate critical hit at medium range from the Spanish return fire that took down her fore mast and has reduced her speed accordingly, although the bow wind meant the British were moving slowly anyway.


Thus it was that our British commanders were looking a little punch drunk and on the ropes as our Spanish commanders were not quite believing their luck, and with the battle very much on but very much undecided as the last few hours of our day approached.

HMS Irresistible was the third ship in Jervis' line with Victory close astern and took the brunt of Spanish fire, once they had got their 'eye in' practicing on Colossus, again causing a critical hit on the British 74 removing her bowsprit and inflicting high officer casualties on the quarterdeck. The lost bowsprit meant no tacking which limited the her choices of manoeuvre.

Intermingled ships as Moreno and Parker grapple each other and the San Firmin falls to British boarders

The Prince George was in the thick of the exchanges between his and Moreno's small squadron and the firing was very close which minimised the effects of the closed gun ports caused by the heavy swell. As with Moreno's Principe de Asturias, the three decker shows her ability to absorb the knocks that would stagger a 74-gunner.

However a closer look at the state of the respective fleets and the damage caused at the end revealed an interesting picture that would have rewarded a second day playing our game to a conclusion.

The morale states of the respective fleets meant that despite their numbers Spanish morale is brittle with an 11 PPV (Preservation Point Value) for the fleet as a whole versus 19 PPV to the British, meaning that with the loss of three three-deckers (9 PPV) and a two decker (2 PPV) the Spanish would likely break off the battle long before the British reached a similar state.

Broken down by command, it shows Cordoba's group likely breaking off on the loss of three three deckers ((9 PPV) or five two deckers (10 PPV) or a combination of the two and Moreno's group only losing a three decker (3 PPV) or two of its two deckers (4 PPV) to cause a test to break off, which would effect Cordoba's group.

Moreno had already lost a two decker at the close and boarding attacks were in play on others of his command, whilst Nelson and Collingwood were ranging in on the battered third-rates of Cordoba's group as our game ended

Moreno's ships attempt to use their numbers to make up for their lack of quality by massing against Parkers little group of three ships, with their five which includes two three deckers on both sides.

The battle in the centre becomes general and British masts and bowsprits start to fall as Spanish fire proves unerringly accurate.

HMS Egmont 74-guns was the lead ship in in Vice-Admiral Thompson's line as it passed along the larboard side of Cordoba's main group. Arriving later into the fight than Jervis' squadron ahead in the line, she shows less damage than Orion, Colossus and Irresistible, but bears the mark of the Spanish gunnery in our game with her helm dismantled early in the first exchanges of gunfire.

The mass of Spanish ships seen from the larboard side of Cordoba's and Morales' main group with the British attack developing along each side seen ahead.

On further consideration of the state of play at the close of the game, I was able to do a victory point calculation based on a simple, 'how well have I done', victory check I had prepared should we have ended the game with or without a conclusion.

The Spanish weren't having it all their way as the damage log for Conquestada 74-guns leading the starboard group in Cordoba's gaggle of 17 ships and taking on the leading three 74s of Jervis' squadron.
Her larboard gun battery is smashed up and her mizzen mast is gone, testament to the accuracy of the British fire

Close astern of the Conquestada was San Ildefonso which was next to receive British softening up, slightly less damaged than her comrade.


It's the end of the day for us at about 17.45 and the table is tidied up to show where our game was stopped, with battle well and truly underway but sadly no more time to conclude matters.

The Terrible was tucked in close behind the Conquestada and San Ildefonso and has had her guns take apart by British fire as well as losing her helm early on in the exchanges of fire.

Our end table seen from the north and the main battle. The two British 74's seen heading south-east (left of picture) are Nelson's Captain, followed by Collingwood's Excellent looking to head off the escaping though battered Spanish ships, Conquestada, San Ildefonso and Terrible.

The leading Spanish ships though damaged look likely to be able to break off should they choose, but the British lines on either side are working their way toward Morales and Cordoba's flagships and Nelson and Collingwood are preparing a greeting for these chaps in the centre of the picture.

That victory point calculation revealed the following:

My victory assessment awards a value for each ship in the battle based on its hull size x 5 and then adds or deducts points for being outnumbered, damaged or running away, based on a sovereignty rating to deduct points for disgrace
The damage recieved and the loss of the San Firmin reduced the Spanish tally by 55 points

Despite their problems the British were making progress increasing their points tally by 22 thanks to the taking of the San Firmin, but with still plenty of work to be done.

Still very much undecided at game end, the battle between Parker and Moreno. 

I know it is often felt unsatisfying to leave a game with the decision point undecided and I may well come back to this game and refight it over two days at Chez JJ when time permits, but on the other hand I rather like the way this shows how very much a battle like Cape St Vincent could have turned out very differently had not Jervis played very much to his strengths and to the enemy's weakness.

That and a good helping of Nelsonic genius.

The Spanish were not the power they had been in previous centuries, but in large numbers were still a force to be reckoned with as most British commentators of the time have remarked, noting how determined Spanish crews were to defend themselves when under attack.

Our game was definite tick on the 'old bucket list ' of games I have wanted to do for a very long time and I can only thank my friends and fellow DWG club members for making it such a memorable and well played game that typifies how the club like to play.

Thank you to Paul (Vice Admiral Cordoba), David (Vice Admiral Morales), Bob (Vice Admiral Moreno), Lawrence (Admiral Jervis), Jack (Rear Admiral Parker), Steve M (Vice Admiral Thompson and Waldegrave's Squadron) and John (Commodore Nelson) the latter having a very quiet game, only getting into action right at the end and who I now owe a very special place in the next game to make up.

If you would like to watch a ten minute compilation of pictures and video clips from our game illustrating how the models were being activated, fired and moved, using Kiss Me Hardy, then just click on the link below.


Cheers
JJ