
 |
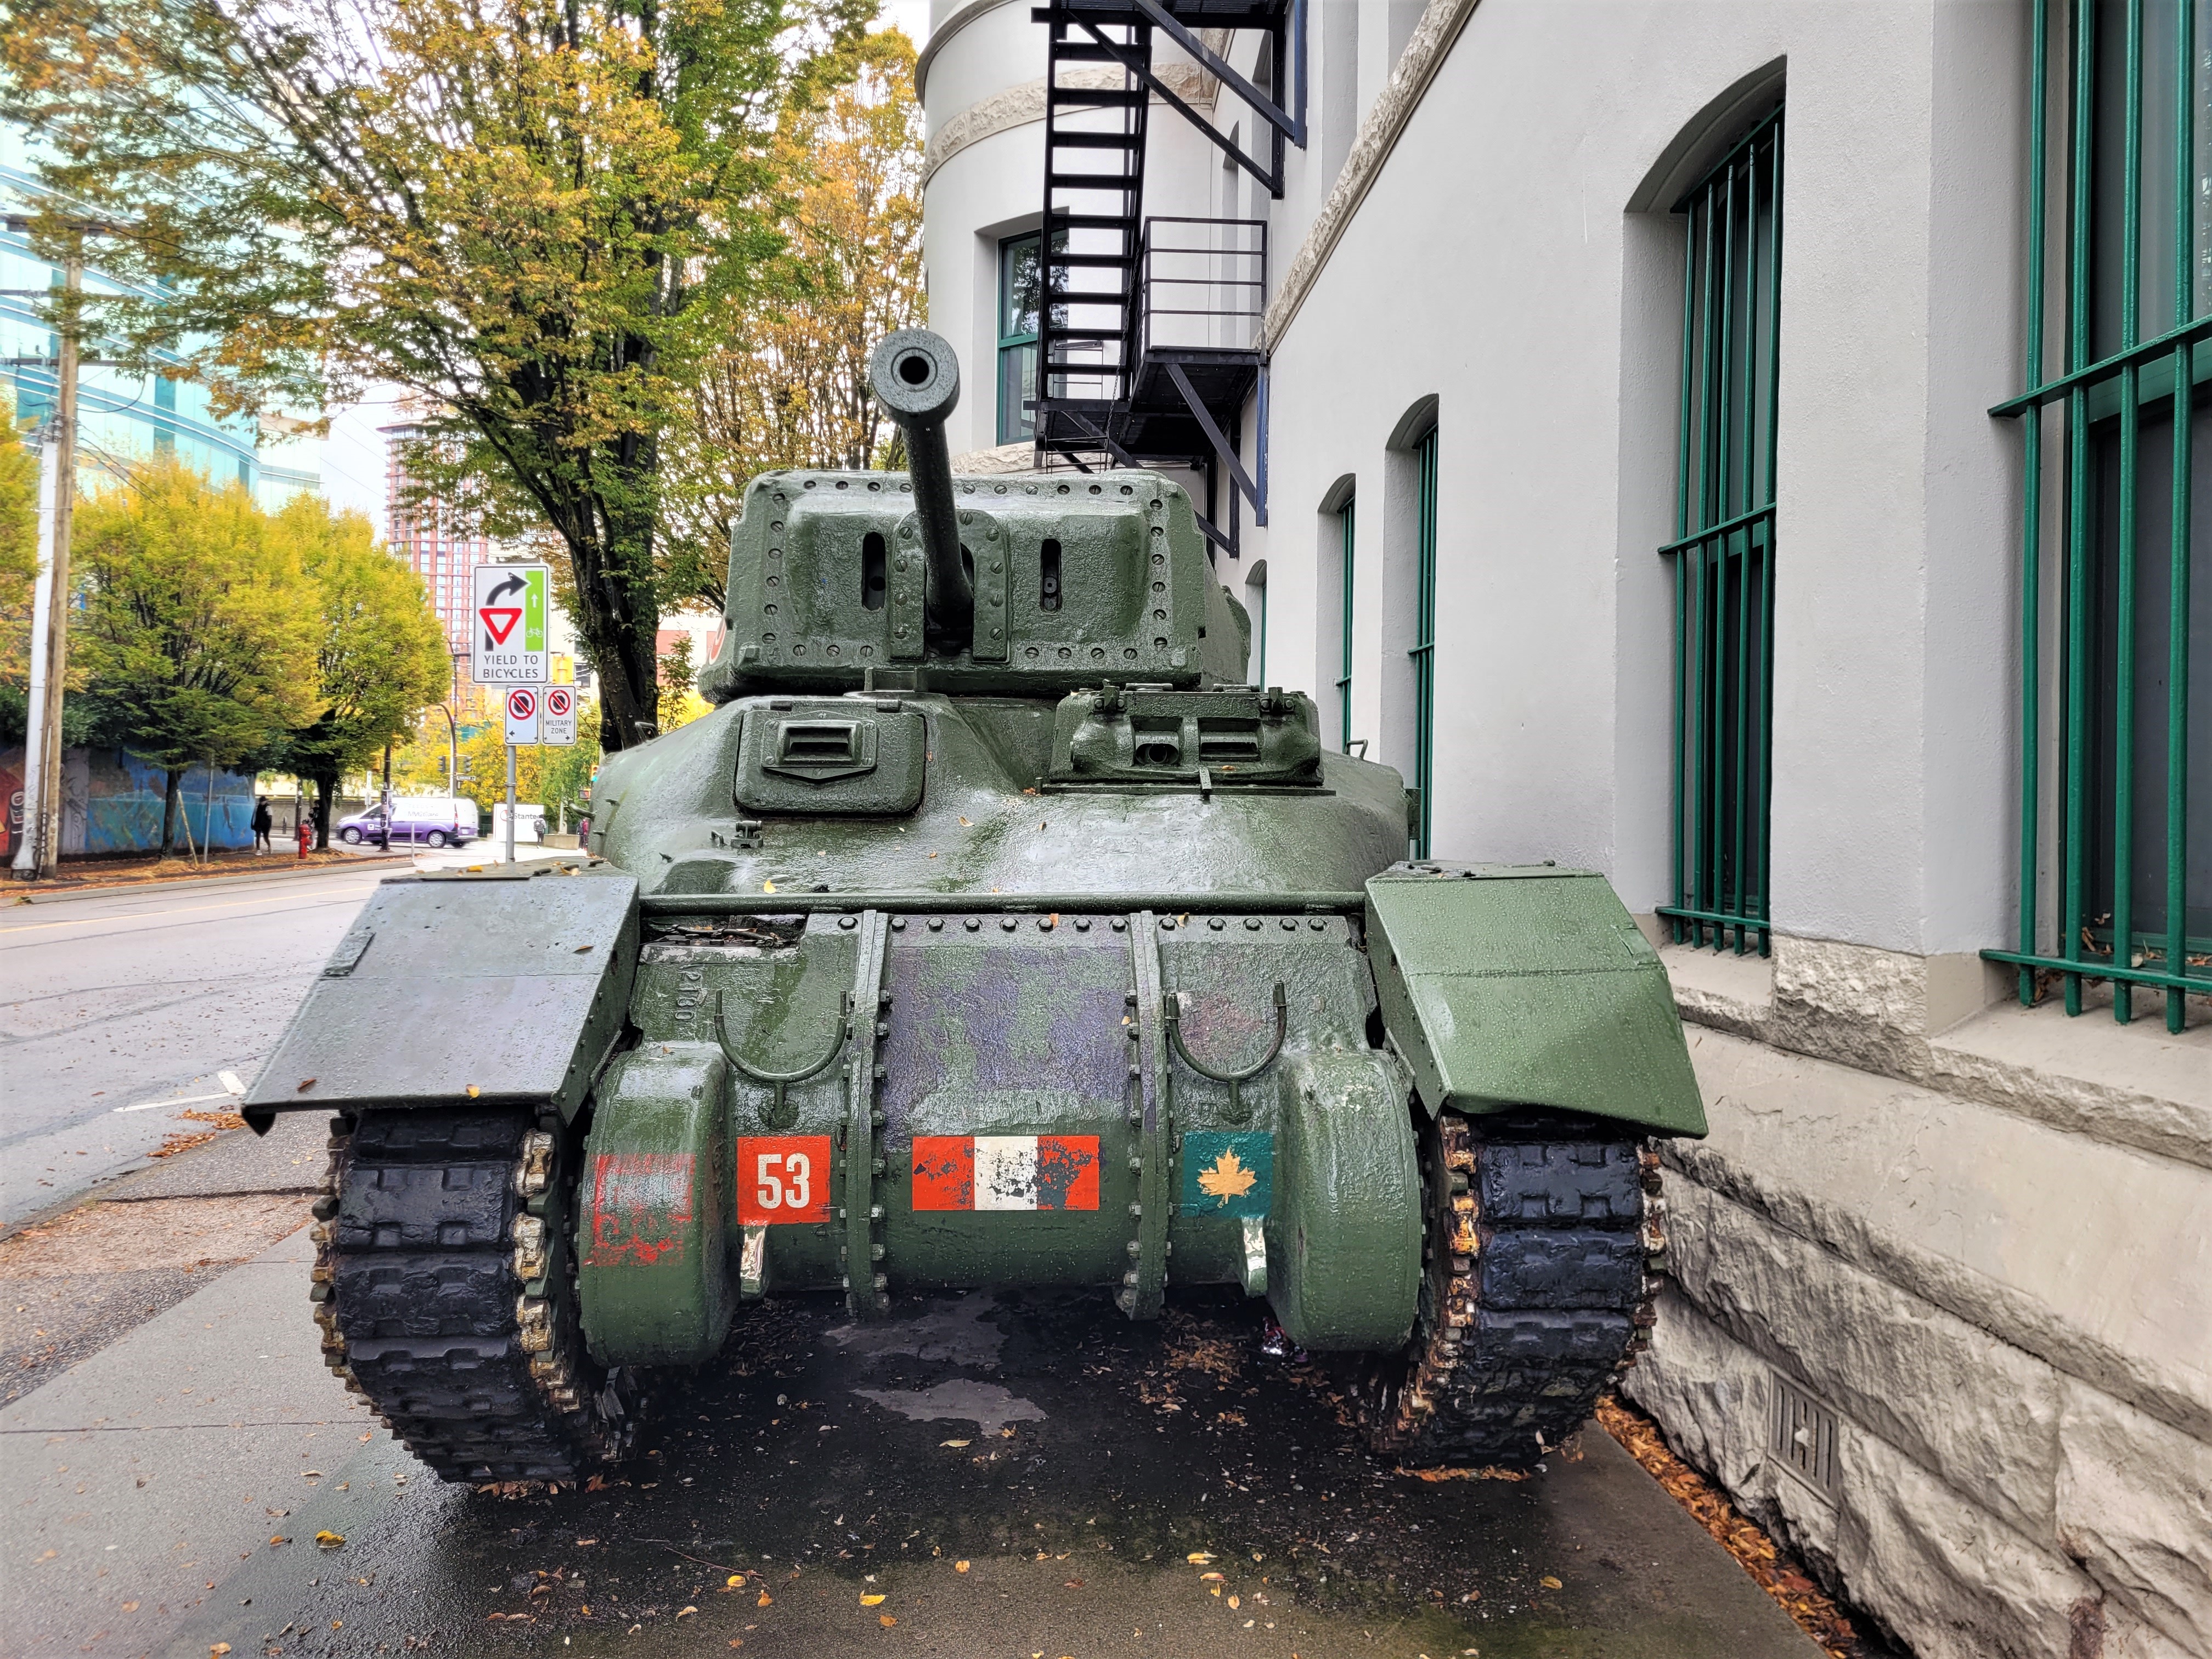
| The Canadian RAM II stands guard outside the Old Drill Hall in Vancouver, a memorial to the Royal Canadian Armoured Corps. |
As regular followers of the blog will know, I work hard at keeping the content on JJ's as varied as I can, representing as it does my own tastes in the things I find interesting that inspires me in the hobby and that helps illustrate that as an historical wargamer we can combine other activities and interests with this one anytime anywhere.
Over the next few posts I will hope to bring lots of new themes and adventures with pictures from a little trip that Carolyn and I had been planning for quite some time now, and put on hold as many other folks plans have been by the Covid pandemic.
 |
| Completed in 1930, the Marine Building in Vancouver, is one of the city's most iconic buildings and a superb example of the Art Deco style of architecture. |
Recently, we set off on our little jaunt that saw us flying to Vancouver in British Columbia, Canada, ostensibly to visit family relations I have in the area, as we stopped off for a few days enroute to another interesting part of the world, but very much keen to get to know better this beautiful part of Canada, into the fall and with the maple leaves turning bright red.
 |
| The original name of the small settlement that became Vancouver, was Gastown, with a makeshift tavern next to Hastings Sawmill, built in 1867 and owned by proprietor John Deighton better known as 'Gassy Jack'. The original site is marked in the city by the remarkable Gastown steam clock. |
 |
| Dr.Sun Yat-Sen's Classical Chinese Garden captures well the diverse cultures and architecture that characterise modern day Vancouver city |

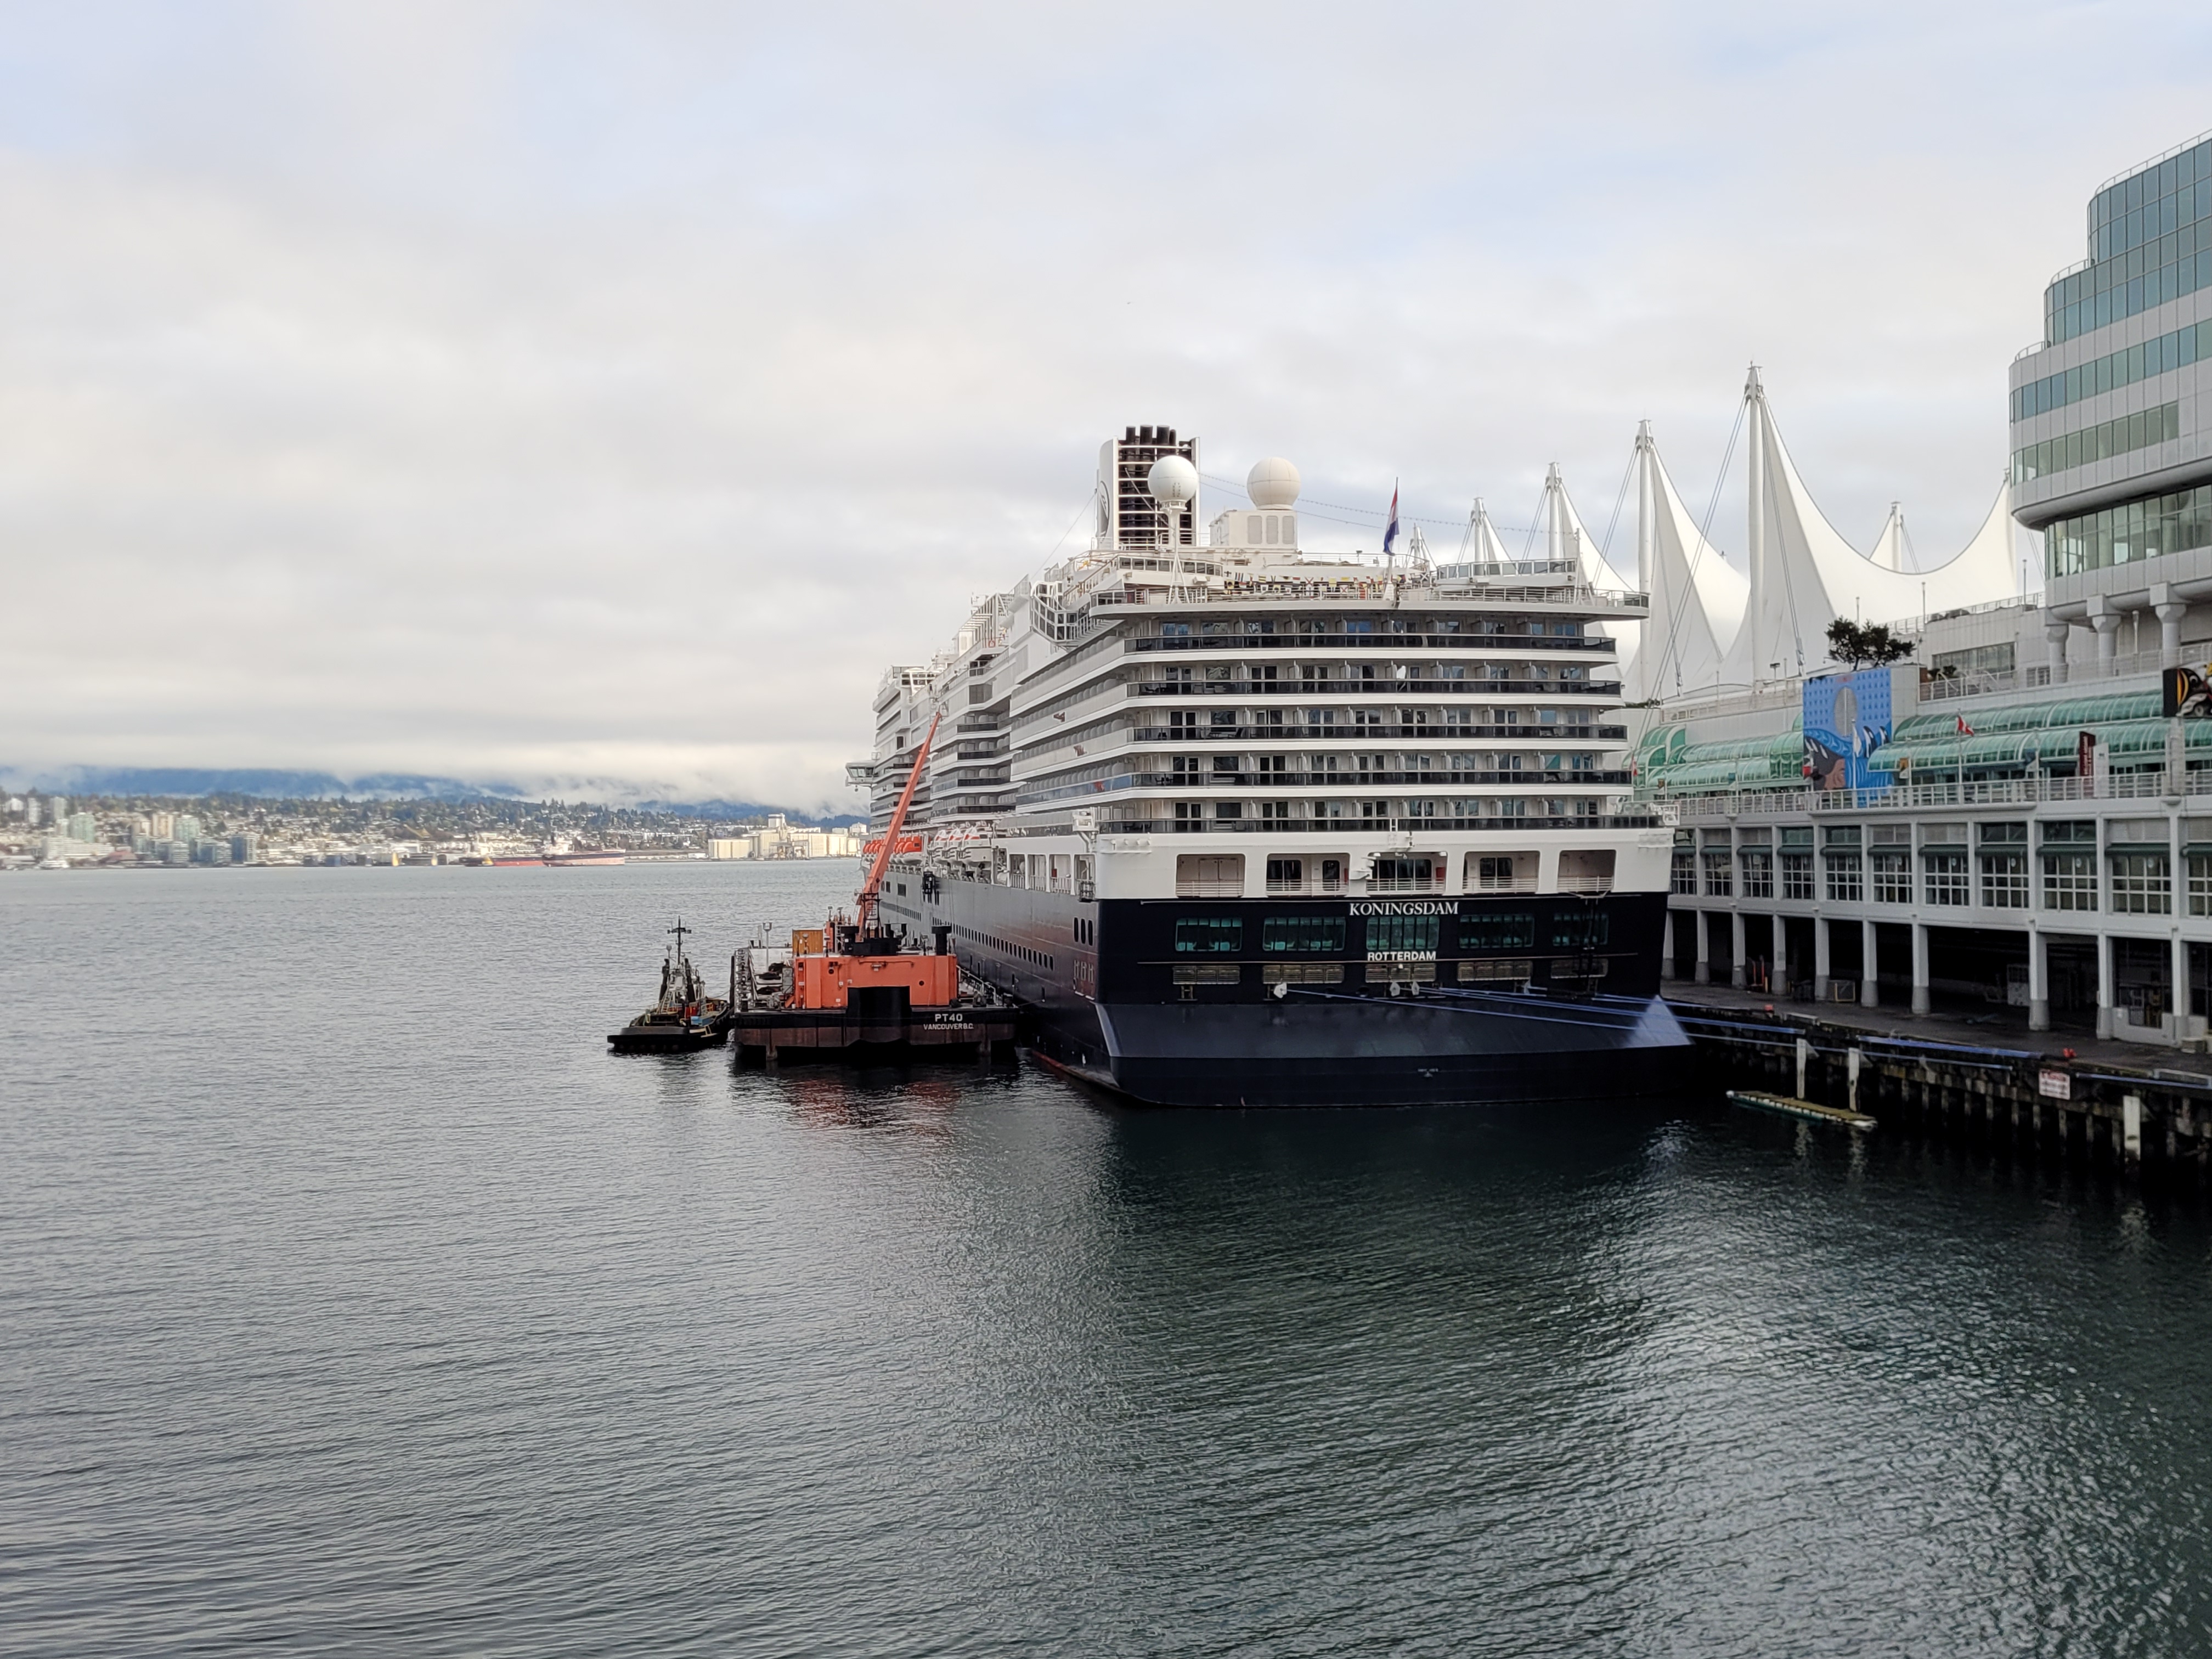 |
| Modern day Vancouver harbour plays host to massive Dutch cruise liners and container ships |
Of course before the arrival of Captain Vancouver, the area had been settled more than ten thousand years previously by indigenous peoples that included the Squamish, Musqueam and Tsleil-Waututh people.
 |
| Territory of the Musqueam Indian Band https://en.wikipedia.org/wiki/Musqueam_Indian_Band |
The First Nations or Indigenous Canadian people of this part of North America are famous for their amazing totem poles often carved from western red cedar trees, and their inclusion in the story of Vancouver is represented across the city in information boards recording the part they played in its creation together with a remarkable collection of totem poles to be seen in Stanley Park, that juts out into the waters of Burrard Inlet.


With the losses sustained by British tank forces in the fall of France in 1940 it was immediately recognised that British tank production was insufficient to reequip British and other Commonwealth forces such as the Canadian army, eager to build it's own tank force as part of its contribution to the Allied war effort.
 |
| The Dukes - One thousand soldiers of the 6th Regiment (Duke of Connaught's Own Rifles), Canadian Active Service Force marching down 8th Street, New Westminster, British Columbia, 1st October 1940, to an unknown destination overseas. |
Thus Canada was forced to look to its own local production capabilities, turning to the Canadian Pacific Railway's Angus Shops in Montreal to use its spare capacity to produce an order for 488 tanks for the new Canadian Armoured Division having previously built 300 partially constructed Valentine tanks for the British.
 |
| Canadian tankers training with the RAM II |
However the Valentine was a slow Infantry Tank and the Canadians were looking for a faster cruiser type to equip its new force and the Canadian Joint Committee on Tank Development concluded that production would be speeded up if the design of its tank was based on an American design and components rather than British, with the basic American M3 hull selected that formed the basis of the Lee/Grant sponson mounted gun tank, a design deemed unsuitable for British and Canadian use and thus leading to a redesigned upper hull and turret to carry a turret mounted main gun.
 |
| RAM Mk.II armed with a 57mm (6-pounder) main gun |
The new hull was designed by British tank designer L. E. Carr with a turret that could take either a British 6-pounder (57mm) main gun or the American 75mm gun, whilst retaining the lower hull of the American M3 tank.
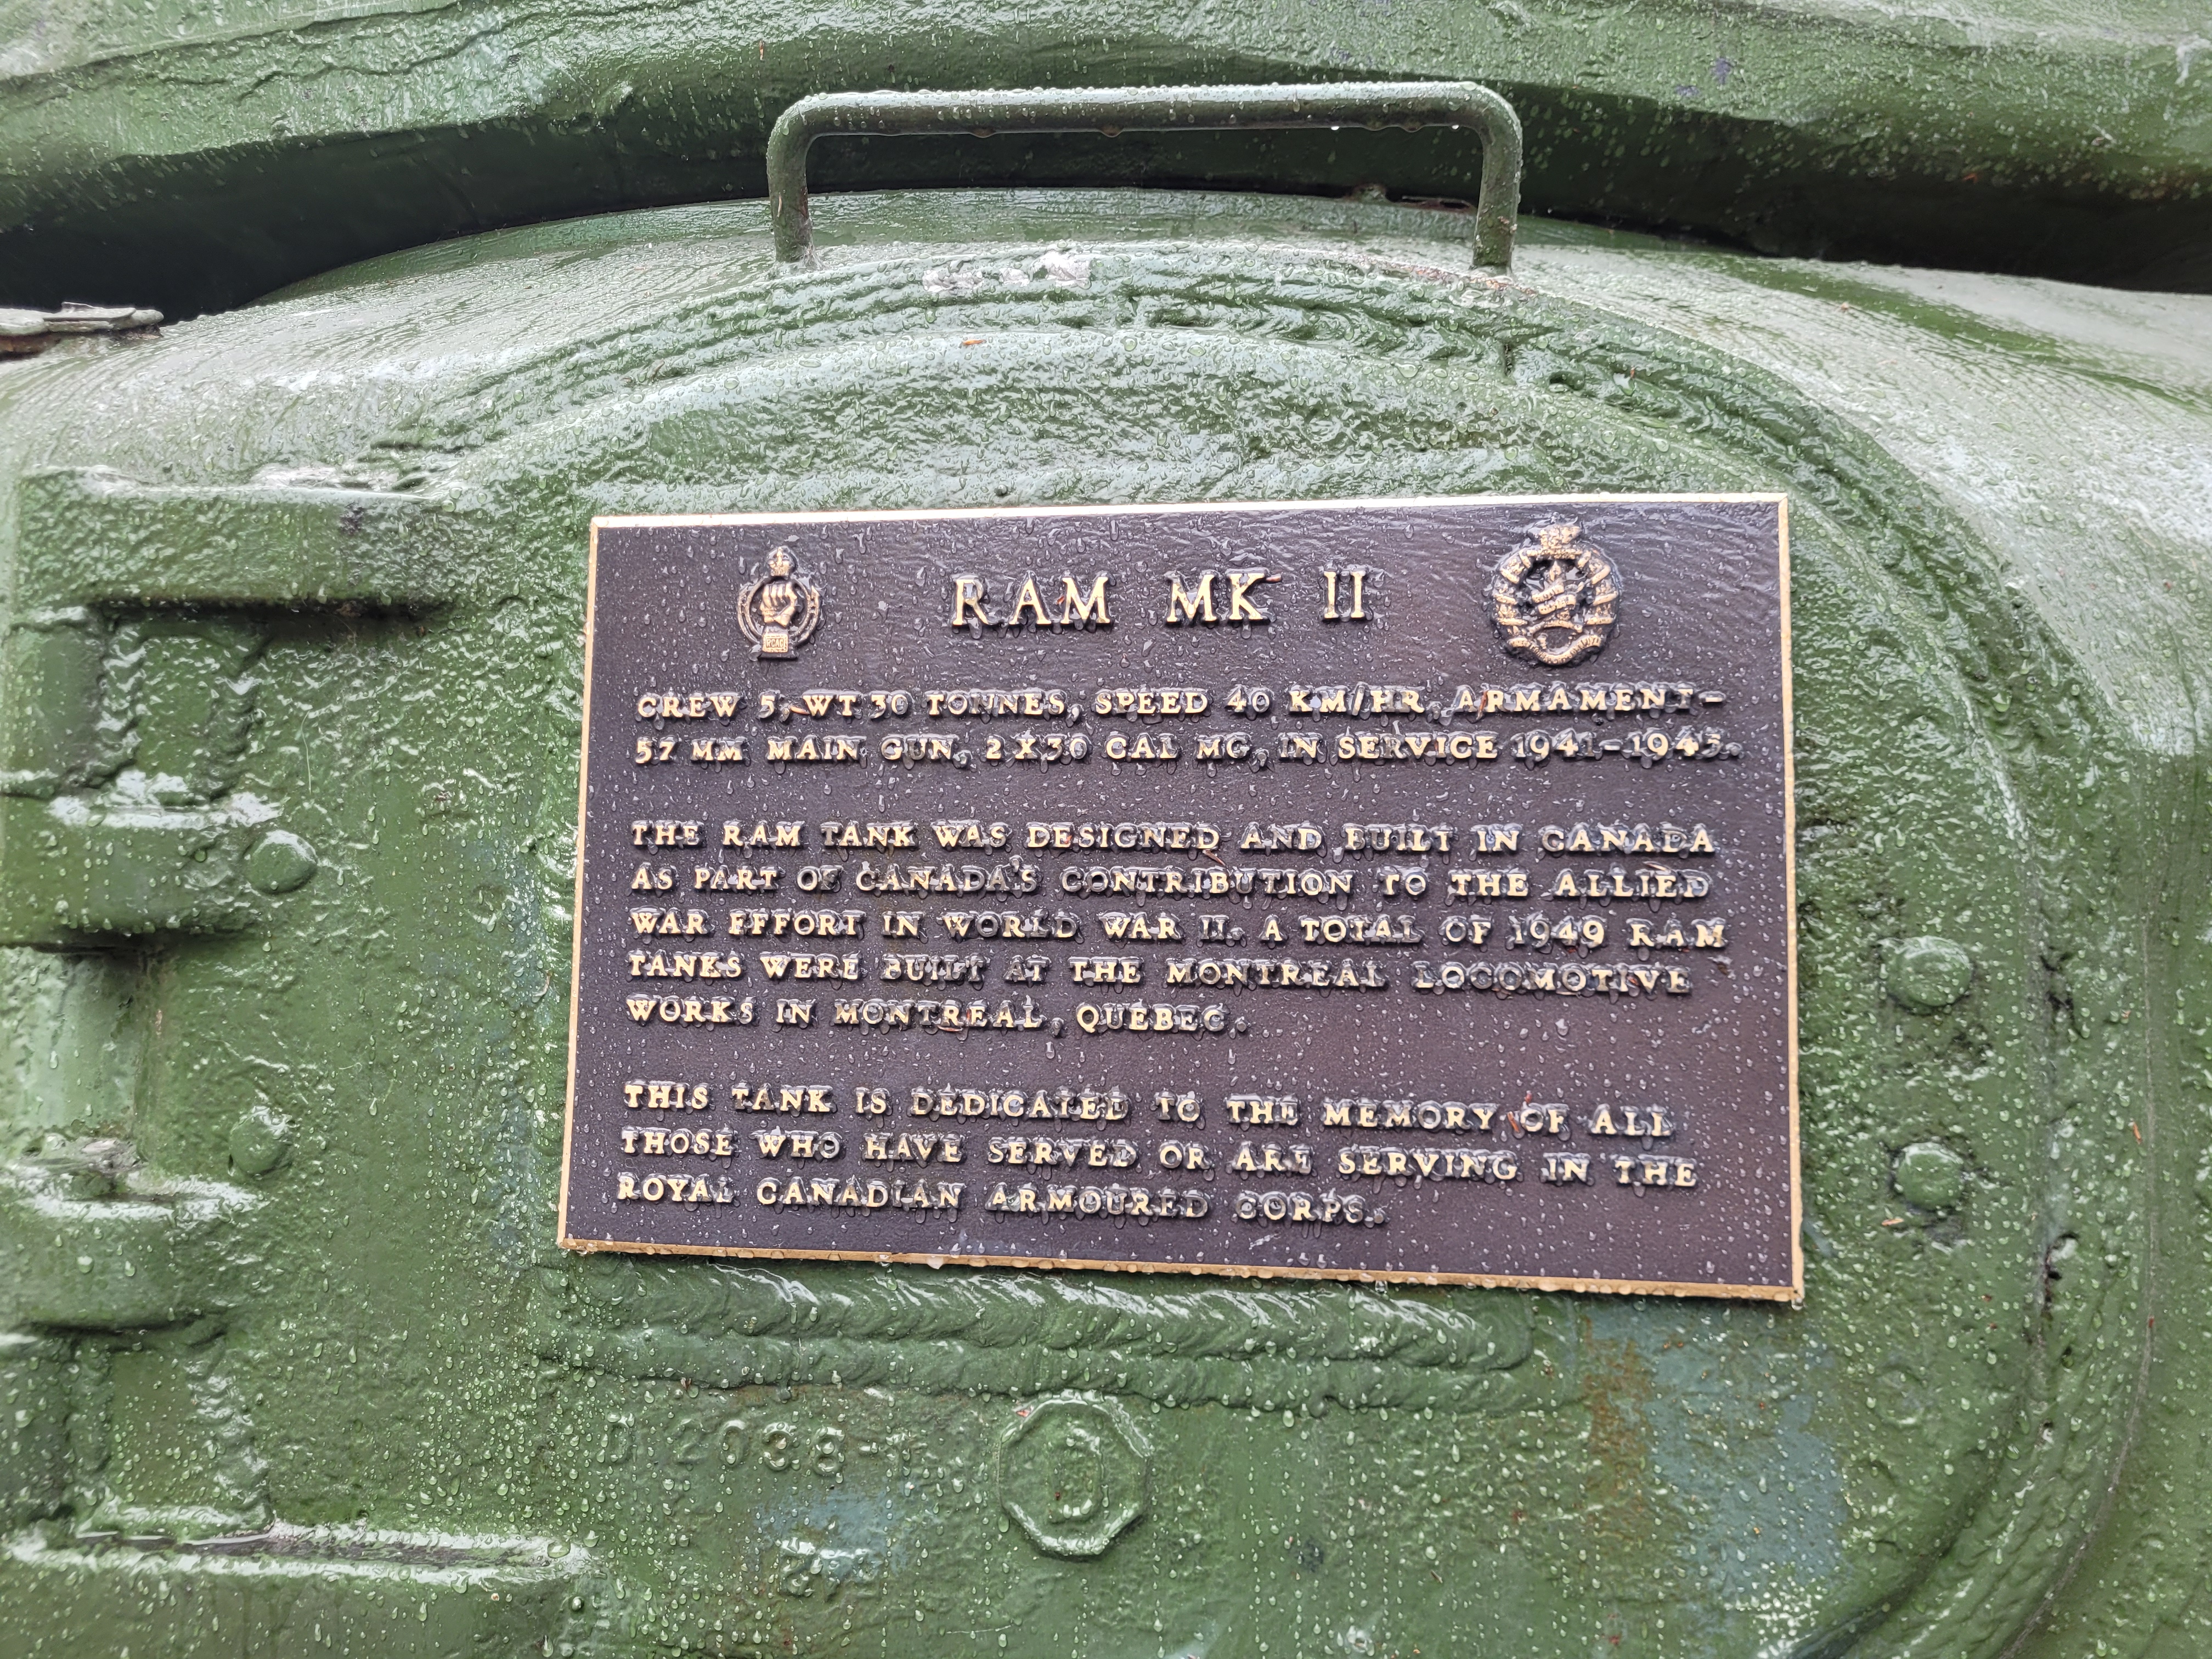
The new hull was cast rather than riveted as on the old M3, however by the time production of the RAM II began in February 1942, the decision to focus on production of the Sherman M4A1 as the main Allied tank to equip British, US and Canadian forces had been taken, confirmed in March 1942.
Thus, although RAM production continued on into July 1943 it was doomed to only see service in its turreted model as a training vehicle for Canadian armoured forces.
 |
| A RAM Kangeroo in action in the closing stages of the war in Europe |
RAM tanks, however still made a contribution to Allied victory in Europe in 1944-45 with their conversion from gun tanks into artillery OP tanks, artillery tractors, flame throwers and perhaps the most long-lasting Canadian contribution, that carried over into post war armoured developments, the first fully tracked armoured personnel carrier, pioneered by the Canadian Lieutenant General Guy Simonds in Normandy using converted or 'defrocked' M7 Priest 105mm SP guns, having had their guns removed, later turning to the RAM Kangeroo, seen above, so codenamed in honour of its ability to carry its babies in its pouch, namely the open space in its fully armoured hull once the turret was removed.
 |
| With its cast hull seen from the back you might think you were looking at the M4A1 Sherman |
The RAM heralded the formation of the new Royal Canadian Armoured Corps on the 13th August 1940 and would see 2nd Canadian Armoured Brigade in support of 3rd Canadian Infantry Division land in Normandy on D-Day, followed later by the 4th Canadian Armoured Brigade as part of 4th Canadian Armoured Division and including tanks from the British Columbia Regiment or 28th Armoured Regiment.

The 4th Canadian Armoured Division, alongside the Polish 1st Armoured Division would go on to participate in the closing of the Falaise Pocket in August 1944 as the tip of the spearhead of 21st Army's thrust to meet the American breakout forces closing in from south of the town of Falaise.
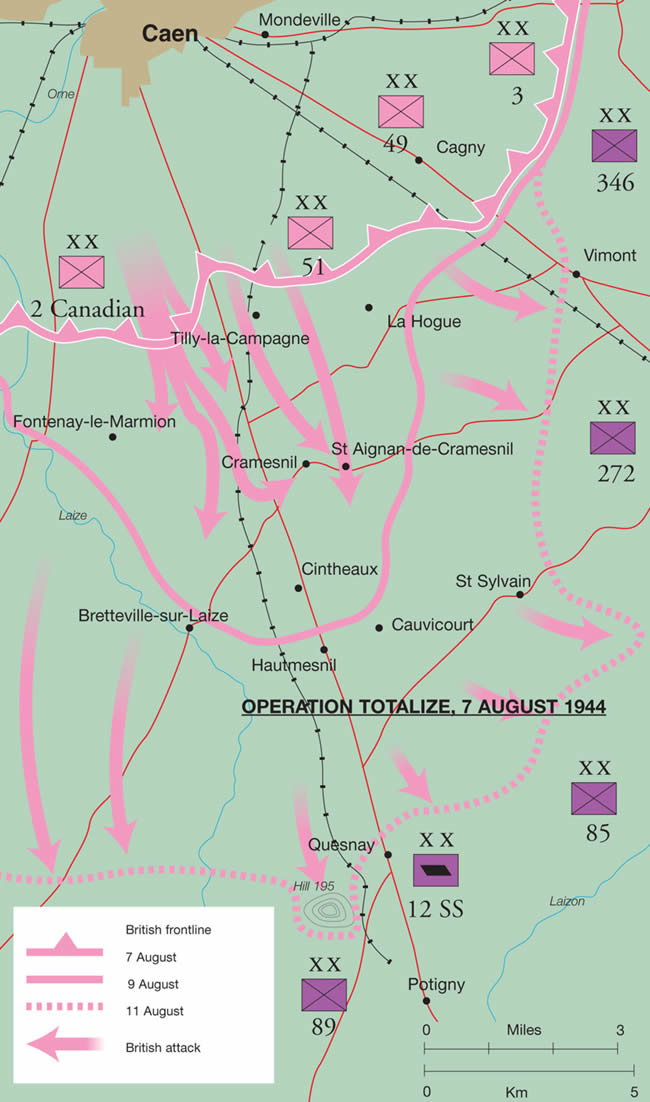 |
| Map of Operation Totalise 8th-9th August 1944 https://commons.wikimedia.org/wiki/File:Totalize.jpg |
It was during the early stages of the creation of the Falaise Pocket during Operation Totalise which saw the Allied forces attack south of Caen looking to break through the last defensive German lines south of the city that a famous action occurred on the 8th-9th August 1944 and that links to the other tank outside the Drill Hall below .
 |
| The other sentinel on guard outside the Vancouver Drill Hall was this Sherman M4A3E8, the famous 'Easy 8' with its easily recognisable vertical volute spring suspension, wide tracks and 76mm high velocity main gun. The vehicle carries the markings of the 28th Armoured Regiment and is named BOSS in memory of their commander in 1944, Lt. Colonel Donald Grant Worthington, this being the name of his personal command tank. |
This tank, though not of the type used by the 28th Armoured Regiment, stands in Vancouver to remember the gallant men of the regiment who fought and died around Hill 140 as part of what became known as 'Worthington Force' named after their commanding officer Lieutenant-Colonel Donald Worthington.
 |
| Lt. Colonel Donald Grant Worthington Commander of the Canadian 28th Armoured Regiment |
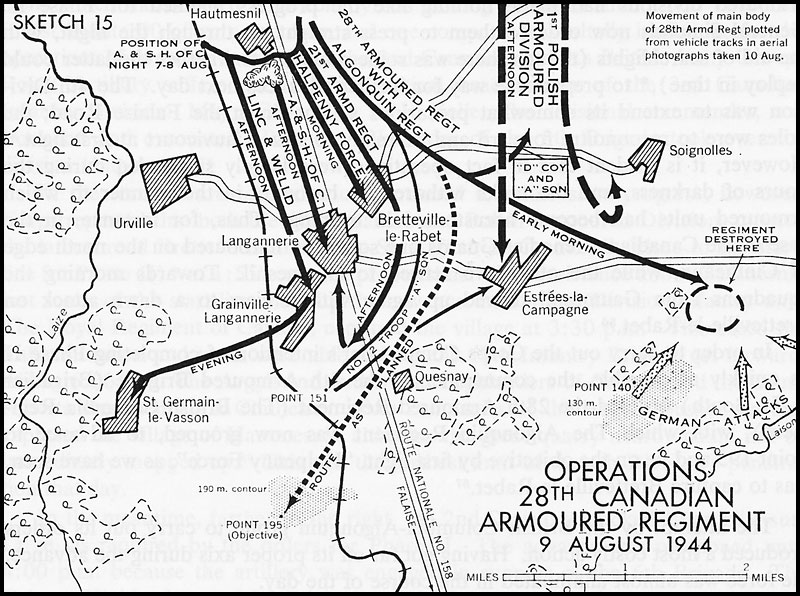
The Official History of the Canadian Army - The Victory Campaign, records the sad but dramatic battle fought by Worthington Force in the Second Phase of Operation Totalise thus;
'During the night and the early hours of the morning of 8 August, the two armoured divisions intended to crack the enemy's second line were moving forward and marshalling in the areas from which the infantry divisions had now advanced.
By dawn the 4th Canadian Armoured Division was concentrated between Fleury sur-Orne and the Falaise Road. The 10th Infantry Brigade was between Fleury and Ifs and the 4th Armoured Brigade between Ifs and the road, except for the 28thArmoured Regiment (British Columbia Regiment), which was east of the road. Simultaneously the 1st Polish Armoured Division was marshalling south-east of Cormelles
 |
| The look of Canadian troops in N.W. Europe 1944-45 - Ronald Volstad Canadian Forces in WWII - Rene Chartrand (Osprey Men at Arms) |
In order to carry out the Corps Commander's intention of completing Phase II as quickly as possible, the commander of the 4th Armoured Brigade (Brigadier E. L.Booth) ordered the 28th Armoured Regiment (The British Columbia Regiment), with which The Algonquin Regiment was now grouped, to advance to Point 195 and be on the objective by first light. "Halpenny Force", . . . was to capture Bretteville-le-Rabet.

The attempt by the British Columbia-Algonquin group to carry out its orders produced a most costly action. Having got far off its proper axis during the advance, the force was almost annihilated in the course of the day.
The group moved off from the vicinity of Gaumesnil. After encountering minor resistance as it advanced east of the main road it found "Halpenny Force" preparing to attack Bretteville-le-Rabet.
The officer commanding the group, Lt.-Col. D. G. Worthington of The British Columbia Regiment, decided to drive on "while we still have surprise". His plan was evidently to by-pass the enemy resistance at Bretteville-le-Rabet. This involved circling to the left (that is, eastward), then swinging to the right across the main highway to reach Point 195.
"The light was very poor this early in the morning", and it seems clear that the regiment, fighting its first battle, and advancing across country with few landmarks and dealing with scattered opposition as it did so, simply lost its way.
A single troop of "B" Squadron kept to what was evidently the intended line of advance--the stretch of open country between the villages of Grainville-Langannerie and Quesnay--and reached Point 151, south of Grainville and fairly close to the objective, before finding itself hopelessly isolated and withdrawing.
But the main body went east ofthe village of Estrées-la-Campagne instead of west of it. Shortly, in the words of the British Columbia Regiment's diarist, "High ground was sighted and we headed for it." The high ground now taken up--which was to be only too easily identified for the historian by the riddled hulls of the regiment's tanks†--was found in and around a field surrounded by hedgerows and scrub some 2000 yards east of Estrées.
 |
| Phase 2 of Operation Totalise and the Movement of Worthington Force |
It was on the wrong side of the Falaise Road and about 6500 yards north-east of the objective. Nevertheless, the group believed itself on the objective (it seems possible that Lt.- Col. Worthington had mistaken the lateral road running east from Estrées for the Falaise Road) and it so informed Headquarters 4th Armoured Brigade.
At 6:43 a.m. it reported, "Objective less 1800 metres . . . forming up now to reach objective". At 6:55 a.m. the following message was entered in the brigade log: Objective 0650 hrs. No evidence of enemy occupation-but recent signs. . . . We are holding until our friends come forward to consolidate.
At 7:55 a.m. the group, in answer to an inquiry, gave its position, as recorded in the log, as map reference 0964. This position is actually close to Caen, and it seems clear that the person keeping the log intended to write 0946, the simple map reference for the square containing Point 195.
Having taken up its mistaken position, the group remained upon it, waiting for the reinforcements which--in the light of the reports it had made of its whereabouts--could never come.
The troops present were "C' Squadron of the 28th Armoured Regiment, the greater part of "B", and two companies of the Algonquin Regiment."A" Squadron and another Algonquin company had been coming on in rear as reserve. Only two tanks of "A" got through to join the main body.
The experienced German tank officers lost no time in assailing this strong enemy group which after approaching their positions had come, so inexplicably it must have seemed, to a halt.

At a time not precisely specified, but between 8:08 and 8:41 a.m., the 28th Armoured Regiment reported to Brigade, "Have run into enemy and lost ten tanks" and inquired whether it was possible to have artillery support.
At 8:49 Brigade Headquarters asked for the location of the "opposition", to which the 28th Armoured Regiment replied, "Same as 2 hrs ago. Approx 500 yds SE." Brigade evidently arranged for fire on this rather vaguely defined target, and at 9:07 asked, "Are you getting required support now?" No answer came; and thereafter there was only silence.
According to post-war narratives written by officers of the 12th S.S. Panzer Division, the British Columbia tanks had been seen by Lieut. Bernhard-Georg Meitzel, an officer of the division's headquarters, who reported their presence to Battle Group Wünsche, the 12th S.S. armoured group.*Part of the Battle Group was then sent against them, Tigers going in from the west, while Panthers circled round and attacked from the east.
This was the beginning of a long day of bitter fighting in which continued attacks by German tanks and infantry gradually wore down the isolated Canadian detachment.
 |
| The Divisional Marking of Canadian 4th Armoured Division |
. . . No ground help reached the group during the day. At one stage tanks, believed to be Polish, appeared in the distance; but they first fired upon our men, and when yellow recognition smoke stopped the firing they themselves came under German attack and were driven back, losing several tanks.
The most encouraging support the group received was that of a brace of Typhoon fighter-bombers. They too fired on the position until warned with yellow smoke. Thereafter, "They returned at half-hour intervals all day long, rocketing and strafing the enemy around us. They were heartily cheered many times during the day."
Early in the afternoon Lt.-Col. Worthington, finding there were some eight tanks undamaged, ordered them to break out of the position and run for it. They got out safely, but although a report of their return was received by 4th Armoured Brigade at 3:00 p.m. through a liaison officer with the Poles, this does not seem to have produced any firm information of the group's position, at least immediately.
The enemy continued to attack with both armour and infantry. A British officer who was in the position wrote later: "At 1830 hours [6:30 p.m.] a strong enemy counter-attack came in. It was met by the infantry and tank crews with small arms and grenades. Serious losses were inflicted on the enemy who then withdrew. At this stage of the battle I saw one soldier, shot through the thigh and with a broken leg, still throwing grenades. Every man who was still conscious was firing some type of weapon."
At about this time Lt.Col. Worthington, who had directed the fight with cool courage throughout the day, was killed by a mortar bomb. At dusk, as a final German attack was coming in, the surviving Canadians who could do so slipped out of the position. Most of them succeeded in making their way into the Polish lines. Lieut. Meitzel, the German prisoner, says that he persuaded one group, after an initial refusal, to let him guide them to the German lines where they surrendered.
 |
| A line up of 4th Canadian Armoured Division Sherman tanks and the types used by the 28th Armoured Regiment in Europe. The long 17-pounder gunned Sherman Firefly tanks are immediately obvious and used with great effect against German tanks. |
This episode, with its tragic mixture of gallantry and ineptitude, had been appallingly costly. The British Columbia Regiment lost 47 tanks--almost its entire tank strength--in its first day's fighting, and its personnel casualties on 9 August totalled, as closely as they can be calculated, 112, of which 40 officers and men were killed or died of wounds and 34 became prisoners.
The Algonquin Regiment's total casualties as reported for 9 and 10 August came to 128, including 45 officers and men killed or died of wounds, and 45 taken prisoner.
The great majority were undoubtedly suffered on the 9th by the two companies that had been with the B.C.R. Such losses would have been deeply regrettable even had they been the price of success. Unfortunately, they were suffered in the course of a tactical reverse which did much to prevent us from seizing a strategical opportunity of the first magnitude.'
 |
| The rear plate of 'Boss' representing the Command Tank of Lt Col Worthington and carrying the tactical markings of the 4th Canadian Armoured Division together with the unit sign '53' on a red background for 28th BCR Armoured Regiment. |
Two very interesting tanks representing the development of the modern Canadian armoured forces from their inception in WWII and the tragic but heroic stand of the British Columbia 28th Armoured Regiment in Normandy.
Both vehicles serve as memorials to the Canadian's who volunteered and died in WWII, a very long way from home and in my mind, like the best memorials to the sacrifice of others, they are passed by daily by those lucky enough to benefit from that sacrifice and to live in much more peaceful times, which is testament to the successful outcome of their service and the best possible memorial.
Carolyn and I had a fantastic stay in Vancouver and can well recommend a visit if you have never been, but after a couple of days we were all set to resume our odyssey to another very interesting destination.
More anon


