Friday 28 January 2022

The St Vincent Campaign October 1796 - February 1797


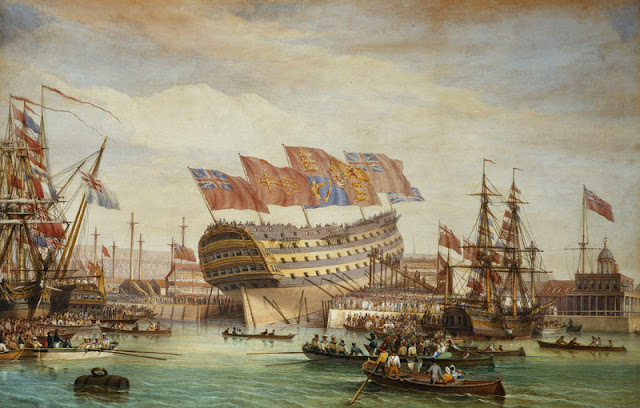
With the 225th Anniversary of the Battle of Cape St Vincent fast approaching next month, and my plans to refight the battle at the Devon Wargames Group, I thought I would take a bit of blog space to look at this pivotal naval campaign that changed the course of the war at sea during the French Revolution and laid the ground for the triumph of the Trafalgar Campaign eight years later during the subsequent Napoleonic War.

The St Vincent Campaign, October 1796 - February 1797
The step by step movements of the various fleets and Nelson's voyage that formed the campaign that resulted in the Battle of Cape St Vincent on the 14th February 1797.
My map adapted from Adkin.

Two hundred and twenty five years ago Great Britain was four years into a war with Revolutionary France and facing the combined threat of the naval forces of France, Spain and the newly created puppet state of the Dutch Batavian Republic.

The signing of an alliance by Spain with France in July 1796 and her fears for the protection of her Caribbean interests saw her declare war on Great Britain three months later and at a stroke France virtually doubled her naval power in terms of quantity if not quality.

A certain French General Bonaparte was building his reputation at the head of the Army of Italy, with Milan falling to his troops in May 1796 and Leghorn in June, and with just a short step to his birthplace Corsica beckoning, a likely French invasion and the loss of another ally, and a convenient base for the British Mediterranean Naval Squadron.

A simple timeline of events together with the map above, I hope, will illustrate the tumultuous series of events that culminated in the Battle of Cape St Vincent and the dramatic change of initiative that it caused.

1. The Fall of Leghorn, Northern Italy - 30th June 1796


Entree des Francais dans Livourne (Leghorn), 30 Jun 1796 - Original by Carl Vernet

The fall of Leghorn was a major blow to the British Royal Navy as the neutral port was as much a meeting place for the British Mediterranean Squadron as it was a source of victuals and stores.

One of the British ships in the harbour when French troops arrived was the frigate Blanche 32-guns, whose compliment included the American sailor-of-fortune Jacob Nagle who wrote about the typical naval sang-froid that greeted the sudden setback;

HMS Blanche raking the French frigate Pique 36-guns off Martinique in her action fought on the 5th January 1795 - John Thomas Baines
(Royal Museums Greenwich)

'Early in the morning the French began to fire at us, but the guns from the batteries could not reach us by 15 or 20 yards, though their guns were chock'd so that they could not recoil . . . we lay still and washed our decks down as usual in the morning. 

At 8 o'clock we piped to breakfast. During this time, finding they could not reach us, they got a long gun from a tower on the S.W. side of the town and brought it to the nearest battery to us and began to open up on us.

The very first shot went over us a quarter of a mile. Immediately the hands were turned up to weigh anchor, got under way, and began to beat out, having a head wind from the westward.

Our vessel being light, we fell to leeward and having to stretch along shore past all the batteries, they kept up a continual fire upon us and we returning the salute till we were out of reach of their guns, which was not less than two hours.'

2. The British reinforce Elba - 10th July 1796


View of the West Side of Porto Ferrajo Bay seen here with the 74 gun Captain (Commodore Nelson) and the frigates Flora, Inconstant and Southampton

After  the fall of Leghorn, Elba looked likely threatened to be the next target for French attacks and the British reacted quickly to reinforce the garrison when on the 10th July Nelson's squadron occupied, with the agreement of the local authorities, the fortress town of Port Ferrajo.

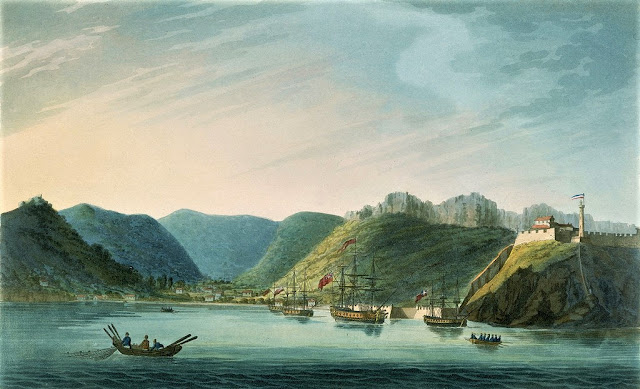
3. August 1796, French Naval Squadron shelters in Cadiz


View of the Coast of Spain - c1795 - Anonymous (National Maritime Museum)

The British position in the Mediterranean worsened throughout the year as one by one Britain's allies were forced to sue for peace by French land victories. Spain's attitude hardened and as a French squadron sheltered in Cadiz in August an alliance was signed with France in San Ildefonso followed on October 5th by Spain declaring war against Great Britain that would encourage French plans for an invasion of Ireland and the old spectre of Franco-Spanish domination of the English Channel.

Just eight days after the Spanish declaration of war, the first naval engagement occurred on the 13th October 1796 between the former allies when HMS Terpsichore 32-guns under Captain Richard Bowen met and captured the Spanish frigate Mahonesa under Captain Tomas de Ayalde in an action lasting one hour and forty minutes, which left the Spanish ship with 30 killed and 30 wounded for the loss of four wounded aboard Terpsichore, but leaving the Mahonesa so badly shot up that she was never used in British service.

HMS Terpsichore capturing the Mahonesa off Cartagena, 13th October 1796 - Thomas Whitcombe

With the Mediterranean fast becoming untenable and the need for the The Mediterranean Squadron to be repositioned so that it could rapidly reinforce the Channel Squadron, the British decided in September to withdraw first to Gibraltar, with Admiral Jervis arriving on December 1st and then sailing on to Lisbon, not before dispatching Nelson on December 12th with two frigates, Minerve 42-guns and Blanche 36-guns, to evacuate Sir Gilbert Elliot and the British garrison on Elba.

4. Anglo-Spanish Naval Engagement - 20th December 1796


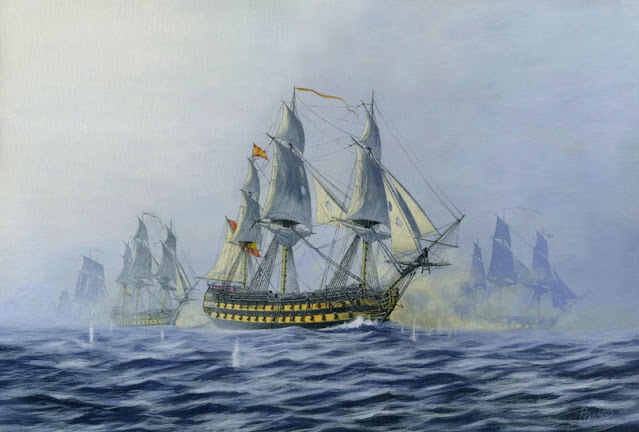
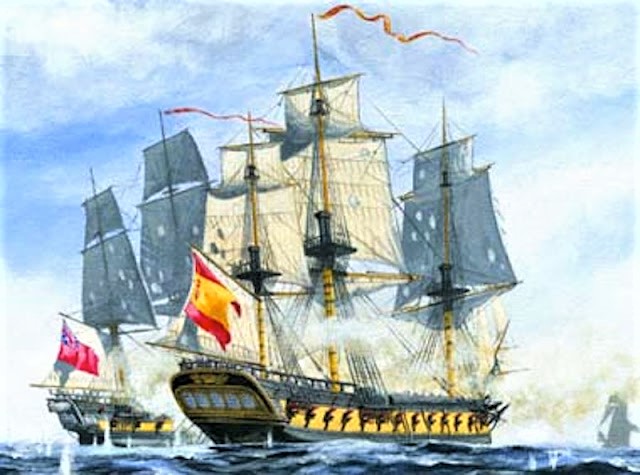
Minerve vs Santa Sabina - Carlos Parilla Penegos

During darkness and in the early hours of the 20th December 1796 on his voyage back to Elba, Commodore Nelson aboard HMS Minerve and with HMS Blanche in company encountered the Spanish frigates Santa Sabina and Ceres, see the map above for the approximate position for the action.

The great William James, whose prose to my mind is a thing of joy, takes up the story;


'On the 19th of December, at 10 p.m., Commodore Nelson, in the 38-gun frigate Minerve, Captain George Cockburn, accompanied by the 12-pounder 32-gun frigate Blanche,  . . . fell in with two Spanish frigates. While the Blanche, agreeably to the commodore's directions, wore to attack the frigate to leeward, the Minerve hauled up, and at 10 h. 40 m. a.m. brought to close action the larger frigate, or that to windward.

After a brave resistance of two hours and 50 minutes, during which she lost her mizenmast, and had her fore and main masts shot through in several places, the Spanish 40-gun frigate Sabina, Captain Don Jacobo Steuart*, struck her colours to the Minerve; whose masts, although none of them had been shot away, were, as well as her rigging and sails, much wounded.

*Captain Don Jacobo Stuart, was the great-grandson of King James II of England, Scotland and Ireland, the Catholic monarch deposed by the Protestant William III, and when summoned by Nelson to strike as the Minerve crossed the Santa Sabina's stern quarters ready to rake the Spanish frigate at close range, declined the summons in the most perfect English, rather surprising the British commodore and his crew

Out of her complement, consisting with a few supernumeraries of 286 men and boys, the Minerve had one midshipman and six seamen killed, one lieutenant (James Noble, who had quitted the Captain 74, to serve under Commodore Nelson), the boatswain, and 32 petty-officers, seamen, and marines, or soldiers (a detachment from the 18th regiment), wounded. 

The Sabina had commenced the action also with 286 men and boys; of whom she lost, in killed and wounded together, according to Commodore Nelson's letter, 164, but, according to a Spanish account of the action published at Carthagena, 10 men killed and 45 wounded, two of them mortally.

The Minerve mounted her 42 French guns, and the Sabina, 40 guns, 18 and 8 pounders Spanish. The loss and damages of the former show, that the Spaniards pointed the Sabina's guns with more than their accustomed precision. The British, on the other hand, must have felt some disadvantage from the French armament of the Minerve. 

Upon the whole, the action was very gallantly maintained on both sides; and it is scarcely necessary to state, that Commodore Nelson, in his official letter, pays the full tribute of praise to his Spanish opponent.

The young Thomas Masterman Hardy
perhaps the most famous Flag-Captain in history, was left with the prize crew 
aboard the Sabina when the Minerve had to break contact.

The first and second lieutenants of the Minerve, John Culverhouse and Thomas Masterman Hardy, with 40 petty-officers and seamen, having been placed on board the Sabina, the latter was taken in tow, when, at 4 p.m., a frigate, known by her signals to be Spanish, was seen coming up. The Minerve cast off the prize, which immediately stood to the southward; and at 4 h.30 m. P.M., the former came to action with the 34-gun frigate Matilda. 

In half an hour the Minerve compelled this her second antagonist to wear and haul off, and would, most probably, have captured her, had not three other Spanish ships, the Principe-de-Asturias of 112 guns, and the frigates Ceres of 40, and Perla of 34 guns, hove in sight. At daylight on the 20th these three ships were joined by the Matilda; and the Blanche also made her appearance far to windward.

The Minerve had now her own safety to look to; and crippled as she was, it required the greatest exertions to get clear. The squadron chased all day, but at dark gave up the pursuit; leaving the Minerve with much additional damage to her rigging and sails, and with the additional loss of 10 men, including the gunner, wounded.

Lieutenant Culverhouse, now the commander of the Sabina, purposely to draw the attention of the Spaniards from what, on more than one account, would have been by far the more valuable prize of the two, hoisted English over Spanish colours; and the lieutenant and his few hands, although greatly inconvenienced in having the whole surviving Spanish crew, except the captain, in their custody, manoeuvred the prize with the utmost skill and steadiness, not surrendering the Sabina until her two remaining masts went over the side, and left her a mere wreck upon the water.'


In three or four minutes after the Minerve had poured her first broadside into the Sabina, the Blanche was close alongside the frigate to leeward. Eight or nine broadsides, very feebly returned, silenced her; and, calling for quarter, the Ceres hauled down her colours, with a loss, as subsequently ascertained, of seven men killed, and 15 wounded. 

But the consummation of the victory was impracticable; the Matilda and Perla, who were almost within gun-shot when the action commenced, being at this time so near that the Blanche was obliged to wear and make sail in the direction of her consort the Minerve. 

As, however, the Matilda and Perla did not close immediately with the Ceres, who, although damaged in her rigging and sails, had now got her foresail, fore topsail, and fore topgallant sail set, the Blanche again stood towards the latter. But the Ceres outsailed the Blanche before the wind, and, moreover, was presently joined by the Principe-de-Asturias three-decker, from near the land. 

Captain Preston, therefore, although his ship had sustained neither damage nor loss, was obliged to content himself with a trophiless triumph. 

The Minerve, in the mean time, had proceeded upon her destination, and on the 26th anchored in the harbour of Porto-Ferrajo. Here the commodore remained, embarking the troops and stores, until the morning of the 29th of January, 1797; when the Minerve, accompanied by the Romulus, Southampton, and Dido frigates, Dolphin and Dromedary store-ships, two sloops, and 12 transports, set sail upon her return. 

On the same evening, the Minerve and Romulus parted company from the squadron, and stood towards the French coast. On the 1st of February these two frigates reconnoitred the road of Toulon, and successively the ports of Barcelona and Carthagena, and on the 10th rejoined their companions at Gibraltar.'

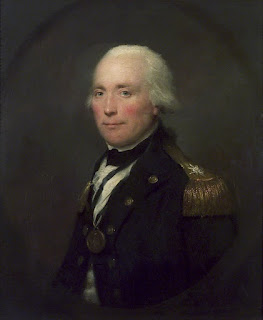
4. Nelson's arrival off the Gibraltar - 9th February 1797


The Frigate Minerve off Gibraltar February 1797
Gordon Frickers

At the Rock, Nelson learned that the Spaniards had passed through the Straits just five days earlier. Nelson stopped just long enough to take on water and to welcome back Lieutenants Culverhouse and Hardy together with their seamen after being released in an exchange deal with the Spanish.

On the 11th February he sailed again to join Jervis off Cape St Vincent, being chased, as he left, by two Spanish ships of the line that had been waiting close by in Algeciras Bay, and during the chase Nelson was asked by Colonel John Drinkwater, ADC to the British Viceroy of Corsica, Sir Gilbert Elliot if he thought it likely that there would be an engagement, which Nelson thought was quite likely and looking aloft at his commodore's pennant added;

'But before the Don get hold of that bit of bunting I will have a struggle with them and sooner than give up the frigate, I'll run her shore.'

Shortly afterwards they went to dinner, barely starting their meal to be interrupted by the cry 'Man overboard!'

Thinking the Spanish ships were sufficiently far astern, Captain George Cockburn ordered a boat lowered and Lieutenant Hardy clambered aboard to take charge. Minerve was still making headway under full sail against the strong west-east current and with the search taking some time but finding no sign of the unfortunate seaman, the boat was drifting far astern and the Spaniards were closing fast.

Seeing this Nelson exclaimed 'By God I'll not lose Hardy!' According to Drinkwater, Nelson turned to Cockburn to order 'Back the mizzen topsail!', more likely to have been back the topsails to have got the necessary reduction in speed with the current then adding to the eastward momentum of both the ship and boat.

Hardy and the boat crew were retrieved almost under the guns of the leading Spanish 74-gun Terrible which surprisingly reacted to the Minerve backing her sails and slowing, by performing a similar manoeuvre in response. Another case of fortune favouring the brave.

On the night of the 12th February the Minerve found herself in far greater danger as the flickering lights and occasional looming hulk of an unidentified ship of the line indicated to Nelson that he had found the Spanish fleet which he kept track of until they turned west, indicating their course towards Cadiz, before Nelson proceeded to rendezvous with Admiral Jervis, scrambling up the sides of HMS Victory the next morning to report and pinpoint the Spanish position, whilst Culverhouse and Hardy were able to update the admiral on their numbers and state of morale after their recent few weeks in Spanish custody.

Jervis had been at the rendezvous point since the 6th February, the day the Levanter wind started to blow his enemy towards him and on arrival had met with Rear-Admiral William Parker leading a five ship squadron of reinforcements aboard his flagship the 98-gun Prince George, the other four being the 90-gun Namur, and three 74s, Colossus, Irresistible and Orion.

On the 9th of February Jervis learnt from his frigates that the Spanish fleet had passed through the Straits on the 6th, almost certainly headed for Cadiz, leading to much disappointment at another likely missed opportunity to catch the enemy at sea. On the 11th February, the Elba convoy arrived reporting that the Spanish fleet was close but in much disorder leading to Jervis signalling the fleet to 'Clear for Action', with Midshipman George Parsons leaving a vivid account of preparations aboard the 98-gun Barfleur;

HMS Barfleur in action with the French flagship Ville de Paris at the Battle of the Saintes 12th April 1782 - Thomas Whitcombe
Barfleur was a Sir Thomas Slade design, launched in 1768 and with fifty one years of service before her breaking up in 1819 achieved an enviable list of battle honours which as well as Cape St Vincent in 1797 included the Battles of Chesapeake 1781, St Kitts 1782, Saintes 1782, Mona Passage 1782, Glorious First of June 1793, Groix 1795 and Cape Finisterre 1805.

'Grinding cutlasses, sharpening pikes, flinting pistols, among the boarders; filling powder, fitting well-oiled gunlocks to our immense artillery by the gunners, sling our lower yards with chains; and, in short, preparing a well organised first-rate for this most important battle.'

The course was south-east before turning south-west towards the enemy and between them and sanctuary in Cadiz. On 13th February, Nelson arrived with more precise details of Cordoba's position. The next day would be St Valentines Day.

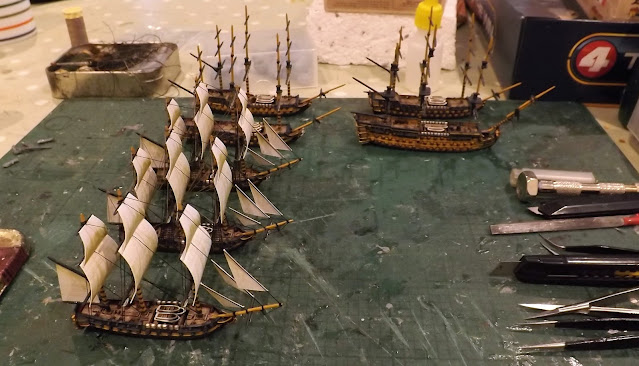
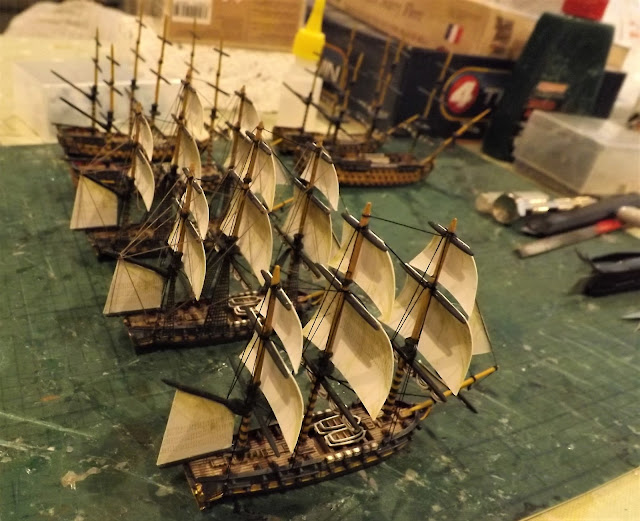
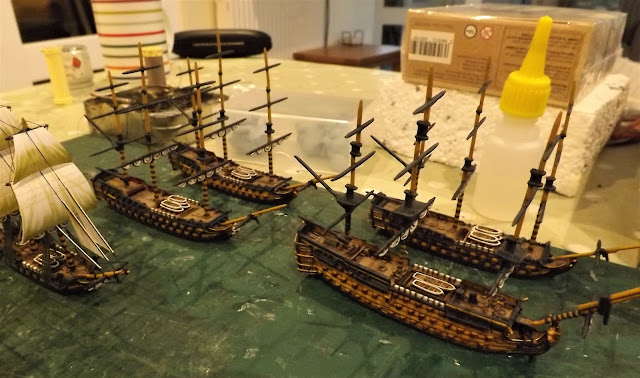
The fleets set up for Cape St Vincent at JJ's Wargames HQ as part of the pre-game planning - more anon.

In a follow up post, I'll take a look at my pre-game planning and preparation in time for our refight at the Devon Wargames Group on February 12th 2022.

Sources consulted for this post:
The Trafalgar Companion - Mark Adkin, 
1797 Nelson's Year of Destiny - Colin White
Fleet Battle and Blockade, The French Revolutionary War 1793-97 - Chatham Pictorial History
The Naval History of Great Britain - William James

Friday 21 January 2022

All at Sea - On the Stocks in JJ's Dockyard (Bob's British Squadron)


It was nearly two years ago that I first started work on the Warlord Games Black Seas British Squadron box set of model 1:700th ships, which comes complete with a British first rate, three third rates Colossus, Ajax and Mars and three fifth rates, Euryalus, Naiad and Indefatigable plus some brigs and a set of gunboats.

However in 2022, JJ's Shipyard is contracted to build a squadron for a foreign power, and Bob has commissioned me to put together a British and French squadron to form the core of his own collection, which I plan to build in between projects of my own.

Naiad, nearest camera and partly sporting standing rigging sits next to Indefatigable and Euryalus, fully rigged and with the third and first rates behind awaiting their fitting out. 

Thus with the completion of my AWI Jaegers over the Xmas break, I immediately popped the box on the British squadron and had them primed before New Year to begin work on them in the January and this week the build moved into the fitting out yard where the models get rigged and have their colours attached.

Close up of the three British frigates getting rigged this week. Naiad awaits her shrouds before work on the running rigging can be done.

With regard to my own collection, I only have a few smaller models to add and am really 'treading water' on new builds until Warlord release their new models and while I work up playing the large battles that the current collection was designed for.

HMS Colossus - Austin Johnson
http://scillydivers.blogspot.com/p/wreck-of-hms-colossus.html
A reconstruction of HMS Colossus wrecked off the Scilly Isles in 1798 and the inspiration for the model seen below.

The big battle practice started this month with the Battle of Cape Finisterre scenario played at the Devon Wargames Group meeting and I am now in the process of putting the final touches to a 225th anniversary playing of the Battle of Cape St Vincent, also at the club using Kiss Me Hardy, alongside a campaign to run a series of games through this year.

Devon Wargames Group - An Opportunity Mist, Battle of Cape Ferrol

In the meantime, whilst looking to share some love with other collections of figures, I am keen to bring to the table, I thought the love could go a bit further by helping mates to complete their own collections of model ships, whilst allowing me to keep up my painting and modelling skills for these kits which I will need for the Dutch.

The mighty first rate in Revolutionary War trim stands proud next to the third rates, Ajax and Mars and with HMS Colossus, built in 1787, seen, back left, also in a similar trim, representing the vessel that was wrecked off the Scilly Isles in December 1798

So the next time I feature Bob's British Squadron it will be to cheer them down the slips with a jaunty rendition of God Save the King before getting the band to brush up on their version of La Marseillaise in preparation for a similar French Squadron build.

The All at Sea theme will also include a look at the planning and preparation that has gone into putting the Battle of Cape St Vincent project together which has included much fun sorting out which Spanish ships were actually there!

More anon

JJ

Saturday 15 January 2022

Mohawk Campaign Game - Scouting Mission Playtest


Just before the Xmas break I was busy getting my Jaegers finished off for my Mohawk collection 

JJ's Wargames - Mohawk Valley Collection, Jaegers & Militia

and in the process of pondering all things AWI Mohawk Valley ideas, as I am want to do, I came across a video review on YouTube illustrating a playthrough of the Mini-Game, Roger's Rangers by Decision Games and written by Joseph Miranda, which after a little bit more research on Boardgame Geek, I picked up a couple of copies, one for me and the other for my FIW enthusiast and mate Steve M.

Boardgame Geek - Rogers Rangers

The video link can be followed below with Centurion's Review showing a playthrough of the Scouting Scenario.


Of course I immediately spotted the problem with the game in that it is focussed on the right theatre in North America and with a similar theme but very much on Roger's Rangers and their role in the French Indian War, but, I thought might, with a little tweaking, work just as well recreating the adventures of Butler's Rangers and the King's Royal Yorkers in the American War of Independence.

Readily adapted artwork from the Perfect Captain AWI game served for my new counters to represent the two forces engaged in this theatre

Thus I sat down to play with this little project, to make the necessary tweaks with the map, units and cards to put the game into Cyberboard where I could playtest it to see if the idea would work or not and I thought you might like to see the results and how I got on.

When I say tweaks, that included a redesigned map, new counters to represent the different troop types and some changes to the Mission and Operations cards to change the descriptions to being more appropriate for this theatre in the AWI together with artwork to compliment the theme. The rules of play are however as written so once those aspects were done the game was ready to test.

My redesigned game map to represent the AWI frontier

So with the module finished over the Xmas break I decided I would start playtesting in January and for those unfamiliar with it, I should explain if you haven't followed the links above, that this is a solitaire game with the player running the Rangers force or in this case Crown forces and the system generating any opposition that you might bump into as you strive to complete one of four missions, which if playing the full campaign can be linked one after the other, Scout, Rescue, Frontier Raiding and the Big Campaign.

An example of one of my theatre-themed
Mission Cards and the subject of the first play test

The Mission Cards drive the set up and objectives for each game and in the example above, the game I am reporting here, my loyalist force under the command of Sir John Johnson are tasked with moving into enemy territory from one of the staging posts, either Fort Oswego or Fort St John, to recover the 'Intel' represented by one of seven objective counters randomly placed on the map and hidden from view until revealed when my force enters the area.

Of course some of those other objectives can aid or hinder my march to find the Intel counter and so every time one is turned over adds a little moment of anticipation in the game, in addition Ops (Operations Cards) can also help or hinder this process.

Two examples of Operations Cards that can get revealed each turn of the mission and in this case alerts the player to the possibility of contact with the enemy. Note the Alert Level being higher makes this more likely.

To achieve each mission, Operations Cards are required to allow it to continue, and this mission starts with six, which are used up each turn of the game mission, and can be lost because of events or equally gained in the same way. If you run out of ops before returning to base with the objective, the mission fails.

In addition I also need to build my force with the 8 RP (Recruit Points) allotted and take necessary gear to help my men achieve success, and these all cost RP and I am limited to 3 units represented by the Command factor, although my leader, Johnson is a free addition to the force.

Gear, in the form of boats and the green objects help to overcome likely obstacles during the mission
and the objective counters give each mission its purpose.

The numbers on each unit counter refer to combat factor (left) and movement (right), with the former requiring a die roll equal to or less than to defeat an enemy unit and the latter determining how many spaces on the map can potentially be moved to on the march, determined by the slowest marching unit in the column and special terrain such as Rebel Forts or Mountains that force the column to stop despite their move allowance.

Rebel units are simply deployed to the map when generated so don't require a movement rate but just have a combat factor, and commanders are counted as elite units giving a plus factor to the Tactical Superiority die roll which determines who shoots first and also have a Combat Factor of 1 (Crown) or 2 (Rebel) to simulate their small ability to influence the battle at that level should it become required.

The game test set up with six operation cards ready to drive the game and my loyalist force starting in Oswego

The screen shot above shows the module set up ready to go with the Scouting Mission, with seven objective markers placed on the map from Unadilla to Castle Town and up to Crown Point.

The Alert Level, indicates how ready the Rebels are for an incursion by Crown Troops and indicates how many troops might oppose me if I bump any on my route

My RP level is at zero as I have purchased my force of Kings Royal Yorkers, Butlers Rangers and Mohawk Indians and am taking the Long Rifle and Hatchet as my gear, attaching them to the latter two units, intending to start my march from Fort Oswego to Unadilla before moving into the Mohawk Valley.

Turn One - Arrival at Unadilla

So armed and ready my little force made its way south from Oswego via Lysander and stopped at Unadilla, having moved two areas, the furthest the force can march with the slower moving King's Yorkers in company


On arrival, the first Op Card was turned and it was not a good start, revealing my march had been spotted by Oneida Indians allied to the rebels, thus raising the Alert Level to two and reducing my remaining op cards to just four and barely into enemy territory.

On the positive side my arrival allowed the release of loyalist prisoners held in the area and adding an RP to the pot and the potential to raise more men and gain more equipment if needed.

The force then marched on to Fort Hunter, with the added threat of Rebel strongpoints in the area which causes Crown troops to halt the march immediately on entering the area.

Turn Two - Arrival at Fort Hunter

The subsequent Ops card was a rebel attack on my Ranger Camp which as I hadn't built one had no effect, and the turned objective marker revealed farms and homesteads which were burnt and destroyed, gaining me a further RP, which I forgot to record but will include in the next mission, as the march continued to Fultonville offering the opportunity to return to Oswego, should I fail to gain or, worse still, loose further Ops Cards.

Turn Three - Arrival at Fultonville and Rebel Ambush

Fultonville revealed the Butler's Rangers Op Card, which I at first put to one side in anticipation of using it later if required, only to find the revealed objective counter heralded a Rebel Ambush, now with the Alert Level at 2, setting up two randomly picked Rebel units, revealing Riflemen and Militia waiting on my march route.

Rebel Riflemen and Militia attempt to ambush my force, but the Butlers Rangers Ops Card helps to ensure victory for the Crown.

Thus I decided to play the Butler's Rangers card immediately giving my troops the automatic gain of the Tactical Superiority, meaning my chaps got to fire first with my KRRNY and Butlers hitting on 4's or less on a d6 routing the enemy before they knew what hit them, whilst also gaining me one Ops Card for winning the skirmish. 

Emboldened by my victory I decided to press on with the mission and head back up the valley to Fort Hunter ready to face events in Turn Four with my two remaining ops cards.

Turn Four - Return to Fort Hunter and the Battle of Fort Hunter

Needless to say my bold move to go back along the Mohawk Valley deep into Rebel territory was a risk with only one op card left and too far away to get back into Canada, and indeed the Rebels were waiting for me with a column sent out to hunt my force down now that they were aware of its presence.

The Rebel Army Ops Card immediately moved the Alert Level up further to 3 and required a die roll to see how many Rebel Units would oppose me revealing the three seen above, with a tough force of State Levies, Rebel artillery and militia in support.

Fortunately Sir John Johnson and the Long Rifle capability of my Rangers gave me +2 to the Tactical 
Superiority die roll which I easily won and all my units defeated the Rebels in quick succession to award me a battle victory and two additional and highly valuable Ops Cards to continue the mission.


It seemed as if fortune was favouring the brave and so Johnson's little army moved on to Ballstown, where the next Ops Card announced the Mohawks thirst for revenge and the possibility of further Indian allies joining the column, but sadly a die roll of 4 revealed that this Indian warband was busy elsewhere.

Turn Five - Ballstown and Success! Loyalist supporters meet the column to pass on the vital intel.

However Johnson's luck continued as the objective counter was turned to reveal the sought after Intel and the force could now focus on the challenge of getting back to Oswego and completing the mission.

With just three Ops cards left Johnson decided to avoid the Mohawk Valley on the return march, with the two Rebel Fort areas only slowing the march and increasing the risk of interception, and instead head back down the Schoharie Valley at Fort Hunter and try to get back via Unadilla.

Turn Six - Return to Fort Hunter and avoidance of Rebel Army

Fort Hunter proved yet again a dangerous place to march past as the third visit saw the turning of the Rebel Attack Operations Card that required me to roll a D6 higher than the Alert Level of 3 to avoid a battle, which was ideally what I was looking for and needles to say 'lady-luck Fortuna' duly obliged.


Surely now with just Unadilla between my troops and sanctuary at Oswego there would be nothing to prevent Sir John returning with the valuable Intelligence reports.


Just when you think this game is easy it seems to throw in a few more surprises as the next Ops Card turned on arrival at Unadilla announced a possible Rebel Ambush and similarly to avoid it the D6 roll needed to be higher than the Alert Level 3.


Yes, get in there! 

What a conclusion to this first mission and successfully achieved allowing progress on to the next Mission, 'Rescue', following the Intel revealing that Loyalists were being targeted to join the local militias at the risk of imprisonment and confiscation of property on their failure to enrol.

Turn Eight and Sir John's little force makes it safely back to Oswego with the Intel following quite an adventure along the Mohawk to Ballstown.

The end of the mission was completed with one Ops Card remaining and a Recruit Point in the bank both of which are carried over to the next mission.


This first mission was great fun to play and suggests lots of possibilities for using with the Mohawk Valley Collection of figures going forward and I look forward to showing how I get on in the next one entitled;


In addition the simplicity of the basic game invites further tweaks to the set up to perhaps vary the threat posed by the Rebels and raise the anticipation levels a bit more  - more anon.

Tuesday 11 January 2022

Battle of Cape Finisterre/ Ferrol or 'Calder's Action' - 22nd July 1805

A brand new year started at the Devon Wargames Group this weekend and with a lot of optimism that slowly but surely things are and will get better, with at least the hope this year of getting a full calendar of events completed at club this year when compared with our late start last year

Keen to carry on playing games with my own lockdown project, the 1:700th collection of Napoleonic ships, I ran a Kiss Me Hardy (KMH) Scenario from the Too Fat Lardies Summer Special of 2006, entitled 'An Opportunity Mist' recalling the difficult visibility conditions that accompanied the somewhat indecisive Battle of Cape Ferrol or perhaps more commonly referred to as the Battle of Cape Finisterre or 'Calder's Action' fought in the summer of 1805 

If you would like to see how this game turned out then you can follow the link below to the club blog to see an AAR of our game.

Devon Wargames Group - An Opportunity Mist, Battle of Cape Ferrol

This post is designed to throw some light on to what led up to this battle and its aftermath.

The complex manoeuvring that ensued in the summer of 1805 is well illustrated by Mark Adkin's map of what would become known as the Trafalgar Campaign with the Battle of Cape Finisterre or Ferrol or Calder's Action, depending on your preference, shown occurring on the 22nd July.

On the 7th July 1805, HM Brig Curieux arrived in Plymouth, having been sent by Admiral Nelson from the West Indies after his fruitless pursuit of French Admiral Villeneuve's, Combined Fleet, there from the Mediterranean, carrying the latest news of the whereabouts of the enemy fleet, updated by Captain Bettesworth, commander of the Curieux, who had seen Villeneuve's fleet standing to the northward, some 900 miles north-north-east of Antigua on his voyage home and thus indicated they were heading towards the Bay of Biscay area rather than back to the Mediterranean, as Nelson had suspected. 

The confused indecisive skirmish that was the Battle of Cape Finisterre 22nd July 1805 comes to life on our table at the Devon Wargames Group for our first meeting in 2022
Devon Wargames Group - An Opportunity Mist, Battle of Cape Ferrol

Bettesworth hastened to the Admiralty in London, arriving late on the 8th July, to find Lord Barham, the First Lord had retired to bed and no one dared wake him, leaving his Lordship furious the next morning to find that seven to eight precious hours had been lost.

Admiral Charles Middleton, Lord Barham, First Lord of the Admiralty in 1805 - Isaac Pocock (Royal Museums Greenwich)
Similar to Lord Dowding's handling of the victory that was the Battle of Britain, perhaps Lord Barham is the unsung hero of the Trafalgar Campaign having the wit, even at the grand age of 80 together with a superior understanding of commanding naval forces over vast distances to undo all the machinations of Napoleon Bonaparte, unable to grasp the differences and difficulties in manoeuvring Naval Squadrons to that of Army Corps.

Without waiting to dress, he jotted down a note of what he considered should be done, stating;

'My idea is to send the intelligence direct to Admiral Cornwallis (Commander Channel Fleet) who may be directed to strengthen Sir Robert Calder's squadron with the Rochefort squadron and as many ships of his own as will make them up to 15, to cruise of Cape Finisterre from 10 to 50 leagues to the west. To stand to the southward and westward with his own ships, at the same distance for 10 days. Cadiz to be left to Lord Nelson.'

Barham had decided to strengthen his forces at the likely decisive point designed to unhinge French plans to dominate the English Channel by decisively defeating and destroying one of their key squadrons, that of Villeneuve, at the expense of abandoning the blockade of Rochefort. However he failed to clearly reveal this intent to Cornwallis who clearly failed to recognise the importance of Calder's mission by informing Stirling and thus Calder on his arrival.

Calder's Action living up to its billing recreating the confused action in the fog that were the key characteristics of the battle.
Devon Wargames Group - An Opportunity Mist, Battle of Cape Ferrol

On receipt of this new information, Cornwallis immediately ordered Stirling to join Calder which he did on the 15th July and as soon as the French in Rochefort realised that Stirling was no longer blockading the port, Captain Zacharie Allemand led his squadron to sea bound for Ireland in compliance with his orders to create a diversion. Napoleon had changed these orders, wanting Allemand to rendezvous with Villeneuve off Ferrol, but his new orders arrived after the French squadron had left port and thus Allemand would not take part in any of the upcoming actions.

Barham's planned interception took place almost on the exact position predicted on the 22nd July with the advance squadron of Calder's fleet consisting of the frigates Egyptienne, Sirius and the 74's Defiance and Ajax out ahead of the fleet in two columns, when, towards noon, the mists parted to allow men in the crosstrees of HMS Defiance to spot strange sails far to the south-west.

Captain Richard Durham and his officers excitedly scanned the horizon with their telescopes, identifying the strangers as the enemy and signalling first twenty-four, then later twenty-seven ships of the line and frigates in sight, and Calder ordered his fleet to bear to the south-west and clear for action.

With sixteen miles separating the two fleets it would take a further five hours sailing at about three knots in the slight breeze before the closest ships would be near enough to open fire.


It was not until 13.00 that Villeneuve's lookouts on his leading frigates reported the approach of the British fleet of twenty-one sail at which the French admiral hoisted the signal for his three columns to form a close hauled line of battle on the Spanish leeward squadron led by Admiral Gravina in the Argonauta 80-guns.

Map adapted from Naval Warfare in the Age of Sail - Tunstall & Tracy

The decks were cleared for action and the ships closed up to half a cable (100 yards), riding a heavy swell and passing through thick patches of fog, that only parted sufficiently at 15.30 to allow both commanders to get a longer and more informative look at each other.

At about 16.30 Calder appreciated that if he maintained his current course, with the two fleets only about eight miles apart and with the Combined Fleet heading north, the enemy might escape and so he signalled the fleet to tack in succession and come round onto a northerly course, surprisingly he did not consider tacking together and thus speeding up the whole progress to the north.

Map - The Trafalgar Companion, Mark Adkins

At about the same time as Calder ordered his fleet to head north the British frigate Sirius 36-guns, operating well ahead of the fleet, found herself at the rear of the Combined fleet heading towards the French frigate Sirene, herself towing a captured treasure galleon, reportedly valued at 15 million francs; a tempting prize for Captain William Prouse who on closing with the Sirene came under fire that so alarmed Villeneuve that his rear was under attack caused the French admiral to order a change of course by wearing south, back towards his rear, thus causing both fleets to return to approaching each other from opposite directions.

The change of course had a sobering effect on Captain Prouse aboard the Sirius as his attempt to seize the treasure ship was abruptly halted with the looming shape of the 80-gun Argonauta suddenly bearing down from out of the fog and causing the British frigate to make a hasty retreat, with the Spanish honouring the code by not firing a single shot at the much smaller British ship.

However the Argonuata soon found herself otherwise engaged as at around 17.30 the 74-gun Hero under Captain Alan Gardner complying with Calder's signal to 'engage the enemy more closely' yelled to his ship's master to tack immediately to larboard, thus bringing his starboard battery to bear and followed by the following ships in the British Van Squadron and from which position our game progressed, as seen below.

The rather confused and certainly indecisive battle that followed would last about three and a half hours with the firing ceasing at about 21.00 with the failing light and gloom together with Calder's signal to break off combining to bring the fighting to a close; with the Spanish squadron having taken the brunt of the action, with Villeneuve's own flagship Bucentaure only suffering six casualties and the eight ships behind her taking no real part in the fighting.

The Spanish would see two of their ships captured, and 1,200 of their men taken prisoner whilst most of the 480 casualties were among their surviving ships a fact that would lead to much recriminations between the allies afterwards and see Villeneuve make a dramatic reorganisation of his squadrons to include both French and Spanish ships when they next met the British under Nelson off Cape Trafalgar in October.

Both admirals claimed success, and indeed Calder had captured two enemy ships with light casualties of under 200 men, with Calder's dispatch the next day declaring that it was;

'A very decisive action which lasted upwards of four hours, when I found it necessary to bring up the squadron to cover the captured ships.'

But with Villeneuve rather 'gilding the lily' by reporting;

'The enemy then made off. He had several vessels crippled aloft, and the field of battle remained ours. Cries of joy and victory were heard from all our ships.'

Calder would face a court martial, not for what he did, but rather for what he failed to do, allowing difficulties to persuade him not to resume the action in the following days, with both admirals sailing away from the area on the 25th having let each other move out of sight of each other and with Calder heading north to rejoin Cornwallis whilst Villeneuve sailed south-east for Vigo to replenish supplies and carry out repairs before heading south to Cadiz and the decisive Battle of Trafalgar nearly three months later.

Admiral Sir Robert Calder

Calder's trial lasted three days between 23rd to the 26th December 1805 held aboard the 98-gun three decker Prince of Wales and presided over by the Commander in Chief, Admiral George Montague delivering its condemning verdict after a rather lengthy and laborious preamble;

'the court is of the opinion, that the charge of not having done his utmost to renew the said engagement, and to take or destroy every ship of the enemy, has been proved against the said Vice-Admiral Calder; that it appears that his conduct has not been actuated by cowardice or disaffection, but has arisen solely from error in judgement, and is highly censurable, and doth adjudge him to be severely reprimanded, and the said Vice-Admiral Sir Robert Calder is hereby severely reprimanded accordingly.'

Sir Robert Calder never received another active command but was promoted to full admiral by seniority in 1810 and later appointed Commander in Chief at Portsmouth in 1815, dying in 1818 at the age of seventy-three.

Sources consulted for this post:
Far Distant Ships - Quintin Barry
The Trafalgar Companion - Mark Adkin
Naval Warfare in the Age of Sail - Brian Tunstall
The Battle of Trafalgar - Geoffrey Bennett