

Just before the Xmas break I was busy getting my Jaegers finished off for my Mohawk collection
 |
| JJ's Wargames - Mohawk Valley Collection, Jaegers & Militia |
and in the process of pondering all things AWI Mohawk Valley ideas, as I am want to do, I came across a video review on YouTube illustrating a playthrough of the Mini-Game, Roger's Rangers by Decision Games and written by Joseph Miranda, which after a little bit more research on Boardgame Geek, I picked up a couple of copies, one for me and the other for my FIW enthusiast and mate Steve M.
 |
| Boardgame Geek - Rogers Rangers |
The video link can be followed below with Centurion's Review showing a playthrough of the Scouting Scenario.
Of course I immediately spotted the problem with the game in that it is focussed on the right theatre in North America and with a similar theme but very much on Roger's Rangers and their role in the French Indian War, but, I thought might, with a little tweaking, work just as well recreating the adventures of Butler's Rangers and the King's Royal Yorkers in the American War of Independence.
 |
| Readily adapted artwork from the Perfect Captain AWI game served for my new counters to represent the two forces engaged in this theatre |
Thus I sat down to play with this little project, to make the necessary tweaks with the map, units and cards to put the game into Cyberboard where I could playtest it to see if the idea would work or not and I thought you might like to see the results and how I got on.
When I say tweaks, that included a redesigned map, new counters to represent the different troop types and some changes to the Mission and Operations cards to change the descriptions to being more appropriate for this theatre in the AWI together with artwork to compliment the theme. The rules of play are however as written so once those aspects were done the game was ready to test.
 |
| My redesigned game map to represent the AWI frontier |
So with the module finished over the Xmas break I decided I would start playtesting in January and for those unfamiliar with it, I should explain if you haven't followed the links above, that this is a solitaire game with the player running the Rangers force or in this case Crown forces and the system generating any opposition that you might bump into as you strive to complete one of four missions, which if playing the full campaign can be linked one after the other, Scout, Rescue, Frontier Raiding and the Big Campaign.
 |
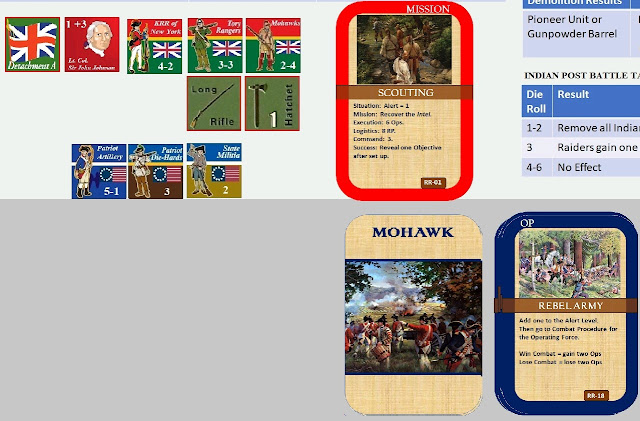
| An example of one of my theatre-themed Mission Cards and the subject of the first play test |
The Mission Cards drive the set up and objectives for each game and in the example above, the game I am reporting here, my loyalist force under the command of Sir John Johnson are tasked with moving into enemy territory from one of the staging posts, either Fort Oswego or Fort St John, to recover the 'Intel' represented by one of seven objective counters randomly placed on the map and hidden from view until revealed when my force enters the area.
Of course some of those other objectives can aid or hinder my march to find the Intel counter and so every time one is turned over adds a little moment of anticipation in the game, in addition Ops (Operations Cards) can also help or hinder this process.
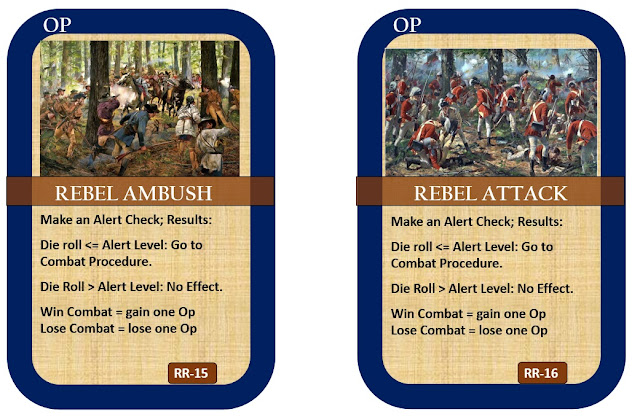 |
| Two examples of Operations Cards that can get revealed each turn of the mission and in this case alerts the player to the possibility of contact with the enemy. Note the Alert Level being higher makes this more likely. |
To achieve each mission, Operations Cards are required to allow it to continue, and this mission starts with six, which are used up each turn of the game mission, and can be lost because of events or equally gained in the same way. If you run out of ops before returning to base with the objective, the mission fails.
In addition I also need to build my force with the 8 RP (Recruit Points) allotted and take necessary gear to help my men achieve success, and these all cost RP and I am limited to 3 units represented by the Command factor, although my leader, Johnson is a free addition to the force.
 |
| Gear, in the form of boats and the green objects help to overcome likely obstacles during the mission and the objective counters give each mission its purpose. |
The numbers on each unit counter refer to combat factor (left) and movement (right), with the former requiring a die roll equal to or less than to defeat an enemy unit and the latter determining how many spaces on the map can potentially be moved to on the march, determined by the slowest marching unit in the column and special terrain such as Rebel Forts or Mountains that force the column to stop despite their move allowance.
Rebel units are simply deployed to the map when generated so don't require a movement rate but just have a combat factor, and commanders are counted as elite units giving a plus factor to the Tactical Superiority die roll which determines who shoots first and also have a Combat Factor of 1 (Crown) or 2 (Rebel) to simulate their small ability to influence the battle at that level should it become required.
| The game test set up with six operation cards ready to drive the game and my loyalist force starting in Oswego |
The screen shot above shows the module set up ready to go with the Scouting Mission, with seven objective markers placed on the map from Unadilla to Castle Town and up to Crown Point.
The Alert Level, indicates how ready the Rebels are for an incursion by Crown Troops and indicates how many troops might oppose me if I bump any on my route
My RP level is at zero as I have purchased my force of Kings Royal Yorkers, Butlers Rangers and Mohawk Indians and am taking the Long Rifle and Hatchet as my gear, attaching them to the latter two units, intending to start my march from Fort Oswego to Unadilla before moving into the Mohawk Valley.
 |
| Turn One - Arrival at Unadilla |
So armed and ready my little force made its way south from Oswego via Lysander and stopped at Unadilla, having moved two areas, the furthest the force can march with the slower moving King's Yorkers in company

On arrival, the first Op Card was turned and it was not a good start, revealing my march had been spotted by Oneida Indians allied to the rebels, thus raising the Alert Level to two and reducing my remaining op cards to just four and barely into enemy territory.
On the positive side my arrival allowed the release of loyalist prisoners held in the area and adding an RP to the pot and the potential to raise more men and gain more equipment if needed.
The force then marched on to Fort Hunter, with the added threat of Rebel strongpoints in the area which causes Crown troops to halt the march immediately on entering the area.
 |
| Turn Two - Arrival at Fort Hunter |
 |
| Turn Three - Arrival at Fultonville and Rebel Ambush |
Fultonville revealed the Butler's Rangers Op Card, which I at first put to one side in anticipation of using it later if required, only to find the revealed objective counter heralded a Rebel Ambush, now with the Alert Level at 2, setting up two randomly picked Rebel units, revealing Riflemen and Militia waiting on my march route.
 |
| Rebel Riflemen and Militia attempt to ambush my force, but the Butlers Rangers Ops Card helps to ensure victory for the Crown. |
Thus I decided to play the Butler's Rangers card immediately giving my troops the automatic gain of the Tactical Superiority, meaning my chaps got to fire first with my KRRNY and Butlers hitting on 4's or less on a d6 routing the enemy before they knew what hit them, whilst also gaining me one Ops Card for winning the skirmish.
Emboldened by my victory I decided to press on with the mission and head back up the valley to Fort Hunter ready to face events in Turn Four with my two remaining ops cards.
 |
| Turn Four - Return to Fort Hunter and the Battle of Fort Hunter |
Needless to say my bold move to go back along the Mohawk Valley deep into Rebel territory was a risk with only one op card left and too far away to get back into Canada, and indeed the Rebels were waiting for me with a column sent out to hunt my force down now that they were aware of its presence.
The Rebel Army Ops Card immediately moved the Alert Level up further to 3 and required a die roll to see how many Rebel Units would oppose me revealing the three seen above, with a tough force of State Levies, Rebel artillery and militia in support.
Fortunately Sir John Johnson and the Long Rifle capability of my Rangers gave me +2 to the Tactical
Superiority die roll which I easily won and all my units defeated the Rebels in quick succession to award me a battle victory and two additional and highly valuable Ops Cards to continue the mission.

It seemed as if fortune was favouring the brave and so Johnson's little army moved on to Ballstown, where the next Ops Card announced the Mohawks thirst for revenge and the possibility of further Indian allies joining the column, but sadly a die roll of 4 revealed that this Indian warband was busy elsewhere.
 |
| Turn Five - Ballstown and Success! Loyalist supporters meet the column to pass on the vital intel. |
However Johnson's luck continued as the objective counter was turned to reveal the sought after Intel and the force could now focus on the challenge of getting back to Oswego and completing the mission.
With just three Ops cards left Johnson decided to avoid the Mohawk Valley on the return march, with the two Rebel Fort areas only slowing the march and increasing the risk of interception, and instead head back down the Schoharie Valley at Fort Hunter and try to get back via Unadilla.
 |
| Turn Six - Return to Fort Hunter and avoidance of Rebel Army |
Fort Hunter proved yet again a dangerous place to march past as the third visit saw the turning of the Rebel Attack Operations Card that required me to roll a D6 higher than the Alert Level of 3 to avoid a battle, which was ideally what I was looking for and needles to say 'lady-luck Fortuna' duly obliged.


Just when you think this game is easy it seems to throw in a few more surprises as the next Ops Card turned on arrival at Unadilla announced a possible Rebel Ambush and similarly to avoid it the D6 roll needed to be higher than the Alert Level 3.

Yes, get in there!
What a conclusion to this first mission and successfully achieved allowing progress on to the next Mission, 'Rescue', following the Intel revealing that Loyalists were being targeted to join the local militias at the risk of imprisonment and confiscation of property on their failure to enrol.
 |
| Turn Eight and Sir John's little force makes it safely back to Oswego with the Intel following quite an adventure along the Mohawk to Ballstown. |
The end of the mission was completed with one Ops Card remaining and a Recruit Point in the bank both of which are carried over to the next mission.

This first mission was great fun to play and suggests lots of possibilities for using with the Mohawk Valley Collection of figures going forward and I look forward to showing how I get on in the next one entitled;

In addition the simplicity of the basic game invites further tweaks to the set up to perhaps vary the threat posed by the Rebels and raise the anticipation levels a bit more - more anon.
JJ,
ReplyDeleteBeautiful AAR and a good introduction into Roger's Rangers. It brings back memories, and offers to make some new one's as well. You post was fun to read, and presented in a format that pulled me in. Along the way rekindling my interest in this game format, and Roger's Rangers in particular.
At the moment I am deep into Coop Campaign for X-wing, for once forgetting the serious aspects of wargaming, re-finding my happiness in fiddling with a game's design and format because it's fun to tinker.
That said, your post presented an answer to my quest for a better campaign format, for something more than linked scenario's in x-wing. At the moment I use Heroes of the Aturi Cluster (HOTAC) as a baseline for solitaire or coop scenario’s and campaigns. It's a really smart design and very succesfull in transforming confrontational x-wing into a cooperative game format. It doesn't, however, present a mechanism for developing a story, that's up to the players. So I have been searching for a format that I like and helps in creating a developing story.
The game play in Roger's Rangers offers an elegant mechanism for engagements to be meaningful. It builds a story for why and when the engagements happened. The view might change from wooden forts and forest, to starbases and panorama’s of stars but the game’s underlying mechanism would be intact, with alertness levels indicating how easy, or how difficult passage through an area might be. With opportunity to tie in all kinds of story elements through event or object cards, as well as mission & operations cards helping with the overall story.
Of course I will have some tweaking to do. Kind of like look forward to it. The great part will be that is raises interest in putting these miniature on table, and both might be luring my partner and wife into playing x-wing.
But first, I have to but Roger's Rangers. :-))
And thank you for sharing.
Kind Regards,
Swen
Hi Swen,
DeleteThank you for your comment, and I'm glad you enjoyed the read. It looks like we are of a similar mind when it comes to thinking about little games like this providing a simple but not simplistic background narrative to our table-top games.
This is yet another fascinating aspect of our hobby that has provided me with hours off pleasure, just tinkering around with board games to see what potential they have to offer and very often the game has a little too much going on that would end up with more time being spent on it than on the table-top.
What I immediately like about this is the points you highlight and the cards and map providing all the narrative as to why your little force has ended up on the field of battle and where in relation to the wider story.
Once you are into the system it plays really quickly as well making it a very useful bolt on to the table top play and I have several ideas about linking the strength points to table forces, with the breakdown of the units already established by the counters appearing for the respective forces.
I'm thinking of storyboarding the other missions as I go so I can get a clearer picture in my own mind as to how best to link things, nothing quite like playing to understand better over just reading.
I'm glad this little experiment has inspired you to ideas for your own games, great fun and enjoy.
All the best
JJ