

Last weekend, I had the great pleasure of travelling up to the appropriately named little village of Nelson, just outside of Cardiff, with friends from the Devon Wargames Group to join with friends from the Penarth and District Wargames Society to get together to stage a two day celebration of all things wargaming, the game, the models, the banter, the social, married with a game in the Grand Manner, with our theme for our inaugural gathering, the Battle of Trafalgar, fought using the rules 'Kiss Me, Hardy' (KMH) from the Too Fat Lardies.
 |
| https://toofatlardies.co.uk/product/kiss-me-hardy/ |
The venue for our game was the gloriously historic sixteenth century Llancaiach Fawr Manor in which we had the use of the Education Block building and its tables to run our game over the two days we intended to play and able to setup on the Friday evening to get the players briefed and the commands allocated followed by a fish and chip supper to allow everyone to get to know each other prior to play.
 |
| The Manor is open over the weekend and we produced a flyer to advertise the game as we were very happy to welcome visitors curious about our mad hobby and our celebration of it. https://www.llancaiachfawr.co.uk/en/ |
The social side of our hobby always comes to the fore when you get a group of wargamers together, and the chat gathered pace well into the evening before we departed for our Friday night billets with a start time of 09.00 on Saturday morning to look forward to.
 |
| The NWS Yeovilton line up for The Leeward Line scenario JJ, Ian, Steve, Pete, Glyn and Andy JJ's Wargames - Naval Wargames Society Weekend |
The genesis of this game came about with a meeting between myself and Mr Glyn Williams, who was the founding and former chairman of the Penarth club, and our meeting up last year at the Naval Wargames Society Meeting in Yeovilton, (link above) during which he and the chaps joined myself and 'Captain Steve' our club name for yet another Steve to join our club, thus helping to avoid confusion when calling the right Steve to the bar to collect his beverage of choice, where we quickly rearranged our game plan to include us all for the playing of the 'Leeward Line ' scenario I had put together, and as it proved, a good warm up for this much larger affair.
Glyn flew the idea of getting together at Llancaiach Fawr Manor and making a weekend of it doing a 'big game' and frankly they don't get much bigger, naval wise than Trafalgar in 1:700th scale and so the day arrived when six of us from Devon made the journey up to South Wales on the Friday night to meet up with our hosts, eagerly looking forward to a fun weekend ahead.
 |
| The glorious model of the battle in the Victory Museum that I saw as a young lad and that provided the inspiration many years later. |
I should say that this game also has a much earlier genesis, when the thirteen year old JJ made his first visit with friends on a school trip to Portsmouth and HMS Victory, back in the early seventies, and yes we are talking last century!
 |
| My old Jackdaw folder, containing not just the original collection of contents but all the old versions of the Victory guides I have collected over the years, together with the odd postcard or two. |
The picture above taken from the copy in my Jackdaw folder for the Battle of Trafalgar, illustrates well the model I first saw in the Portsmouth 'Victory Museum' that had such an influence on the younger version of me, and I well remember the gasp of astonishment at seeing it as seen above, capturing the action of the Battle of Trafalgar as well as the imagination of a thirteen year-old boy, gazing at it for an age and just absorbing the drama on display and laying the seed of thought that led to me working on this collection of models.
 |
| HMS Agamemnon, the most recent addition to the Trafalgar collection, amply illustrates the opportunity to capture the look of the Victory Museum display models on a wargames table. |
Fast forward to the modern day, and with new information we can now look at Trafalgar in a much more forensic way than previously and with books such as Mark Adkin’s, Trafalgar Companion, published during the bicentenary of the battle, the maps therein give a clarity to the moves of the two navies coupled with a detailed look at the tactics and constraints imposed on opposing commanders to help the wargamer more closely model the battle, and explain why it ended being fought the way it was and not in the way a wargamer might like to have fought it.
 |
| Mark Adkin’s, Trafalgar Companion formed the foundation work for the planning of our game. |
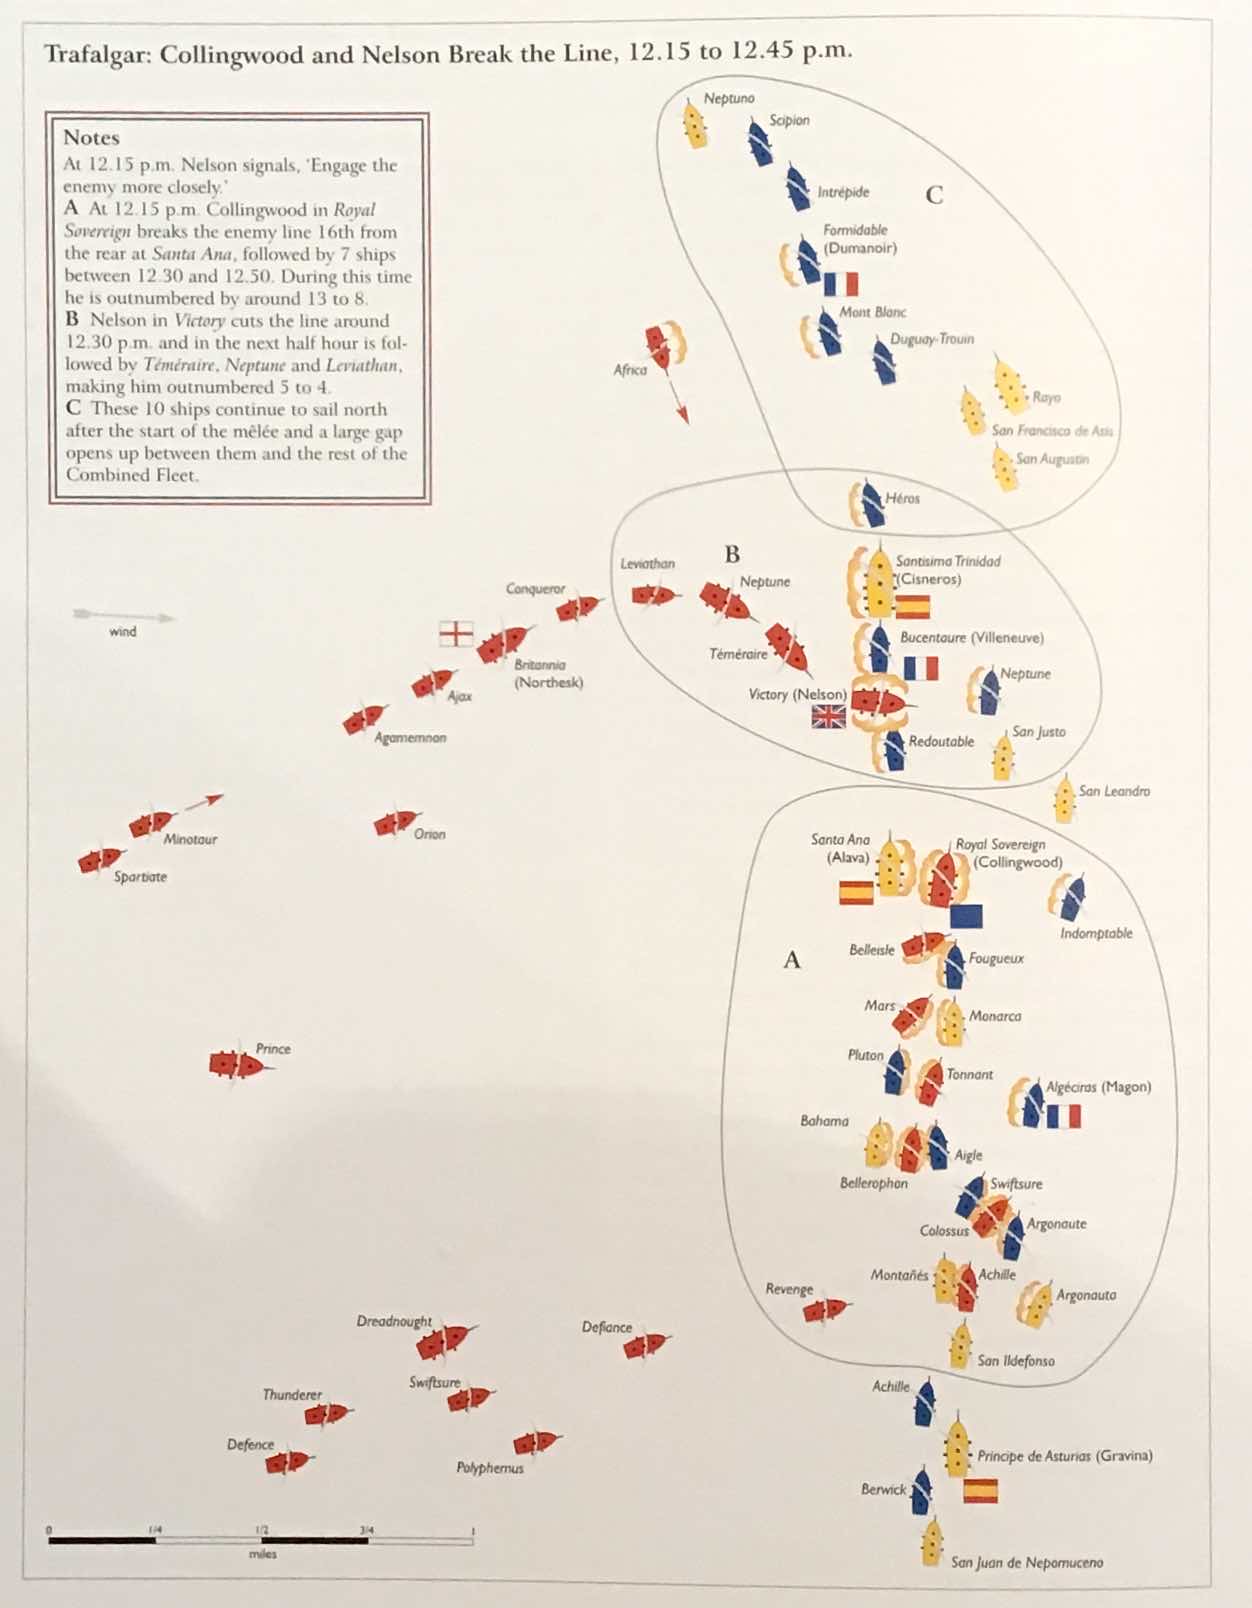 |
| Adkin's map of the approach made by Victory and the late turn towards the Bucentaure. The Trafalgar Compendium has been a big influence on the plan for our game |
The modelling done by the wargaming group, 'The Inshore Squadron', based in Portsmouth, illustrated that by plotting the Victory's course that she made and was recorded in her master's log revealed that she did indeed head for the Allied van right up until Villeneuve hoisted his vice-admiral's pennant, causing Nelson to revert to the original plan outlined in his famous Memorandum, to attack the enemy's flagship likely located in the centre of the Allied line, explaining the damage to Victory's mizzen that could not have been likely caused had she headed directly there as first thought.
 |
| The excellent work carried out by members of the Inshore Squadron to reveal the details of the course followed by HMS Victory at the Battle of Trafalgar is covered in the 2008 publication 'A Great and Glorious Victory' by Seaforth Publishing. |
To capture this aspect we had our Victory stay on course for the Allied van for a predetermined number of moves to simulate the delay in identifying Villeneuve's flagship.
 |
| Vice-Admiral Pierre-Charles Villeneuve |
Similarly I was very keen that for the players running the Combined Fleet it was clear to them the constraints they and their historical counterparts were operating under, and we discussed in the pre-game briefing the comments made by Villeneuve about them and the impact they would have if they were forced to confront an enemy, whose tactics he predicted with uncanny certainty.
The scale of KMH is not specified and estimates have determined a turn to represent about two minutes of actual time based on infantry movement and firing rates used for landing actions. However if you compare KMH with other similarly scaled rule sets, an average movement time is in my opinion likely to be somewhere around five minutes in normal winds.
Villeneuve’s comments about elements of his fleet just prior to the battle are very revealing as to their fitness for battle, here writing and praising the quality of the Spanish ships, but deploring the state of their crews on the 24th September 1805;
'What is essentially lacking in this [Spanish] Squadron is seamen and the funds to supply them with clothing; it is very distressing to see such fine and powerful ships manned by herdsman and beggars and having such a small number of seamen.'
Likewise we can read Villeneuve’s minutes from the Council of War meeting held on the 8th October 1805;
'The ships of the two Allied nations are for the most part badly manned from the weakness of the crews; that several of the ships have never yet been able to exercise their people at sea in any way and that the three-deckers Santa Anna and Rayo, and the San Justo 74, fitted out in haste and barely out of the dockyard, can in extreme necessity put to sea with the Fleet but that they are by no means in a state to render the service in action of which they will be capable when they are completely organised.'
Adkin points out that Villeneuve was not only constrained by the quality of his ships crews but by their lack of adequate signalling arrangements highlighting that the Combined Fleet had no common signal book, and a translation of the French code book was not distributed to Spanish ships until after the battle.
In the end they agreed to use the French General Instructions Code Book for signalling the more common nautical and tactical instructions, thus no fancy manoeuvres!! Examples, No.24 ‘Wear together’, No. 266 ‘Leading ship to make more sail’, No. 242 ‘Open fire’.
But perhaps the most revealing sentence delivered by the French commander in chief was contained in his Fleet Orders detailing how he and his commanders would act in the face of an enemy attack, stating;
'. . . I by no means propose to seek out the enemy; I even wish to avoid him in order to proceed to my destination. But should we encounter him , let there be no ignominious manoeuvring; it would dishearten the crews and bring about our defeat.'
 |
| Adkin's map illustrating the wearing of the Allied Fleet at 08.00 as the two British columns bore down on his line of battle now only six miles distant, and with Vice-Admiral Collingwood's division about to change formation into line of bearing as the British attack plan developed. |
Unfortunately his decision to turn the Combined Fleet back in the direction of Cadiz at 08.00 on the morning of the 21st October 1805, led exactly to the 'ignominious manoeuvring' he was so keen to avoid and the demoralisation it likely caused to a very disrupted line of battle that we placed on the table for our refight of this famous battle.
As in previous large fleet refights using KMH, we would be using the the Squadron and Fleet Morale rules developed to reflect the fact that as ships were lost to a given fleet, there was a growing chance that parts of it in terms of the squadrons and eventually the whole fleet might decide to try to break contact and save what remains of those still intact vessels, to fight another day.
 |
| Rear-Admiral Dumanoir's squadron card with the ships and their respective pennant numbers together with a status record of damage or capture and the PPV in red indicating a ship that was taken during the actual battle. I have two columns calculated to allow for leaving out the attached frigates and brigs if required. Damaged ships that escape the table still run the risk of foundering on the way home, made worse with an upcoming storm and can also be captured by less damaged enemy equivalents, if available and successful, on the roll of a die in the post battle analysis. Note the Poor sailors recorded, to be used for keeping formation if testing to make a squadron manoeuvre, with Dumanoir's seniority indicating his position to take command of the fleet should that be required and his ability as a commander (Patriotic) to be used as a modifier for testing to stay in the fight. |
So to help keep everyone informed as to the state of their squadron and the fleet as a whole, I produced laminated command cards so that as ships became progressively more damaged or indeed destroyed or struck, we could quickly see when the threshold had been reached in terms of PPV's lost to cause the affected command to test to see if they would continue to fight or break off, with the result kept discreet from the enemy so as not to give them any information as to the outcome, other than in the case of a failure, the remaining ships attempting to put distance between them and the enemy as they headed for an off table escape route.
 |
| Each of the model ships had its own ship record card that I have developed to help administer our games more easily with all the information players need to quickly work out gunnery, melee and damage effects and status of their ship during play |
In the end four allied squadrons would end up testing before our game concluded with just one failing and deciding to quit the table.
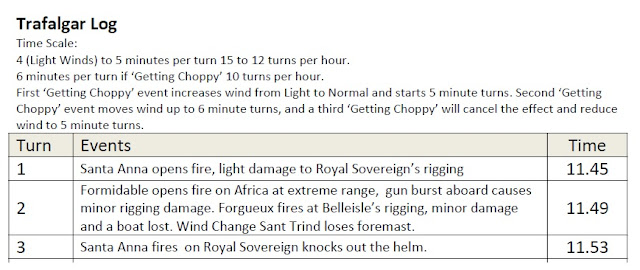
Finally to give some context to the actual battle and to compare and contrast with the results obtained by both commands but especially Nelson's, given the extraordinary victory he and his fleet achieved I contrived a log of the battle we fought putting a time to our events based on a game clock that I devised for the scale KMH is based on.

The wind strength being important as KMH doesn't get bogged down with wind, accepting that both parties are equally affected by whatever wind is blowing and simply having a 'Getting Choppy' check to see if it affects sea conditions enough to cause gun ports to be closed.
However a given ship will take longer to travel its basic distance, ten centimetres in the case of a first rate, in a light wind than it would in a strong breeze and so the time scale needs to flex accordingly with, as I allowed for, hours composed of ten, twelve or fifteen turns, depending on that wind strength and governed by the number of successful 'Getting Choppy' tests that were revealed.
The battle commenced at 11.35, when the Fougueux opened fire on the Royal Sovereign and lasted over five hours, with the surrender of the Intrepide at around 17.15, with the battle seeing its most intense fighting after 12.30 and eleven Combined Fleet ships taken, including three flagships, by 15.00, in a battle that started under light winds but that would gather momentum into the storm that would characterise its end, and thus the log became a way of recording a similar narrative to our game.
Day One - Saturday
With everyone briefed and the respective commands allocated, it just left for one final piece of game admin to be completed before Jack was able to pull the first chit from the bag to get our game started, and that was of course our obligatory team photo, which was not as complete as I would have preferred as our Penarth hosts had planned to share the love across their club by inviting in some club mates to replace those who were just playing on the Saturday, so to make sure I account for all involved I will add that we were joined on the Sunday by Martin C. and Bleddyn, the latter flying out later that day to join in the fun at Historicon.
 |
| The briefings done the night before together with our table set up and commands distributed, the team assembles for day one of our Trafalgar refight. Left to right, JJ, Glyn, Dave, Captain Steve, Steve M., Rhys, Alistair, Andy T (at the back), Pete, Kevin, Mr Steve, Stephen, Phil, Ian, Graham J., Barrie, Chas, Andy B., and Jack. We were joined on the Sunday by Martin C. and Bleddyn. |
Our teams of players were randomly selected the night before, with everyone simply drawing a command chit blindly from the bag, with the framework of our game resting on the plan and briefing from the Lardies own 2005 bicentenary game and quoted here together with a few 'special rules' to add some extra context.
 |
| Admiral Villeneuve, a.k.a. Alistair gets the game off with the Combined Fleet centre moving |
Combined Fleet Briefing
'You are Admiral Pierre de Villeneuve. The desperate gamble that would have seen a massed combined fleet move up the English Channel is over. Napoleon has decided that your time as commander of the Combined Fleets has come to an end. Admiral Rosily will soon be arriving and you have orders to take the fleet to Naples, to protect Italy and Napoleon’s operations in Austria.
On board your flagship, the Bucentaure, centrally positioned in a poorly assembled order of battle, you can see the enemy fleet bearing down towards you, driven by a slight breeze. You outnumber your opponent, whose crews are also battle hardened and competent than is seen on many of the vessels in your fleet. Defeating the enemy will not be easy. He has the initiative yet judging by his angle of approach you may be able to defeat each of his vessels as they close in turn. Your ships and their commanders will need to remain calm.
This will not be a battle of manoeuvre, many of your vessels, particularly those in the Spanish fleet, are poor sailors and will struggle to maintain their position in the line of battle. Your actions today will determine the fate of Europe for the next hundred years.'
 |
| The British leeward division with Nelson's windward column over on the next table |
The combined fleet is split across six commanders, three French (Villeneuve, le Pelley and Magon) and three Spanish (Cisneros, Gravina and Alava). Their ships are more interspersed with each other, and this will recreate nicely the problems in coordination and formation manoeuvring that the Combined Fleet were faced with on the day. That said, there remains sufficient scope and control for some well-coordinated local fighting to occur.
 |
| Combined Fleet Order of Battle, Dumanoir's, Villeneuve's and Cisneros' Squadrons |
 |
| To get our game moving, Collingwood's Royal Sovereign was placed just outside of extreme gunnery range, so would receive her salute from the Combined Fleet line pretty soon after her first move. |
 |
| Combined Fleet Order of Battle, Alava's, Magon's and Gravina's Squadrons |
 |
| The Leeward Division of the British fleet led by Vice-Admiral of the Blue, Lord Cuthbert Collingwood's Royal Sovereign 100-guns, with the 74-gun Belleisle under Captain William Hargood alongside |
British Fleet Briefing
Nick skinner chose to quote the famous Nelson Memorandum as the most suitable briefing for the British players and I too sent that out in the briefing notes, and I quote perhaps the most pertinent paragraphs to outline the way our table was set up;
'. . . The Second in Command will, after my intentions are made known to him, have the entire direction of his Line to make the attack upon the Enemy, and to follow up the blow until they are captured or destroyed.
If the Enemy's Fleet should be seen to windward in Line of Battle, and that the two Lines and the Advanced Squadron can fetch them, they will probably be so extended that their Van could not succour their friends.
I should therefore probably make the Second in Command's signal to lead through, about their twelfth Ship from their Rear, (or wherever he could fetch, if not able to get so far advanced); my Line would lead through about their Centre, and the Advanced Squadron to cut two or three or four Ships a-head of their Centre, so as to ensure getting at their Commander-in-Chief, on whom every effort must be made to capture.
The whole impression of the British Fleet must be to overpower from two or three Ships ahead of their Commander-in-Chief, supposed to be in the Centre, to the Rear of their Fleet. I will suppose twenty Sail of the Enemy's Line to be untouched, it must be some time before they could perform a manoeuvre to bring their force compact to attack any part of the British Fleet engaged, or to succour their own Ships, which indeed would be impossible without mixing with the Ships engaged.
Something must be left to chance; nothing is sure in a Sea Fight beyond all others. Shot will carry away the masts and yards of friends as well as foes; but I look with confidence to a Victory before the Van of the Enemy could succour their Rear, and then that the British Fleet would most of them be ready to receive their twenty Sail of the Line, or to pursue them, should they endeavour to make off.
 |
| The centre of the Combined Fleet's line occupied by Vice-Admiral Villeneuve's flagship Bucentaure 74-guns and ahead Rear-Admiral Cisneros' Santisima Trinidad 136-guns. |
If the Van of the Enemy tacks, the Captured Ships must run to leeward of the British Fleet; if the Enemy wears, the British must place themselves between the Enemy and the Captured, and disabled British Ships; and should the Enemy close, I have no fears as to the result.
The Second in Command will in all possible things direct the movements of his Line, by keeping them as compact as the nature of the circumstances will admit. Captains are to look to their particular Line as their rallying point. But, in case Signals can neither be seen or perfectly understood, no Captain can do very wrong if he places his Ship alongside that of an Enemy Of the intended attack from to windward, the Enemy in Line of Battle ready to receive an attack,
E …… Advanced Squadron (8 sail)
n ………. Weather Squadron (16 sail
e ………… Lee Line (16 sail)
m
y Total British 40 sail
(Note, Nelson simply adapted his plan to the ships from the forty he anticipated, creating just the Weather and Lee Squadrons from the twenty-seven ships of the line he had on the day)
The divisions of the British Fleet will be brought nearly within gun shot of the Enemy's Centre. The signal will most probably then be made for the Lee Line to bear up together, to set all their sails, even steering sails, in order to get as quickly as possible to the Enemy's Line, and to cut through, beginning from the 12 Ship from the Enemy's Rear. Some Ships may not get through their exact place, but they will always be at hand to assist their friends; and if any are thrown round the Rear of the Enemy, they will effectually complete the business of twelve Sail of the Enemy.
Should the Enemy wear together, or bear up and sail large, still the twelve Ships composing, in the first position, the Enemy's Rear, are to be the object of attack of the Lee Line, unless otherwise directed from the Commander-in-Chief which is scarcely to be expected as the entire management of the Lee Line, after the intentions of the Commander-in-Chief, is [sic] signified, is intended to be left to the judgment of the Admiral commanding that Line.
The remainder of the Enemy's Fleet, 34 Sail, are to be left to the management of the Commander-in-Chief, who will endeavour to take care that the movements of the Second in Command are as little interrupted as is possible'.
 |
| With 'England Expects' flying from her yards, Nelson's Victory leads the Weather Division of the British fleet towards the Allied Van with as yet the location of the French flagship, Bucentaure, uncertain. |
To make the full battle achievable, the British commands are split. Nelson’s column is split into three components, under the command (for the war game) of Admirals Nelson and Northesk, and (Commodore) Codrington. The lee column is split between Admiral Collingwood and (Commodore) Cooke and the frigates and under the rate vessels under (Commodore) Blackwood. This keeps the number of ships controlled by each player at a manageable level, and (as the orders of battle show) is designed to give the British a better command and control system, with more possibilities for local coordination than the Combined Fleet.
 |
| British Fleet Order of Battle, Nelson's, Northesk's and Codrinton's Squadrons |
 |
| HMS Africa 64-guns under the command of Captain Henry Digby runs down the windward side of the Allied van having missed the signal during the previous night to turn south, seeing her open fire against the enemy at 11.20 as she passed them on her way to join up with Nelson's weather column. |
 |
| British Fleet Order of Battle, Collingwood's, Cooke's and Blackwood's Squadrons |
Alongside the rules of play already outlined above, we also included the following from the Lardies briefing;
“England Expects”
 |
| 'England Expects' - Obviously this particular rule was a controversial one to be played in Wales, but 'history is history'! |
Inspirational commanders may additionally act to motivate their fleet with a signal designed to bolster their spirits in action. This is the “England Expects” moment. On the turn of this chit an inspirational commander may declare he is hoisting a special signal. All crews under the command of that commander, including those under subordinate commanders if the Inspirational commander is the commander in chief, have their rating improved by one for the duration of that turn. Thus poor crews become Average, Average become Elite and Elite crews count as ‘Exemplary’.
An Exemplary crew is a new concept and serves as an example of excellence to the rest of the fleet. As such they receive bonuses when firing, receiving one additional d6 on all firing, they count as copper bottomed for all movement and never fail a tack test.
This chit may only be used once. Once played it is removed from the draw.
 |
| The small ships were included in our game on both sides with the rear of Blackwood's British light squadron, and the schooner Pickle with 8 x 12pdr carronades and the cutter Entreprenante and her 10 x 12pdr carronades. |
Death of a Commander

If a flagship bearing a commander receives High Officer Casualties, roll a d6, and subtract the number of masts lost (not the bowsprit). On an adjusted score of 0 then the commander is deemed to have been amongst the casualties. I suggest using the masts lost as an adjustment as these tend to generally reflect the degree of battering the ship has sustained.
Re-roll to discover the officers fate for the rest of the campaign at the conclusion of the battle
1-2 = killed,
3-4 = Badly Wounded (Roll d6 1-2 = Available to serve in 5 years, 3-4 = 4 years 5-6 = 3 years’ time)
5-6 = Lightly Wounded (Available to serve the year after next.
If the Commander is killed as a consequence of a HOC hit result then the flagship remains in command of the fleet, however the flagship itself is instantly downgraded (i.e. Elite becomes Average, Average becomes Poor etc) and the new Commander is graded one level lower. The next senior commander in the fleet as a whole then becomes in charge.
In addition to the above, when a ship sustained the critical hit 'High Officer Casualties' we simply rolled an addition d6 with a six indicating the ship's captain had been similarly been hit.

Reloading between Broadsides

If a broadside has been fired in the turn before and wishes to fire again in the next it will be a Partial one representing crews still in the process of reloading. Conversely the player may opt to not fire and thus be fully reloaded and able to fire full next turn. Note other factors apply, thus if the broadside would be partial because of reloading and partial because of target aspect then half the dice and half them again.
In the game, you will see a cannon marker placed on the base of a ship, it having fired, and would indicate a vessel subject to the partial broadside effects should it fire in the following turn, or instead have it removed at the end of the following turn because it chose to reload instead. A very simple but effective curb on excessive firing effects.
 |
| Minotaur 74-guns, closest to camera, commanded by Captain Charles Mansfield and part of Codrington's squadron, armed with 28 x 32-pdrs on her lower deck, 28 x 18-pdrs on her upper deck and 14 and 4 x 9-pdrs on her quarterdeck and forecastle, respectively, with a crew of 615, 540 naval and 75 Royal Marines. |

Our game would end up bearing a striking resemblance to the historical fight with the first part of Saturday seeing Collingwood's division close in on the allied line aimed at Alava's, Magon's and Gravina's squadrons, following through on Nelson's plan to overwhelm the rear of the enemy line with an attack in line of bearing.
 |
| The Royal Sovereign receives a long range broadside from the Santa Anna, extreme left, as the leeward division closes in line of bearing |
 |
| As the Royal Sovereign fouls astern of the Santa Anna, the Belleisle 74-guns comes up in support |
With the first turn very much focussed on moving and with the Combined Fleet Line trying to keep some semblance of order as Collingwood's leeward division closed, the key event was Santa Anna 112-guns, Vice-Admiral Alava's flagship greeting the Royal Sovereign with a long range broadside.
 |
| The Fougueux 74-guns, centre, passes the Santa Anna, right of picture, carrying a strike test marker on the front of her base having taken a close range broadside bow rake from the British flagship as she passed |
However over the next three turns of play, the drama was already starting to ratchet up, as the next broadside from the Santa Anna on the Royal Sovereign was partial, with the Spaniard choosing not to reload but continuing to fire as she bore, and in so doing managed to get a critical hit on the British flagship that ended up taking out her helm just at the critical moment of attempting to pass through the gap between the Santa Anna and the following French 74-gun Fougueux.
 |
| The Mars 74-guns is the next in the line with Tonnant 74-guns on her starboard side, with Bellerophon 74-guns and Colossus 74-guns following in top right of picture |

 |
| Sizing up an extreme range broadside against Victory's rigging |
With the fight developing around the Santa Anna and Royal Sovereign, other parts of the line started to activate as Africa 64-guns exchanged fire with Formidable 80-guns, Rear-Admiral Dumanoir's flagship as the former worked her way down the line of the Allied van squadron.
 |
| Victory leads the Weather Column ever closer with the 98-gun Temeraire close alongside, keeping station, still heading for the allied van as the whereabouts of Villeneuve's flagship remains uncertain. In fact she is tucked in behind the Santisima Trinidad, the large three-decker seen ahead . |
Then at 11.49, the drama shifted another notch as did the direction of the wind as it shifted a full point on the compass from ESE to SSE, catching many of the Combined Fleet in irons as they struggled to hold a bow wind and with some crews caught out by the sudden change and unable to pay off seeing Santisima Trinidad and Formidable loose their foremasts as a consequence.
 |
| The change in wind has driven the Combined fleet to bring their bows towards the right hand table edge and causing them more problems with their already disorganised line. |
 |
| Victory now closes on the Allied centre, having identified Bucentaure as the Heros 74-guns opens fire on the approaching British three-decker |
 |
| Victory braves the fire of Heros and Santisima Trinidad as she prepares to break the Allied line. |
With our afternoon phase of play underway following a light lunch, the play picked up from where we had left things, with Collingwood's Leeward Division arriving steadily to prepare to deliver close in bow and stern raking broadsides, as the Allied Rear Squadron and Squadron of Observation braced themselves for the first wave of British third rates and the onslaught that was developing.
 |
| It's just after 12.15, game time, on Saturday afternoon and the drama is building with the first elements of Collingwood's division already stuck in down the far end of the table, with fires breaking out and strike-test markers proliferating as broadside rakes are delivered at short and point-blank ranges. All this as Nelson charges in with four British three-deckers aiming to overwhelm the Allied centre. Closest to camera, the Allied Van is immobilised as the Formidable has lost her foremast along with two other van ships, preventing them tacking about and with the frigate Cornelie coming across to allow Dumanoir to transfer his flag. |
Meanwhile further along the line, Nelson had now turned Victory towards Villeneuve's Bucentaure and was just about to penetrate the Allied line with three British three-deckers close behind, Temeraire and Neptune 98-guns and Northesk's Britannia 100-guns.
 |
| The frigate Cornelie seen closing on the Formidable, to send a boat across to pick up Admiral Dumanoir |
 |
| '. . . strike-test markers proliferating as broadside rakes are delivered at short and point-blank ranges.' |
 |
| The action is developing nicely at the rear of the Allied line as Gravina's Squadron of Observation brings up the rear as ahead Collingwood's leeward division strikes home |
The afternoon session of play set the scene for our battle going forward as the cannon exchanges became up-close and personal, as evidenced by the game log seen below, as Collingwood's pressure on the rear of the Allied line started to show results, with the Combined Fleet loosing two of its third-rates, the French 74-gun Pluton, having had its captain, Commodore Julien-Marie Cosmao-Kerjulian killed among high officer casualties in the first exchanges of gunfire with HMS Belleisle, striking at the first time of asking as a result.

 |
| Centre left, Bellerophon 74-guns has cut across the bow of Montanes 74-guns which has suffered under the raking fire delivered losing her wheel and with a strike test counter on her base. Ahead of Montanes is the Bahama 74-guns, also on a strike test having been bow raked by Tonnant which will cause a fire leading to the Spanish third-rate blowing up |
 |
| A good end to day one, and Vice Admiral Nelson (a.k.a Glyn) is still alive, seen here at the far end of the table, celebrating the fact with Rear-Admiral Dumanoir (a.k.a Steve M.) over an afternoon port. |
Day Two - Sunday
With things really starting to hot-up at the close of play on Saturday the action looked likely to ratchet up yet another notch as the British fleet brought on the melee action foreseen by both Nelson and Villeneuve, with both commanders appreciating the benefits that favoured the British ships with this kind of battle, but with little either could do to influence events as they themselves became embroiled in the struggle.
The pressure applied by Collingwood's division had already started to bear fruit as we ended play on Saturday, with the only question mark being the damage sustained by Royal Sovereign as she battered her way into Rear-Admiral Magon's line finding herself at one stage surrounded by four enemy ships as she returned fire and survived four strike test challenges, with her British elite status fervently determined crew and flagship status, making her a very difficult ship to subdue through morale failure and seeing her repair her wheel to give her a fighting chance now that her ability to manoeuvre had been restored.
 |
| Victory with Neptune astern, stern rakes the Heros 74-guns as she passes, heralding the start of our morning session of play on the Sunday, and with much to look forward to with the resumption of play. |
The players were reminded, especially the British, that the best way to destroy Allied squadrons was to take out just enough of their ships to force them to take a squadron break test, the failure of which would leave them vulnerable to a general chase, unable to initiate broadsides unless fired upon and boarding actions except in defence, as they attempted to escape, not able to claim support from friends in close proximity if challenged to a strike test, given that a squadron breakoff implied everyman for himself.


It's turn nine of our game, 12.17, game time and Lord Nelson looks to take the initiative with an immediate inclusion of the 'England Expects' chit put into the bag and designed to up the anti as more and more British ships closed into short and point-blank range.
 |
| Nelson decides to fly his famous signal to inspire the fleet |
 |
| The Victory and her consorts look to take full advantage of the 'England Expects' chit as Nelson plots his move into the ranks of Villeneuve's centre |
 |
| Having raked the Heros as she passed, Victory ploughs on between Bucentaure 74-guns (left) and the Spanish 74-gun San Augustin, part of Rear Admiral Cisneros' squadron. The Heros can be seen in her wake, centre-top, with her wheel destroyed and facing three oncoming British ships. |
 |
| The Royal Sovereign centre and hard pressed, alongside the Spanish 74-gun Monarca, and the 112-gun Santa-Anna beyond and with the French third-rate, Fougueux, across her bow. |
 |
| Nelson's attack develops on the Allied centre as Dumanoir in the van has just transferred his flag to the frigate Cornelie, top-right |
 |
| Collingwood's attack in full sway with his follow up echelon of ships coming into support from the centre right of picture. |
 |
| Temeraire 98-guns delivers a point blank stern rake to the Santisima Trinidad, resulting in an immediate placement of a strike test counter to her base. |
 |
| Temeraire can be seen top left raking the Santisima Trinidad as Victory cuts between Bucentaure and San Augustin, with Heros beyond about to be overwhelmed by following British ships in the Weather Division. |
 |
| Victory opens fire on the Bucentaure, note her Vice Admirals tricolour pennant flying from her foremast, with a short range broadside, reduced to partial fire (half the possible dice) as indicated by the cannon marker on the front of the base |
 |
| Yet another perspective of Nelson’s lead ships attacking the Allied centre |
 |
| The combined fire from the Monarca and Fougueux has caused a fire aboard the Royal Sovereign |
The cheer that accompanied Nelson's morale raising signal in the previous turn seemed to have the desired effect as Captain Pierre Paulin Gourrege decided to strike his colours on the 74-gun Aigle to the Tonnant, just as the wind speed picked up foreboding heavy seas ahead.

Suddenly the rear of the Allied line was rent by a fearful explosion as a fire that had taken hold of the Royal Sovereign got to the magazine of the 100-gun three decker sending massive chunks of flaming timbers skyward to shower down on nearby vessels, setting the 74-gun Spanish Monarca alight in the process.
 |
| Santa Anna 112-guns, with Prince 98-guns alongside, and with the Spanish flagship already marked with a strike-test counter. Santa Anna will strike to the Prince when tested. |
However Collingwood's demise was not going unavenged as another two Allied ships were taken out of the order of battle with the crew of the Hero overpowered by a boarding party sent over from the Conqueror, leaving no one spare to continue to man the pumps forcing all to evacuate the stricken French 74 as the vessel settled lower in the water, soon sinking in the rising swell.
Soon after the French 74-gun Swiftsure under Captain Charles l'Hostpitalier-Villemandrin hauled down her colours to HMS Achille 74-guns.
 |
| Royal Sovereign alongside the Spanish 74-gun Monarca with yet another strike test counter and a fire aboard. Admiral Collingwood would be killed at 12.26 when the British three-decker exploded after her fire got out of control, causing the Monarca, seen here close alongside, to catch fire from the falling debris. |
 |
| The rear of the Allied line with a burning debris marker indicating the remains of the Spanish 74-gun Bahama that blew up at 12.13 after a fire got to her magazine. |
 |
| Victory engages the Bucentaure with Redoutable in close company as the Santisima Trinidad is bow raked |
 |
| Santisima Trinidad under fire. She would strike at 12.31 to HMS Leviathan 74-guns |
 |
| The new flagship, frigate Cornelie, takes command of the Allied van |
 |
| The Spanish 74-gun Monarca is on fire after getting caught by burning debris from the 100-gun Royal Sovereign after it exploded, with the burning wreckage seen close by. Likewise Rear Admiral Magon's flagship Algeciras 74-guns, note pennant flying from the mizzen mast, has a fire after taking a broadside from Mars 74-guns |
 |
| The intensity of the fighting in the rear of the Allied line is indicated by the burning wreckage of the Spanish Bahama and British Royal Sovereign both having blown up after failing to put out fires aboard. |
After the drawing of breath by both sides caused by the exploding demise of the Royal Sovereign the intensity of our battle reached a climax in our final turn as multiple ships struck, captains fell, and some squadrons decided to flee while others decided to stay and fight.

A turning point had been reached as two Allied flagships struck their colours, Cisneros' Santisima Trinidad and Alava's Santa Anna, another flagship opted to break off, Magon's Algeciras, and another three Allied third rates struck in quick succession.
However the British were being made to pay for their success, with Commodore Codrington, commanding the 74-gun Orion being mortally struck down as his ship came alongside and grappled the French Indomptable 80-guns.
Then the most extraordinary event of the day saw the British 64-gun Polyphemus cause the French 74-gun Achille to strike her colours only to end up striking her own to the French 74-gun Berwick.
(The Polyphemus failed her strike test needing to roll 99% or less to pass, only to see double zero appear in the tray of the dice tower.)
 |
| At 12.31, Rear Admiral Magon's squadron attempt to break contact having lost three ships struck and one, the Bahama exploded and with the flagship taking medium damage, requiring in port repairs |

 |
| Looking like a scene from a Nicholas Pocock painting, the battle has become a confusion of Allied and British ships, with HMS Victory at the centre of this melee. |
 |
| HMS Agamemnon 64-guns, her first outing on the table sails into action alongside HMS Ajax 74-guns on her larboard side. |
 |
| HMS Prince 98-guns takes the surrender of Vice-Admiral Alava's Santa Anna 112-guns, like Agamemnon in her first table top action. |
The loss in Allied ships had moved three of their squadrons into the break off threshold, with Magon failing the test and starting to edge off the table as the other two Spanish commanders were forced to check their willingness to keep fighting.


However the Spanish opted to continue to fight with all three commands rolling the required 5 or 6 on the die to keep fighting.
That said, we ended our game at that point with the Allied fleet reeling under the British onslaught having lost eleven ships of the line including two flagships, but hitting back with the destruction of the Royal Sovereign and the striking of the Polyphemus, likely to be retaken.
More importantly we had all had a lot of fun playing the game and making new friends and I had learnt a lot about running a game of this size with Kiss Me Hardy, which gives a game of great granularity and plenty of narrative that would be hard to match with a fast play set of rules often used for these type of big battles, and KMH seems to me to match the models adding to the Grand Manner effect of playing these games in 1:700th scale.
If you would like to see a short video of the chaps playing the game I have uploaded one to YouTube which will give you another impression of play and the way the rules perform using 1:700 models in a large game.
My thanks to all involved from the Penarth and Devon clubs for playing our game in the excellent spirit that it was, and in particular my opposite number Glyn for helping me pull this together and his work to secure the venue and facilities which are superb and many thanks to Llancaiach Fawr Manor for letting us have the use of their Education Block facility to stage this rather large game.
I would add that, as mentioned in the preamble, the Manor was open to the public over the weekend we played and I did see some folks wonder through and chat with some of the chaps as we played and I too had the great pleasure of chatting to a couple of German holidaymakers who were standing, watching the fun, and getting familiar with the details of the Battle of Trafalgar, a battle they had never heard of.
I should also thank Jack, my fellow DWG club member, who stepped up to act as our chit drawer and second umpire/rules query translator that really helped to keep our game flowing along in the way it did, and with an inimitable ability to butcher the names of any admiral or commodore appearing on a chit, that eventually led to Admiral Cisneros becoming better known as Admiral Cicero to Admiral Swiss Roll depending on your preference.
For those wanting to know, all the models are from the Warlord Black Seas range of Napoleonic warships in 1:700th scale for which we used Kiss Me Hardy straight out of the box and our cloths are the sea variety supplied by Tiny Wargames, with a link at the top right of the blog.
Good times, great memories, and here's to the next one, with the Battle of Bantry Bay 1796 well into the planning and preparation stages, so more fun to come in 1:700 scale going forward.
As always, more anon
JJ
An excellent Naval Napoleonic eye candy feast, and fantastic AAR.
ReplyDeleteWillz.
Hi Willz,
DeleteThanks mate, glad you enjoyed the read, as I was hoping to do justice to a really special couple of days. Much fun had by all.
Cheers
JJ
Blimey! What a tremendous game! Great write up too. Outstanding.
ReplyDeleteHi Jim,
DeleteThank you, much appreciated.
JJ
Not my period but what a wonderful hobby or pastime we espouse. Oddly I had just been talking to a very old friend whose husband, the captain, had been sailing past Arthur Ransome territory, East Coast, past secret waters to moor off Chatham dockyard and visit the splendid ships and exhibitions therein. Thank you as always. With best wishes.
ReplyDeleteHi, and thank you for your comment.
DeleteIt's really great to be able to share times like these with like minds, and similarly I'm no sailor, but I can really appreciate the pleasure of sailing on that part of the coastline and simply soaking up the history.
Cheers
JJ
What a wonderful post, epic game report - looks fabulous
ReplyDeleteHi Eric,
DeleteComing from a chap who's run a few epic games of his own, I take that as a great compliment, thanks mate.
JJ
Brilliant game and AAR! Both of the KMH games at Historicon this past weekend used Brian's modifications. My 1/1200 Langton's were overwhelmed by another fleet of 1/700 Warlord ships. Not sure I can attach photos here though.
ReplyDeleteOne of the quibbles I have with KMH is the Dead Zone test for being taken aback. In light wind a ship is just not going to lose a foremast if she gets headed by a wind shift. I don't use this rule at all unless the wind and sea conditions justify it.
Hi Eric,
DeleteI trust you had an enjoyable Historicon despite a bit of ship scale envy, picture links always invited and I can post them here if you would like.
I know what you mean about the Dead Zone and its on my list to change, and I guess that's what I really enjoy about KMH is its fleible adaptability now that BW has given the game a scale framework.
I still have a few tweaks to make on the morale assessment QRS combined with my record cards just to help players find it more intuitive and as regards the Dead Zone test effects on masts, rather than dispensing with it, I'm thinking in terms of minor rigging damage, whilst reserving a complete lost mast to only if the 'Getting Choppy' conditions are in effect that would indicate the heavier wind conditions you allude to.
Having read 'Far Distant Ships' by Quinton Barry covering the operation of the Channel Fleet, it is surprising to see how many ships of the line sprung their fore top masts, particularly in the earlier FRW period and I think that would be what I would want the light rigging damage to represent, say with the loss of a speed box, which if a vessel gets the opportunity could be repaired at sea.
Anyway just my thoughts and thank you for your kind comments. much appreciated.
JJ
That sounds like just the thing for the Dead Zone test. A sprung mast section taking off a speed box may be the way to go. I would be happy to play test any rules tweaks you are planning with my gaming group.
DeleteOk, great. What I'm planning to do is to compile an addendum of house rules and tweaks that we have used for KMH, and I will also have something about losing masts in the dead zone and possibly something around the speeding up and slowing down rules which came up in conversation during the Trafalgar game.
DeleteOnce the last aforementioned have been play tested, and I have my Bantry Bay scenario coming up that I'm planning to play at Clotted Lard and the NWS Meeting in Yeovilton this September to do that, I'll get them all written up on a pdf for wider distribution.
Sounds good thanks. The speed change rules always bring up questions in my games and for me as well! It is easier to control your speed in real sailing than in KMH ! It certainly adds friction for the player!
ReplyDelete