Tuesday 31 March 2020

Slow Convoy (SC 7) October 1940 - Tonnage War Solitaire


In my post looking at using Vassal to allow boardgames to be played remotely, specifically War of 1812 that I'm playing with Steve M at the moment and part of a theme very much in vogue at present with social distancing important, I thought I might illustrate a solo module available that can also fit the bill in between painting and reading.


Tonnage War Solitaire is a Vassal module for a free to download paper game developed by Leonard Heinz, a game I remember printing out many years ago and playing on a holiday to France on a bit of down time in between days out at the beach or trips to the Normandy countryside.

Now you don't have to print the game and cut out the paper counters as everything you need to play is available on the Vassal site to download with beautiful digital counters representing the various ships and aircraft needed to play convoy battles in the North Atlantic.

http://www.vassalengine.org/wiki/Module:Tonnage_War_Solitaire

http://fireonthewaters.tripod.com/tonnage_war_solitaire.htm

Evidence of this excellent artwork is illustrated in the guide to reading the unit markers that is part of the module with many of the markers needed to record the status of individual aircraft and ships handled by the counters themselves with codes appearing on them when evading or attacking to help keep you informed of your progress through each phase of play.

The game is very much about numbers that generate the results - The various 'Attack Values' are the number needed or less on a D20 to cause a hit whilst the various visibility or asdic numbers likewise work to establish whether a contact has been made. With attack factors of 2 or 3 using depth charges, multiple escorts are the best way of going after U-boats often just trying to force them to evade and thus stop them attacking.

Those play phases recreate the often several days of attacks on a series of historic convoys included with the game, as U-boats controlled by the game mechanics of a U-Boat Reaction Table attempt to close with the convoy and with you the player looking to manoeuvre your escort assets of warships and aircraft to try and prevent attacks whilst also destroying the Nazi submarines.

Each phase of play consists of three U-boat moves and three Escort player moves representing four hours of battle with U-boats attempting to penetrate into the attack zones around the convoy and deliver torpedo attacks.

The zones surrounding the convoy formation are a neat division of the surrounding ocean that the escorts seek to monitor with radar and asdic (sonar to my US cousins, but seeing as we Brits invented both I will use the RN terminology).

The game recreates the 'wolfpack' tactics of the Kriegsmarine as the first U-boat in contact acts as a contact boat broadcasting a running commentary on the position of said convoy to allow other boats to move into the area to attack.

As the escort commander you are focused on trying to defend against those tactics by placing decoy escorts firing star shells to draw U-boats away from the merchantmen, identifying the contact boat and driving him off or better still destroying him, changing the course of your convoy to try and shake off the pursuit and of course attempting to identify and attack enemy submarines before they can attack the merchantmen.

In addition you may have or you can detail an escort to act as a rescue boat, picking up survivors from sunken shipping and thus reducing the victory tally of the enemy achieved from their sinkings.

So lots of decision points for the player in this game as you manage the assets you have whilst imagining what is was like for the real escort and convoy commanders managing their stress as well as their response to a merciless enemy.

The Attack on Convoy SC7 - The sinking of SS Assyrian - John Alan Hamilton (Imperial War Museum)

Slow Convoys, code-named SC, with a number to indicate their position in the running order, were convoys of older merchant ships, usually only able to cruise at about 8 knots, running east bound from Sydney Harbour, Nova Scotia, Canada often to Liverpool which started with SC 1 on the 15th August 1940.

Sydney Harbour and the Royal Canadian Naval base HMCS Protector from where the Slow Convoys started their passage to the UK.

A total of 177 slow convoys ran between then and May 1945, totalling 6,806 ships and with only three failing to complete the passage, but because of their slow speed, they were particularly vulnerable to attack, especially in the early war years when Allied escorts, their equipment and tactics were not as effective as they would later become.

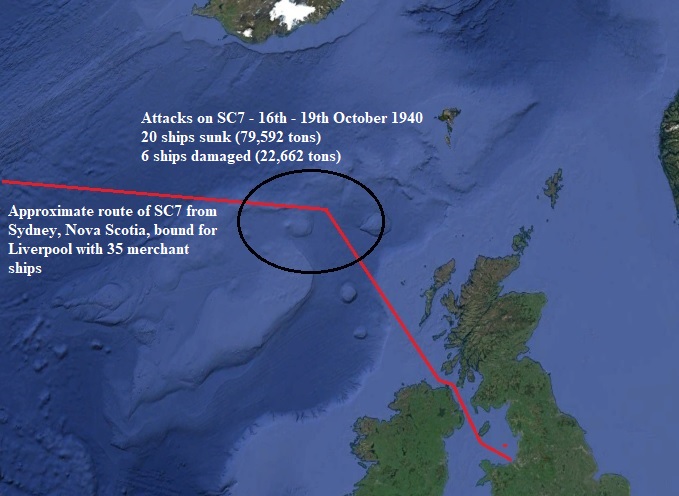
Slow Convoy SC-7 was a 35 ship convoy carrying mainly lumber and iron ingots for the British war industry, but also included the 9,512 ton tanker MV Languedoc carrying oil for the Royal Navy and the British SS Empire Brigade carrying vitally needed trucks for the military.

Leaving Sydney on the 5th October 1940 and meeting up with a five ship escort of corvettes and sloops, SC-7 would earn the unenviable notoriety as the convoy that suffered the worst day's shipping loss, twenty ships, in the entire North Atlantic campaign.

The first two weeks of the voyage was principally concerned with coping with the storms and gales of an October North Atlantic, with several ships in the 35 ship convoy becoming separated and forced to make the cruise independently and with the Greek freighter Aenos being intercepted and sunk by U-38.

It was not until the main convoy entered the Western Approaches on the 16th October that SC-7 found itself under attack from a seven strong U-boat Wolf-pack that started to methodically pick off ships on the approach to the Irish Sea in a three day and night sustained attack.


It is at this point that the scenario contained in the Vassal package picks up and the snapshot of my game shows the position at 08.00 on the first day as the U-boat pack, following the location broadcast of the contact boat seen centre in the 'Inner Zone' (IZ), moves into the attack with four boats joining the contact boat and another moved in to the 'Outer Zone'.

The 'Good-Guys' from left to right - HMS Bluebell (K80, Flower-class Corvette), HMS Fowey (L15, Shoreham-class Sloop) and HMS Scarborough (L25, Hastings-class Sloop).

With just three escorts available, HMS Bluebell, Scarborough and Fowey, the other two due to arrive the next day as reinforcements, I felt compelled to remain in close attendance in the 'Attack Zone' (AZ) rather than to push an escort out in to the more expansive IZ in an attempt to hunt down the growing threat but leaving a quadrant undefended. This is when you start to appreciate the problems of the chaps that did this for real.

In addition to the growing threat from gathering U-boats I had six merchantmen in the straggler zone and out of formation thus vulnerable to attack whilst unescorted and with no rescue ship I could not afford to detach my limited escorts to rescue any survivors, unlike my historical predecessors who ended up loaded with survivors but thus spent more time in rescue work rather than fending off attacks.

The situation at 08.00 after the first four hours of the 17th October, with the wolf-pack gathering.

The convoy came under attack mid-morning on the 17th October as U-38, U-48 and U100 managed to move into the port, starboard and bow AZ's, evading the escort which failed all attempts to pick them up on asdic, thus seeing them sink six merchantmen.

At the midday point, day one, six merchant ships have been sunk and U48 and U100 can be seen regrouping away from the convoy after their attacks. They will have to see if they will be able to pick the convoy back up to repeat their attacks. The other attacking boat U38 has lost contact and is placed in U-boat Exiting box seen at the top of the display, one less to worry about! However another two boats are in the 'U-boats Entering' box meaning they are available to move in to make attacks.

The attacks continued into the afternoon as the remaining boats less the contact boat made their attacks, with the stragglers coming under attack but suffering no hits fortunately and with HMS Bluebell making a contact and forcing a boat to evade, but which managed to return and make an attack later in the day.

My escorts were being run ragged as the attacks continued on into the hours of darkness which allowed the U-boats still in contact to adopt their favourite tactic of moving in close on the surface.

The only effect my close in escort was having was that the U-boats were delivering their attacks from the AZ, perhaps to avoid my escorts whilst taking the time to move closer into the 'Convoy Zone, CZ' amid the merchantmen where any attack would have been even more destructive.

Midnight at the end of day one and the fury of the wolf-pack has been vented on SC-7 with only three U-boats  in contact with the convoy, the rest having broken off as illustrated by the boats stacked at the top in the 'U-boats Exiting' box, but having sunk 14 merchantmen.

As the escort commander, I was starting to feel like an observer of events rather than a participant as the tally of sunken merchants grew to fourteen as the midnight hour of the 17th October drew near.

Surely I had to get a break! Then it happened, as the elite crew of the Type VIIB, U-46 under their 'experten' commander, Kapitanleutnant Englebert Endrass, only just awarded oak leaves to his Knights Cross and his U-boat War Badge with diamonds started to move in to make a second attack, this time in darkness on the surface from the starboard AZ.

Type VIIB veteran U46 met its nemesis in the form of HMS Bluebell when sunk by gunfire whilst making a surface attack at midnight on day 1

As U-46 moved into the starboard AZ, HMS Bluebell rolled to see if she could spot the U-boat at night on the surface needing 4 or less on a D20 and scoring a '1'!

The tension grew as I then proceeded to check the first time intercept rules at night by an escort, replicating the chance of the escort catching the U-boat by surprise.

On a second D20 roll a score of 1 would see Bluebell sink U-46 by ramming but suffering damage herself requiring her to withdraw from the battle or score a 2 seeing the U-boat sunk by accurate gunfire.

Needless to say that the highlight for me as the escort commander was seeing the two appear in the commentary screen as the simulated die roll sound effect heralded the result - scratch one elite U-boat.

Victory! of sorts, with 14 merchants at the bottom of the Atlantic, but the elite U-46 joining them (bottom left in the U-boat Sunk Box) after being taken out by gunfire at night on the surface by HMS Bluebell. U-101 has managed to get into the stern AZ and is about to sink another two merchants before the day is over.

By the end of the 17th October SC-7 has suffered a terrible mauling, only slightly compensated for the sinking of U-46, but just four ships away from suffering the same fate as the historical outcome.

Reinforcements due 08.00 on the 18th October in the form of (left to right) HMS Leith (U36, Grimsby-class Sloop) and HMS Heartsease (K15, Flower-class Corvette) seen here after her transfer to the USN in March 1942 as PG70, USS Courage

As the early hours of the 18th October played out, the consolation of two more escorts, HMS Heartease and Leith due to arrive at 08.00 together with the fact that the enemy wolf-pack was now reduced to just two boats left in contact with it gave some hope to cling to as the scenario entered the second day.

It's 08.00 on the 18th October and U-101 is still regrouping to the 'Outer Zone, OZ' after its stern attack on the convoy, sinking two more merchants, and with U-123 acting as contact boat, but with the escort group now reinforced by HMS Leith and Heartseas upping my abilities slightly to intercept attacks should they enter the bow and starboard zones where I have placed two rather than a lone escort.

U-101 moves into attack

It took most of the morning of the 18th before U-101 had managed to regroup and sadly, for me and the convoy, pick up the position for another attack. With her sister boat closing in, U-123 maintained the role she had carried out throughout as the contact boat as my escort team attempted to guess where the next attack might be pressed and to present the best chances of interfering with it.

With just two enemy boats in contact with my convoy, I was now willing to change tactics slightly in that with my reinforcements available I determined to press any attack from interceptions away from the convoy on U-boats leaving after an attack, but preferably during an evade.

I could now take the risk of leaving a zone vacant temporarily whilst pursuing an asdic contact at least into the IZ, and hopefully taking out another u-boat.

Contact, bearing 045! - HMS Bluebell picks up U-101 on her asdic and calls in HMS Heartsease to make a concerted attack, pursuing the contact into the IZ after she had sunk another three merchants.

As U-101 moved into the IZ at about midday on the 18th I awaited the result of her attempt to get into the AZ. In the game, this is a randomised process with a D200 result identifying with AZ quarter the U-boat enters to make its attack.

Needless to say I was pleasantly surprised to see U-101 move into the Starboard quarter of the AZ where I had positioned Bluebell and Heartsease ready for such an event and offering me two opportunities to make an asdic contact.

A hopefully chastened U-101 in the OZ, survives the full out attack by Bluebell and Heartsease, IZ right, in what proved to be her final attack on the convoy, leaving the contact boat U-123 to make the final attack in the dark hours of the 18th.

HMS Bluebell delivered the required asdic ping and called HMS Heartsease to her support as both escorts delivered their depth charge attacks as U-101 lined up and delivered another salvo of torpedoes taking out three more merchants.

However this time I was determined to pursue the evading boat into the IZ as it withdrew and HMS Heartsease managed to keep the asdic contact allowing both escorts to deliver a second attack, which failed to claim a kill and saw Heartsease use up all its depth charges in the process - Well I did order an aggressive defence!

With all her sister boats departed, U123 moves in to deliver her attack on SC-7 after two days of shadowing the convoy. A nice touch in the game is that the board darkens to remind you that the visibility has shortened as darkness closes in.

As U-123 prepared to move into the AZ I could only hope it would be in the bow or starboard zone where two escorts gave me a better chance to intercept a U-boat on the surface as the light started to fade.

Fortune favoured the brave as U123 attacked through the bow AZ submerging to deliver a salvo of fish and taking out two more merchants just as HMS Leith obtained an asdic contact,to call in Fowey to support the counterattack.

U123 makes good its escape after taking damage in a depth charge attack from HMS Leith and Fowey

The first salvoes of depth charges missed and U-123 went deep to evade the pursuit as HMS Leith maintained asdic contact into the IZ.

I couldn't rely on U-123 losing contact with the convoy even though she wouldn't have a contact boat to give the position for a second attack and so I continued with my orders for the day and sent both Leith and Fowey off into the IZ in pursuit.

Success, Fowey and Leith continue to pursue U-123 into the IZ with HMS Fowey managing to damage the U-boat with its final depth-charge attack forcing it to break contact with the convoy. Note the U-boat counter marked with a red 'DA' indicating she was damaged in the attack.

Night attack by surfaced U-boats featured large in the game, culminating in the final attack by U-123

HMS Leith maintained asdic contact into the IZ and in the two attacks with depth charges, HMS Fowey managed to damage U-123 thus at least ensuring she would break off and the survivors of SC-7 could make their way to Liverpool.

Midnight on the 18th October and with four turns of day three,the 19th, not required SC-7 makes its way to Liverpool after its terrible battle with the wolf-pack. I ended up losing two more merchants than historically but managed to sink and damage two U-boats in return, producing a remarkable simulation of the actual events

This was a great game and I really enjoyed the tension generated as the U-boats move into the attack coupled with the exhilaration of pressing back with a counter-attack by the escorts.

This early period of the Atlantic Campaign seemed to be well modelled with a weak escort force forced very much on to the defence with little opportunity of breaking up and disrupting a building U-boat attack.

I could have tried a change of course on day one to shake off some of the threat but may well have ended up with more merchantmen in the straggler box as a consequence. The thought of using a decoy escort or detaching one as a rescue ship was dismissed early due to my limited numbers.

With more escorts and of course air support there is a greater opportunity to take the battle to the U-boats as they advance across the OZ and IZ to make their attacks and the later scenarios should offer that potential, although facing more U-boats as well.

The next prepared scenario is another slow convoy out of Sydney, SC-48 which takes place a year later on the 14th October 1941 over five days and with a lot more escorts and aircraft involved, including a US escort group that historically saw USS Kearny damaged by U-568 that raised tensions further between the US and Nazi Germany.

Friday 27 March 2020

War of 1812, Columbia Games, on Vassal & More Ships on the Way.


As well as tabletop gaming I'm very partial to playing historical boardgames and I have quite a collection going back to many classic titles from Avalon Hill.

My regular opponent is Steve M who lives along the road and so it makes it very easy for each of us to take a short walk to each others house to play.

That is until Chinese Bat Flu has gone and forced many simple pleasures and pastimes to have to be re-thought now that the UK, like many other countries around the world, gets use to the new paradigm of lock downs and social distancing.  

http://www.vassalengine.org/

The new situation has forced a bit of a rethink about how we could get together and play and I suggested to Steve that we might try out playing a simple but very entertaining game and one that both of us are very familiar with by using the internet platform Vassal together with linking up on a video link while we played.

This way of playing seems to be common in places like the US but less common here, I think, because of the proximity to other gamers being much less of a problem here, but the new circumstances are likely to force keen boardgamers here to consider this approach and I thought I would share our impressions after having a go with the system on Thursday night this week.

A snapshot of our game at where we saved it in the Winter of 1812, ready to pick up again next week.

Having only ever messed about with the system, mainly to run solo games at home or on holiday, setting a game up in the Vassal game room system and linking up with Steve while we chatted through synchronising our computers over Messenger was an interesting learning curve, not helped with a few issues of wrong information in the Vassal On Line Guide, only sorted out by checking out similar issues reported on the Vassal Forum.

For example, I set up our private 'game room' using the Vassal software, looking to keep the space exclusive to Steve and me and looking to use a password for access only to find that there never has been a password system of access and that players lock their room once they are both in!

The next interesting aspect was seeing how each of us alternated play, which turned out simpler than we thought and was just like playing face to face, and no complications of having to click anything to end a phase to allow the opponent to have their move.


The game was enhanced by being able to chat to one another on Messenger and see each others expressions as a particular die roll score flashed up on each others system making it feel just like playing face to face.

We were soon rattling through the game turns only interrupted by the occasional gliche as contact was lost with the Vassal server, however the platform seems very robust and we soon learnt to save the game when the contact was dropped and then reestablishing the link and picking up where we left off.

Our first effort took a bit longer than it should as we took a bit of time getting things set up but we concluded our game at the winter of 1812 and have saved the module to pick up again next week.

Both of us were very impressed with how the platform runs and purposefully having chosen a relatively simple game to try out, we are now thinking of trying out other more complex systems that use card play activation.

Although getting started with this way of playing might at first seem quite daunting to a newbie, I would recommend taking a look at Vassal to help bridge the gap whilst in lock-down and I am looking to get more familiar with it.


As well as prepping for this little exercise, the time at home has been well spent preparing my next set of 1:700th ships ready to be rigged next week.


This next batch of models is the British Fleet box with three names frigates and 74's, a first rate together with HMS Royal Sovereign and the mighty Santisima Trinidad seen at the back in the picture above and below.


I'm really looking forward to sitting down and rigging this lot which is a nice way to spend time at home and not going out, definitely recommended.


Pictures to follow of these models once they are finished and I will do a review of the collection as a whole.

Keep well

JJ

Wednesday 18 March 2020

Death before Glory, The British Soldier in the West Indies in the French Revolutionary & Napoleonic Wars 1793-1815 - Martin R. Howard


Following my recent review of  By Fire and Bayonet, Grey's West Indies Campaign by Steve Brown covering General Sir Charles Grey's campaign to the West Indies at the start of the French Revolutionary War, and following a recommendation by a friend at the DWG (thanks Nick) I picked up a copy of Death before Glory by Dr Martin Howard.

This current reading ties in nicely with my growing 1:700th Napoleonic naval collection and thinking more widely about where I might chose to game with this collection of these model ships and the Caribbean theatre along with the North Atlantic and Mediterranean loomed large in the the thoughts of the British admiralty as war with Revolutionary France would come to dominate the late and early decades of the eighteenth and early nineteenth centuries.


Unlike Brown's book that focused on a single campaign and the key characters, navies and armies involved, Howard's scans the several campaigns that covered the whole period, including Grey's, giving a much wider take on the aspects that came to dictate how war was conducted in this arena and the changes that occurred over time dictated by events and experience.

The period saw some dramatic changes in the way the various factions conducted the war, most particularly between the two principle adversaries, France and Great Britain, with the former constrained in its ability to project naval power as it had in the American War when several large naval actions were fought in the region, to a French navy now hamstrung with the loss of so many naval officers due to revolutionary purges against the nobility and a general collapse in its infrastructure that supported the supplying and maintenance of the fleet.

Likewise the Royal Navy and Great Britain were similarly constrained with demand for naval support stretching the numbers of vessels that could be brought out of ordinary, crewed and rationed out to Britain's key areas of interest around the globe and with an army in the process of changing from the somewhat amateur arrangements of the previous century with limited manpower and no common drill book to that that would benefit from the Duke of York's reforms that would set out to allow a much more professional and better organised army that became a hallmark of later campaigns in the Napoleonic period.

Private soldier of the 5th West India Regiment, National Army Museum Collection - All combatants in the West Indies recognised the need to raise locally recruited black units given a greater resistance to the diseases that blighted the region and decimated units of white European troops. Concern over the revolutionary fervour that enveloped some islands among the former slave population slowed the process, but the reality of war in the region forced a change in recruitment.

Alongside these stresses, the French Revolution initiated further tensions to the West Indies, with the slave population of the islands given glimpses of emancipation in the wake of revolutionary zeal overturning the established order, and with that and the losses suffered among white European soldiers from Yellow Fever and Malaria amongst other deadly diseases common to the islands, causing all sides to recognise the need to raise units among the black and mulatto population, better able to stand up to the rigours of campaigning and providing a growing proportion of the forces involved, with the better conditions that service in the army offered them.

Thus Howard's book and the first seven chapters guides the reader though the campaigns and forces that took part whilst considering these key constraints and changes, highlighting the effects they had on the forces involved, bringing the view down to the level of the musket as he takes the final four chapters to allow those involved to describe the fighting and the dying and the sheer struggle to avoid an agonising lingering death from disease in a seeming paradise that seemed to contradict the horror and threat of this unique theatre of war.

General Toussaint Louvreture a key leader in the Haitian Revolution,
leading the Slave Insurgency against the Spanish, French and British
forces.

Alongside the focus on the British experience and arrangements for fighting in the area, Howard does a good job in presenting an overview of the French and other forces that opposed them, from the French national forces on their islands to the irregular forces of Toussaint Louverture and Andre Rigaud on Saint Domingue, the Maroons on Jamaica, the Caribs on St Vincent and the Dutch and Spanish regular forces in Surinam and Demerara and Peurto Rico. That said I did find myself thumbing through my Osprey titles looking at the troop types while reading this chapter to add further understanding of the look and arming of these forces.

The final four chapters focus more on the personal experiences of soldiers, sailors and civilians involved in the various campaigns describing some of the realities of combat, the fear of disease, seeing comrades rapidly struck down and suffering extremely distressing symptoms and the daily life routine for troops in garrison.

War in the West Indies was an infantryman's war and the accounts together with Howard's description of events well illustrates the difficulty encountered by cavalry and artillery when trying to operate in the mountainous and jungle clad interior of many of the islands against irregular or light infantry type foes, that required the British forces to operate very much in a similar fashion, giving commanders such as Sir John Moore and others valuable experience in Light Infantry tactics that benefited the wider British army in later campaigns in other theatres.

Martin Howard brings his medical expertise to these experiences that have been recorded and considers the fears of the soldiers and their friends and families reacting to the news of their deployment to what many considered a certain death.

It is easy looking at these accounts in the safety of modern medicine and struggle to grasp the full impact of these concerns, but as I write this post I reflect on the global reaction to current events and the sudden shock experienced around the world to the current pandemic, appreciating that we at least have a much better understanding of what is faced than did those who sailed to the Caribbean.

The book contains an excellent set of maps of the region and the key islands and territories covered in the text and I certainly found the book a useful addition and very complimentary to the other title mentioned.

That said I am still looking for a book covering campaigning in this area that gives a more detailed coverage of the naval and land forces involved and that doesn't entail taking out a second mortgage to afford getting a copy, which is why I haven't yet read Soldiers, Sugar and Seapower by Micheal Duffy first published back in 1987. Perhaps one of the general military publishers could organise another reprint of this title to allow other generations of readers to pick up a more affordable copy - pretty please!

Death before Glory contains eleven chapters together with thirty illustrations, twelve maps and an extensive bibliography of primary and secondary sources along with other manuscripts;

Contents
Acknowledgements
List of Illustrations
List of Maps

Armies
Chapter 1. Dangerous Battalions: The British Army in the West Indies
Chapter 2. Citizens and Warriors: The French and Other Enemies

Campaigns
Chapter 3. The Crater of Vesuvius: Saint Domingue 1793-1794
Chapter 4. With Spirit and Impetuosity: The Grey Jervis Expedition 1793 - 1794
Chapter 5. The Flame of Rebellion: The Uprisings of 1795
Chapter 6. Winds of Change: The Abercromby Expeditions, the loss of Saint Domingue and the Peace of Amiens 1795 - 1802.
Chapter 7. An English Lake: The Short Peace and the Napoleonic Wars 1802 - 1815

Soldiers
Chapter 8. A Sense of Terror: Voyage and Arrival
Chapter 9. Nancy Clarke and Susy Austin: Life in the Garrison
Chapter 10. Muzzle to Muzzle: In Action
Chapter 11. A Great Mortality: Disease

Notes
Bibliography
Index

A good and informative addition to the library, Death before Glory is published by Pen & Sword in hardback with a list price of £25, but you can pick a used copy up for as little as £2.37 or a new copy for £5.40 via Amazon, which either way is very good value. 

----------------------------

Well events in the UK as in other parts of the world are moving apace and more an more of us are either enduring a forced or voluntary lock down on our movements in the war against COVID-19.

This will impact in the short term on what I can blog about externally as visits to shows and other events are curtailed as part of my contribution to minimising the effects of the outbreak and hopefully bringing it to a speedier conclusion and a return to more normal behaviour.

In the meantime it will allow more focus on other aspects of our hobby that do not require social interaction and travel.

I wish everyone and in particular all my readers good health and well being during the coming months.

JJ

Sunday 15 March 2020

War of the Ring at the Devon Wargames Group


I was having much fun yesterday, letting down my historic wargaming credentials with an indulgence of Lord of the Rings fantasy gaming recreating the drama of the Battle of Pelennor Fields from Tolkien's great book.


As you will see the game was complimented with great scenery and great painting from Mel one of our game hosts, alongside Lee and Jamie, and she also helped in managing the many cats or fellow club members, as we got to grips with playing War of the Ring, the GW Mass Battle rules from yore.


I am a big fan of the Middle Earth series of books by Tolkien and am at present two thirds through a second reading of Lord of the Rings as well as enjoying the uncut versions of the Peter Jackson films. In addition I am looking forward to visiting many of the sites presented in the film later this year, so a lot of boxes got ticked yesterday along with a very enjoyable game.

If you would like to see more of our game then just follow the link to the club blog
https://devonwargames.blogspot.com/2020/03/the-battle-of-pelennor-fields-war-of.html

and you can also see more of Lee's adventures in the hobby and no doubt more stuff about their figure collections on his blog

https://battlebunkerblog.com/

Next up I have a book review and hopefully a report on a very interesting trip planned, Chinese Bat Flu allowing, not to mention more adventures at sea with the All at Sea collection of ships.

Saturday 7 March 2020

All at Sea - On the Stocks in JJ's Dockyard, New British Builds, Part One


The first part of my work on some of the named British ships in my 1:700th collection has started with perhaps the most famous, and certainly the oldest, largest and still serving ship from the classic age of sail, HMS Victory of 104 guns and flagship of perhaps one of the most famous admirals in history.


I have a long memory, like so many British folks of my generation, of being introduced to Nelson at a very early age in my schooling, with the range of Ladybird, illustrated books for kids coming to mind, which were very much in vogue in the 60's, illustrating a young Nelson taking a swing at a polar bear on the ice, with the butt of his musket, as he stood over a comrade and defended him from the beast standing tall as a picture of roaring teeth and claws.

I first toured the Victory in my early teens after we had studied the Battle of Trafalgar at school, with a television documentary in the school hall, covering the battle, before we got on a coach to take the class to Portsmouth.

A few years ago I took my own sons to Portsmouth and the fantastic Historic Dockyard to help them appreciate the heritage that British naval history represents and to get to know our most famous and somewhat likeable admiral, who displays a good share of typical human weaknesses alongside his great humanity and obvious abilities as a naval commander and leader of men in battle.

Portsmouth Historic Dockyard 2016
Portsmouth Historic Dockyard 2017

Perhaps it is those qualities that still keeps Nelson very much in the hearts of many of his countrymen where other great military heroes don't seem to quite appeal in a similar way.

I am a great admirer of the abilities of the Duke of Wellington who perhaps picked up the mantle of opportunity that Nelson's great victory offered Great Britain, but I know which of the two I would happily look forward to invite to dinner.

The wax cast of Nelson based on contemporary images of the man, so vividly captures his appearance.
My photo taken on our recent visits to Portsmouth.

I have never, in my time in the hobby, built a model of the great man's flagship, at his greatest battle, HMS Victory, resplendent as she must have looked in her signal bunting barrelling towards the line of the Combined Fleet, seemingly oblivious to the sporadic cannonade coming at it from the enemy ships ahead.

Thus as I sat down to prepare the model that Warlord have created, it was of that ship that I had in mind to act as a centre piece to my British collection of models.

My interpretation of HMS Victory in 1805 flying 'England expects'.

In addition, I clearly took inspiration from the visits made to the great lady over the years and reference to mine and other pictures only added to the motivation to produce a model that would grab the eye when set among other similarly arrayed model ships.


The ship had a glorious history which began long before its ultimate association with Lord Nelson.

Ordered during Britain's first world war, in 1758, at the height of the Seven Years War, with the country committed to an earnest struggle in defending its colonial possessions against the French, Victory was built to better facilitate and gain an edge in the global aspect to the conflict where naval power was crucial to the outcome.

Sir Thomas Slade 1703 -1771

The ship was designed as a 104-gun ship of the line by Sir Thomas Slade, perhaps the most influential naval architect of his generation with his ship designs gaining general approbation and providing the generic models for the principle classes of ships used by the Royal Navy of the period.

Launched in 1765 and consuming 6,000 trees in her construction from her laying down in 1759, she served as the flagship to Admiral Augustus Keppel at the Battle of Ushant, 27th July 1778, Admiral Sir Richard Howe at the Battle of Cape Spartel 20th October 1782, Admiral Sir John Jervis at the Battle of Cape St, Vincent, 14th February 1797 and of course Vice Admiral Lord Nelson at the Battle of Trafalgar, 21st October 1805, a quite illustrious list of battle honours for any great ship.


Following the Battle of Trafalgar, Victory was declared too old and in too great a state of disrepair to continue on as a first rate ship of the line and so went into gradual retirement by being downgraded to a second rate in 1807 with a diminution of her armament, then to becoming a troop ship from 1810 to 1811, to a depot ship in Portsmouth in 1812 and ending her decline as a prison ship from 1813 to 1817.


Major repairs carried out in 1814 and a later general strengthening of her structure enabled the old lady to be recommissioned in 1817 as 104-gun first rate but by 1824 she was declared past the point of active service and returned to Portsmouth to act as the Port Admiral's Flagship until 1830 when in the following year the Admiralty ordered her to be scrapped.


However the Admiralty met its match in the face of a public outcry at such plans and was forced to simply leave the ship afloat to gradually spring leaks as its role changed throughout the 19th century from tender to training ship until her state of repair in 1887 almost saw her sink at her moorings.

This process of lack of care and disrepair as the Navy tried not to spend too much money on a vessel that had less and less of a role to warrant any investment on their part continued on into the next century, until the decision was taken to save the ship in 1921 and to remove her to a permanent dry dock facility, which would be the oldest dock in the world, No.2 Dock in Portsmouth.


The process of restoration and maintenance continues to this day with a huge project in progress to shore up the hull from a sag, as timbers struggle to hold their place one to another after all this time, which sees the ship today without topmasts and rigging as this vital work is done.

Thus my recent pictures of her includes none from the outside as I can't bare to show the old lady in that state, looking as if smiling without her teeth in, and so I have posted a picture of a postcard I had of Victory from my second visit to her in the early 1980's before the current work started, seen below as used as a reference for my model.


HMS Victory remains to this day the Flagship of the First Sea Lord and has been the case since October 2012, remaining the oldest commissioned warship in the world and I would guess still a ship that retains great affection among the British public.


I think Warlord have produced an excellently affordable wargame model of the great ship that really exudes the power of the Victory combined with the graceful curves of her structure, and I really enjoyed building this kit.


I am really looking forward to seeing the model at the head of a column of British ships of the line bearing down on an enemy line ahead in preparation to unleashing the number of dice this model can let lose.


Typically HMS Victory would have carried 30 x 32-pdrs, 28 x 24-pdrs, 44 x 12-pdrs and 2 x 68-pdr carronades.


Postscript


My home town of Exmouth on the East Devon coast has some links to Lord Nelson and the many Georgian fronted town houses and cottages with pillared door porches similar to that seen on the hull of the victory and with sash windows looking like the stern gallery quarters on the ship, are testament to its gentility and place among the upper echelons of polite naval society.

Lady Frances, Vicountess Nelson 1798
by Daniel Orme, National Maritime Museum
https://en.wikipedia.org/wiki/Frances_Nelson

Carolyn and I were married in our local church which is the final resting place of Lady Frances (Fanny) Nelson, the Admiral's estranged wife after his liaison with a certain Emma Hamilton, and she is remembered today with a blue plaque on her former house in the town.

Sir Edward Pellew, later Lord Exmouth

As well as the Nelson connection the town donated its name to another great naval officer of the age, Sir Edward Pellew, later Admiral and created 1st Viscount Exmouth in 1816 following his successful action against the Barbary States and his bombardment of Algiers by an Allied fleet that secured the release of 1200 Christian slaves, Sir Edward being a local lad hailing from our neighbouring coastal town of Teignmouth.

Pellew is one of the greatest British naval commanders of this era with his association with the Razee frigate created from the former 64 gun HMS Indefatigable and, given his local connections, I intend to cover some of his actions with the collection going forward.

I, myself, also have a tiny piece of Nelson associated memorabilia, and something that is one of my prized militaria possessions, namely a Court Martial Record dated 11th November 1794, seen below.

HMS St George 98-guns seen here as she would have looked in 1787

The court martial document lists those present aboard the 98 gun HMS St George to hear the trial of two officers accused by the ships company of HMS Windsor Castle 98-guns, of 'Cruelty and Oppression', with the second named captain sitting on the jury of officers, as a certain Captain Horatio Nelson.

My court-martial record dated 11th November 1794, aboard HMS St George in San Fiorenzo Bay, with Captain Horatio Nelson in attendance, listed as the second named officer in the list of captains.

I have attached a transcript of the full three page document, written in the amazingly perfect hand writing of the time using a quill.

The Mediterranean Squadron, under Vice Admiral Hotham was wintering in San Fiorenzo Bay, Corsica after an eventful previous year during which it had been led into Toulon under the command of Vice Admiral Lord Samuel Hood, eventually forced out of the port by the actions of a young artillery officer called Napoleon Bonaparte.

A contemporary view of San Fiorenzo Bay, Corsica occupied by the Mediterranean Squadron in 1794

The island of Corsica was occupied by British forces in 1794 after Admiral Hood, needing a safe anchorage close to Toulon to be able to monitor the comings and goings of the French, opened communications with the Corsican separatist, General Pasquale de Paoli, and on his understanding of the parlous state of the Republican French garrison launched an invasion of the island in January and by June after several difficult sieges of the key towns, the French garrison surrendered and General Paoli formerly transferred Corsica's allegiance to Great Britain on the 19th.


When reading the court martial document, I was reminded by its date that Captain Nelson was probably not at his best for sitting on the panel of officers given that he was still recovering from the blinding of his right eye on the 12th of July when it was hit by gravel thrown up during a heavy artillery exchange during the Siege of Calvi.


It was during the actions against Corsica that the Royal Navy first encountered a new structure to them, the gun tower at Mortella Bay, which managed to frustrate a landing by troops after a two and a half hour bombardment of the tower by the 74-gun HMS Fortitude and the 32-gun HMS Juno with both ships taking significant damage from the gun tower; and with the Fortitude suffering sixty-two casualties and a fire, before pulling out of range.


The tower surrendered the next day after coming under fire from guns landed on shore, but the impressive defence was noted by British commanders and the British south coast still boasts its Martello towers to this day as a testament to the dark days of a threatened French invasion in 1805 and the sturdiness of these defensive structures.


Anyway to conclude and hopefully round off my ramblings in a post designed to talk about the latest model in my collection of ships from this period, one of the ships attached to the Mediterranean Squadron at the time of the invasion of Corsica was HMS Victory and the watercolour picture below of the Siege of Bastia in the Island of Corsica, May 1794 was made by Ralph Willett Miller from the Victory.


Work on the collection now moves on to the British Fleet box set from Warlord and two other named first rates, to include three named British frigates and 74's together with a generic British first rate, HMS Royal Sovereign and the Spanish behemoth that was the Santisima Trinidad.


More anon
JJ

Sources consulted for the post
https://en.wikipedia.org/wiki/Siege_of_San_Fiorenzo
https://en.wikipedia.org/wiki/Robert_Linzee
https://en.wikipedia.org/wiki/Action_of_8_March_1795#