Friday 24 January 2020

All at Sea - First Games, New Rules

HMS Unicorn  32 in action with Tribune 36 8th June 1796. It was during this action, 50 miles west of the Isles of Scilly, that HMS Santa Margarita 36 successfully engaged Tamise 32, the set up for our first scenario

This week I finally got around to arranging with fellow Age of Sail enthusiast Jack to get together to try out some rules with the new collection of 1:700th ships.

I am very much in the process of deciding what rules to use with this collection and have pretty much come to the conclusion that it will be two distinct sets, given that I am planning to do same big battle games as the collection grows; but initially I am quite keen to set up some single and small group engagements which will require a more granular set to capture the individuality and differences between the ships involved.

One set of rules that caught my attention as I have looked at alternatives to my usual turn to set, Kiss Me Hardy was War By Sail written by Thomas Jensen at Ostfront Publishing.

http://www.ostfrontpublishing.com/games/warbysail/

The aspect that really caught my eye was that the rules incorporate the types and number of each type of gun carried by the ships ranging from 1550 through to 1815 and are designed to allow the gamer to model that precise set of guns carried by its historic predecessor, which might not necessarily be the standard armament for its type.

That said, there are other aspects of the rules that were not quite as I would want them, but as I have always subscribed to the policy of changing parts of any rules to fit my own requirements, long before the modern trend of rule writers to include that suggestion within their rules, I simply decided to give these a go incorporating some initial changes and getting Jack's input as we played through three scenarios to test out the ideas.

The principle adjustments were to change the initiative based sequence of play to one of using cards as per Kiss Me Hardy to determine when specific actions such as moving, firing and boarding could occur, together with player held cards for pre-setting what the ship/ships would do once their move card appeared, namely Starboard/Port turn, Straight Ahead and Tack. The changes also included incorporating turning into movement as a whole rather than, as the rules are written, with movement straight ahead, separate from turning decisions.

We also added in a d6/d3 variable to the movement rates for the models to make that slightly less predictable, with the better trained ships crews, British, getting the choice from rolling two die.

The other main aspect was the setting up of the games, all chase scenarios, with a pursued and pursuer, with still some work needed to get the distances between them balanced from the start, as we were using the ten move variable end system outlined in the rules to decide when the scenario came to an end.

The first scenario we played featured a Spanish built frigate captured in 1779 during the American War of Independence and renamed HMS Santa Margarita, seen here in 1782 cutting adrift the French prize Amazone

Thus said, the result of each game was not really the point, but more, how it played as regards testing the changes we made. In that our games developed as we moved from one to the next, with notes made on the crib sheets as we went, to capture what worked well and cross out what didn't.

So for our day of simply playing with the model ships, I selected three historical scenarios, mapping out where the engagements occurred, using the headings and wind as detailed in the accounts to set up and with the ships stats based as closely to those of the ships that took part rather than any generic setup.

The French frigate Tamise, in our first scenario, had three years previously been His Majesty's Ship Thames, 32 gun frigate, as seen above, until its capture by Uranie on the 24th October 1793

The first two engagements were between a French and a British frigate with two years separating them but with the British captain, Thomas Byam Martin the same in both actions but captaining two very different ships, reflecting the change in the size of frigates and the armament carried as the French Revolutionary War progressed.

Admiral of the Fleet, Sir Thomas Byam Martin in 1849
https://prints.rmg.co.uk/products/sir-thomas-byam-martin-gcb-admiral-of-the-fleet-1849-a2585


The final scenario saw the tables turned and us getting out the big ships with three French 74's in pursuit of HMS Alexander 74 in 1794 and a rare occasion when a British 74 was captured during the Revolutionary/Napoleonic conflict.

I have illustrated each scenario with a map showing where the actions occurred, together with an account of it from William James' 'Naval History of Great Britain', together with an account of how each game played out

The first of our three scenarios took place about 50 miles west of the Scilly Isles in 1796 between HMS Santa Margarita, a former Spanish built frigate captured during the American War of Independence and Tamise the former British frigate HMS Thames

'On the 8th of June, at 2 a.m., Scilly bearing east half-south distant 17 leagues, the British 18-pounder 32-gun frigate Unicorn, Captain Thomas Williams, and 12-pounder 36-gun frigate Santa-Margarita, Captain Thomas Byam Martin, discovered, about three miles on their lee beam, three strange ships of war; which, on being neared in chase, were ascertained to be two frigates and a ship-corvette. 

They were, in fact, the French 36-gun frigates Tribune, Commodore Jean Moulston, and Tamise (late British Thames), Captain Jean-Baptiste-Alexis Fradin, and 18-gun corvette Legere, Lieutenant Jean-Martin-Michel Carpentier. These ships had sailed from Brest on the 4th, in company with the 40-gun frigate Proserpine, Captain Etienne Pevrieux, who had since parted from them in a fog.

..... At 4 p.m. the Tamise bore round up, both to avoid the fire of the Unicorn, and to pour a broadside into the bow of the Santa Margarita; but the latter judiciously evaded the salute, by laying herself close alongside her opponent. This pair of combatants now went off by themselves, engaging with great spirit during 20 minutes; at the end of which the Tamise, having sustained considerable damage in hull, sails, and rigging, struck her colours.'

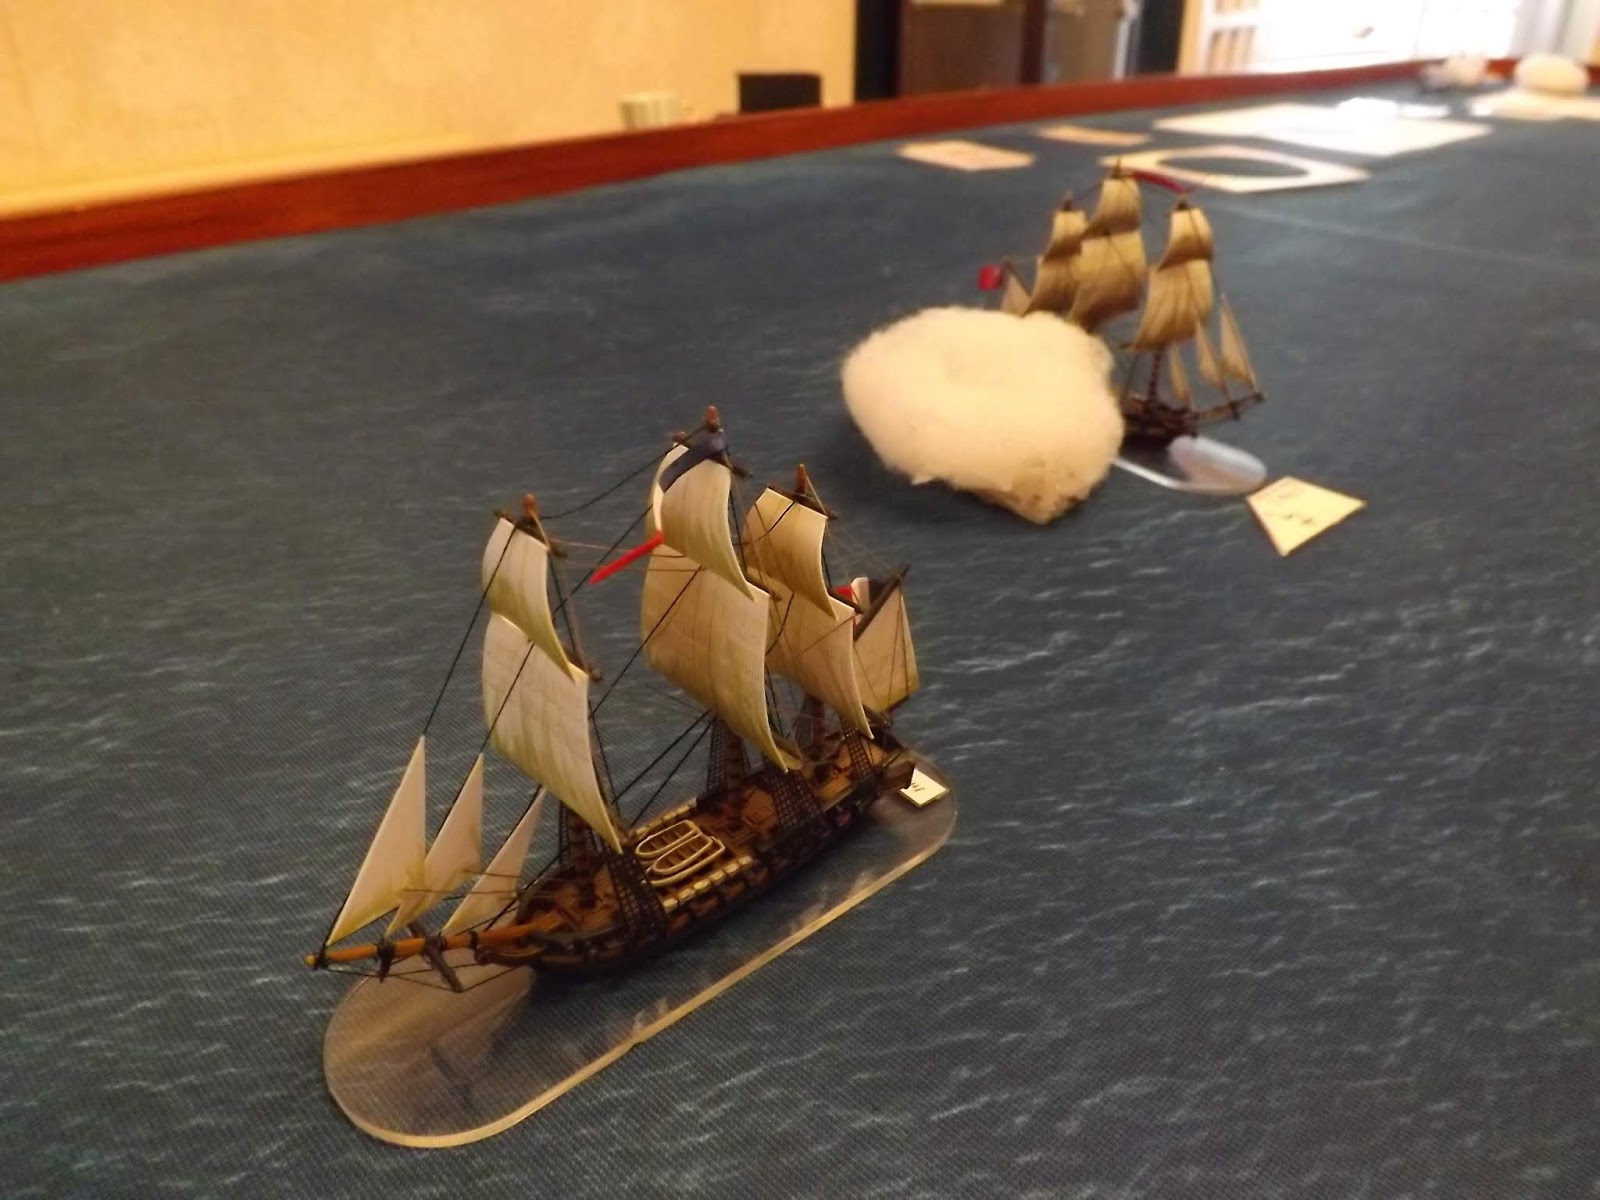
HMS Santa Margarita in pursuit of Tamise, our first scenario for the day

I chose this action to try out two relatively well matched combatants with two frigates illustrating the lighter caliber guns carried by these types, namely a main deck of 12 pounders and the upper decks using 6 pounders and the odd 36/32 pounder carronade.

The French frigate kept on running with the wind under her skirt

This game proved to be most instructive on how we needed to change some of the original ideas with the chase well modelled but the set up distances needing to be altered to better suit the ten to fifteen move scenario plan, and the need to move away from War by Sails, fixed movement rates and to include a variable element to them to stop each move being too predictable.

Then Tamis pulls off a surprise turn to deliver a broadside against her tormentor firing 6 pounder bow chasers in the pursuit 

The lighter cannon and there less destructive capability at the longer range gave a clue as to the need to better arrange the start positions of a scenario where one side is attempting to evade the other.

That said, the card play that randomises movement works really well in these kind of games where the pursuit vessel is keen to close on the target but has to be wary in case the hunted turns hunter as in our game where I ordered the French ship to turn broadside on to Jack's ship that charged straight on only to find itself facing a bow rake, which due to combination of poor French gunnery, range and light guns only managed to inflict a crew casualty and not the rigging damage I was hoping for.

Tamis about to escape having caused a few casualties to Santa Margarita during their chase action

The variable end to the scenario added another four moves to the ten turn end point, that saw the Frenchman escape with light damage to her rigging and a few crew casualties to HMS Santa Margarita, principally down I think to the ships being to far apart at the start. Another play test needed.

The gunnery section of the rules lived up to my expectations and I was looking forward to the next scenarios to see the difference using bigger and heavier armed ships and the card activation was as good as ever, but I would like to move towards using chits instead of shuffling cards each turn.

On to the second scenario with HMS Fisgard's encounter with Immortalité west of Brest in 1798 which saw Captain Martin now commanding the 38 gun, 18 pounder armed frigate Fisgard with 9 pounders and eight 32 pounder carronades on the top deck up against Immortalité armed with 24 pounders and 8 pounders together with four 36 pounder carronades up top.

HMS Fisgard 38, in pursuit of Immortalité 36, as depicted by Derek Gardner, 20th October 1798

William James sets the scene for this action;

'On the 20th of October, at 8 a. m., in latitude 48° 23' north, and longitude 7° west, the British 38-gun frigate Fisgard, Captain Thomas Byam Martin, while standing on the larboard tack with the wind at west-south-west, saw a strange sail due west, on the opposite tack, steering free. At 8 h. 45 m. A. M. the Fisgard tacked in chase, and gained on the stranger; who was no other than the Immortalite, pursuing her course to Brest, and which port, but for this to her unlucky encounter, she would very soon have reached. 

At 11 A.M. the Immortalite hoisted French colours, and commenced firing her stern-chasers. At 11h. 30m. a.m. the Fisgard hoisted English colours, and opened a fire in return with her bow-guns, still, with a fine moderate breeze on the quarter, coming up with the object of her pursuit. At half-past noon the Fisgard got close alongside her opponent, and a spirited action commenced.


So effectual, however, was the Immortality's fire, that, in 25 minutes, the Fisgard was rendered quite ungovernable, having her bowlines, braces, top sail-ties, back-stays, and the whole of her running rigging, cut to pieces. The Fisgard, in consequence, dropped astern; and the Immortalite, profiting by the occasion, crowded sail to escape. 

At 1 h. 30 p.m., by the active exertions of her crew, the Fisgard was again alongside her opponent; and a cannonade now commenced, more furious than the first. At the end of half an hour the Fisgard had received some shots so low in the hull, as to have six feet water in the hold. Still her resolute crew persevered; and at 3 p.m., after nearly an hour and a half's close engagement, the Immortalite, then nearly in a sinking state from the Fisgard's shot, and having her mizenmast gone close to the deck, and her fore and mam masts, and all her other spars, as well as rigging and sails, much cut; and having, besides, lost her captain and first lieutenant, hauled down her colours.'


This proved to be another great chase scenario, where I again took the role of the French captain in this case Jean Francois Legrand, with a 330 man crew and 250 soldiers aboard my 36 gun frigate and with Jack taking the role of Captain Martin and 281 man crew aboard Fisgard.

Immortalité and Fisgard go broadside to broadside

Again I was content to play down the turns by running, but always looking for an opportunity to turn and bring my 24 pounder main battery to bear with its slightly better range over the British ship, and the strategy worked up until the closing stages of the chase when the Fisgard got close enough to turn to port and deliver a crashing broadside as I prepared to escape; that completely dismasted the Immortalité and together with a morale check from the additional crew casualty added to losses from a previous strike saw the Frenchman haul down his colours, right on the last turn.

HMS Fisgard lets loose a powerful broadside just as Immortalité looked set to escape, dismasting the French frigate and seeing her strike

Following our messing about with the small boats together with a quick lunch, Jack and I set up the final game for the day pitting the 74s of the Royal Navy and the Marine National with the historic clash between Admiral Nielly and Captain Richard Bligh.


This is how William James described the encounter between the two sides in 1794;

'In the latter end of October, or beginning of November, Rear admiral Nielly, with the five 74-gun ships, Marat, Tigre, Droits de 1'Homme, Pelletier, and Jean-Bart, the Charente, Fraternite, and Gentille frigates, and Papillon brig-corvette, sailed from Brest on a cruise to the westward, and, as it was understood, to endeavour to intercept the homeward-bound Lisbon and Oporto fleet. 

On the 6th of November, at 2 h. 30 m. a.m., latitude 48° 25' north, longitude (from Greenwich) 7° 53' west, this squadron fell in with the two British 74-gun ships Alexander, Captain Richard Rodney Bligh, and Canada, Captain Charles Powell Hamilton, returning to England after having escorted the Lisbon and Mediterranean convoys to a safe latitude.

The two British ships, when first seen, were to leeward of the French squadron, steering north-east, with the wind at west. The Alexander and Canada immediately hauled upon the wind, on the larboard tack, and, at a little before 4 a.m., passed the strange ships, the nearest distant about half a mile, but without being able to ascertain their national character. Shortly after wards the two British ships kept a little free, letting out the reefs of their topsails, and setting studding-sails. At 5 a.m. it was discovered by the night-glasses that the strangers were standing after the British ships; whereupon the latter crowded all sail, and hauled more to the eastward. At about daybreak the Canada passed the Alexander, and, steering a more northerly course, brought herself on the latter's larboard bow. 

Two ships of the line, one bearing a rear-admiral's flag, and two frigates, now went in chase of the Canada; and the remaining three ships, one with a commodore's pendant, and one frigate, pursued the Alexander.


..... The Alexander continued firing her stern-chase guns until early 11 a.m.; when the advanced ship of the three in chase of her (believed to have been the Jean-Bart) ran up and brought the British ship to close action. So well-directed a fire in return was opened by the Alexander, that, in half an hour, the French 74 was compelled to sheer off and call a frigate to her assistance.

The French commodore, in the Tigre, next advanced, but would not come fairly alongside: notwithstanding which, the Alexander, in about half an hour, shot away the head of the Tigre's main topmast, her main yard in the slings, and her mizen topmast. A third ship now took the latter's place, and used her endeavours to compel the Alexander to surrender.

This unequal conflict the British 74 sustained until some minutes past 1 p.m.; by which time she had her main yard, spanker-boom, and three topgallant yards shot away, her three lower masts shot through in many places, all the other masts and yards more or less wounded, nearly the whole of the standing and running rigging cut to pieces, her sails torn into ribands, her hull shattered, and on fire in several places, and her hold nearly filled with water. 

The French 74 , Droits de l'Homme in pursuit of HMS Alexander, 6th November 1794

The other ships, also, which had quitted her consort, were rapidly advancing, and the French admiral already threw his shot over her. Captain Bligh, therefore, justly deemed any further efforts as a needless waste of lives, and ordered the colours of the Alexander to be hauled down.

As far as could be ascertained, the Alexander's loss amounted to about 40 men in killed and wounded; including, among the latter, one lieutenant of marines, the boatswain, and pilot. The Canada, owing to the high firing of the French, sustained very little damage and no loss, and reached a home-port in safety.

According to the French papers, the Alexander's two principal opponents were very much disabled, and sustained between them a loss in killed and wounded amounting to 450 officers and men.'

For this scenario we had the French coming on in a general chase, with each successive French ship one move behind the one in front.

Again the variable movement helped upset any plans of the French arriving en mass with the lead 74 Droits de l'Homme pulling away from the other two looking to slow down the Alexander to allow her consorts to come up and finish the fight.

With the wind up their skirts the two opposing 74s are set up for our final game

The initial contact saw both opposing 74s exchanging broadsides with the Frenchman getting slightly the better of the exchange.

Then in the next move the card play took a hand with the French ship attempting to get across the bows of the British 74 thwarted by the Alexander getting in a combination of moving and firing before the French ship could reply, by which time it could only bring half its broadside to bear.

HMS Alexander running as best she can but giving away a slight speed advantage to the French

The close range cannonade and the difference in weight of shot delivered bore its inevitable fruit with the French 74 taking a pounding and three crew casualties and a fire creating a 'bloodbath' and a morale failure that caused the Frenchman to strike.

However the British victor was in no place to follow up his success with the other two French 74s bearing down on him but not at the speed that would have stopped the eventual disengagement that saw the British 3rd rate make good its escape.

Droits de l'Homme led the French pursuit with the flagship Marat following, followed herself by Jean Bart.

So that was it in terms of games played and Jack and I had plenty to talk through afterwards with these three chase scenarios.

What worked well?
Being both confirmed Lardy enthusiasts, I think we both found the card play randomising when specific events occurred a more satisfying way to play rather than the sequenced play outlined in the rules. Unless resorting to writing down your planned move ahead of doing it, which is a tiresome way of playing, this method of play is a great alternative, although the card shuffling between turns is to my mind annoying and I would prefer using tokens in future.

The first exchange of fire as Alexander turns to engage Droits de l'Homme in an effort to blunt the French pursuit

The gunnery rules are really good and perhaps the stand out feature in War by Sail with each type of gun having its own stats in terms of range and damage causing ability. Those aspects combined with rolling for each gun fired in an attack to hit and then cause that damage makes the fire exchange really interesting in these small scale battles.

Alongside the modeling of the ships guns lies the decision points in the game for the respective commanders such as ceasing fire to make a dedicated reload of all the guns or just firing as she bears with each gun rolling a crew test to see if it is loaded in time to fire again. Likewise deciding on fighting fires, or fighting the ship, manoeuvring to contact, and the use of bow and stern chasers to target rigging to slow down a pursuer or chaser are there in the rules.

The British 74 gets the better of the exchange with Droits de l'Homme struck and on fire, but with Captain Bligh pulling away to escape the other two pursuing French ships. The counters are part of War by Sail designed to easily note damage, but can be recorded on paper instead if preferred.

The Lardy ethos also influenced the decision to use the movement rates as written but to add in a small randomised component of d3 or d6 inches additional or reduced according to the ships attitude to the wind. This again took away certainty that the players could look at the table and know definitely that after both sides had moved the distance between them would be a given one to the exact inch.

The time limited variable end to the scenario as taken straight from War by Sail really works well and with some slight modification could be added to to better reward certain outcomes in different scenarios such as a chase or a duel.

HMS Alexander making good its escape after dealing with Droits de l'Homme

What still needs work?
I am keen to create a collection of what I would describe as Chase and Duel scenarios based upon these historical engagements together with a tabletop set up for a generic fictional option recreating both types.

By chase and duel, I am simply catagorising these fights into ones where one side was looking to avoid action and thus being chased by the opponent to bring it on or where both sides were looking for a fight thinking that they had a good opportunity of winning.

The set up for the chase is still not quite right and I am planning to play some more games to get it to that right balance point where both sides have a good chance of getting a result in their favour. The duel set up should be simpler and with little change needed to the basic rules.

One other factor discussed was the element of better sailing attributes for better crews, able to get the most from their ship compared with less able opponents, but I think this will need more thought to see if the factor can be modelled without distorting the play balance too much.

Thanks to Jack for a very enjoyable day immersed in the Age of Sail and his input to working through these games. The plan is to get together again next month to run through the rules again in the light of the changes we arrived at, together with some new scenarios and some additional ideas we had, to test them with.

Next up - New ships have been added to the collection and work commences on the French fleet box set together with HMS Victory.

More anon
JJ

Wednesday 22 January 2020

Fighting at Sea in the Eighteenth Century, The Art of Sailing Warfare - Sam Willis


In my year review for 2019 as part of my plans for this year I mentioned some of the models and books I received over Xmas that were part of my early year modelling and reading plans with a promise to review this title as soon as I had finished it.

Well I started reading Sam Willis' book almost as soon as I had unwrapped it and found it an engrossing read.

The book is entitled as focused on the eighteenth century, but the content very much applies to the early nineteenth century as the Royal Navy became dominant in the period up to 1815.

So what to say about this particular book and why I found it so engrossing.

Perhaps I can find no better way of summing up the content than by quoting the author himself in his thinking behind writing this title. The book as described by Willis, in his preface, is a history of sailing warfare that 'was faithful to the practical realities of life at sea in the eighteenth century' and that with research started at sea before moving to the archives and museums, resulted in a series of essays designed to provide a thematic interpretation of fighting at sea.

Thus the book is laid out in a chronological narrative of two ships or fleets, meeting, engaging in a chase and escape, manoeuvring for position in an engagement, right through to the aftermath of battle.

In the process of describing the intricacies of each of these quite separate but linked steps, Willis makes careful reference to actual accounts referring to the experience of the men who did this for real with a notable reference to the many court martial records of the events, judged by the officer's peers, who in their recorded judgements either agreed with, or not, the actions taken, with an explanation of their thinking. 

The book is beautifully illustrated by Jamie Whyte with line drawings of the ships and their equipment pertinent to the text, together with nine glorious maps of the various naval theatres of the period. This example used to illustrate the layout of the standing rigging.
http://jamiewhyte.co.uk/portfolio/fighting-at-sea-in-the-eighteenth-century-illustrations/

Alongside the accounts there are many battles quoted from the period to illustrate the results of the various actions taken which can at first seem quite overwhelming until you realise there is a copiously notated reference at the back of the book outlining the battles referenced and the key events in them. That said I did find myself thumbing through my copy of Naval Warfare in the Age of Sail by Brian Tunstall and Nicholas Tracy by Conway Maritime Press for extra insight, together with the excellent maps that particular title contains, but much of that kind of extra information is also quite readily available on the net.

As Willis points out, his book is very much Royal Navy centred given that most accounts come from a very extensive amount of firsthand source material and he also points out the omissions from the subjects covered such as the techniques involved with fighting at anchor or the practicalities of the immediate aftermath of battle.

That said this books covers a wealth of information in a very detailed and easy read that takes a landlubber like me through a very practical narrative of how these men practiced the art of sailing warfare and informs the way I imagine my model ships would have performed in reality.

Some of the standout references for me was covering how these men started to identify friend from foe in the days of limited optics and communications between ships meeting on the high seas; and the way the intent of a strange ship could be determined by the way its sails were set or how it reacted to seeing a stranger itself. 

The approach made by a stranger either to windward or larboard and how they approached, head on or presenting the broadside could cause one vessel to misinterpret the intentions of the other and occasionally cause friend to fire at friend if not done correctly or other factors prevented other ways to ascertain a strangers identity.

Even the shape of the ship helped the informed observer identify the likely nationality of a strange vessel, or even which friendly ship it was if part of a local squadron, and given that specific sail settings were observable from a much greater distance than signal flags, the setting of topsails could enable a signalling process over much greater distances by the simple process of setting the topsail at a certain shape or lowering and raising it several times.

Identifying friend from foe, reading a strangers intent and managing pursuit and evasion were all part of the skill set for a ship commander in the age of sail

When a ship or group of ships chose to run from a stranger and a chase developed, opposing ships could easily loose sight of one another over a long distance pursuit, and with the intervals of nightfall, the commander of the chasing ship would have to fall back on some basic deductions to work out the likely course of his prey once it had passed over the horizon, centred around where they were likely heading for, best course to maintain the best speed with the prevailing wind, to avoid being contacted again.

It is amazing how these simple techniques often enabled the pursuer to pick up the trail of a previous contact and how the better trained crew could often out-sail the faster ship with a poorly trained crew, and thus bring it to action.

One aspect of modelling fleet actions in Age of Sail games is the best ways of recreating signalling to capture the issues of command and control between multiple ships where a commander is attempting to bring a greater number of ships into action against a portion of an enemy fleet.

Nelson briefing his ships captains before Trafalgar

This aspect of naval warfare also caused much contemplation among the actual commanders themselves as outlined by Willis detailing the gradual adoption of standard operating procedures after some notable failures.

Willis points out some interesting aspects of this art of command, highlighting the difficulties for captains in mastering the techniques of manoeuvring in company with other ships in their squadron or division, taking into account the vagaries of their individual ships that could impact on their ability to keep station at the prescribed distance in the line of battle.

When it came to manoeuvring for action, historians focus on 'The Fighting Instructions', the codified list of what a captain should do in response to a specific signal from his respective commander, I say respective, because a captain had a first expectation of command to his direct commander before the fleet commander, another factor that could lead to confusion.

However the fighting instructions were just one part of the understanding between a senior admiral and his captains, which also included written instructions, those additional points that a specific admiral may issue that would either supersede the signal book, or add to it, and then there was the doctrine that governed what a captain should do in the event of a lack of orders for one reason or another.

The Court Martial documents help flesh out the view of this doctrinal approach where senior captains would take a view of the actions of a captain before them based on their understanding of what would have been most appropriate for the situation. An example would be the failure of a captain to come to the support of the ship nearest to him in the line assailed by an overpowering number of the enemy, something that was almost a given expectation in the Royal Navy.

To help captains in their approach to a likely imminent encounter with the enemy, it became standard for commanding admirals to meet with their captains to outline their plan and intent for battle to guide them in the actions to take when signalling and other communication became impractical. This developed into such a guiding principal  that the Admiralty started to take a very dim view of commanding admirals that failed to take this basic approach and then suffered a humiliating setback.

French Admiral Villeneuve, commander of the Combined fleet at Trafalgar

This aspect of command is where Nelson stands out among his peers in the way he was able to communicate his intent to such an extent that all his captains felt empowered as a unit to take the initiative in such circumstances, but not so that they would take actions that were of their own thinking but rather that of their commander; so much so that Admiral Villeneuve paid Nelson the compliment that he created a fleet of Nelsons, with captains very able at interpreting what their commander would expect of them in almost any given situation, with the great admiral famous for his comment about the least worst thing a captain could do would be to put his ship alongside that of the enemy.

The one aspect that helped confound this aspect of command and control at sea was that during the long periods of peace that separated the periods of war, these skills and abilities were often lost and lessons and skills had to be relearned as part of the build up to another war. This explains why fleets had to have time at sea to practice their manoeuvres and learn to understand their commander, their fellow captains, and their ships and crews abilities.

To add to these challenges, any movement of groups of ships between the different fleets could add to the time needed for this understanding to develop as the expectations of the admiral commanding the Channel Fleet could be quite different from that commanding the Mediterranean Fleet, and battle was not a good place to discover those differences as Willis illustrates with examples.

These are just some of the fascinating aspects of the realities of naval warfare of this period covered in this book, and I came away with a much deeper understanding of them after reading it and with a much better understanding of what could go wrong and why, when a commander sought to bring his ship or ships into action in a particular way and what the 'Command Factor' contained in some rules for the period are attempting to model in their differentiation.

Fighting at Sea in the Eighteenth Century is 251 pages including the index and list of references.

The contents are;

List of Illustrations
Preface
Abbreviations
Maps

Introduction

Chapters
1. Contact
2. Chase and Escape I: Speed and Performance
3. Chase and Escape II: The Tactics of Chasing
4. Station Keeping
5. Communication
6. Unwritten Rules
7. Command
8. The Weather Gage
9. Fleet Tactics
10. Fighting Tactics
11. Damage

Conclusion. 
Notes
Appendix: Fleet Battles
Glossary of Nautical Terms
Bibliography
Index

This book seems readily available from most good book dealers from around £20 and is a welcome addition to any collection of reference books on the subject.

Next up, the 1:700th ships get their fist roll out with a selection of three scenarios trying out some rules to use with the models.

Friday 17 January 2020

Spectre Operations - Xmas 2019 Game


The Xmas break has for me traditionally been an opportunity to get in a few wargames with friends and family and as well as playing Augustus to Aurelian this Xmas with Will, Tom and Ben I got together with Steve M, Vince and Chas to play a game of Spectre Operations, in Vince's toy room.


I think I first came across the incarnation of this, what I would call, modern, special operations/asymmetrical warfare, set of rules back in 2018 at Colours in Newbury when I reported on the game seen below, which I remarked then was a game that would very much appeal to several of the chaps in the Devon Wargames Group - so I wasn't entirely surprised to see that Chas and Vince were getting to grips with them and the game we were about to play.

Spectre Operations at Colours 2018 - more pictures can be seen in the link below together with links to the rules and associated figures

https://jjwargames.blogspot.com/2018/09/colours-2018-newbury-reading-wargame.html

https://www.spectreminiatures.com/

https://www.facebook.com/groups/spectreopwargame/

Our stage for our fictitious battle, a benighted town in  the country of Nowhere. 

Our tabletop presented the normal third world, fly blown, shanty town, common to many news reports about terrorist hot-spots around the world, complete with its enclosed Presidential Palace into which, no less a person than President Donald Trump had managed to get himself kidnapped during an ill-advised visit.

I know, I know, but just go with me on this!

The scenario based on this initial set up saw the President being held by the militia forces of this fictitious state, looking to bargain with various interested factions who wanted to get hold of this VIP.

One faction, it turned out, was a shady firm of private military contractors purportedly working alongside western coalition forces, but with that relationship left in a certain level of uncertainty.

Another faction was the government of this fictitious state represented by its own military forces who though officially working alongside the coalition were to be considered as potentially unreliable in so many ways.

Finally there were the peoples militia forces themselves, who were holding the President, and demanding their own agenda be met before any prospect of the release of him.

The end of town that would figure most in our battle, with the Presidential palace, centre-top.

Into this unbelievable mess, with the stress on unbelievable, but if you are still with me, just keep going for a bit longer, are to be sent a rescue mission of US Army Rangers commanded by yours truly.

On being briefed about the three other factions with forces on or about to enter the table, I had two squads of elite Army Rangers tasked with securing the President who we knew was being held within the Presidential Palace compound and to come up with a plan to safely extract him, using lethal force as necessary, which as we all know is a very undefined criteria in these kind of operations.

The drone over flight about to call in missile fire against the AA mount on the roof of the palace garrison building, with the HMG armed pickup in the compound in front. The President was being held in the security block in the right corner of the compound close by.

To help the Ranger force, I had the use of helicopters, Humvee armoured transports, drone observation and missile fire support, and the somewhat dubious backup from a platoon of government troops with their own Soviet made APC.

I was also made aware that western private contractors may also be operating in the area.

with flame and smoke rising from a successful missile strike, the helicopter brings in the security team

My plan was simple:
The Rangers would enter the Presidential compound via helicopter lift onto the roof of the main building, with one helicopter and its team sniper detailed with taking down militia guards within the compound perimeter who might contest the landing.

The initial assault would be preceded with, as I was later briefed, my one missile strike, which I directed at the building on which a rather large Soviet made AA gun was positioned.

The next pre-landing primary target would be the heavy machine-gun mounted on the pickup in the compound, the crew for which would be dealt with by the sniper.

Some of the compound garrison lie dead as the garrison building burns and gate guards look to take cover

Once on the roof, a hole was to be blown in it and any occupants neutralised, together with any other members of the immediate garrison attempting to interfere with the landing.

With the compound secure the other Ranger squad would land on the roof securing the surrounding area as the release squad moved to the building where the President was held and escort him back to the palace building where he would change into Ranger fatigues.

with the assault on the compound under way, Chas prepares to resist Steve's oncoming government troops

With the palace and its surrounds secured, the helicopters would return along with the Humvees, with the latter providing ground support with their HMGs as the helicopter lift proceeded.

The government troops were tasked with capturing and holding the ground next to the palace in which a container park had been set up, and they would support the Humvees in suppressing any enemy ground forces.

As I suspected from the start, my plan was to be interfered with by other force agendas and so I determined to play the role straight, and assume the role of the Ranger commander, trusting no one, and only engaging known enemy or others who threatened my forces after being warned to stand down.

As part of that approach I determined to only allow other forces to come within a predetermined distance from my troops who would use the protection of the palace to limit the scope of any outside interference, but if those forces proved loyal could help support my operation by suppressing known enemy, whilst any deviation would alert me to their actual intent, freeing me to engage them accordingly.

The government forces move over the hill supported by their APC ready to secure the container park and the large white transport office building occupied by the private contractor force who narrowly avoided being brassed up by the APC

So the game played out with the Rangers successfully taking the compound in about five to six moves, destroying the AA gun and pick up as planned and with the security squad quickly neutralising other guards on the gate and in the guard house who fired on my team, killing one ranger.

This squad with the help of the recce drone quickly identified other militia units approaching the palace in nearby buildings and likewise continued to neutralise those other threats completely.

Rangers secure the roof of the Presidential Palace with one man down from fire taken from the gate guard, about to be disposed of by a rifle grenade, as shown by the blast template over the gate

The President was quickly released and brought safely into the palace where he changed clothes to make identifying him and his whereabouts from any other Rangers impossible to any force likely to want to take him hostage.

There was a risk to the President from fire directed at the Rangers, but knowing that the likely intent of other forces was to capture, not kill our VIP it was deemed a sensible precaution to hide the target.

The dismay on the faces of my eventual opponents, once revealed, seemed to confirm the success of this approach, that seemed to catch them off guard - all's fair in Spectre Operations!

Government troops cautiously enter the container park

With the President secured and only one Ranger down, the plan had gone very well and it was now that the other forces started to make their play, with the government troops insisting that they leave the area allotted to them and enter the Presidential Palace and its compound.

I issued an order to their commander to stand down and to follow my orders, with the the threat of failure to comply seeing my troops firing on them if required.

Militia forces take shelter in the lee of the perimeter wall after losing a lot of men from fire from the Rangers as they landed

Similarly private contractors were observed advancing alongside the government troops and, approaching a separate wall on the perimeter, blew a hole in it with a demolition charge, announcing they were a US Seal team operating clandestine in support of our mission.

Still uncertain as to their real intent, I called to their commander stating that the palace building was off limits to all coalition forces, save my men, who were now the Presidential guard, and under his authority I was in command and would shoot any unauthorised person or persons entering the palace, instructing him to order his men to defend the perimeter in support of the operation to extract.

Rangers on the roof secure the surrounds as others move behind the palace towards the security block to release the President.

The directions given to the government and private forces were clear, designed to test their intent before I determined to open fire on them, if they erred from my directives, which I felt sure they would.

The Rangers control the palace and the compound, with its security wall providing good cover from enemy fire

The government troops likewise blew an access into the compound and started to attempt to break into the palace through one of the main doors, failing to gain access in the face of warnings to desist and that they would come under fire on entry.

The goverment soldiers eventually forced the palace door but were immediately gunned down on entering through it.

The private contractors chose to blow in one of the ground floor doors with a charge that stunned two of my Rangers on the door.

Fortunately one Ranger had the fortitude to immediately open fire, killing one of the four man team, with another Ranger on the roof taking out another two with a well directed grenade.

Militia units tried to ram the palace gate in another pick up but were disposed of by a well placed grenade launched at long range by Rangers on the roof

With the battle opened on the supposed allied forces, the militia tried to gain access through the main gate by charging a squad up to it in a pick up with the intent to ram their way in.

A well directed rifle launched grenade put an immediate stop to that attack, leaving the vehicle burning on the road outside.

The first helicopter is shot down by the private contractor team

With a temporary hold put on attempts to get into the palace the decision was taken to call in the helicopters and Humvees, with one helo standing off as the other came in ready to begin the extraction.

As this happened the Humvees moved into cover and opened fire on the most dangerous threat, namely the contractors gathered outside the breach in the perimeter wall, with their 50 cals dealing with the majority of those men, before themselves falling to an attack from government troops.

The President is down along with three of the Ranger extraction team - game over

Frankly at this stage of the op I think all bets were off at a successful extraction, but I could at least make sure that the enemy would have to make a decision on their own objective, to either capture the President alive or to simply kill the Ranger teams.

Dead and wounded private contractors lie helpless inside the perimeter wall as they tried to force access with a shaped charge

The government APC oversees the little battle without itself becoming engaged

The ploy worked in one sense in that the contractors who had lost a lot of men at this stage of the battle, opened up with everything they had, with troops capable of delivering fire to the same level as my Rangers.

Obviously with all thoughts of profit now forgotten, the return fire from a nearby building was deadly, killing three of the Rangers on the roof, taking down the helicopter that crashed in front of the palace, but also killing the President as well.

The Humvee team are taken out by government troops

With no hope of extraction I ordered my Rangers to stand down, whist securing the body of the President and await capture from whoever got onto the roof first.

No doubt an order would be now issued for the killing or capture of the contract team leader and its members and the government of this benighted country would now go through a change of management in the light of this unfortunate incident.

The militia were almost forced spectators as the battle evolved into one between the Rangers and contractors

The rules played fast and furious with the usual disparity in effectiveness between modern forces and less well trained and equipped militia types.

Thanks to Steve M, Vince and Chas for a pleasant day of battling in 'Nowheresville'