Friday 27 October 2023

The History of Britain in Blue Plaques

 
This weekend Carolyn and I'm off up to London to stay with friends for a long weekend and to take in a West End musical 'Moulin Rouge' followed by a bit of supper in town, so this weekend's post is coming out on the Friday instead.

My glorious 1798 map of Great Britain and Ireland below illustrates where exactly this particular post is focussed in relation to blue plaques, as I know there are lots of folks who read the blog who might not be quite so familiar with the layout of the territory as compared to those of us blessed with living here.

Tenby in Pembrokeshire, and my home of Exmouth and nearby Budleigh in East Devon, the focus of this particular post.

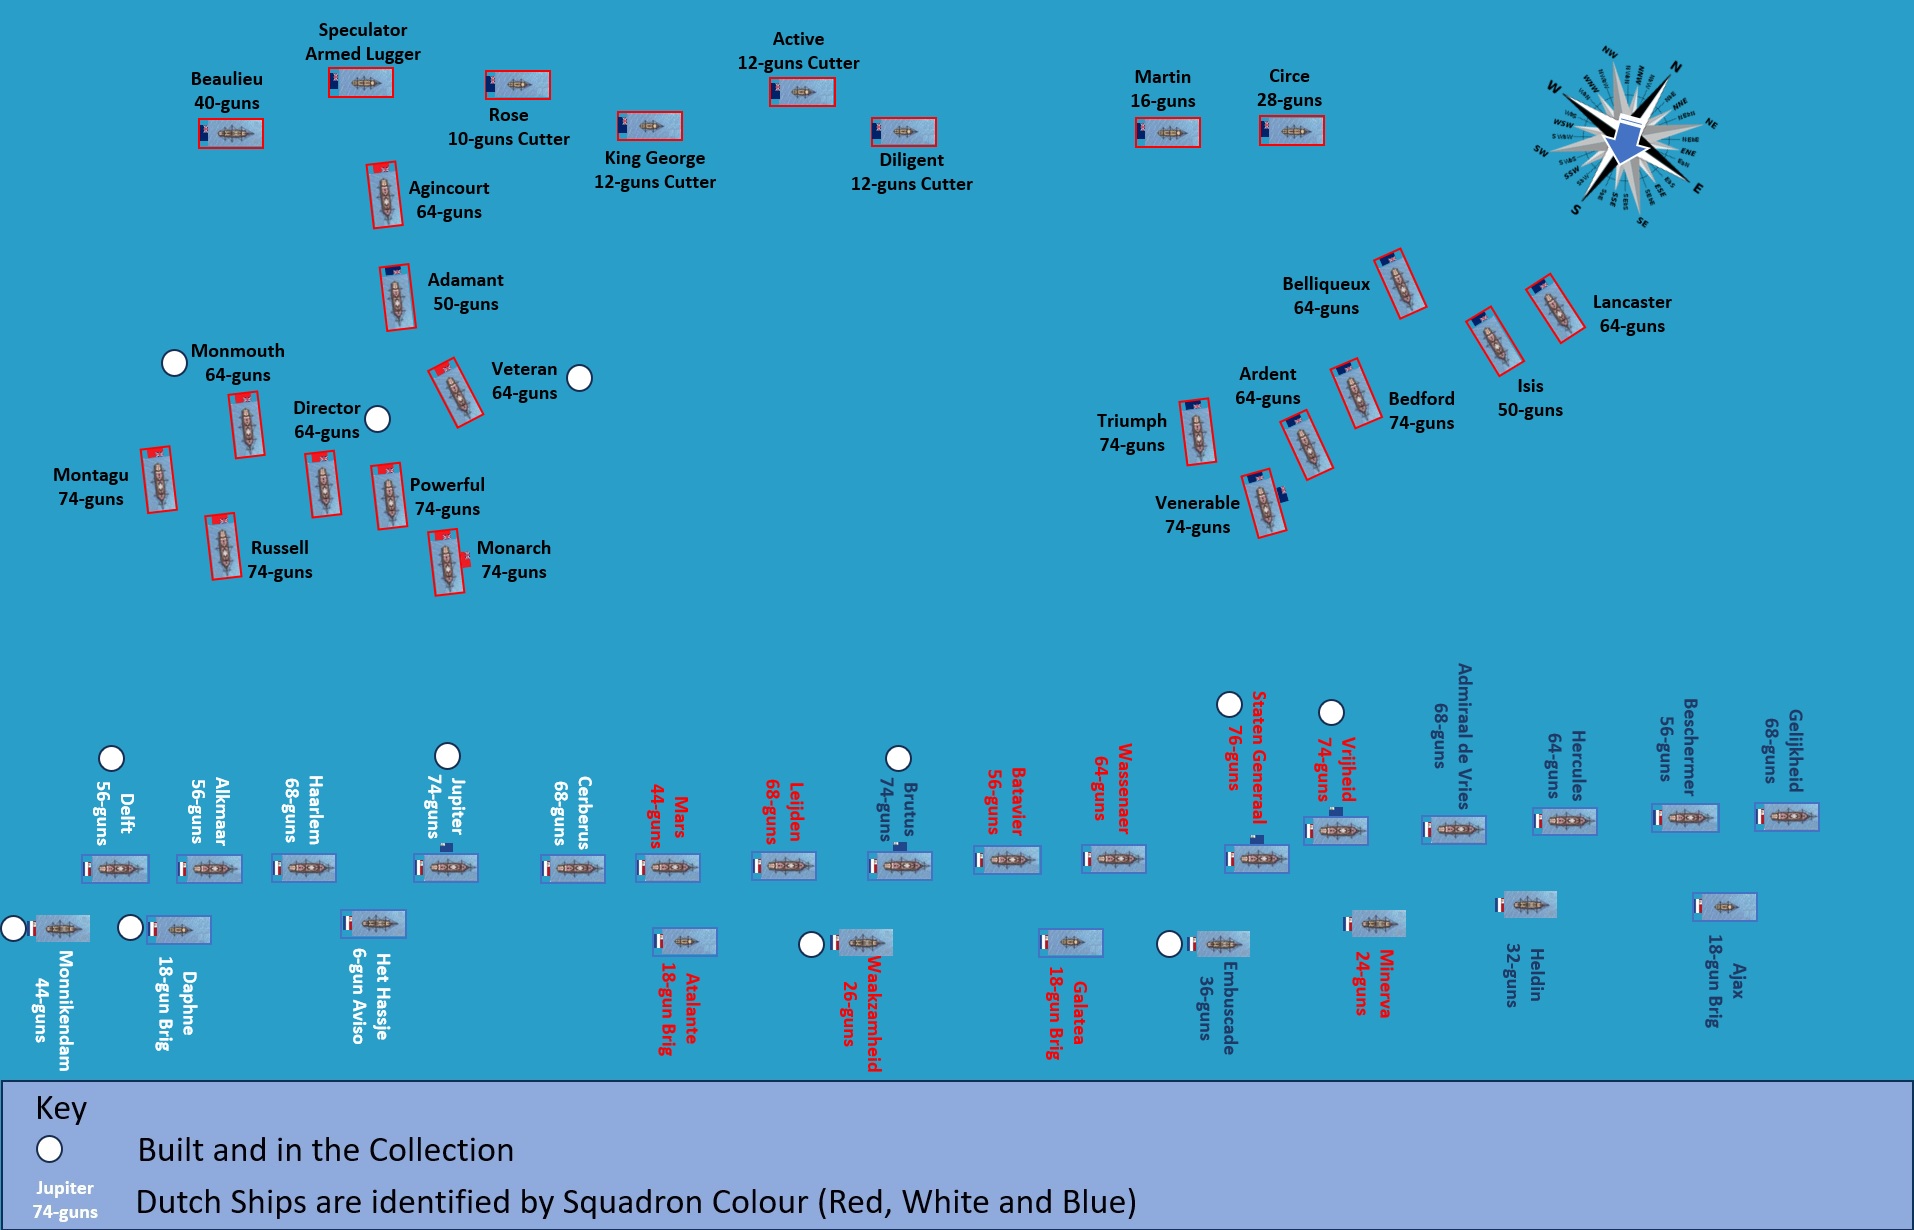
In a post looking at my most recent project to build my fleets for the Battle of Camperdown, I mentioned that much of British history is commemorated in the names of its streets, but it occurred to me that in addition to that we also have the delightful custom of putting up blue plaques on historically interesting buildings, that can reveal another layer of that history and the local characters associated with the building that helped to make it, and then I thought it would be fun to illustrate some blue plaques that caught my attention in recent weeks, and the stories of the folks involved.

I've passed Simcoe House many times, walking through Budleigh, and sometimes it's good to stop and acknowledge the amazing history on your own doorstep.

Following the death of his father, Captain John Simcoe RN, from pneumonia, commanding His Majesty's 60-gun ship HMS Pembroke in the mouth of the St Lawrence River on the 15th May 1759, just prior to the siege of Quebec, the seven year-old John Graves Simcoe and his mother Katherine Simcoe moved back to her parental home in Exeter; where he would be educated at Exeter Grammar School, then Eton College, before attending Merton College, Oxford, and then Lincoln's Inn, before deciding to follow a military career rather than a legal one.

John Graves Simcoe in the green uniform of the Queen's Rangers

The young Simcoe would begin his military career as an ensign with the 35th Foot, serving with them in the American War of Independence and seeing action at the siege of Boston, later being promoted to captain in the 40th Foot, serving with and later commanding the grenadier company through the New York, New Jersey and Philadelphia campaigns and at the Battle of Brandywine, where he was wounded, and reportedly prevented his men from firing at fleeing rebels, that included George Washington.

A Ranger and Hussar of the Queen's Rangers

In 1777 he would take command of the Queen's Rangers formed on Staten Island, famously leading this elite Loyalist Regiment, seeing action right through to the Siege of Yorktown before being invalided back home and gaining promotion to lieutenant-colonel, and recording his experiences in his 'A Journal of the Operations of the Queen's Rangers' published in Exeter in 1787.

Colonel John Graves Simcoe, Lieutenant Governor of Upper Canada 1791-96 - George Theodore Berthon

Following convalescence at his home in Devon, Simcoe entered Parliament in 1790 as MP for St. Mawes in Cornwall, before taking up the role of Lieutenant Governor of Upper Canada a year later, serving until 1796, and being appointed to the rank of Major-General before ill-health forced a return home, resigning his office in 1798. 

He would briefly serve as commander of the British expeditionary force to the captured French colony of Saint-Domingue itself dealing with a slave rebellion, and seeing action against the Haitian commander Toussant Louverture, then cooperating with the French, before being replaced in March 1797.
 
Simcoe House was acquired by General Simcoe as a seaside villa in 1797, here in Budleigh Salterton, Devon, as a welcome respite from his duties as the Military Commander for the Army in the West of England 

On return home he was appointed Colonel of the 81st Foot in 1798, exchanging to the 22nd Foot six months later and promoted lieutenant-general and commander of the Western District of Great Britain.

In 1806 he was appointed Commander-in-Chief, India in anticipation of his succeeding Lord Cornwallis, but died in Exeter on the 26th of October 1806 aged 54, before taking up his new role.

Nancy Perriam, one of only three British women to see service at sea during the French Revolutionary and Napoleonic Wars

As well as Exmouth's association with Lady Frances 'Fanny' Nelson, Viscountess Nelson and Duchess of Bronte who lived in the town in her later years and is buried at St Margaret and St Andrew's Church in Littleham, we have an association from another lady from the complete other end of the social strata of Georgian England, also laid to rest in Littleham Church, Nancy Perriam, Royal Navy powder monkey, seamstress and surgeons mate.

My picture of Lady Nelson's grave back in 2020.

Nancy Ann Letton was born in April 1769 in Exmouth, marrying a Royal Navy seamen, Edward Hopping in 1788, he later serving aboard the 36-gun frigate HMS Crescent, commanded by Captain James Saumarez, then cruising the coast of France, with the Crescent returning to Plymouth, for repairs in 1795.

HMS Crescent under the command of Captain James Saumarez, capturing the French frigate Réunion off Cherbourg, 20th October 1793 - Thomas Whitcombe

Nancy went to Plymouth to meet her husband and being deemed of good character and a wife of one of the crew was allowed to come on board and sail with him, later following him to HMS Orion 74-guns when Saumarez was given command of her and selected Hopping to come with him to his new ship.

HMS Orion 74-guns - Nicholas Pocock

Hopping would serve on Orion as second gunner and Nancy would help him serving as a 'powder-monkey' preparing gun cartridges, seeing action at the Battle of Groix 23rd June 1795, in the Bay of Biscay during which Orion lost six killed and eighteen wounded.

Battle of Groix 23rd June 1795 - Nicholas Pocock

On the 14th February 1797 she was in action at the Battle of Cape St. Vincent, with Orion suffering nine wounded in the chase of the Spanish fleet and with Nancy tasked with mending one of Samaurez's shirts as they went into battle, and later tending to the wounded.

She would recall her role vividly, recounting later about assisting the surgeon operating on a young midshipman;

"the boy bore the operation without a murmur, and when it was over turned to me and said: 'Have I not borne it like a man?' Having said this he immediately expired."


Battle of Cape St Vincent 14th February 1797 - Robert Cleveley

Her final battle was to be one of the greatest in British naval history, the Battle of the Nile fought on the 1st of August 1798, that would see one of the most decisive victories achieved in the Revolutionary and Napoleonic wars and the French losing thirteen of the seventeen vessels that started the battle together with estimated casualties of between 3-5,000 men whilst the British squadron under Nelson escaped with 218 killed and 678 wounded and with the Orion suffering 13 killed and 29 wounded.

Battle of the Nile, 1st of August 1798 - Nicholas Pocock

Nancy gave birth to two daughters while serving on the Orion and her brother together with another twelve men from Exmouth also served aboard the ship, one later achieving flag rank and dying an admiral.

Edward Hopping was drowned in 1802 and Nancy would go on to marry John Perriam in 1805, surviving him after his death in 1812 and living out her life in Exmouth working as a street fish seller until the age of 80 when ill-health forced her to retire and, after locals campaigned for her to receive a government pension for her service, was given a pension of £10 a year.

This pretty little cottage in Tower Street, Exmouth was Nancy's home until her death in 1865

In 1847 she was one of only three women recommended to be awarded the Naval General Service Medal in 1847, alongside another Nile veteran, Mary Anne Ridley and Trafalgar veteran Jane Townshend, but all three were refused on the likely recommendation of Queen Victoria who was a known opponent of women's rights.
 

Nancy lived in Tower Street, Exmouth, in the little cottage seen above, until 1865 when she died in her 98th year, outliving her children and leaving a will worth £100.

The chain of Wetherspoon pubs are famous for reflecting the local history in the names of their establishments and thus we have the Powder Monkey pub in Exmouth recording the exploits of this remarkable Exmouth woman, Nancy Ann Perriam, former powder monkey of His Majesty's Ship Orion.


A few weeks ago I got to spend a very pleasant long-weekend in Tenby, in the beautiful Welsh county of Pembrokeshire, and as is my want to do, enjoyed soaking up the architecture of this wonderful coastal resort and its three miles of golden sandy beaches and its Norman stone wall complete with its five arches gate.


Whilst walking up from the harbour I noticed the blue plaque seen above relating to a famous King of England, Henry VII the first Tudor monarch who came out on top at the end of the so called Wars of the Roses or 'Cousins War' with his seizure of the crown on the 22nd August 1485 at the Battle of Bosworth Field.
 
A young Henry Tudor, dated between 1470 to 1480 looking as he might have when he made his desperate escape from Tenby

Henry was the nephew of Henry the VI, the Lancastrian king whose rather inept reign virtually ensured a civil war between the houses of Lancaster and York in the wake of the lost territories in France, with his tenuous grip on power seemingly restored in 1469 when Richard Neville, Earl of Warwick, 'The Kingmaker' changed allegiances and went over to the House of Lancaster restoring Henry VI to the throne in 1470.

The deposed Yorkists and Edward IV were forced to flee the country and seek sanctuary abroad in Burgundy and in Ireland as they regrouped and plotted their return the following year that saw the Lancastrian cause routed at the Battle of Barnet on the 14th April 1471 and the death of Warwick. 

The Battle of Barnet - Graham Turner

Then the final coup de grâce took place on the 4th of May 1471 at the Battle of Tewkesbury when Edward completely defeated the Lancastrian army led by Edward Beaufort the Duke of Somerset and nominally the young Prince Edward and his mother Queen Margaret of Anjou, that would see both Somerset and the young prince dead at the end of it and his father Henry VI likely murdered in the Tower soon afterwards, thus seemingly ending any hope of a Lancastrian return to power.

Mr Steve and I visited the battlefield of Tewkesbury back in October 2020
JJ's Wargames - The Battlefield of Tewkesbury,1471

In the wake of Tewkesbury many surviving Lancastrians chose to flee abroad once again, including the young Henry Tudor where he would spend the next fourteen years under the protection of Francis II, Duke of Brittany, at one time managing to avoid being handed over to Yorkist envoys from King Edward when Francis fell ill, managing to claim sanctuary in a local monastery until the envoys were forced to depart.
 
The property in Tenby occupying the suspected site of where Henry Tudor made his escape to Brittany in the wake of the Lancastrian defeat at the Battle of Tewkesbury in 1471.

By 1483 he was being promoted by his mother, Margaret Beaufort, as an alternative to the new Yorkist monarch, King Richard III, and on Christmas Day 1483, Henry pledged to marry Elizabeth of York, the eldest daughter of Edward IV, and Edward's heir since the presumed death of her brothers in the Tower, likely with the connivance of Richard.

Richard did his best to extradite Henry from Brittany, but Henry escaped to France, where he was welcomed and supplied with troops and equipment for a second invasion, landing at Mill Bay, Pembrokeshire on the 7th August 1485, making the most of his Welsh birth and ancestry by amassing an army of some 5-6,000 men on his march to Bosworth and his destiny to establish the new Tudor monarchy.

King Henry VII circa 1505

On my continued exploration of the streets of Tenby I came across my final example of another classic blue plaque and another great story from British history to end on.

The relationship that developed between Lord Nelson and Lady Emma Hamilton scandalised Georgian society, particularly as her then much older husband Sir William Hamilton was still very much on the scene, and the liaison by the time Nelson had returned home, in the wake of his victory at the Battle of the Nile, would result in the birth of Horatia, Nelson's daughter, on the 1st of February 1801. 

The Pembrokeshire Gin Co. had an interesting blue plaque over one of its doors

Arriving at Great Yarmouth on the 6th November 1800, it seemed to many that Nelson had lost all sense of proper behaviour, sporting unauthorised foreign decorations on his uniform causing him to be shunned by King George III at his formal presentation to the king at St James' Palace on the 11th November 1800, and with his treatment of his wife Fanny, according to Lady Spencer, wife of the First Sea Lord, treating her 'with every mark of dislike and contempt' at the evening dinner in his honour held at the Admiralty. 

Even his former commander, Lord St Vincent commented;
'That foolish little fellow Nelson has sat to every painter in London. His head is turned by Lady Hamilton.'

A Georgian ménage à trois, Nelson, Emma and William Hamilton


Nelson's relationship with St Vincent was tense on his return home, and a dispute over prize money probably didn't help, but his abilities ensured he was made second in command of the British fleet sent to tackle the Danes at Copenhagen, and his significant contribution to the outcome of the campaign added further laurels to his reputation on his return home for nineteen months of leave during the subsequent peace that followed the Treaty of Amiens between France and Great Britain on the 25th March 1802.

By then Nelson and the Hamilton's had a new home in Merton, Surrey, and in the summer of 1802, Nelson accompanied them on a tour of Sir William's West of England and Welsh estates and were in Pembrokeshire overseeing progress on a scheme to develop the town of Milford Haven by promoting it as a naval dockyard, with Nelson instrumental in influencing the Navy Board to sign a fourteen year lease on land at Milford Haven in 1800.


The importance of the deal with the navy was only emphasised by the fact that Emma was a prodigious spender and the £8000 produced by Sir William's Pembrokeshire estates was not enough to keep up with her needs, that, following her surviving the other two, Hamilton dying in 1803 at the age of 72 and Nelson in 1805 at Trafalgar, and the subsequent falling through of the arrangements with the navy, would see her unable to service her debts and her dying in poverty in Calais in 1815.

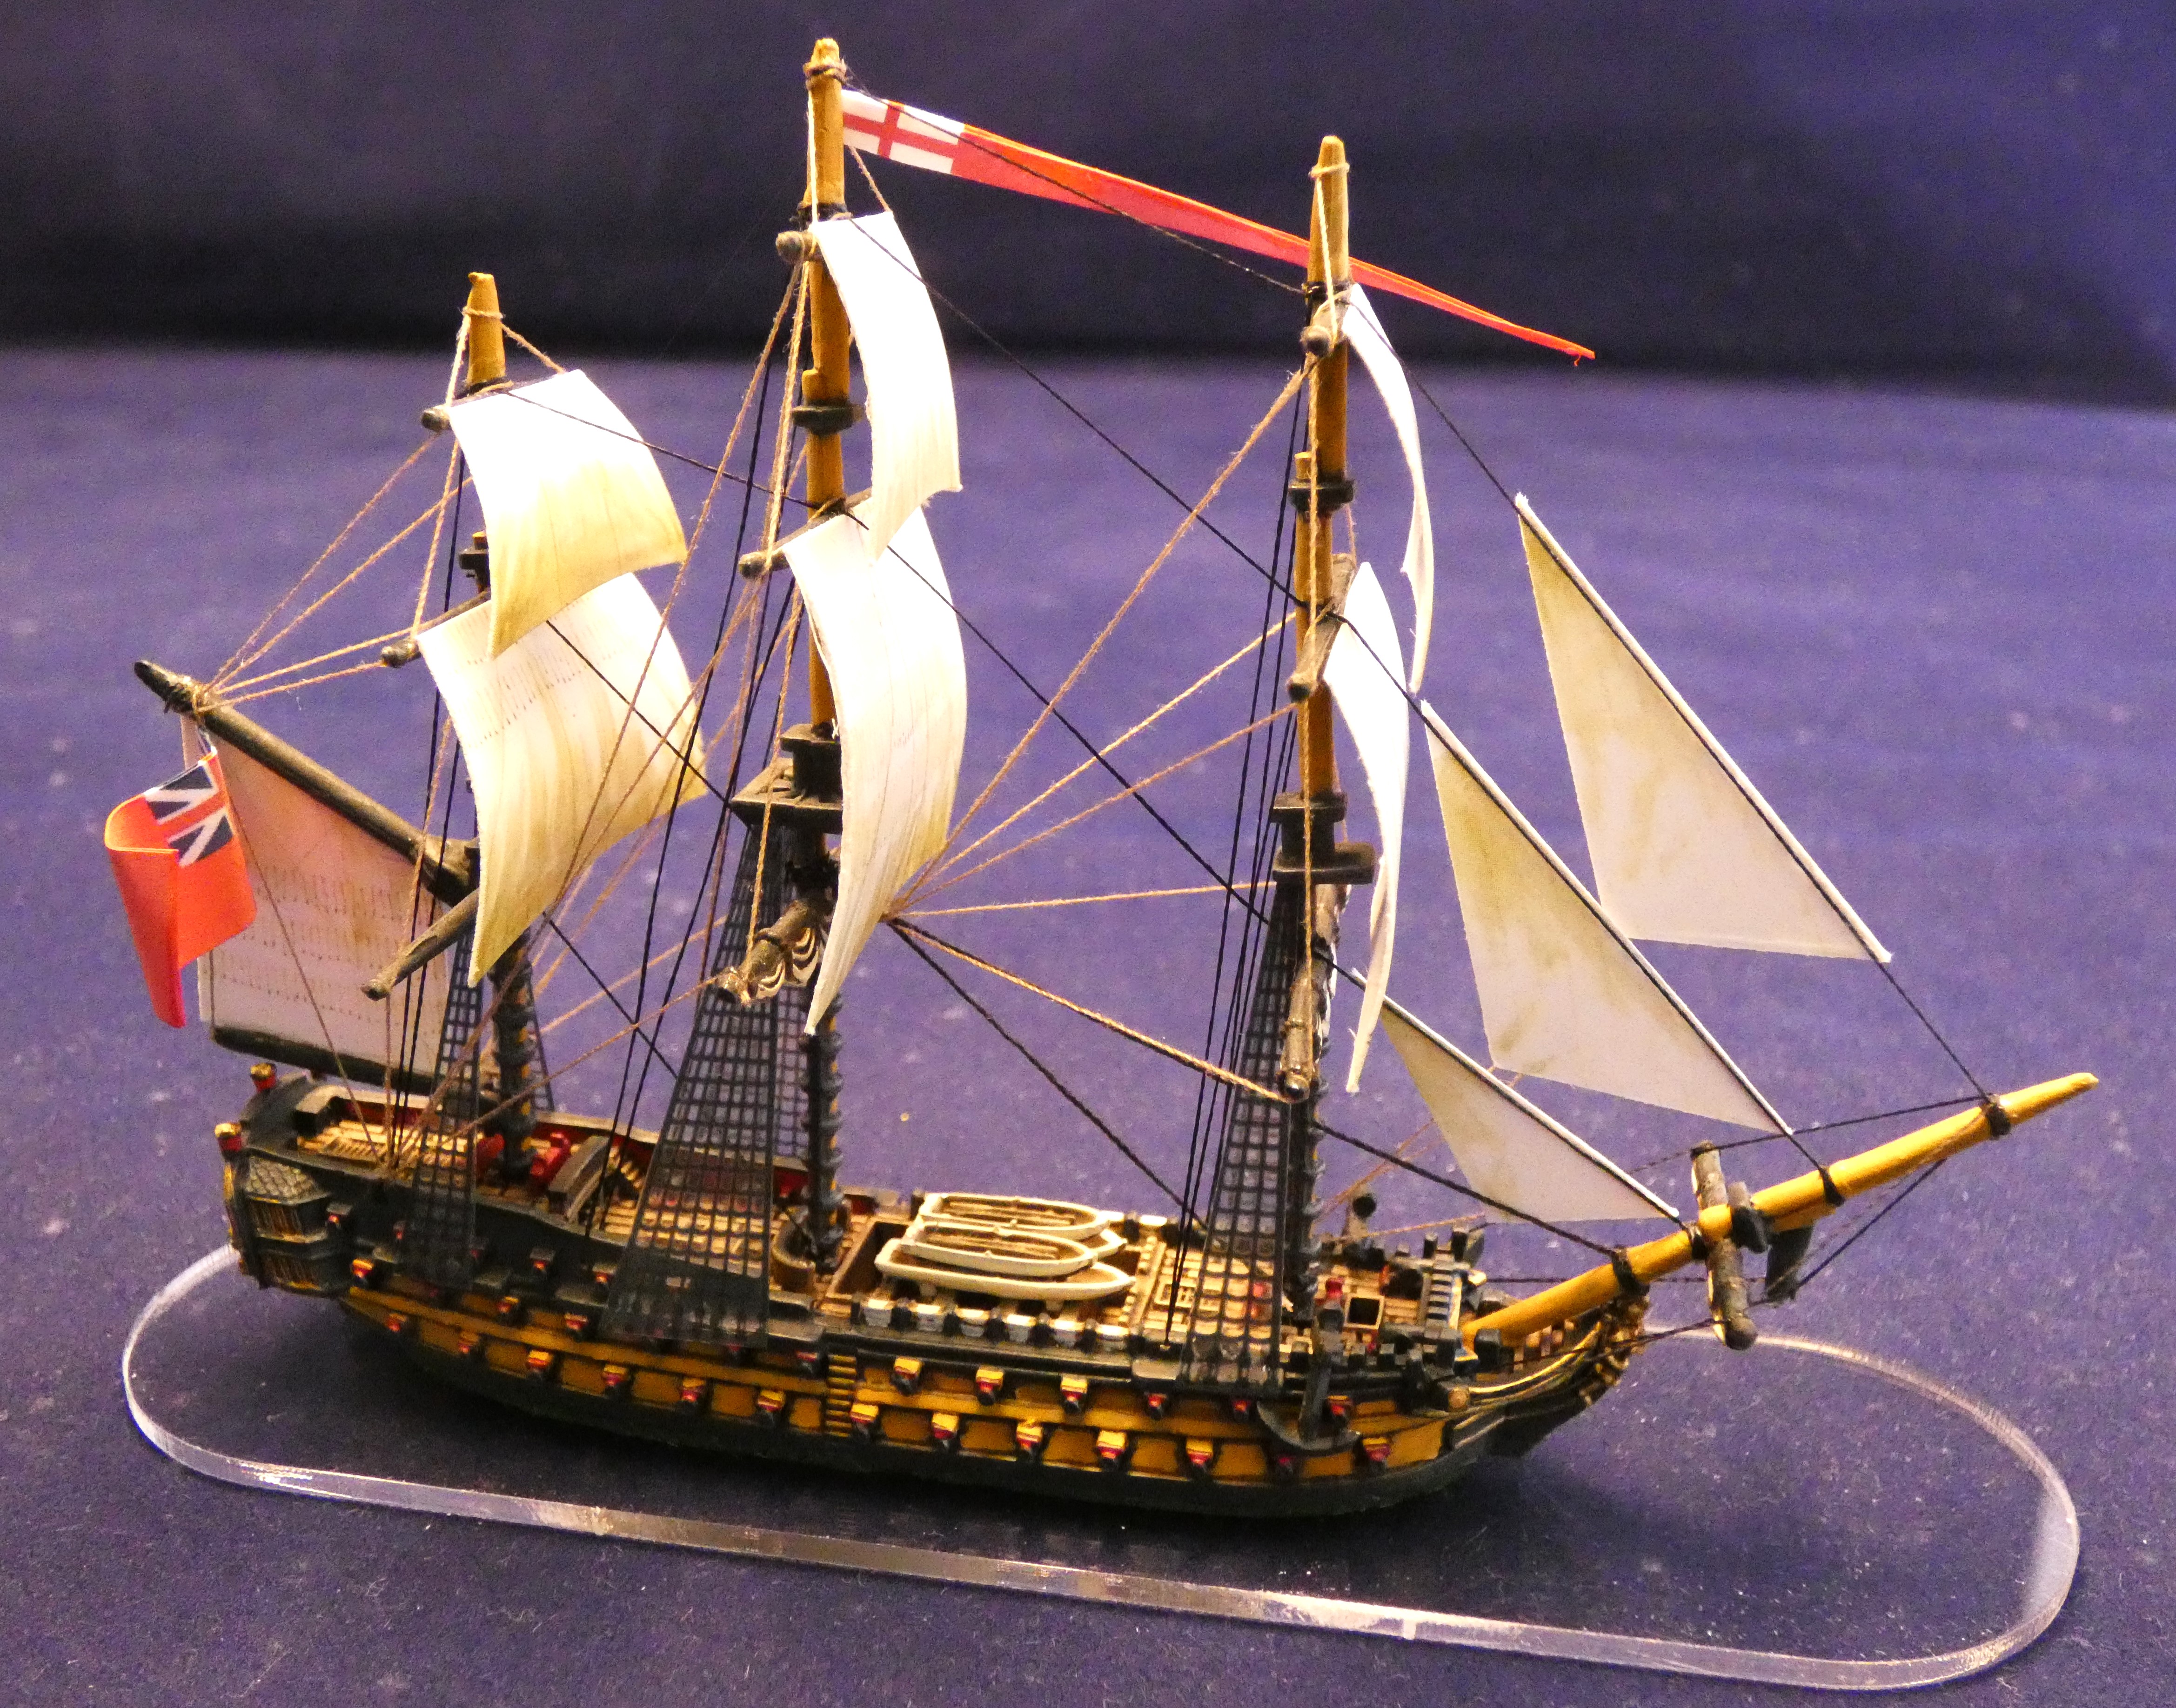
Next up, work progresses on my British 74's for Camperdown, Mr Steve and my adventures in and around Oxford and I have a book review to do.

More anon
JJ

Friday 20 October 2023

All at Sea, Battle of Camperdown - Project Build, Part Two, British 64's of the Leeward Division

'Captain Bligh goes to War', HMS Director leads the attack of the Leeward Division at Camperdown - Geoff Hunt

Following on from Part One, see link below, of this 'Project Build' series of posts looking at my progress in building the British and Batavian-Dutch Fleets for the Battle of Camperdown, I have turned my attention to the British fleet, and in particular the nine ships that made up the Leeward Division, under the command of Vice Admiral Richard Onslow.

JJ's Wargames - All at Sea, Battle of Camperdown, Project Build Part One

As you will see from the Order of Battle below, the fighting force of the Leeward Division consisted of its eight third rates, 74-gunners and 64-gunners, four of each, and initially I have started with the latter, carrying the red ensign of Sir Richard's colour.

Vice Admiral of the Red, Sir Richard Onslow - Thomas Philips (National Maritime Museum)
In the next post I will look at Sir Richard Onslow and his part in the Battle of Camperdown when I showcase his flagship, HMS Monarch and two other of the Leeward Division's 74's, HMS Montagu and Russell.

As could be the case with naval battles from the age of sail, sailing order would give way to where a captain found himself when the gunfire started and Camperdown is no different, with the British focussed on making best speed to close with the enemy when Duncan realised the Dutch were attempting to close with the shore, and directing his fleet to close quickly, and break through their line to engage on the leeward side, regardless of sailing order and the Dutch squadron arrangements not quite working to plan as the three columns shook out into line of battle just before midday and the flagship Brutus ending up away from the rest of the blue-squadron in the line that met the British attack.

With the addition of the four Dutch flagships, I've made a good start on the Batavian fleet and it was time to start getting stuck into the British so that I can bring these two fighting forces together as a joint project

The illustration I have created above is based on the map from the book 'de Delft' as shown in Part One of this series of posts, and I created it to try to make sense of the various maps and accounts of the two fleets organisation and sailing orders as the battle commenced, with the Batavian Dutch arranged in squadron groups of red, white and blue, similar to the British system, although it is uncertain whether they had adopted this organisation prior to the battle.

In addition I intend to use it as a way of tracking progress in the build, hence those models highlighted that have already been built and are part of the collection, including these new British 64's. 

This illustration may well be subject to change as I discover new facts about this rather enigmatic battle, and I should add that much of the light ship arrangements shown are rather speculative and based on educated guesswork as to where they may have likely positioned themselves before the battle, mixed with those I have evidence from various sources that they actually were in and around the area shown

The actual Leeward Command as detailed in Clowes Vol. IV Page 326, with it seems the frigate Beaulieu in attendance to repeat signals and to tow out damage friendly ships or prizes, and as mentioned, Admiral Duncan's signal to make best sail towards the enemy sees the fourth-rate HMS Adamant end up as part of Onslow's command, as shown in the plan above.

For this part of the project build, I decided to use the first of the Warlord small third rate models that they launched with, that originally came with metal mast components, that have since been replaced with the plastic third rate set that comes with the 74-gun sprue.

As the British had upgraded their 64's to have the more modern gaff and boom spanker sails, and the metal is a lot less easier to modify than the plastic, it made sense to use these for my British, reserving the plastic options for my Dutch where I will need to create the lateen rigged mizzens.

Cross of St Patrick, added to the Union flag in 1801 after Camperdown

As mentioned in the preamble to my first post, I have decided to flag my Camperdown British in the colours they carried on the day, namely red and blue ensigns, and so I have produced my own set of colours with the Union canton excluding the Cross of St Patrick that was not added until 1801 with the Act of Union which saw the addition of the Irish symbol to the existing flag and creating the modern Union Flag, more commonly referred to as the Union Jack.

The Warlord small third-rate was designed to incorporate plastic components from the 74-gun third rate, which also includes the use of the figureheads, one of which I incorporated into these models, with the first one illustrated using one of the plastic options, which adds to the variety you can create with these models

HMS Director
HMS Director was a St Albans class 64-gun third-rate ship of the line designed by the great British naval architect Sir Thomas Slade famous for his other designs that included, HMS Victory, Agamemnon and Bellerophon, to name but a few, and she was built at Gravesend, Kent, launched on 9th March 1784.

Her general characteristics were:
Tons burthen 1388 (bm)
Length of gundeck 159 feet 
Beam 44 feet, 4 inches
Depth of hold 18 feet, 10 inches


Her armament consisted of:
Gundeck: 26 x 24-pounder long guns
Upper gundeck: 26 x 18-pounders long guns
Quarterdeck: 10 x 9-pounder long guns, 6 x 18-pounder carronades
Forecastle: 2 x 9-pounder long guns, 2 x 24-pounder carronades

The service record of the Director prior to the Battle of Camperdown shows the ship being fitted out as a Medway guardship in 1789 before fitting out as a ship of the line the following year in response to the Spanish Armament crisis after the Nootka Sound incident.

Captain William Bligh illustrated here in 1792.
Most famous for his role in the mutiny of HMAV Bounty in 1789 

Returned to Ordinary in June 1790, the Director would be fitted out for war service in 1796 at Chatham and recommissioned under Captain William Bligh who would remain with her until 1800.

The mutinies among the ships of the Channel (Spithead) and Nore Squadrons was a principle cause of the French plans to bring together the Dutch and French fleets at Brest possibly in support of another invasion attempt. However the Dutch fleet did not sally forth until after the mutinies had been resolved. This caricature of the meeting held on the 20th May 1797, at which the 'Delegates of the Fleet' presented their list of eight demands, shows Admiral Charles Buckner (extreme left), Commander in Chief, The Nore, and President of the Delegates, Richard Parker ( extreme right) who was later hanged for treason and piracy from the yardarm of HMS Sandwich 90-guns, the vessel where the mutiny started 

The Director was one of the ships that mutinied in the Nore Squadron during the Spithead and Nore Mutinies that occurred on the 12th of May 1797, with the Director being the last ship to raise her colours in submission to the authorities, it later being learned that Bligh's nickname among men in the fleet was 'that Bounty bastard'.


As captain of the Director, Bligh would engage three Dutch vessels, the Haarlem 68-guns, Aalkmar 56-guns and later the Vrijheid 74-guns, flagship of Vice-Admiral de Winter forcing the latter to strike his colours.


Despite being in the thick of the action, the Director would suffer only seven seamen wounded, and Bligh would be recognised for his actions during the battle with the award of the Naval Gold Medal.


As part of my 'deep-dive' into the Battle of Camperdown, I have been digging into copies of Howe's signal book from 1790 which was being used by Admiral Duncan for this battle to better understand the signalling that he used to manage matters, alongside consulting the ship log books that have survived as a record of the action.

In my next post covering HMS Monarch and Sir Richard Onslow, I will take a look at the 1790 Signal Book and the signalling made during the battle in a bit more detail.

In the previous post looking at the Dutch flagships I mentioned how poor in general the British ships logs are for Camperdown, except for perhaps one, the notable exception being Captain William Bligh's Director, which might not have done him any harm in seeing him awarded his Naval Gold Medal and is worth recounting here, whilst looking at my interpretation of the ship.

Extracts from the log of HMS Director at the Battle of Camperdown.
William Bligh, Captain, - Admirals' Journals, Vol. IV. 

'October 11th. P.M. - At 12.40, the Monarch (Vice-Admiral Onslow) began to engage the Dutch Vice-Admiral in a most spirited manner. At 12.45 we began with a second ship in the rear, the Russell having just begun before us with the sternmost ship, the rest of our division came on and on all sides there was a general firing.

Battle is joined, shown here at 13.00, with the Director shown having crossed the bows of the Alkmaar firing as she bore

The Dutch gave way, and the ships became mixed, so that it required sometimes great caution to prevent firing into one another. The Dutch began to strike, and particularly one to us, but we engaged different ships, indeed I believe most all the enemy's rear received shot from different ships of ours. 

Its 14.00 and the battle has been raging for an hour and a half and the Dutch rear has all but been overwhelmed, leaving HMS Director to head for the Vrijheid, as described in Captain William Bligh's log.

The Director was now advancing towards Vice-Admiral Onslow' s ship, when we found the ship he was engaging had struck, and the rear of the enemy done up. It appeared to me now that some force was wanted in the van, as we saw five ships unengaged and apparently not hurt, and also the Dutch Commander-in-Chief without any ship of ours engaged with him. There was no time to be lost, as night was approaching, and as there were enough ships in our lee division about the rear of the enemy to take possession of them, I made sail (and passed the Monarch) engaging some of the centre ships, for I considered now the capture of the Dutch Commander-in-Chiefs ship as likely to produce the capture of those ahead of him, and I desired my first lieutenant to inform the officers and men I was determined to be alongside the Dutch Admiral.

HMS Director raking the Dutch flagship Vrijheid - Samuel Owen

At 3.5, we began the action with him, lying on his larboard quarter within 20 yards, by degrees we advanced alongside, firing tremendously at him, and then across his bows almost touching, when we carried away his fore mast, topmast, topgallant mast, and soon after his main mast, topmast and topgallant mast, together with his mizen mast, and left him nothing standing. The wreck lying all over his starboard side, most of his guns were of no use, I therefore hauled up along his starboard side and there we finished him, for at 3.55 he struck and the action ended. (1) 

At 15.00 the Director moves in to finish the fight with Vrijheid.

Admiral Duncan, who we knew had been severely engaged with the van of the enemy, had wore, and was now on the starboard tack standing from the shore about a half a mile to leeward of the Dutch Admiral. I therefore bore up to speak to him, when he hailed me to take possession of the Vrijheid, the ship we had just beaten, and I sent my first lieutenant on board in consequence. The Dutch Admiral, Mr. De Winter, was taken on board of Admiral Duncan, and as the captain could not be removed owing to a death wound, my first lieutenant sent to me the captain-lieutenant, who was next in command. 


As soon as the action ceased, my officers came to congratulate me, and to say there was not a man killed who they knew of, and of such good fortune I had no idea, for it passed belief. Before we got up with the Dutch Admiral, we had a share with the Veteran in making a Dutch ship strike, and we passed close to leeward of a Dutch ship of the line on fire. Our defects are, our fore yard shot away, topsail yard badly wounded, bowsprit shot through, the fore topmast shot through the head, booms and boats shot through, stays, running rigging, and sails much cut.'

(1) According to the Dutch accounts of the battle the Vrijheid never struck her colours. When the masts fell the ensign was shown on a spar; this was shot away, but was replaced with a blue Admiral's flag. This again was shot away, and there was nothing left to strike. An officer hailed from the Montagu and asked in good Dutch if she had surrendered, and an officer of the Vrijheid replied, ' What do you think about it ? ' The ship was then taken possession of, apparently by the Director, though the Circe's boat took Admiral de Winter to the Venerable (D' Vrijheid, p. 201).


HMS Monmouth
The 64-gun ship of the line Monmouth had originally been built for the East India Company and given the name Belmont, but was instead purchased by the Royal Navy, one of five ships then being built in commercial dockyards along the River Thames at the start of the French Revolutionary War, herself being launched on the 23rd April 1796 and commissioned in September.

Three of the other purchases, later named HMS Ardent, Agincourt and Lancaster would serve alongside her at the Battle of Camperdown.

Her general characteristics were:
Tons burthen 1440 (bm)
Length of gundeck 173 feet 1 inch
Beam 43 feet, 4 inches
Depth of hold 19 feet, 8 inches


Her armament consisted of:
Gundeck: 26 x 24-pounder long guns
Upper gundeck: 26 x 18-pounders long guns
Quarterdeck: 10 x 9-pounder long guns
Forecastle: 2 x 9-pounder long guns.

HMS Monmouth in company with East Indiamen in 1808

The Monmouth was also involved in the Nore mutiny, with the crew taking her first lieutenant, Charles Bullen, prisoner and threatening to execute him.

Captain William Carnegie, Earl of Northesk

Her then captain, William Carnegie, Earl of Northesk, who would serve as third in command in 1805 with Nelson and Collingwood at Trafalgar, was confined to his cabin by the mutineers, but managed to intervene and he was then selected by the mutineers committee to carry their terms to the king, he having a reputation as a friend to seamen


The crew of the Monmouth are said to have helped end the mutiny, after which Northesk resigned his commission and the ship was placed under the command of Commander James Walker as acting captain, who had originally been tasked to attack mutinous ships at anchor with a squadron of gunboats before the situation was ended.


Walker commanded Monmouth at the Battle of Camperdown and addressed his crew before the battle;

"Now, my lads, you see your enemy before you. I shall lay you close on board, and thus give you an opportunity of washing the stain off your characters with the blood of your foes. Go to your quarters, and do your duty."

Monmouth would engage both the Delft and the Alkmaar during the action, capturing both, that would leave the Delft very badly damaged, likely causing her to sink on passage back to England, and leave the Monmouth with five killed and twenty-two men wounded.


As with HMS Director, the log of the Monmouth has an interesting account of the action.

Extracts from the log of HMS Monmouth at the Battle of Camperdown.
James Murray, Master, - Official No. 2807. 

'October 11th. P.M. At 15 minutes past 12, the Vice-Admiral began to engage, and broke the enemy's line, passing under a Dutch admiral's stern. At 20 minutes past, the second ship in the enemy's rear began to fire on us, which we returned, and passed through their line astern of our opponent engaging on both sides. The action now became general. 

At 13.00 Monmouth passed through the enemy line recording
'. . . the second ship in the enemy's rear 
began to fire on us, which we returned, and passed through their line astern of our opponent engaging on both sides.'

At 50 minutes past 12, the Russell shot up alongside the weather ship we were engaging and began to engage also, several of whose shot having struck us, we desisted firing for a time upon the enemy lest our shot might injure the Russell. 

HMS Monmouth in action with Delft, with the Alkmaar close by demolished by the British third rate earlier in the battle. 

The ship on our larboard bow, which we had been engaging for 50 minutes, having lost her main topmast and mizen mast, we hove all aback to engage the ship astern of her, and after having exchanged three broadsides with him, observing he kept away, bore round up, ran athwart his hawse, raked him, and backing alongside him to leeward engaged him very close for 40 minutes, when he struck to us and proved to be the Delft, of 66 guns and 375 men. 

At 14.00 the Monmouth has been engaged with the Alkmaar for 50 minutes and has now 'hove all aback' to engage the Delft. 

Lowered down the cutter and sent the 1st lieutenant and men to take possession of her. Filled and shot to the before-mentioned ship, which had lost her main topmast and mizen mast, which after firing a few shot at, she bore up towards us and said she had struck. Soon after the Agincourt running athwart our hawse fired 2 shot into us.


Hoisted out another boat and sent an officer and men to take possession of her. Found her to be the Alkmaar, of 56 guns and 350 men. People employed repairing the damages received in the action. 

It's 15.00 and the Delft has struck, the fight recorded in the Monmouth's log;
'having exchanged three broadsides with him, observing he kept away, bore round up, ran athwart his hawse, raked him, and backing alongside him to leeward engaged him very close for 40 minutes, when he struck to us and proved to be the Delft, of 66 guns and 375 men.'
The Delft was no 66-gunner but she certainly fought like one!

At 7, made sail, the most disabled prize in tow. At the close of the battle, perceived that 8 sail of the line and a frigate had struck, among which was their Commander-in-Chief and their Vice-Admiral. During the action, perceived a Dutch line-of-battle ship on fire abaft. At 12, moderate breezes and cloudy; prize in tow.'

HMS Veteran
HMS Veteran was a Crown Class 64-gun ship of the line designed by another great British naval architect, Sir Edward Hunt, and launched at East Cowes on the 14th August 1787, one of his last ships, following his death earlier that year, that saw the new 74-gun ship go into the Ordinary having cost the exchequer £38,954 to complete after fitting out and coppering, just over £7.5 million in today's money.

Commissioned in March of 1793, Veteran was made ready to join Admiral Howe's Channel Fleet, before being ordered to join the Leeward Islands Squadron in November of that year sailing under the command of Captain Lewis Robinson, who would be killed in operations against the French island of Martinique.

She would complete her service in the Caribbean in 1796, returning to England to be paid off in the October of that year.

Her general characteristics were:
Tons burthen 1397 (bm)
Length of gundeck 160 feet 6 inches
Beam 44 feet, 6 inches
Depth of hold 19 feet, 5 inches


Her armament consisted of:
Gundeck: 26 x 24-pounder long guns
Upper gundeck: 26 x 18-pounders long guns
Quarterdeck: 10 x 9-pounder long guns, 6 x 18-pounder carronades
Forecastle: 2 x 9-pounder long guns, 2 x 24-pounder carronades


Veteran was returned to service in May of 1797 under the command of Captain Abraham Guyot, who would command the ship until the arrival of the man who would take her into action at the Battle of Camperdown, Captain George Gregory, where she would suffer 4 killed and 21 wounded.


Her role in the battle saw her cut across the Jupiter before turning in pursuit of the Dutch centre and following the Dutch defeat played an important role in the struggle to save the battered Delft, sending across a tow line to the stricken Dutch fourth-rate in rising seas, and later sending across the first rescue boat to bring off the Dutch wounded.

So finally to round up this post, the log of HMS Veteran and her record of the Battle of Camperdown.

Extracts from the log of HMS Veteran at the Battle of Camperdown.
EDWARD GROUNDWATER, Master. Official No. 3094.

'October 11th. P.M Standing along the enemy's line and engaging them as we came up. Moderate with drizzling rain. 45 minutes past noon, the Vice-Admiral and his division commenced the action with the rear of the enemy. Admiral made the following signals: 

at 12, to engage, the Belliqueux and Russell to port in succession; 
at 12.20, the Belliqueux to keep her station; 
at 1.10, Adamant to engage; 
10 minutes past 3, we made No. 68; Admiral Nos. 101, 10, 100, 171 and 7; at 4, Admiral Nos. 109,
64, and 171. 
10 minutes past 1, one of the enemy's ships of the line and a frigate struck. 


About 1 we stood into the enemy's line, firing our broadsides at such ships of the enemy as we could bring them to bear on. At 20 minutes past 1, perceived one of the enemy's ships on fire. 

The log report above records the movement of the Veteran seen here as she passed the Jupiter, flagship of Vice-Admiral Reyntjes

The action appeared now to be general. 24 minutes past, supposed the enemy's Vice-Admiral from his flag being down to have struck.


About 2, we was in close action with a ship of the line and a frigate. The former bore up, when we raked her till she struck and [she] proved to be the Gelijkheid.  Stood on firing at such ships as had not struck. Observed shortly after such ships as had not struck endeavouring to escape. 

By 14.00 the Veteran had moved to support the battle with the Dutch van, engaging the 68-gun Gelijkheid. Note the position of the Dutch 64-gun Hercules observed to have been on fire by the Veteran at 13.20

A section of a painting of the battle by Thomas Luny, showing the Dutch Hercules 64-guns on fire, an incident recorded in the log of HMS Veteran as she moved to support the fighting with the Dutch van.


At 45 minutes past 2, the action ceased. Sounded occasionally in 10 and 9 fathoms. Egmond-aan-zee, SE by S, 4 leagues. Answered our signal to stay by prizes in the NE. Lost in the action 3 men killed and 25 wounded, 3 guns disabled and our sails and rigging much cut. Carpenters employed in stopping shot holes, ship's company in knotting and splicing the rigging. 

At 15.00 Veteran and Belliqueux are shown alongside the now struck Gelijkheid with,  as the log of the Veteran records, a boarding party sent over at 19.00 to secure the prize, together with other men sent across to the Vrijheid.

At 7, sent an officer with a party of men on board the Gelijkheid, and a petty officer and 10 men on board the Vrijheid, the Admiral de Winter's ship. The Circe took the latter in tow. Made and shortened sail occasionally. Standing to join the fleet. 


At 8, Egmond E by S. The Admiral WNW 4 miles, Montagu, Circe, and two prizes in company. At n, saw 9 sail of the enemy's ships bearing SW by S 3 or 4 miles. Spoke the Montagu and Circe.'

I intend to finish building the strictly eight, but including the fourth-rate Adamant 50-guns, nine ships of the British Leeward Division with three of the 74-gunners next to feature, Montagu, Russell and Sir Richard Onslow's flagship, Monarch.

Next up, Mr Steve and I enjoyed a couple of days last month exploring some famous English Civil War and Medieval battle sites, together with a few Tolkienian landmarks in Oxford, and the Odyssey to the Antipodes continues as Carolyn and I headed further north into Queensland, Australia.

More anon
JJ