

Regular followers of the blog this year may have noticed a distinct lack of pictures of games played in the wargames room and other than a few pictures from my terrain building session in the first quarter of 2019, with my table covered in new terrain items being created on the covered table, the room has featured very little this year.
The main reason for this is that Chez JJ has been receiving some key home improvements that has meant my wargames table has been covered in all the boxes of figures and other associated wargaming materials that would have normally been stored in other parts of the house.
Thus with no table, no games have been played in the room for the best part of nine months and now with the build work completed in the week before Christmas Eve I was keen to recommission the room and table and get wargaming as normal.
 |
| The room is back in commission with the first game set up since a nine month layoff |
What to play on the table, once things were tidied up was simple as both Will and Tom were keen to get in a game over the Christmas break with time off from University studies and apprenticeships and both opting for a game of Augustus to Aurelian (AtoA) with the Romano-Dacian collection.
 |
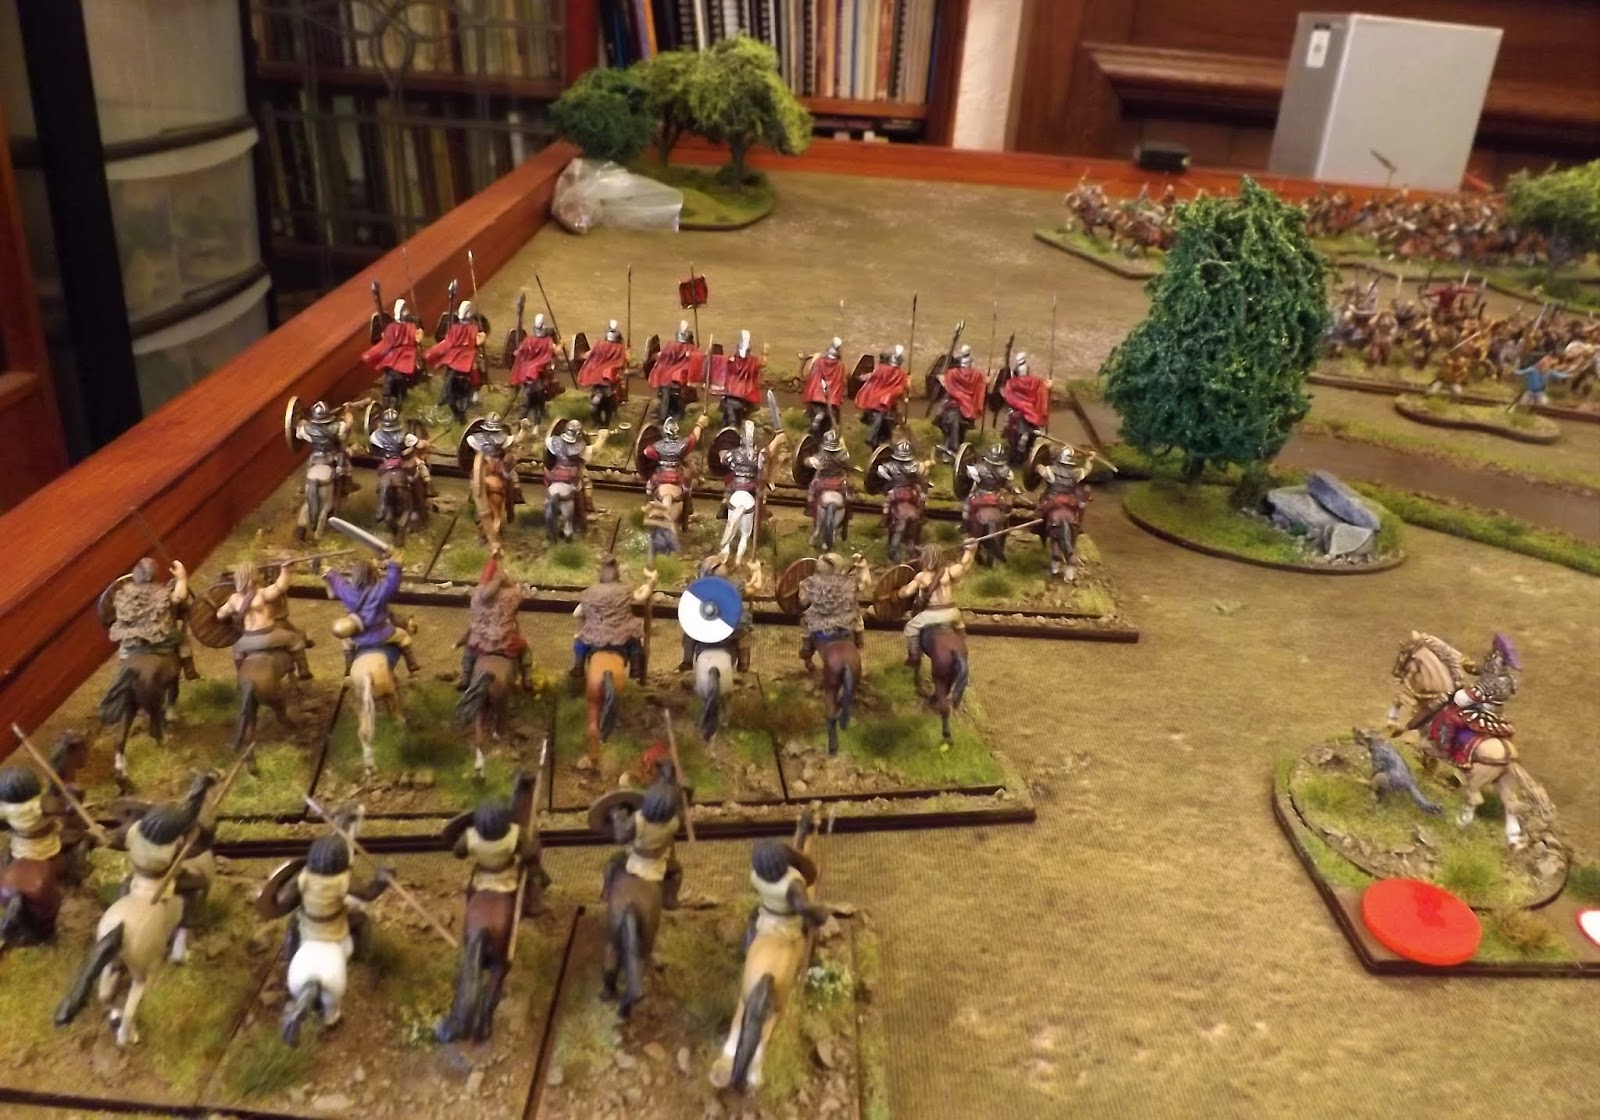
| The Romano-Dacians are back together with some of my new terrain created at the start of the year |
More troops have been added to the collection since Will and I played with them over Christmas last year, with a division of Sarmatian cavalry, four units, added to compliment the now eight Dacian warbands, plus three Leigionary cohorts and an Auxilliary cohort added to the Romans.
 |
| The Sarmatian cavalry got to grace the table for their first outing |

Thus I turned to the Hail Caesar Dacian War Campaign supplement and picked out the river crossing scenario and with adjustments made to the orders of battle together with the rules to better suit AtoA, I laid out the table as seen with the river dividing the opposing armies, each of three divisions, two infantry and one cavalry.
 |
| The Dacians are bolstered by the addition of three more warbands |
To keep things interesting and uncertain, something AtoA offers in spades with its chit draw activation system, I also put out the unit cards for the three varieties of 'Untried', 'Experienced' and 'Hardened' options of units, as se in the first pictures, with the commanders dicing to see what kind of units they had in their army before play, keeping the result secret from the enemy.
A D10 was rolled for each unit with 1-2 = Untried, 3-9 = Experienced and 0 + Hardened.
In addition I allowed the Dacians to field two of the eight warbands as heavily falx armed versions and one of the cataphract units as 'Noble'.
For the Romans the Praetorian Guard cavalry would only reveal its quality to both sides on first contact with the enemy, so leaving the Romans unsure as to how good they really were.
 |
| And the Romans are fielding four more Legionary and Auxiliaru cohorts |
The dicing for quality left the two orders of battle looking thus;
DACIANS
1 x Falx Warband - Hardened
1 x Falx Warband - Untried
6 x Warbands - 1 x Hardened, 1 x Untried, 4 x Experienced
1 x Archers - Hardened
1 x Archers - Experienced
1 x Slingers - Untried
1 x Javelins Experienced
SARMATIANS
1 x Noble Cataphract - Experienced
1 x Cataphract - Experienced
1 x Horse Archers - Experienced
1 x Light Cavalry - Untried
 |
| Oh and I nearly forgot the German Auxiliary cavalry getting their first time out on the table |
Romans
4 x Legionary Cohorts - Experienced
6 x Auxiliary Cohorts - 1 x Hardened, 1 x Untried, 4 x Experienced
1 x Auxiliary Archer Cohort - Experienced
1 x Slingers - Experienced
1 x Slingers - Untried
1 x Scorpio - Experienced
1 x Praetorian Guard Cavalry - Pseudo Guard (Good but not as good as they think they are)
1 x Auxiliary Ala - Experienced
1 x Auxiliary German Light Ala - Experienced
1 x Numidian Light Ala - Experienced
 |
| Two divisions, equating to eight Dacian warbands with supporting light troops make a formidable showing |
The Dacians would set up first anywhere along the length of the river in their half of the table, then the Romans would set up within six inches of their table edge.
The Romans had 24 points of time to get six formed infantry or cavalry units, not skirmish infantry or cavalry, across onto the enemy side of the river at game end.
The Points system works by further varying the time the game will end by rolling a D6 at the end of a phase of play determined by two Meridiatio chits appearing, with the score deducted from the time points.
Thus the game could end anytime between four and twenty four phases of play, with each phase variable depending on how many units activated before the Meridiatio chits ended it.
In the end we played nine phases with some phases only wiping off one point and two phases costing five points.
 |
| The Roman line glowers at the enemy as the table awaits the commanders to take the field on the morrow |
The final variable to our game was to include consulting the favour, or not, of the respective gods for the upcoming clash, by rolling a D6 with 1 indicating a very unfavourable set of goat entrails, whilst a 6 showed the finest looking goat liver this side of the Danubius.
Tom managed to roll a 1 twice, once outside of the dice tower and once in it so the Romans were penalised with a '-1' on all their reaction tests until they successfully passed one and reassured the rest of the army that Jupiter was only messing with their heads.
 |
| All set and ready to go |
For our day of family fun we were joined by a wargaming 'Newbie', and classics scholar, Ben, who fancied joining Will in running out the forces of the Dacian King Decebalus and he and Will set up first with Tom adjusting his set up afterwards and opting to make a dash for the river with his cavalry, on seeing the Dacians hedge their bets as to which flank the Romans might go for, by deploying the Sarmatians in their rear-centre.
 |
| Our commanders for the day, Will (left) and Ben (centre) commanding the Dacians and Tom (right) commanding the Romans. The Roman cavalry nearest to camera on the Roman left with the Sarmatian cavalry in the rear-centre of the Dacian lines opposite. |
 |
| With the fist moves played and Tom has made a bold advance on his left with the Roman cavalry advancing rapidly to get across the river as the Roman infantry division to their right closes up on the first bend in the river to be met by four Dacian warbands. The Sarmatian cavalry is galloping across the rear to contest the Roman cavalry advance. |
The terrain was open on either side of the river with the few trees simply for decoration, with the principle terrain feature, the river, fordable across its length and offering a defender on its banks a positive combat modifier when counter-charging a struggling foe attempting to come across.
 |
| The light troops on both sides are the first to engage the enemy |
Will and Ben were keen to get as close to the river as possible to ensure they had a chance of using its defensive qualities, but, not knowing exactly where the Romans would head for, set up centrally with the two divisions of warbands, keeping the more mobile cavalry in the central reserve ready to move out once they could see where the enemy were heading.
One potential problem when trying to hold a position with warbands is their propensity to go impetuous once Romans get within charge range and certainly when getting shot at by skirmishers, so Tom was aiming to try and provoke such a reaction where possible.
 |
| Massed ranks of Roman cavalry prepare to cross the river |
The Romans had the advantage of setting up to take advantage, if they could, of the Dacian set up but with a limited time to get across would have to commit to their plan or risk running out of time.
As it proved this was the key factor that influenced the result.
 |
| The small red casualty die indicates the first hits are starting to occur |
 |
| The Roman Auxiliary Light Infantry Cohort armed with composite bows move up ready to support their forward cohorts |
Tom immediately identified the Roman left as offering the best chance of getting units across quickly, looking to march move (a double move of sixteen inches and not moving withing enemy charge range, ten to twelve inches) the cavalry to the extreme flank and thus get two of the six formed units across without having to fight first.
 |
| With their pilum marker still in play these legionaries still carry a volley of their formidable melee weapons |
Following them up in march move were the first division of Roman cohorts with the hardened auxiliary cohort forming a combined unit with the archer cohort shooting overhead, smashing the warband sent to contest its crossing, soon to be followed by two legionary cohorts driving back the warbands opposing them.
 |
| Decebalus with his Carpe Diem chit still to hand watches the early Roman moves |
 |
| The Dacian left moves up to the river bank with the Roman skirmishers content in trying to provoke a barbarian charge across it into the waiting cohorts |
However this was the high point of the Roman advance as their cavalry were pounced on with accurate javelin and archery from the Sarmatian light cavalry which allowed the cataphracts to follow up and smash both the Praetorian and Auxiliary alas that were forced to fight individually due to the limited deployment space on the flank.
With two of the Roman formed units destroyed and just three over the river as the game entered the second half, Tom tried to get other units on to the river as quickly as possible to give him a chance of grabbing back the initiative.
 |
| Dacian slingers attempt to soften up the legionary lines as Trajan moves up to encourage the troops |
 |
| Roman slingers start to cause casualties on the Dacian defenders |
 |
| The Praetorian Guard lead the cavalry advance |
 |
| A mass of Dacians resist the goading legionaries and hold their line on the river bank |
The Numidian and German light cavalry fell back to hold the river line they had so boldly advanced over, as one unit of cataphracts turned to support the hard pressed warbands.
 |
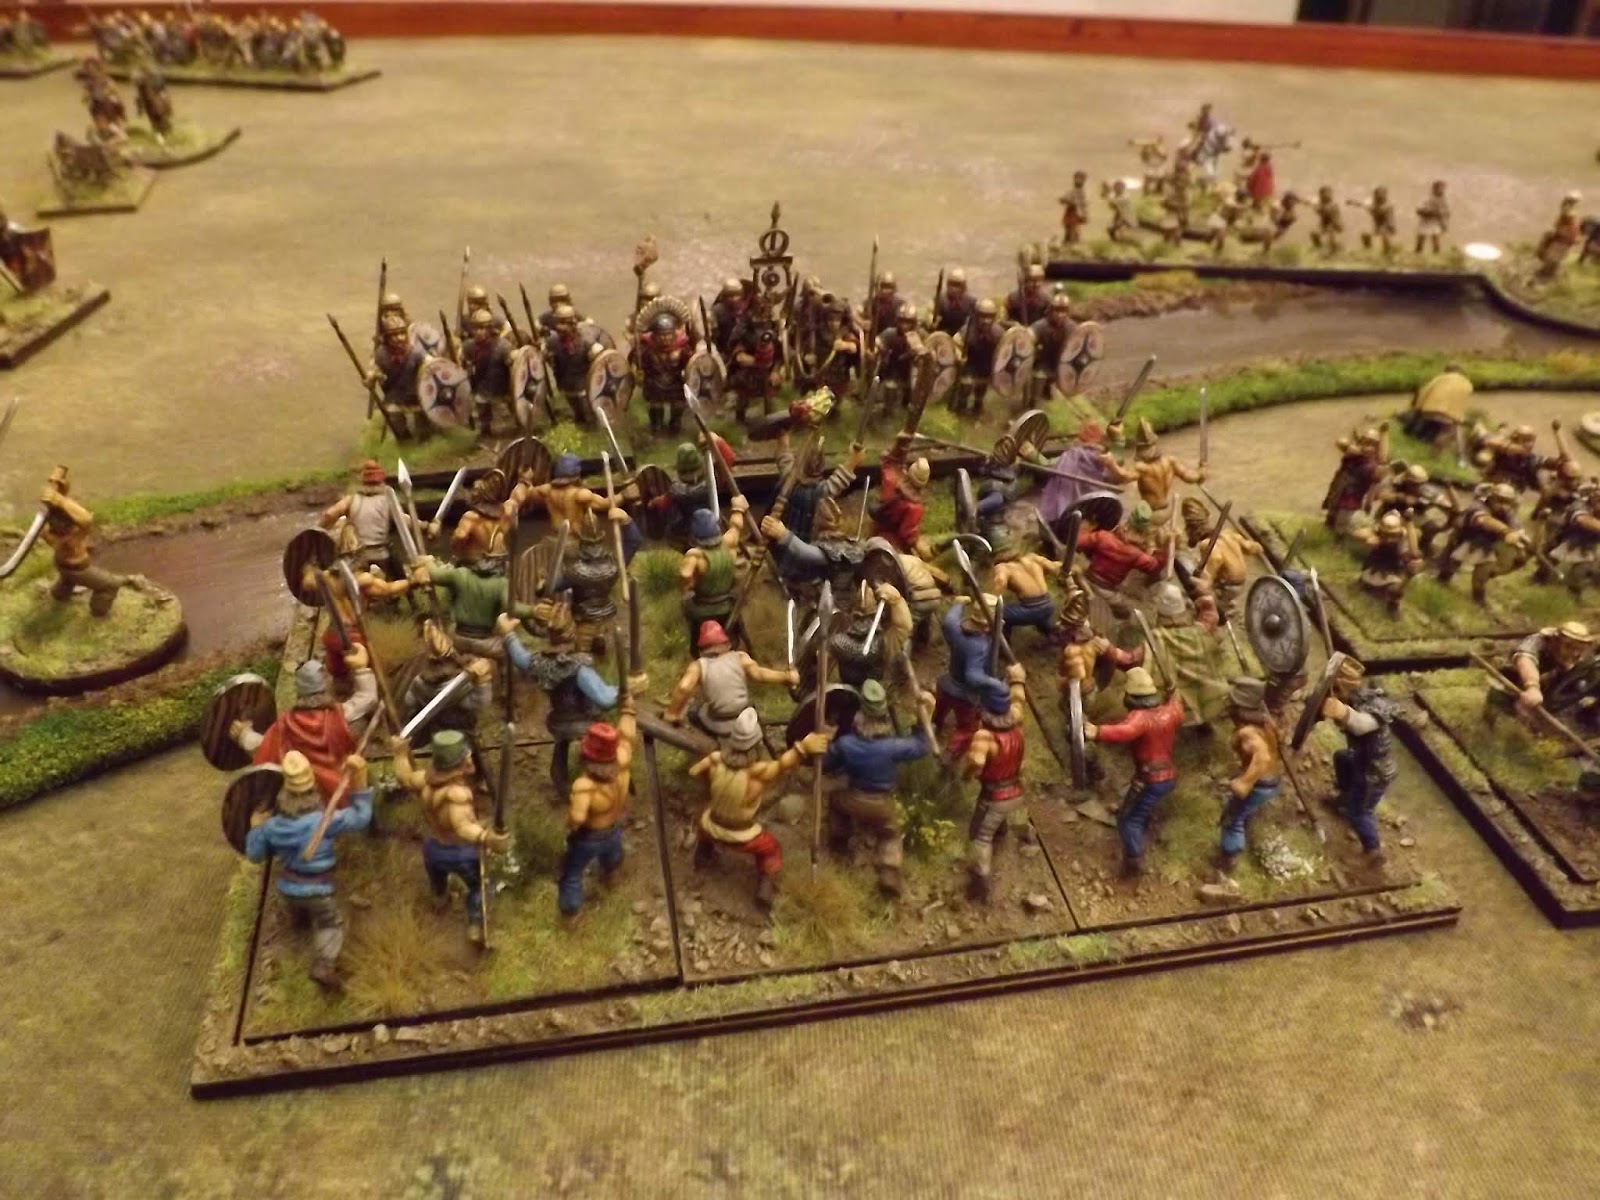
| The climax of the battle - The Romans in the centre have forced a crossing with two auxiliary cohorts and the legionaries to their left have just pushed the next warband off the river with a volley of pila and close in gladius work. However the Roman cavalry have been crushed by the Sarmatians with the German and Numidian light cavalry falling back behind the river to protect the flank and rear of their infantry. Casualties litter the field where the main fighting has occurred. |
 |
| The Roman light cavalry struggle to hold back their Sarmatian opposites |
 |
| The Roman auxiliaries closely supported in a combined formation by the archer cohort are victorious with Trajan on hand to witness the events |
Turning to the second Roman division which had struggled to get forward without recourse to using Trajan to get them moving, as their commanders chit seemed to refuse to come out in normal play, they tramped towards the river only to find four fresh warbands glowering from the other bank.
 |
| The Dacian warband has managed to rally back after being driven off, but the Romans are pressing forward looking to expand their crossing |
Not taking the bait of being goaded into charging and with time running out Tom sent a unit of auxiliary infantry over at the charge, lobbing javelin as they went and causing a couple of casualties.
However only managing to cause one hit in the hand to hand combat that followed, the Roman unit recoiled as it was met by the hardened falx warband that clouted it with four hits and forced it back from whence it had come.
 |
| Meanwhile of the Roman right the refused flank has now closed on the river, but perhaps a little too slowly |
 |
| The Dacians mass to oppose a Roman advance on their left flank as the fighting reaches a crescendo further up river |
 |
| The Dacian archers are running and the warband to their left have just rallied but are badly disordered after losing the fight on the river |
 |
| The victorious Sarmatian cataphracts come over to help the Dacian infantry in their struggle with the legionaries, weighed down with the heads of Praetorian guardsmen strapped to their bridles |
 |
| The Romans make a last final push to try and snatch a victory as the game threatens to end before they can seal a win |
 |
| The Dacian left is comparatively tranquil as the focus falls elsewhere in the closing stages |
Suddenly the last Meridiatio chit had been drawn as the roll of the dice declared the Romans had run out of time and with just three units across on the other side the game ended in favour of the Dacians.
 |
| An Auxiliary cohort charges towards the opposite bank only to be met by a 'Hardened' Falx wielding warband that smashes it in the first round of combat |
On reflection Tom decided he would have dispensed with the Duplex Acies deployment he opted for and would have closed up to bring more of his infantry closer to one point of attack and possibly to have used his advantage in Carpe Diem chits to have got both his divisions of infantry up more quickly.
That said the first attacks by the Romans were extremely effective and as usual the pila attacks hurt warbands .
The combined auxiliary cohorts were also very effective with the overhead shooting a useful tactic on the attack.
 |
| The legionaries have more success driving back their opposite numbers, but its not enough! |
 |
| The Sarmatians mop up on the scene of their ambush giving no mercy to wounded Romans trying to get back to the river |
AtoA gave a great game with lots of unpredictability that combined with the variable length phases and turns added pressure to the commanders to make decisions and back them and with only one Carpe Diem chit for the Dacians and two for the Romans meant that the commanders were very reluctant to throw that control away frivolously.
A good game and a fun scenario to end the year on and it was nice to have the table back in action.
Thanks to Tom, Will and Ben for a very fun day
Your game table and room are wonderful; I always love seeing and reading about your games.
ReplyDeleteThank you that's great to hear and to be able to share.
DeleteAll the best
JJ
This post pretty much sums up life goals for me. Lovely room, fantastic table and armies, and the next generation in play. Wonderful. Going to have to go back through some of your earlier posts. I'm starting up 28mm ancients (only done smaller scales to date), and am interested in your basing system - looks great on the table.
ReplyDeleteAs a follow up - how big are your bases?
ReplyDeleteYes, I have always wanted to give back to a hobby that I have really enjoyed over the years and to get others involved and finding the fun in it is all part of the experience, to have both my sons dabbling and sharing the experience with friends is an added bonus.
DeleteAll the information about my basing for AtoA is contained in three PDFs which you will find in the right hand column under My Resources and Downloads entitled 'JJ's Augustus to Aurelian Unit Cards'.
A lovely game to re-open the games room!
ReplyDeleteThanks Steve, yes indeed, we had a great day with lots of banter and laughs.
DeleteJJ
Great work as usual JJ.
ReplyDeleteRegards
Peter
Thank you Peter, glad you enjoyed the read.
DeleteJJ
Very pretty JJ.
ReplyDeleteI always like to see Sarmatian cataphracts on the table, as I feel they get little love amongst gamers these days.
Vince
Nice to see the table back up and running again. A splendid looking game, will check out your resources / downloads section now.
ReplyDeleteAll the best for 2020.
ReplyDelete