

In the previous two posts covering our stay in Darwin in February 2023, I looked at the town itself and its history followed by the last post that looked at the local area and natural history of Darwin and the Northern Territories, with a link below where you can check those posts out if interested.
 |
| JJ's on Tour - Jumping Crocodiles, Northern Territory, Australia |
This series of posts is journaling Carolyn's and my four month tour of the Pacific, that started in Vancouver, British Columbia, back in October 2022, arriving in Melbourne in December 2022 ahead of New Year, having come via Hawaii, Fiji and New Zealand's North and South Islands in the previous two and half months of traveling.
.jpg) |
| Our route so far on our travels through Australia, starting down in Melbourne just before New Year 2023. Map courtesy of https://www.freeworldmaps.net/australia/ |
As mentioned in my look at Darwin, the town was a key strategic outpost right from its establishment in the mid 19th century as a major link in the ports and harbours of the British Empire and its Far East possessions, that saw Singapore as the principle military and naval base, further emphasised in post WWI plans to upgrade its facilities for a Far East Fleet, that never in the end materialised with the cuts in defence spending that followed the First World War, but that also included plans to develop Darwin as a refuelling base for RN warships operating in the area.
.jpg) |
| Darwin. NT. 19th August 1942. A march past of Australian troops at a forward battle station. |
This strategic location became further emphasised when Japan entered the Second World War in December 1941, quickly taking British, Dutch and American bases in the Indies and Philippines and bringing Japanese forces within striking distance from Australia when they landed in Java and Papua New Guinea and turning the Timor Sea into another English Channel with Japanese aircraft able to make regular attacks on the Australian mainland and with Japanese troops threatening to move over the Owen Stanley Mountains and take Port Moresby to bring those air bases and the treat of invasion even closer.
Post War, Darwin and the Northern Territory area, known colloquially as 'Up-Top', is still front and centre of Australia's defence, principally against drugs and people smuggling but also with a part to play in the Super Power tensions that have come to characterise the early twenty-first century in the Pacific region as a whole, and Australia's key role as a major security partner of the United States.
 |
| The Darwin Town map illustrating the two museums visited in relation to our hotel down on the Wharf Precinct. |
Thus it was that I thought I might get a more quintessentially Australian perspective on the military history of the area by visiting the two key museums in town focusing specifically on the military and aviation aspects that would compliment the remaining signs of that history to be seen at key locations around the town, already highlighted in the previous two posts.
| Darwin Aviation Museum |
The Darwin Aviation Museum is host to nineteen civil and military aircraft, that includes among others a B25 Mitchell, replica Spitfire VIII and the mighty B52, along with a display of twenty-one aero engines and crash site relics.
.jpg)
 |
| The old water tower/control tower relocated to the museum site from RAAF Darwin. |
The museum was first opened to the public in 1988, and in the late 1980s, the Society negotiated with the United States Air Force (USAF) and the Northern Territory Government to obtain a surplus USAF Boeing B-52 Stratofortress bomber and to build a museum to house and display the aircraft, and in June 1990, the new Darwin Aviation Museum opened.

 |
| RAAF, Darwin, May 1941. Visit by Dutch Glen Martins. The old water tower/control tower nicely portrayed in the background can be compared to its look in 2023 above. |
Water supply has always been a challenge in the hot dry climate of Darwin as amply demonstrated today by the array of large water pipes above ground tracking the Stuart Highway, delivering water to the town from the interior countryside; and with the construction of the RAAF base in June 1940, alongside other previous military base constructions, the water tower at the RAAF base was one of three constructed around the town to help relieve the strain on the town's water supply with its height providing an equally useful platform for the airfield control tower.

Having spent time walking around Darwin to get a feel for its history and the lie of the land, together with a bit of pre-reading, I was keen to see how the museum captured the wartime events, particularly with its focus on wreck recovery from that period and as I discovered other items related to the Japanese bombing attacks on the town.
 |
| Darwin Post Office and surrounding buildings display the results of Japanese bombing on the 19th February 1942. |
The pictures above and below show items recovered relating to the bombing of Darwin, including fragments and tail fins from Japanese 130lb bombs dropped during air raids to fragments of masonry and a post box front form the shattered ruins of the Post Office

 |
| Merchant Vessel (MV) Don Isidro - Australian War Memorial |
As defending forces became cut off from supply by the Japanese blockade Don Isidro was one of eight ships, of which only three were successful, known to have made an attempt to run the blockade, and in that attempt, under her captain, Rafael J. Cisneros, Don Isidro became involved in the 19th February Japanese attack on Darwin, Australia where, though not in the port, she was strafed, bombed and left off Bathurst Island burning with all lifeboats destroyed.
 |
| A porthole assembly salvaged from the wreck of the M.V. Don Isidro |
The captain attempted to make land when she grounded about three miles off Melville Island to which survivors swam, and of the sixty-seven crew and sixteen soldiers aboard, eleven of the crew and one soldier were killed or missing; with the survivors rescued by HMAS Warrnambool and taken to Darwin, for treatment at the hospital.

Along with exhibits from the 19th February 1942 were interpretation boards together with period maps outlining the course of the ensuing air campaign against the town from the arrival of the 33rd Pursuit Squadron, United States Army Airforce (USAAF) under the command of Major Floyd Pell, which arrived in Darwin on the 15th of February 1942 with only ten of their original 24 P-40 aircraft that had flown up from Amberley near Brisbane.
 |
| This contemporary Fighter Guide Map illustrates the position of the principle fighter strips, Batchelor, Strauss, Livingstone and RAAF Darwin together with the Bomber strip at Fenton and other constructions mentioned in the post. |
On the 19th of February at 09.15 the flight set off from Darwin to join ABDA forces defending Java, but thirty minutes into their flight they were forced to turn back due to adverse weather and on arrival at Darwin with four aircraft on the ground, including Pell's, whilst the remainder patrolled above, the airborne flight was attacked at 10.05 by nine 'Zero's' over Darwin.

In the resulting air battle Lieutenants Jack Peres and Elton Perry were killed, Lieutenant Bill Walker was wounded, but managed to land, while Lieutenant Max Wiecks bailed out and parachuted to safety, leaving Lieutenant Robert Oestriecher unscathed and able to shoot down two 'Val' dive bombers.
 |
| This aircraft may be the only American P-40 Warhawk to have survived, after the first Japanese air raid on Darwin on 19th February 1942, as the attacking Japanese managed to destroy nine of the ten P-40s of the 33rd (Provisional) Pursuit Group, which was based at Darwin on the day. The sole surviving aircraft piloted by Lieutenant Robert (Bob) Oestreicher claimed two of the four Japanese aircraft shot down during the raid. |
On entering the main aircraft hall, the first exhibition I headed for was the aircraft wreck section with displays of aircraft remains recovered over the years relating to the air campaign captured in the previous gallery.
 |
| The cut out P-40 above the information panels highlights the work of the historical wreck recovery teams at the museum over the preceding years but I couldn't help thinking that the museum needs to acquire an actual or replica P-40, suitably adorned, to better memorialise the heroic air battle fought in the early years of WWII by the pilots remembered in the wrecks on display. |
A squadron of P-40Es from the USAAF 33rd Pursuit Squadron (Provisional) was in Darwin at the time of the first Japanese air attack on the morning of 19th February 1942, only 74 days after the attack on Pearl Harbour, with the same carriers in that attack launching 188 aircraft, comprising 36 A6M2 'Zero' fighters, 36 D3A1 'Val dive bombers and 81 B5N2 'Kate' level bombers against Darwin.

The US pilots had little experience on P-40's and none had seen combat, and whilst putting up a valiant defence during the raid, they were outnumbered and outclassed by the Japanese pilots and their aircraft, that left nine of the ten US aircraft in the air destroyed and two others destroyed on the ground, together with four pilots, including the CO, Major Pell, killed and four others wounded.

A further raid by 54 land-based bombers followed at noon, with no allied fighters available to intercept them.
 |
| Tail section of Lt John D. Sauber's P-40E - Note the remains of European style camouflage seen here and on the wing section pictured below, suggesting an aircraft handed over to the squadron likely previously destined for a British or Dutch squadron in the Far East Asia area. |
Lieutenant Jack Peres, was flying with the 33rd on the 19th February and was No.1 man in 'B' Flight, leading the first two plane element when he was shot down, with Lt. Max Wiecks reporting his loss:
' I thought Peres had engine trouble and was heading back to the airfield . . . I tried to catch up . . . to fill the gap left by Peres. Suddenly below me and to the right I saw Peres being followed . . . as I turned I saw the Japanese fire his cannon. I saw shells hitting Peres, and then his plane slowly rolled over and down.'
 |
| Colt/Browning .50 cal machine gun recovered from the wreckage of Lt. George Preddy's P-40, which resulted from his aircraft having a mid air collision with another P-40 from his squadron, the 9th of 49th Fighter Group - see below. |
In General Order No.36 of the 10th August 1942, the Commendation for the award of the Silver Star to Lieutenant Peres stated;
'When the approaching enemy consisting of approximately sixty high-level bombers, thirty-six fighters and eighteen dive-bombers was intercepted, Lieutenant Peres, in spite of the tremendous odds, courageously attacked the enemy formation . . . until he lost his life when his airplane was shot down.'
 |
| The seat stand assembly recovered from Second Lieutenant Jack Peres' P-40, in commemoration and gratitude for the pilots that gave their lives in defence of Darwin and the greater cause. |
In 1989 parts of the remaining wreckage seen above were recovered and put on display here in the museum, alongside other P-40 crash site recoveries.


The 49th Pursuit Group was sent overseas to Australia in January 1942 and was assigned to the Fifth Air Force. They moved to Darwin in April 1942 and was redesignated 49th Fighter Group in May.
The group was equipped with P-40's Curtiss P-40 Warhawk aircraft in Australia and after a brief period of training, provided air defence for the Northern Territory, with the 9th Fighter Squadron stationed at Livingstone, 8th Fighter Squadron stationed at Strauss Airfield and the 7th Fighter Squadron stationed at Batchelor, most of these operating strips simply scrapes alongside the Stuart Highway.


As the Japanese advanced in the South West Pacific during early 1942, the RAAF hurriedly established three fighter units—Nos. 75, 76 and 77 Squadrons—equipped with Curtiss P-40E Kittyhawks recently delivered from the United States.

Squadron Leader Dick Cresswell assumed command on the 20th April 1942, following its move from Perth, Western Australia, where the squadron formed in March, transferring to Batchelor Airfield near Darwin, in August, the first RAAF fighter unit to be stationed in the area.


Toyoshima took part of the February 19th, 1942, Japanese air-raid on Darwin, and his Zero, tail code BII-124, was launched from Hiryū which contributed 18 B5Ns, 18 D3As, and nine Zeros to the attack, which were joined by squadrons from the other carriers.

After an hour over Darwin, and while returning, he ran out of fuel due to bullet damage to his fuel tank, and crash-landed on Melville Island suffering superficial facial injuries. He then strove to move far away from the plane, understanding that the aircraft and a captured pilot would aid Allied Military Intelligence, as before Toyoshima's crash, only nine Zeros had been shot down and the badly damaged wrecks were of little value.


 |
| A line up of four U.S. Army Air Force Curtiss P-40E Warhawk aircraft of the 8th Pursuit Squadron, 49th Pursuit Group at Darwin, Northern Territories (Australia) on 19 June 1942. The aircraft closest to the camera (No.51 "L Ace") was flown by Lieutenant James Bruce Morehead who shot down seven Japanese aircraft while flying out of Darwin. Captain W.J. Hennon, who has shot down at least five Japanese aircraft, is sitting in the cockpit of P-40 No.36. Note the whitened former red circle of the US national insignia - Australian War Memorial |

Over its eight months of operations, the 49th Fighter Group intercepted over twenty raids, claiming seventy enemy aircraft. losing eight pilots in combat and a total of twenty-five personnel, many in accidents, and following the re-equipping of the RAAF, and Allied successes in New Guinea, the 49th FG were moved to Port Moresby in August 1942.
 |
| Captain Jim Harmond congratulates Lieutenant Jim Morehead (right) on his three kills on ANZAC Day 25th April 1942. |
A number of aces flew with the 49th over Darwin that included Lt. Andrew J. Reynolds, Lt. James Morehead, Capt. George Kiser, Lt. John D. Landers, Lt. Robert H. Vaught, Lt. LB Jack Donalson and Capt. Bill Hennon, some being veterans of the Philippines Campaign with their experience helping to forge the basis for becoming the highest scoring group in the Pacific Campaign during World War II.
 |
| Lieutenant Clyde Burnett of the 8th Squadron, 49th FG in his P-40E prior to a mission |
The 49th Fighter Group was awarded a Distinguished Unit Citation for engaging the enemy in frequent and intense aerial combat while operating with limited material and facilities between March and August 1942.
 |
| Instrument panel from a P-40E of the 8th Squadron, 49th Fighter Group, USAAF, which was forced landed by Lt. James Martin on the 27th April 1942 following aerial combat that resulted in a damaged engine. |

On the 12th July 1942, four 9th Squadron P-40's took off from Livingstone strip to practice combat intercepts, the pilots being Lt LB. Jack Donalson, a veteran of the Philippines and Java Campaigns who led the flight with Lts. Dick Taylor, George Preddy and John S. Sauber.

While flying over the Manton Dam area, Sauber dived on Preddy's aircraft in a mock attack, a manoeuvre that caused Sauber to possibly misjudge the distance between the two aircraft, resulting in a mid-air collision in which Sauber was killed and Preddy managed to bail out with a severely injured leg.
 |
| Salvaged from the crash site in 2001, the wing of John D. Sauber's P-40-E, No. 87 Serial No. 41-35943 |
Preddy would recover to go on and become a leading ace credited with 26.83 kills, before losing his life flying P-51s over Belgium, tragically shot down by American anti-aircraft fire on Christmas Day 1944.


Until this time, air defence over Darwin had been provided by the P-40s flown by the USAAF's 49th Fighter Group, and 77 Squadron moved to another of Darwin's satellite airfields, Livingstone, in September.
.jpg) |
| Gun camera picture of a G4M 'Betty' bomber over Darwin. |
Among its pilots was John Gorton, future Prime Minister of Australia, and No. 77 Squadron saw action defending Darwin from Japanese air raids and claiming its first aerial victory just after 5 a.m. on the 23rd November 1942, when Cresswell destroyed a Mitsubishi "Betty" bomber, making it the first "kill" for an Australian squadron over the mainland, and the first night victory over Australia.

Petty Officer Hajime Toyoshima was the Japanese pilot of the first A6M Zero to be recovered relatively intact on Allied territory (after those recovered after the attack on Pearl Harbour) when he crash landed on Melville Island, Northern Territory, Australia.
 |
| Squadron Leader Dick Cresswell's nose art for his P-40E Kittyhawk A29-113 |
 |
| Between the Fighter Guide Map (left) and the information panel (right) is a section of wing from an Aichi D3A 'Val' dive bomber shot down over Darwin on the 19th February 1942, with two of the four 'Vals' shot down that day credited to Lieutenant Robert Oestreicher of the 33rd Pursuit Squadron USAAF. |


Toyoshima was the first Japanese prisoner of war to be captured in Australia.
 |
| Sergeant Hajime Toyoshima in the custody of Sergeant Leslie J. Powell, 23rd Field Company Royal Australian Engineers. The pistol that Powell is holding is Toyoshima's service pistol. |
In August 1944, while a POW in rural New South Wales, Toyoshima was one of the instigators of the Cowra breakout, sounding a bugle to signal the commencement of the escape, and died during the fight.


 |
| The jettisonable fuel tank seen above in front of the wing section, was externally mounted to the underside of the Mitsubishi Type O A6M2 'Zero' fuselage and had a capacity of 73 gallons and gave an increased range from 1,150 miles to 1,900 miles, usually being released before the aircraft entered combat, with this particular tank recovered along with remains of the Zero on display. |
Some components of the aircraft were recovered for intelligence purposes in 1942, however the remainder stayed at the crash site until it was donated to the Aviation Historical Society of the Northern Territory for display.
| Sergeant W. A. Beatty RAAF, recorded on the 7th March 1942; 'The aircraft . . . is Mitsubishi Type 'O' Fighter (Navy) . . . found in a damaged condition after striking trees in attempting a forced landing on a clearing approximately North of the centre of Melville Island . . . aircraft appears to be very well made and fitted up . . . there were 17 shells left in each cannon.' |
Matthias Ulungura recorded his encountering of the Japanese pilot;
'I caught him at, might be, tea time. Alright I see that Jap . . . through the bushes . . . and then I sneak up quick and wait behind a tree. He walk close past me. I walked after him and grab his wrist near gun. He got proper big fright. I take revolver . . . I say "Stick 'em up, right up, two hands . . ." Then I call Barney, Paddy the Liar and Three Feller and told them to take clothes off pilot but to leave underpants on him . . . I took from him a camera, map and blue cloth . . . Morning time we start to take him to the mission.'

Sergeant Les Powell, pictured above recorded his meeting the prisoner;
'I . . . disarmed him of a .32 automatic which had seven bullets in the magazine (found out later). We took him round to our quarters . . . fixed his wounds . . . fed him and removed his boots and coveralls. A message was sent to Darwin informing them and requesting an aircraft which came two days later . . . ant night time we used to sit around the table interrogating him in Pidgin English. Quite a nice fellow.'


 |
| A rather bent 20 mm (0.787 in) Type 99-1 Mk.3 cannon of which the Zero carried one in each wing, with 60 rounds per gun. |
The premiere high altitude reconnaissance plane of the Japanese Army Air Force was the Mitsubishi Ki46-II or as designated by the IJAAF, the Type 100, Command Reconnaissance Aircraft, Allied code name 'Dinah'.
 |
| Mitsubishi Ki46-II 'Dinah' |
Dinah's employed over the Northern Territory and Western Australia were based at Lautem on Portuguese East Timor's north coast from late October 1942 and were part of the 70th Dokuritsu Dai Shirjugo Chutai (Direct Command Squadron - DCS).
 |
| A Dinah rear observer holding a Type-100 hand-held aerial reconnaissance camera |
Initially the Dinah enjoyed almost complete freedom from interception by Allied fighters, but with the introduction of ground controlled radar interceptions, USAAF P-38-F's in the Pacific and the Spitfire V in defence of Darwin and Western Australia, the Ki-46 losses began to increase.

Nine Ki-46's were shot down by Spitfires over the Northern Territories and one over Truscott, Western Australia on the 20th July 1944, and components from Dinah's #2237, #2250 and #2414, both shot down in the Darwin area are displayed in the museum.

Dinah #2414 was flown by the Commanding Officer of the 70th DCS, Captain Shunji Sasaki and was shot down by Squadron Leader Ken 'Skeeter' James CO of 457 Squadron RAAF on the 18th July 1943 near Point Stuart east of Darwin.

Dinah #2250 was shot down on the 17th August 1943 by Flight Lieutenant Peter Watson and crashed inland of Channel Point, and James shot down his second Dinah #2237 over Fenton; with that day particularly disastrous for the Japanese who lost four of the five Dinah's sent to photograph the Darwin, Fenton and Coomalie areas.

Intercepts by Spitfire V's of the RAF and RAAF squadrons were normally coordinated by RAAF ground control radar which gave the Allies early warning and the ability to climb to intercept the normally solitary Dinah's as they rarely had fighter escort, relying instead on their speed and height to avoid interception.
 |
| Ki46-III 'Dinah' pictured at RAF Cosford back in 2022 JJ's Wargames - Royal Air Force Museum, Midlands, RAF Cosford. |
The Mitsubishi G4M was a twin-engine, land-based medium bomber formerly manufactured by the Mitsubishi Aircraft Company, a part of Mitsubishi Heavy Industries, and operated by the Imperial Japanese Navy from 1940 to 1945. Its official designation was Mitsubishi Navy Type 1 attack bomber and was commonly referred to by Japanese Navy pilots as Hamaki, "cigar", lit. "leaf roll" due to the cylindrical shape of its fuselage and its tendency to ignite after a hit. The Allied reporting name was "Betty".

Designed to a strict specification to succeed the Mitsubishi G3M already in service, the G4M boasted very good performance and excellent range and was considered the best land-based naval bomber at the time. This was achieved by its structural lightness and an almost total lack of protection for the crew, with no armour plating or self-sealing fuel tanks. The G4M was officially adopted on 2 April 1941 but the aforementioned problems would prove to be a severe drawback, often suffering heavy losses, with Allied fighter pilots nicknaming the G4M "The Flying Lighter" as it was extremely prone to ignition after a few hits. It was not until later variants of the G4M2 and G4M3 that self-sealing fuel tanks, armour protection for the crew and better defensive armament was installed.
Nevertheless, the G4M became the Navy's primary land-based bomber, and was the most widely produced and most famous bomber operated by the Japanese during World War II, serving in nearly all battles during the Pacific War.
Nevertheless, the G4M became the Navy's primary land-based bomber, and was the most widely produced and most famous bomber operated by the Japanese during World War II, serving in nearly all battles during the Pacific War.
The remains of the aircraft seen below are of G4M1 Betty T-361 of the Takao Kokutai, part of the 23rd Koku Sentai (Naval Air Flotilla), a veteran unit by the time it appeared in the skies over Northern Australia, having had considerable success during the Philippines, and Netherlands East Indies campaigns.

Between the 14th of March 1942 and the 23rd of November 1943 the unit undertook fifty-six raids on targets in and around the Darwin area, and this aircraft was one of a force of six Betty bombers that took off from Koepang on the 4th of April 1942 on a mission to bomb RAF Darwin, each armed with six 550 pound and thirty-six 130 pound bombs, and escorted by six Zeros.
 |
| Six Betty bombers took off from Koepang on the 4th of April 1942 on a mission to bomb RAF Darwin |
At 13.53 hours the group bombed RAAF Darwin in three two-plane elements flying in a V formation, whilst being intercepted by anti-aircraft fire and USAAF P40-E's of the 9th Squadron, 49th Pursuit Group which resulted in the loss of three Bettys, including aircraft T-361.

The 49th PG's records show that T-361 was a straggler from the formation when it was attacked by Lt. John D. Landers in P40-E 41-5647 and he reported that T-361 broke up in the air but he did not observe it crash.
The bomber exploded over the Cox Peninsula, whilst the three survivors returned home safely but extensively damaged, so badly that they were reportedly written off.
 |
| 20mm cannon strikes on a propellor assembly from Betty G4M1 Model 12 of the 753rd Ku |
At the time the Allied Director of Intelligence stated that T-361 was "the first to crash in any theatre of operations, where it was available for identification and study". However little intelligence was gleaned from the crash site due to heavy souveniring of the aircraft and its data plates.

The parts of this display include a rear cupola (waist window) and part of the central fuselage with the repainted national insignia the Hinomaru displayed.
 |
| The remains of G4M1 Betty T-361 |
The propellor assembly are from a Betty G4M1 Model 12 of the 753rd Ku, which crashed at sea whilst attempting to return to Timor following a raid in 1943. Its precise identity is unknown, and the wreckage was later recovered in 1987 by a fishing boat and later donated to the museum.


Japanese records confirm these losses, and evidently one of these Bettys was carrying two high ranking IJN officers of the 753rd Ku, and the bombing campaign against Darwin was ordered to cease after this loss.
Another possible identity for the wreckage is from the 6th July 1943 raid against Fenton when two Bettys were forced to withdraw prior to bombing Fenton, and were later reported by the 307 Radar Station and Observation Post on Peron Island to have crashed into the sea.

In my first post in this series looking at Darwin, the town and what can be seen of the history of the place today, Carolyn and I visited the hard from which the Black Cat Catalina Flying Boats were operated from during World War II and so I was very interested to see what exhibits and information was held about the war time operations of these squadrons.

Six Catalina flying boats were lost in Darwin Harbour during and shortly after WWII, with their location and identity still an archaeological puzzle.
 |
| The view down from the cliff path towards the old WWII Catalina base on Darwin's waterfront area. JJ's on Tour - Up the Top End in Darwin, Northern Territory, Australia. |
The United States Navy (USN) Patrol Wing Ten lost four aircraft during the first Japanese air raid on Darwin on the 19th February 1942; three in the harbour on their moorings and one shot down off Bathurst Island.
One of PatWing Ten's PBY5's is still missing and the last of their losses was only found sixty-six years ago after its loss.
 |
| Map illustrating the wreck sites identified in Darwin Harbour, note wreck A24-1 which has a picture of the largely intact fuselage on the mad flats photographed in the 1970's below. |
The Royal Australian Air Force (RAAF) also lost three Catalinas in Darwin Harbour's East Arm, with each aircraft being a different type and through a gradual process of study they have been identified and documented.

Several USN Catalina units used modified aircraft as night convoy raiders in the Pacific theatre and proved very successful in their flat black night camouflage at attacking Japanese shipping in this role, sinking some 112,700 tons of merchantmen and damaging another 47,000 tons between August 1943 and January 1944.

Similarly RAAF Catalinas were also adapted for the night raiding role which included minelaying operations between April 1943 to July 1945 in Japanese-held waters in the southwest Pacific between ports and on shipping routes, that forced ships into deeper waters where they became targets for US submarines.


Major strategic bases such as Balikpapan that shipped 80% of Japanese oil supplies were severely affected and these precision mining operations sometimes exceeded twenty hours in duration and were carried out as low as 200 feet in the hours of darkness, coupled with a regular and mounting nuisance bombing campaign in raids that earned the RAAF units the informal title 'The First and the Furthest'.

The terror bombing was designed to keep Japanese garrisons awake and scrambling for cover as the Cat crews rained down on them anything from small bombs, scrap metal, rocks and even empty beer bottles in these night time excursions.


 |
| Catalina over head at the Torbay Air Show this summer, bring back memories of Darwin Waterfront and its Catalina base. |

Under the command of Squadron Leader Charles Frederick Read, who later went on to serve as Chief of the Air Staff, the squadron undertook a period of training before deploying to Batchelor Airfield, Northern Territory, in October, the aircraft flying via Alice Springs.
 |
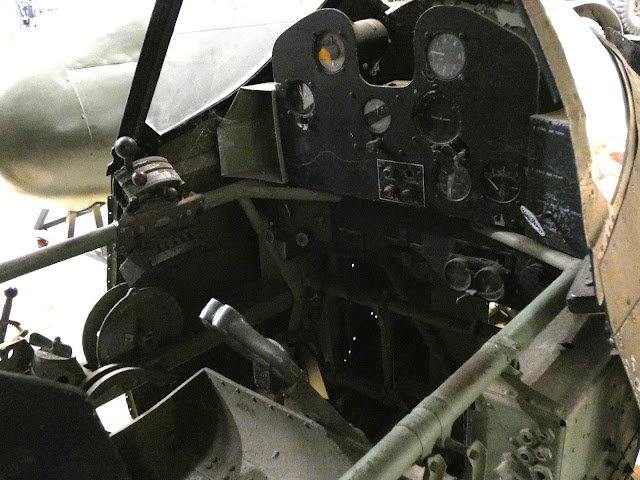
| Beaufighter cockpit recalling the war of 31 Squadron RAAF |
A period of more intense training followed and familiarisation flights were carried out before moving to its operational base at Coomalie Creek Airfield on 12th November and then began flying combat operations on the 17th November, attacking targets in Portuguese Timor.

On the 2nd December, the squadron struck a Japanese airfield at Penfoei, where they destroyed 18 aircraft without losing any of their own, and later that month, the squadron shot down its first Japanese aircraft, when Sergeant Eric Barnett shot down a single-engined Nakajima Ki-27 "Nate" fighter over Fuiloro.
From then the squadron flew ground-attack missions against Japanese forces in the Netherlands East Indies (NEI), concentrating on airfields and ships.

In its first year of combat operations, the squadron was credited with 18 air-to-air victories and a further 49 aircraft destroyed on the ground; although losses amongst the squadron's aircrew were significant due to operating at low level.

There were also some significant individual feats; one of the squadron's most successful pilots was Squadron Leader Reginald Lloyd Gordon, who shot down two Japanese twin-engined Kawasaki Ki-45 "Nick" fighters in one operation; in another incident, a flight of four Beaufighters from the squadron shot down three Japanese floatplanes in one sortie during an attack mission on a Japanese naval airbase in the Aru Islands, when they were attacked by nine Japanese aircraft.

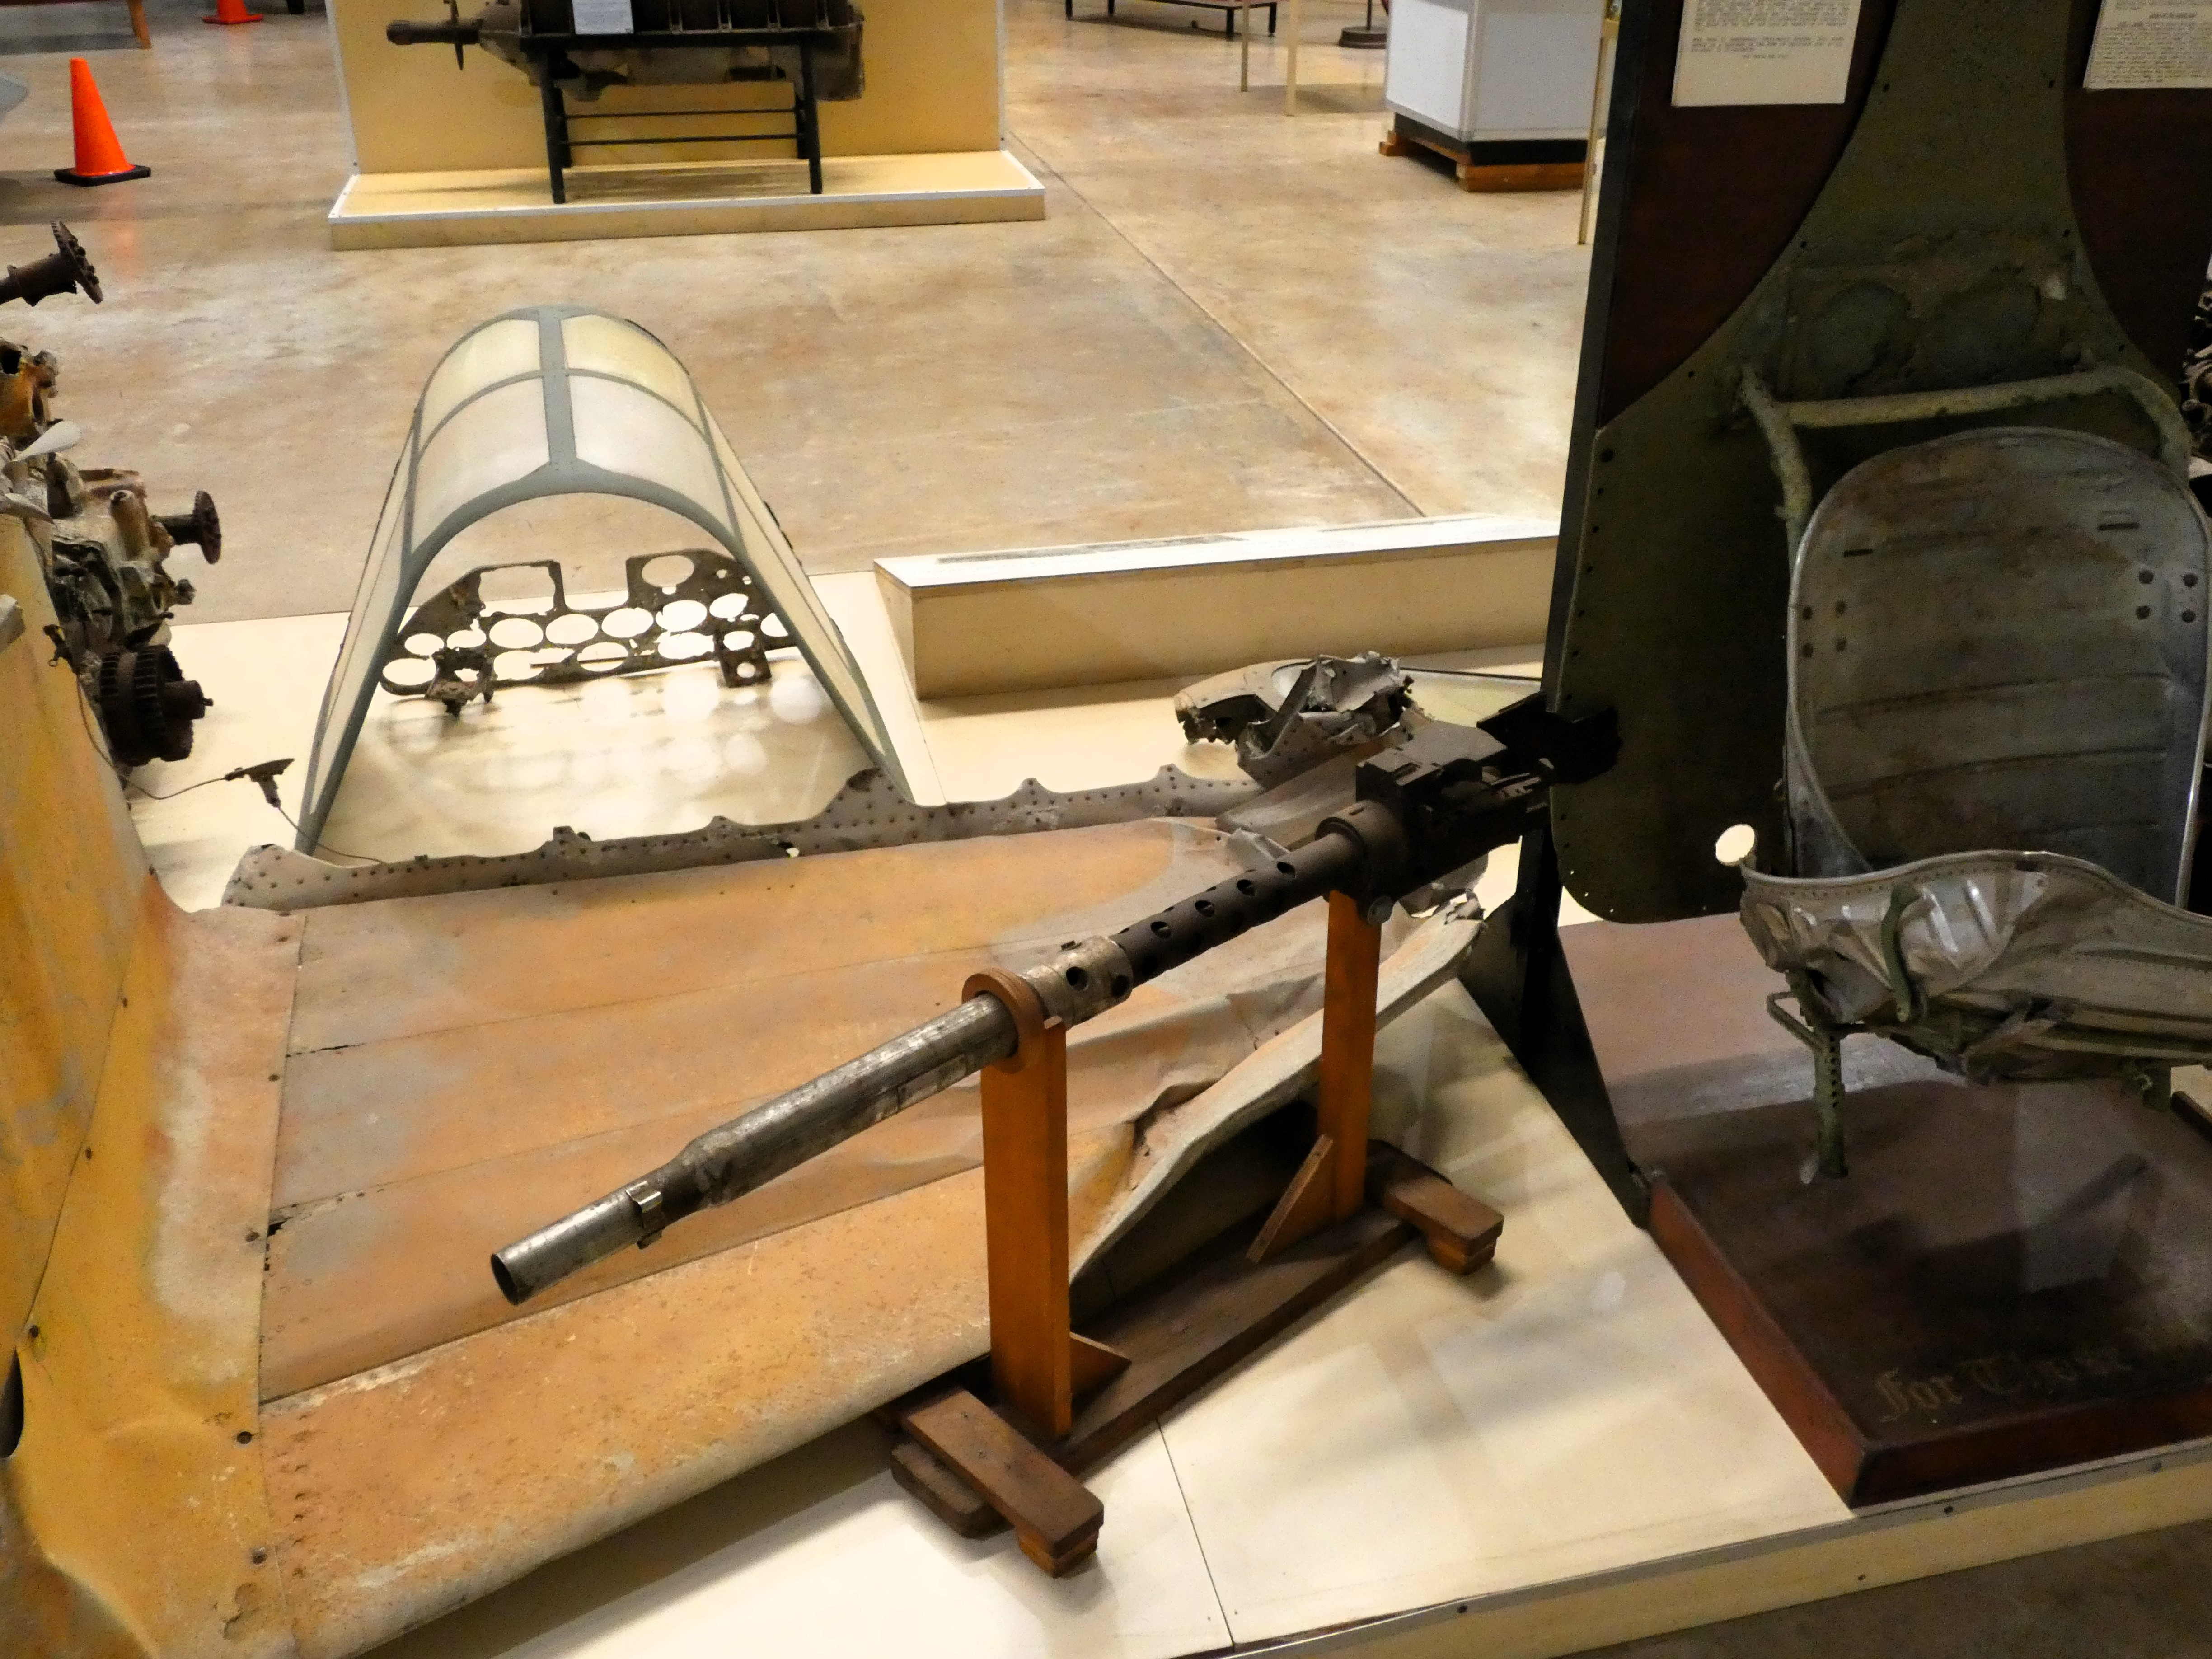
Memories of childhood model aircraft building came to mind with the next exhibit and one kit in particular of the Airfix Commonwealth CA-13 Boomerang, a model that stood in stark contrast to the sleek European types such as the Spitfire and Hurricane I was more familiar with, and an aircraft that is not readily seen in the UK.

The splendid artwork above from the Airfix model comes in handy to bring to life the original look of this little Australian aircraft, not readily grasped from the remains of the fuselage and cockpit on display in the museum, but one I readily recognised when casting my gaze towards it.
The Commonwealth Aircraft Corporation (CAC) Boomerang was a World War II fighter aircraft designed and manufactured in Australia as a small, highly manoeuvrable, fighter between 1942 and 1945; it is significant in that it was the first Australian combat aircraft and was built by CAC in its production plant in Melbourne.

While most RAAF aircraft came from the UK, by 1942, the British aircraft industry was hard-pressed to even meet the needs of its own country, and whilst companies in the United States possessed enormous aircraft manufacturing capacity, their output was at this point being monopolized by the United States Army Air Forces (USAAF) and United States Navy (USN), which were also at war with Japan. Even where capacity could be found for new aircraft to be built overseas, their delivery would require them to be shipped considerable distances in wartime conditions, with consequent delays and at the risk of considerable losses, in particular due to German U-boats and Japanese submarines.
The first prototype was constructed within four months of inception and test flown on the 2nd February 1943 with later Comparison flight tests were undertaken, pitting the CA-12 against a Brewster Buffalo (A51-6) that had been lightened and re-weighted to approximate the flight characteristics of a Zero, as well as a Curtiss P-40E/Kittyhawk Mk I (A29-129) and a Bell P-400/Airacobra Mk Ia (BW127). It was found that the Boomerang was faster in level flight than the Buffalo, although the Buffalo out-manoeuvred it.
.jpg) |
| An Australian-built CAC Boomerang fighter aircraft coded BF-S (serial no. A46-126) nicknamed "Sinbad II" of No. 5 (Tactical Reconnaissance) Squadron RAAF, piloted by 402769 Flight Lieutenant A. W. B. Clare of Newcastle, NSW. |
The Boomerang was superior in armament, with two 20 mm cannon and four .303 calibre (7.7 mm) machine guns, all mounted in the short, thick wings, and its pilots were better protected, with generous armour plating, than Japanese fighter pilots. While the CA-12 was lively at low level, its performance fell away rapidly above altitudes of 15,000 ft, and its maximum speed of 265 knots was not sufficient to make it an effective counter to Japanese fighters like the Zero and the Japanese Army's Nakajima Ki 43 ("Oscar"). Similarly, the best European fighters were reaching almost 350 knots, and even relatively sluggish contemporary fighters – like the Grumman F4F Wildcat and the Curtiss Kittyhawk Mk I – were substantially faster than the Boomerang.
A total of 250 Boomerangs of all types were built during WWII.

The modifications consisted of fitting four .50 calibre machine guns in the nose and two .50.cal side packs either side of the fuselage below the cockpit.


Under going a major overhaul in early 1944, this aircraft flew a further six missions with the 500th BS, before transferring to the 498th BS in the group until it last mission on the 6th April, before being stripped out and made ready for transport duties throughout Australia, and it was on a transport mission near Alice Springs that the aircraft forced landed in the desolate Tanami Desert on the 25th January 1945 from where the crew were rescued but where the aircraft was abandoned and written off.

Fenton Air Strip was built by C Company and HQ Detachment of the 808th Engineer Aviation Battalion between 27th April 1942 and 16th July 1942, with further development of the airfield undertaken by No. 1 Airfield Construction Squadron RAAF, No 14 Airfield Construction Squadron RAAF and the Department of Main Roads (New South Wales) under the Allied Works Council, being named after flight lieutenant Clyde Fenton a RAAF officer who recommended the site for the airfield.


The first air raid on Fenton was carried out by aircraft of the Japanese 23rd Air Flotilla on the 30th June 1943, destroying four Liberators, a lot of equipment and injuring two men, and additionally six Spitfires were lost with one pilot killed, whilst Japanese losses amounted to six bombers and two fighters.
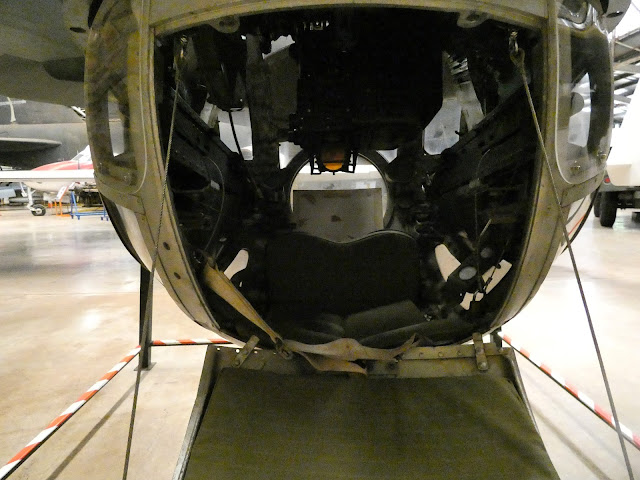
The Upper Martin Gun Turret, seen below was mounted on the top of the fuselage in B-17 Flying Fortress, B-24 Liberators and the PV-1 Ventura and was electrically powered with a mechanical backup.


The Sperry Ball Turret was three and a half feet in diameter in order to reduce drag, and was typically operated by the smallest man of the crew.

The gunner was forced to assume a foetal position within the turret with his back and head against the rear wall, his hips at the bottom, and his legs held in mid-air by two footrests on the front wall. This left him positioned with his eyes roughly level with the pair of light-barrel Browning AN/M2 .50 caliber machine guns which extended through the entire turret, located to either side of the gunner.


The B25D-10 Mitchell, serial no.41-30222 'Hawg-mouth' was manufactured at North American Aviation's Kansas City facility and cost $181,074 US, and was accepted by the USAAF on the 12th February 1943 with modifications to be flown to Brisbane on the 15th June.

The aircraft was assigned to the USAAF's 500th Bomb Squadron, 'the Rough Raiders', of the 345th Bombardment Group and was flown to Townsville for further modifications to convert it to a 'strafer' prior to flying to New Guinea.
 |
| 500th BS "Rough Raiders", 345th BG, USAAF - New Guinea, 1944. http://www.wardrawings.be/WW2/Files/2-Airplanes/Allies/1-USA/04-Bombers/B-25%28Mitchell%29/B-25D-10%28Mitchell%29.htm |
 |
| Map of the Mandated Territory of New Guinea, Papua and Bougainville 1942-45 showing sites of various battles and strategic locations |
From Townsville it was flown to the 500th BS's base at Port Moresby and on the 17th August was assigned to 2nd Lieutenant Raymond E. Geer, flying its first combat mission on the 1st September, a strafing attack on Alexishafen-Madang and Finschafen.
 |
| The 500th Squadron’s attack on shipping at Vunapope, near Rabaul, which led to the epic air battle in which 17 Japanese fighters were claimed shot down for the loss of two B-25s. Taken from plane #572, piloted by 1/Lt. Thane C. Hecox, this photo shows attacks on a 5000-ton and 6000-ton freighter. https://airwarworldwar2.wordpress.com/tag/1943/ |
Missions were conducted over the following weeks against Japanese strongholds, including Rabaul, Wewak, Medang and Gasamata, that would see Geer and co-pilot 2nd Lt. George H. Mitchell awarded the Air Medal and the squadron a Distinguished Unit Citation for a low level attack on Vunapope Harbour naval base on the 18th October.
Skimming the water at 50 feet 'Hawg-mouth' flew through intense flak to destroy the Kinkasan Maru, a 5,000 ton freighter with two 1,000 lb bombs, whilst two of the six aircraft force failed to return following interception by Japanese fighters.

Mission symbols were soon applied to the aircraft, plain bombs denoting missions into enemy territory, but not the release of bombs and bombs crowned with a star indicating successful missions. In addition two Japanese flags were added following a mission over Wewak on the 16th October; with Geer claiming one fighter with the nose guns, whilst the turret gunner claimed another.
Geer had the name 'Hawg-mouth' applied to the port fuselage below the cockpit, though the reason for the title is unclear.

Geer's last recorded mission in the aircraft was 5th January 1944 and he later recalled;
'The mission was 'targets of opportunity' to New Britain. . . While strafing a target at Wilde Bay, we received some very accurate 30mm ground fire and the right engine was shot out at an altitude of about 25 feet. We flew through the palm trees for a quarter to half a mile before coming out over the water. . . We flew about 190 miles to Kerlwena in the Troubriand Islands and landed at an Australian fighter base. The aircraft had over 100 holes and was badly damaged from hitting the trees numerous times.'

The battered remains of the aircraft was recovered by aviation enthusiasts from Darwin in May 1974 and it was a fortunate survivor of Cyclone Tracey whilst on display at the East Point Military Museum in December 1974, to end up here in the collection partially restored to its original colour scheme and nose art carried in New Guinea in 1943.

 |
| Fenton Air Strip was built between the 27th April and 16th July 1942, |
Abandoned since 1945, the site is one of three surviving World War II-era heavy bomber airfields in the Katherine–Darwin region. The airfield is open to the public, and the main runway, taxiways and hardstands are accessible. Remnants of the control tower remain and aircraft wreckage can be found in the area.
 |
| USAAF B-24 Liberator #42-40504 "Gus's Bus" of the 530th Bomb Squadron, 380th Bomb Group, crash landed at Fenton airfield in the Northern Territory. The undercarriage collapsed on landing. |
Fenton Airfield was mainly used by Liberator bombers mounting long range raids against Japanese forces in the Netherlands East Indies, the north-western area of operations, and the South West Pacific Area.
 |
| RAAF B-24 Liberators of No. 82 Wing at Fenton, Northern Territory |
During its operational use, Fenton Airfield served as headquarters for Royal Australian Air Force squadrons and United States Army and Air Force units. Reconnaissance flights beginning at Fenton Airfield were flown over Timor Island, New Guinea and Celebes Islands, and attacks and armed reconnaissance missions were carried out against Japanese airfields, ground installations and shipping. On the 29th February 1944 the USAAF 380th Bombardment Group flew a 16-hour mission from Fenton to Borneo, flying over 2,500 nautical miles.
The airfield was abandoned at the end of World War II.
The airfield was abandoned at the end of World War II.

Briefly occupied by B-17 Fortresses of the 64th Squadron, 43rd Bombardment Group, USAAF, in late 1942, Fenton became the home base of the 319th Bombardment Squadron, USAAF operating B-24s, when it arrived in January 1943 to begin reconnaissance and strike missions in Timor, Celebes and the Moluccas.
Australian radar and anti-aircraft units arrived in March to be followed by the 30th Bombardment Group, USAAF in June 1943 equipped initially with 28 Liberators with the group's 528th and 530th Squadrons carrying out 50 sorties from Fenton in its first month of operations.

 |
| Vertical stabiliser (tail fin) recovered from Fenton and restored with the assistance of staff at RAAF Base Darwin. This belonged to USAAF B-24D 65-CO Gus's Bus (42-40504) assigned to 530th BS of the 380th BG and flying 28 missions before crash landing at Fenton on the 20th October 1943 following a shipping strike. |
A week later the Japanese were back at noon on the 6th July hitting the fuel dumps and damaging the runway but losing one Betty to Australian anti-aircraft fire in the process.
 |
| USAAF B-24D 65-CO Gus's Bus (42-40504) |
During 1943-44 the Liberators from Fenton continued to bomb targets including Balikpapan, Timor and the Celebes until the 380th BG moved north to Darwin during June and July 1944.
In August the first RAAF units arrived which included HQ No.82 Wing and Nos. 21 and 24 Squadrons operating B24 Liberators to continue the long range missions initiated by the Americans.
By the 10th of June 1945 21 and 24 Squadrons had departed for Darwin and the islands and by November 1945 the airfield was deserted but for caretaker units.
 |
| A 20mm Hispano Cannon |
The Upper Martin Gun Turret, seen below was mounted on the top of the fuselage in B-17 Flying Fortress, B-24 Liberators and the PV-1 Ventura and was electrically powered with a mechanical backup.
Able to rotate at about one revolution per second the turret contained two 50-calibre machine guns, and 1,000 rounds of ammunition for each gun in two bins forward of the gunners knees, with the gunners head positioned between the two breech blocks when seated within.


To enter the turret, the turret was moved until the guns were pointed straight down. The gunner placed his feet in the heel rests and occupied his cramped station. He would put on a safety strap and close and lock the turret door. There was no room inside for a parachute, which was left in the cabin above the turret. The Ball Turret Gunner was the only man of the crew to not have a parachute on or next to him.
 |
| An RAF B-24 ball turret in Burma, possibly from No. 358 Squadron. |
In the case of the B-24, the Liberator's tricycle landing gear design mandated that its A-13 model Sperry ball turret have a vertically retractable mount, so that the turret would not strike the ground as the plane pitched up for take-off or during the landing flare.
Below is the cockpit section of a USAAF B-24D, converted into a caravan and recovered by the museum.


 |
| Commando Slide as described above and recovered from the Fenton airstrip. |

Nose art from the port side of Quack Wac an B-24D of the 380th BG, 530th BS , that flew 28 missions before being shot up during a bombing mission against Halong on the 9th February 1944 and later crash landing at Fenton and written off.
 |
| B-24D 'Quack Wac' 42-72775 nose art of the 380th BG, 530th BS, here seen parked up. https://pacificwrecks.com/aircraft/b-24/42-72775/1943/b24-quack-wac1.html |


The B-24 Liberator pilot seat (aircraft tail number unknown), pictured below was used by a Queensland farmer who had purchased a war surplus tank to use as a tractor which had had the turret removed and the driving controls relocated to where the turret had been and to see better the pilot seat was used as the drivers seat.
 |
| JJ's on Tour - The Australian Armour and Artillery Museum |
When the the tank was purchased by the Australian Artillery and Armour Museum, (a museum whose extensive collection I have featured in two previous posts, link above), the tank was restored to its original condition but the seat was destined for the scrap heap until by chance a volunteer from the NT Aviation Historical Society visiting the museum happened to recognise it, and the AAAM management were kind enough to donate it to the Darwin Aviation Museum and even paid to ship it - excellent work chaps!
 |
| B-24 Liberator pilot seat - A gift from the chaps at the Australian Artillery and Armour Museum |


Beautiful Betsy, named after the wife of her first pilot, Lt. Joe Roth, was a B-24D Liberator, serial number #42-40387 on strength with the 528th BS, 38th BG based at Darwin in late 1944, retired from combat after her 25th mission in the November when her airframe was over stressed while avoiding a mid-air collision with another aircraft.

Stripped of her camouflage paint, guns and armour plate, Beautiful Betsy flew throughout Australia on 'fat cat' transport trips, collecting supplies, fresh food, and alcohol for the squadron to relieve the monotonous diet of life on the northern bases.
Inevitably the time came for Betsy to retire, and with over 1,500 flying hours her airframe was assigned one last trip to Brisbane and a salvage depot.

On the evening of the 26th February 1945, Beautiful Betsy took off with Lt. William E. McDonald at the controls, together with Lt. Eugene A. Kilcheski (co-pilot), Hilary B. Routt (navigator), Jack W. Owen (bombardier-navigator); Sergeants Raymond S. Tucker (engineer) and Harold J. Lemons (radio operator); and two passengers, Flt. Lt. T.J. Cook and Flg. Off. Roy Cannon, both Spitfire pilots with No. 458 (RAF) Squadron based in Darwin, setting course for Brisbane; twenty-three year old Cannon was to marry a Brisbane girl four days later and Cook was to be his best man.
Nothing was heard from the aircraft following its departure and despite extensive searches, no trace of Betsy or her crew was found.

 |
| Nothing was heard from Betsy following her departure from Darwin to Brisbane and despite extensive searches, no trace of or her crew was found, until July 1994. |
Over subsequent weeks the wreck was plotted and the remains of the crew recovered, together with personal effects and families of the men were located and informed of the find, and almost fifty-one years following her last flight, the crew of Beautiful Betsy were finally laid to rest with full military honours having finally returned from their last mission.
The Spitfire first flew in 1936 and entered service in 1938 with the RAF, and along with the Hurricane gained prominence in delivering victory in the Battle of Britain in 1940, and eventually serving on every front in World War II from Europe and Russia to North Africa and the Far East including Australia.

This iconic aircraft became a symbol of freedom when seen in the air of friendly and occupied countries during WWII and today still draws admiring glances to its perfect shape, those wonderful elliptical wings, and the unmistakeable growl of its Rolls-Royce Merlin engine.
A total of 22,000 Spitfires and Seafires were produced in over 24 major variants, the last coming off the production line in 1949.
This replica of a Mark VIII was constructed in Queensland in 1991 and flown to Darwin in an RAAF C-130 Hercules aircraft; and is constructed of fibreglass on a timber and steel frame, married up with an original Spitfire Mk V undercarriage and a new Perspex canopy flown out from the UK, with the moulds taken from a genuine Spitfire at Toowoomba, Queensland.

Mark Vc Spitfires of No. 1 Fighter Wing took over the defence of Darwin in January 1943 from the RAAF Kittyhawk squadrons; the Wing sometimes referred to as the Churchill Wing, consisted of 452 and 457 Squadrons RAAF and 54 Squadron RAF, these squadrons, already veterans from the air battles fought over England, were sent to Darwin in response to the Japanese raids on the Top End.

The squadrons operated from newly constructed airfields just south of Darwin, Livingstone, Strauss and Sattler, shown on the Fighter Guide Map at the top of the post, and also from the old Darwin civil airstrip, now Ross Smith Avenue, with the dusty tropical conditions playing havoc with the Merlin engines

Led by Group Captain Clive Caldwell, Australia's leading fighter ace, the Spitfires accounted for many enemy aircraft destroyed or damaged until raids on the Top End finally ceased in November 1944.

In September 1944 the Mk. Vc Spitfires were replaced by the vastly superior Mk. VIII models, however, by this time the raids on Australia had generally declined.


In 2003 the replica was refurbished and repainted in the later green and grey upper surface camouflage typical of the Mk VIII Spitfires in 1944 and 1945, with the port side carrying the markings of Squadron Leader Bruce Watson, Commanding Officer of 457 Squadron and the starboard side with the markings of Squadron Leader Lou Spence, Commanding Officer of 452 Squadron.

The shark's mouth marking was applied to 457 Squadron Spitfires in the latter part of 1944.


The de Havilland DH-82 Tiger Moth entered service with the RAF Central Flying School in February 1932 and was later adopted by the RAAF, and the British production run of this primary wartime trainer aircraft amounted to 7,000 airframes, primarily built by Morris Motors Ltd, and between 1931 to 1944 a total of 8,868 Tiger Moths were produced across the world.

This particular aircraft, A17-4 is a DH-82 A4, serial no. 82558 and was assembled at the de Haviland works in Sydney from an imported fuselage from Great Britain, and was accepted into the RAAF in June 1939.
During WWII, starting service with 22 Squadron from July 1939, it would go on to serve with several Elementary Flying Schools, and survive several accidents resulting from forced and heavy landings to hitting buildings and fences, having a complete overhaul in early 1944 until being sold off to the Royal Aero Club of South Australia in June 1946.

In 1981 the aircraft was fully restored and flown locally by its owner until it was purchased by the museum in 1996, with help from a local government grant.
The wooden propellor exhibited close by the Tiger Moth is a ground testing propellor used to check out Bristol Hercules radial engines fitted to the Bristol Beaufighter after engine overhauls.

As mentioned in the preamble to the post the museum exhibits twenty-one aero engines and my eye was caught by some very specific examples none more so than the two below that span the development of aero engines during WWII from the mighty Bristol Centaurus eight cylinder air cooled radial engine of 53.5 litres, developing 2,500 hp at take-off and up to 2,800 hp with methanol and water injection.

This powerful engine was used in the Hawker Seafury single engine fighter, an example of which we saw below at the Australian War Memorial in Canberra.
 |
| JJ's on Tour - Canberra, Australia |
Close by was an example of peak of inline engine design at the start of WWII with a 1939 model Rolls-Royce Merlin Mark III of just over 27 litres developing 1,030 hp.

As well as providing the powerplant for the ill-fated Fairy Battle Day Bomber used as a target tug here in Australia it was also the engine that formed the basis for development as the highly successful Rolls-Royce Rover/Meteor tank engine that would be used in the late WWII tank designs from Cromwell to Centurion.
But of course it will always be famously remembered for powering the early models of Spitfire, specifically the Mk1a, stalwart of the Battle of Britain, that received the Mk III Merlin, upgraded from the Mk II used in the Spitfire Mk 1, an example of which I photographed at RAF Cosford back in 2022.
 |
| Supermarine Spitfire Mk 1, K9942 - This is one of the oldest surviving Spitfires, first flying in 1939 and allocated to No.72 Squadron and regularly flown by James Nicolson VC, the only recipient of the Victoria Cross in the Battle of Britain, pictured at RAF Cosford back in 2022 JJ's Wargames - Royal Air Force Museum, Midlands, RAF Cosford. |

The Boeing B-52 Stratofortress is perhaps one of the most familiar military aircraft that is associated with the Cold-War era and still plays an important role today despite it being first flown back in April 1952.

Nicknamed the 'BUFF' (Big Ugly Fat Fella) the B-52 bomber concept dates back to a US requirement for a post WWII strategic bomber capable of carrying nuclear weapons and deploying from continental United States bases.
The B-52 was introduced to the US inventory in February 1955 and a total of 744 B-52's were built between 1952 and 1962.

For folks of my vintage the B-52 is well remembered for its role in the Vietnam War when modified B-52Ds entered combat in April 1966 flying from Anderson Air Force Base in Guam, using aerial refuelling for missions lasting between ten to twelve hours, until their move to Thailand in 1967 negating the need for inflight refuelling.

This particular aircraft is a Vietnam veteran having deployed from Guam between 2nd August 1972 to 3rd January 1974 whilst attached to the 92nd Bombardment Wing.


This aircraft, serial no. 59-2596, the '59' prefix indicating the year of manufacture; 'Darwin's Pride' is on permanent loan to the Museum having been gifted by the US Government to the people of Darwin. It has no bomb racks and the four .50 calibre Browning machine guns in the tail turret have had their barrels removed, to indicate the aircraft is a gift of peace, and a plaque inside the bomb bay states 'rest in peace'.


Next to the B-52 was the more diminutive Dassault Mirage III, selected in 1960 to replace the Avon powered Sabres of the RAAF and the first aircraft in RAAF service to be capable of flying at Mach 2 or twice the speed of sound.


In 1949, the RAAF recognised that its Vampires needed to be replaced by a more modern design, and the F-86 Sabre was seen as an obvious choice as CAC Chief Designer Sir Lawrence Wackett could see the potential in marrying the F-86 airframe to the more powerful British Rolls-Royce Avon turbojet.


 The RAAF placed an initial order for 87 aircraft in 1965, with first 20 built by Commonwealth Aircraft Corporation (CAC) and designated the CA30 to establish an all jet training program for RAAF pilots in 1968, with last Australian produced Macchi being delivered in 1972.
In 1963 the RAAF ordered 24 F-111C from General Dynamics to replace the Canberra bomber with the first delivered in 1968 and due to technical issues not formerly entering RAAF service until March 1973.

The purchase proved to be highly successful for the RAAF. Although it never saw combat, the F-111C was the fastest, longest range combat aircraft in Southeast Asia, providing Australia with independent strike capability. RAAF F-111s never saw offensive action, but were deployed periodically as a deterrent, such as for the Australian-led International Force East Timor when Australian F-111s were ready to attack Indonesian forces during the establishment of East Timor's independence and the deployment of the Australian-led International Force for East Timor.
Australian F-111Cs were equipped to launch the Harpoon anti-ship missile, and the Popeye stand-off missile, and in 2006, an RAAF F-111 scuttled the North Korean ship Pong Su on the 23rd March 2006.
Because of the high maintenance time required for every flight hour, the F-111's retirement began with the F-111G models operated by No. 6 Squadron in late 2007. Twenty-four Boeing F/A-18E/F Super Hornets were procured as an interim replacement as the Lockheed Martin F-35 Lightning II program was delayed, with the last F-111s being retired on the 3rd December 2010.


In the mid 1970's the Wessex's were relegated to a utility role as the Westland Sea King Mk.50 took over the anti-submarine responsibilities', and it was finally retired from RAN service in 1989.

During June 1967, the first examples of the AH-1 entered service with the US Army and were promptly deployed to the Vietnam theatre, and it commonly provided fire support to friendly ground forces, escorted transport helicopters, and flew in "hunter killer" teams by pairing with Hughes OH-6A Cayuse scout helicopters. In the Vietnam War alone, the Cobra fleet cumulatively chalked up in excess of one million operational hours; roughly 300 AH-1s were also lost in combat.

The AH-1 also saw combat in Grenada, Panama, and the Gulf War, with the final examples being withdrawn during 2001.

An all-weather supersonic, twin-engine, carrier-capable, multirole combat aircraft, designed as both a fighter and attack aircraft, the first 14 aircraft were allocated for pilot Operational Conversion training and with No. 3 Squadron RAAF becoming the first operational unit in August 1986 followed by No. 77 Squadron in May 1987.

In March 2015, six F/A-18As from No. 75 Squadron were deployed to the Middle East as part of Operation Okra (Airstrikes against ISIL in Iraq and Syria), replacing a detachment of Super Hornets (The F/A-18E single-seat and F/A-18F tandem-seat variants which were larger and more advanced versions of the F/A-18C and D Hornet, respectively), with the final RAAF strike mission flown by two Super Hornets on the 14th January 2018, by which time the Hornets and Super Hornets had conducted over 2,700 sorties.


Post-Cold War B-52s were deployed in Panama (December 1989), Iraq (1990, 1991, 1996 and 1998) and against the Taliban in Afghanistan and over Iraq.

The model housed in the Darwin Aviation Museum is a B-52G that entered service in 1959 and is one of 193 such types making it the most widely produced B-52 variant.
It has had a number of changes designed to extend its service life including increased fuel carrying capacity, a shortened vertical fin and an enlarged radome. In addition the tail gunner (manning the four .50 calibre machine guns in the remote controlled tail turret was relocated to the main cockpit and provided with an ejection seat.
 |
| The Avon powered Sabre seen parked under the tail fin of 'Darwin's Pride'. More about the Sabre below. |
Dubbed the 'Battle Station' concept, the offensive crew (pilot and co-pilot on the upper deck and the two bombing navigation system operators on the lower deck) faced forward, while the defensive crew (tail gunner and electronic countermeasures (ECM) operator) on the upper deck faced rearwards.


Darwin has had a long association with the B-52 welcoming these massive aircraft and their crews as friends, with its airport runway allowing these giant bombers to take off at maximum take-off weight either with full fuel or full load.

Preparation for the aircraft's last flight from the USAF's Anderson Air Force Base in Guam to the Museum began on the 1st September 1989 and involved approximately 18,000 voluntary man-hours by members of the 43rd Maintenance Group under project Glossie Aussie, that saw most of the personnel on the Anderson AFB and their families forming an honour guard of farewell to the aircraft on the 27th March 1990.


An interesting historical note relating to this aircraft's service history is that it was formerly on strength with the 43rd Bombardment Wing from 6th November 1989 until its departure to Darwin and the Wing was formerly the 43rd Bombardment Group that flew B-17's out of Batchelor, Fenton and Daly Waters in the Northern Territories in 1942.


Entering service in 1965 the Mirage served as the RAAF's front line single seat interceptor/ground attack fighter until 1988 making it the longest serving fighter in RAAF history, and it was built under license in Australia providing the RAAF with 100 single seat fighters and 16 two seat versions serving with five RAAF squadrons (3, 75, 76, 77 and 79) together with conversion and research units.
With the acquisition of the of the F/A-18 Hornet in 1985, the Mirage was phased out of service, with 75 Squadron being the first to equip with it in 1966 and the last to operate it.

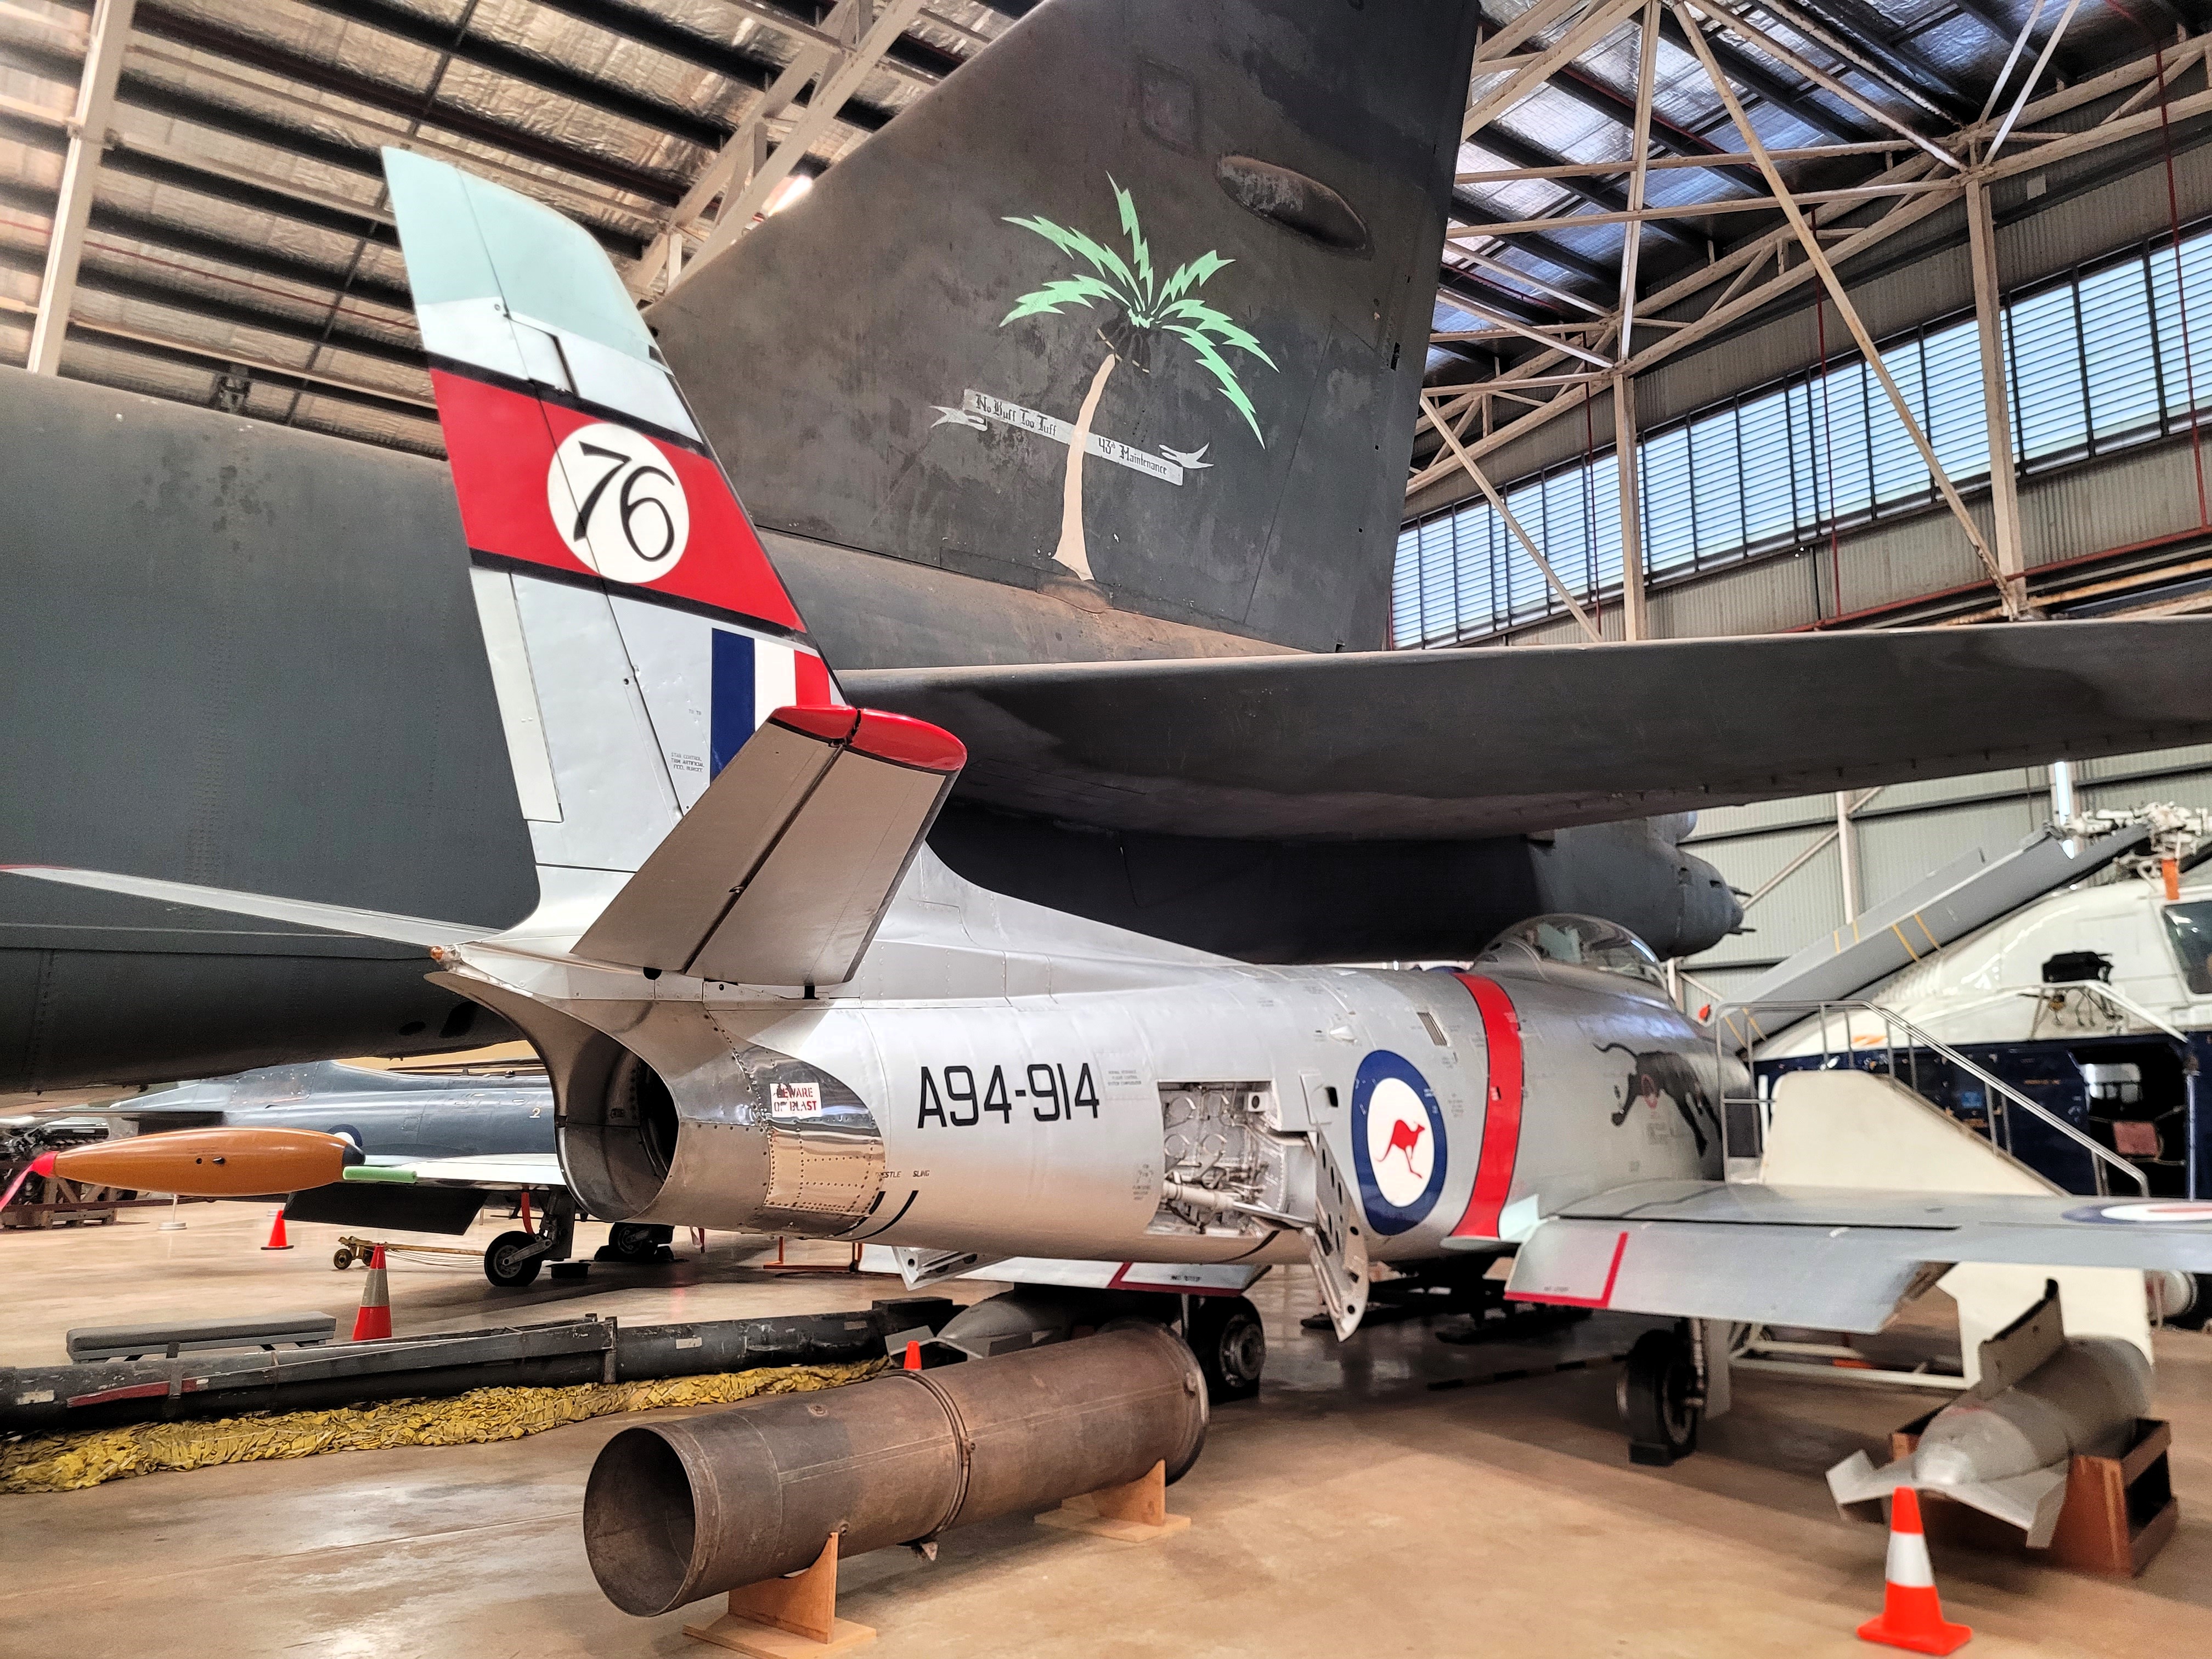
Derived from the North American Aviation F-86 Sabre fighter, the RAAF's CA-27, seen below and above parked under the tail of the B-52, followed the RAAF's first jet fighters in the post-war era, the de Havilland Vampire and Gloster Meteor, recently looked at in my previous post from the Newark Air Museum, link below.
 |
| Gloster Meteor FR.9, Serial No.VZ608 as pictured at the Newark Air Museum this May 2024 JJ's Wargames - Newark Air Museum |
In 1949, the RAAF recognised that its Vampires needed to be replaced by a more modern design, and the F-86 Sabre was seen as an obvious choice as CAC Chief Designer Sir Lawrence Wackett could see the potential in marrying the F-86 airframe to the more powerful British Rolls-Royce Avon turbojet.

With a deepened front fuselage to facilitate an increase in airflow intake and the engine mounting moved further aft to maintain the centre of gravity the F-86F variant had only a superficial resemblance to the original Sabre.

The six .50 calibre Browning machine guns in the F-86 were replaced by two 30mm Aden cannons with a higher rate of fire of 1,200 to 1,400 rounds per minute.

The first prototype was flown in August 1953 and deliveries to squadrons commenced a year later, entering service as the CA-27 Mark 30 with No.75 Squadron in early 1955. The final definitive version was the Mark 32 delivered to squadrons in 1956 and ending in 1961, with updated wing hard points for stores and 3 inch rockets, plus a redesigned Avon 26 engine, and the aircraft was also fitted with American AIM 9B Sidewinder missiles in 1959.
The Sabre served with the RAAF until 1971 when it was replaced by the Mirage IIIO, with sixteen retired Sabres given to the Royal Malaysian and Indonesian Air Forces.

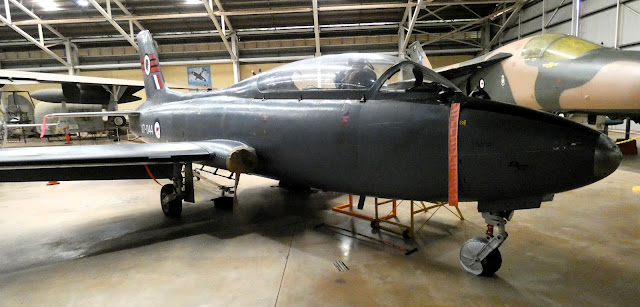
The Aermacchi MB-326H is a single-engine two seat trainer designed in Italy began as a private venture by Aermacchi which produced a prototype for its maiden flight in December 1957.
The Aeronautica Militare Italia (AMI) or Italian Airforce, placed an order for 15 MB-326 in December 1958, followed by a further order for 100 aircraft in 1960.

In 2000 the British Aerospace Hawk 127 was selected to replace the Macchi in the lead-in-fighter training role, bringing an end to the Macchi's service in Australia.

Nicknamed the 'Pig' by the RAAF, the F-111 was the Australian variant of the USAF medium-range interdictor and tactical strike aircraft (nicknamed the 'Aardvark' in US service), and is based on the FB-111A with longer wings and a strengthened undercarriage; it was used by the RAAF as a fighter bomber and reconnaissance aircraft.

Australian F-111Cs were equipped to launch the Harpoon anti-ship missile, and the Popeye stand-off missile, and in 2006, an RAAF F-111 scuttled the North Korean ship Pong Su on the 23rd March 2006.
Because of the high maintenance time required for every flight hour, the F-111's retirement began with the F-111G models operated by No. 6 Squadron in late 2007. Twenty-four Boeing F/A-18E/F Super Hornets were procured as an interim replacement as the Lockheed Martin F-35 Lightning II program was delayed, with the last F-111s being retired on the 3rd December 2010.

 |
| Mark 83 Practice Bomb donated to the museum by the USN aircraft carrier USS Independence (CV-62) on a visit to Darwin in June 1993 |

Westland built 27 Wessex helicopters for the Royal Australian Navy, designated the Mark 31, with deliveries beginning in August 1962, basically the same model as the HAS.1 used by British forces, but powered by the more powerful Gazelle 162 engine.
They equipped four RAN Fleet Air Arm squadrons and served aboard HMAS Melbourne, Sydney, Stalwart, Tobruk and Success, updating n 1968 and 1970 to the Mk. 31B version with advanced anti-submarine sonar equipment and a more powerful Gazelle 165 engine, new radar system and improved Tacan navigation and ultra-high frequency communication system.


The Bell AH-1 Cobra is a two bladed single engine close support and attack helicopter that formed the backbone of the United States Army attack helicopter fleet until replaced by the AH-64 Apache helicopter.

This example built in 1971 was donated to the museum by the US Army Museum in Hawaii in 1997 but not much is known about its operational history.

The McDonnell Douglas F/A-18A Hornet was selected by the RAAF to replace the aging Mirage III in 1981 with an order placed for 57 single seat versions and 18 of the two seater F/A-18B, with sevenbty-three of these airframes assembled at the Government Aircraft Factories in Avalon, Victoria.

The Hornet was a giant leap in technology over the Mirage III and served as an integral part of Australia's air combat capability. In 2001, Australia deployed four aircraft to Diego Garcia, in an air-defence role, during coalition operations against the Taliban in Afghanistan. In 2003, 75 Squadron deployed 14 F/A-18s to Qatar as part of Operation Falconer and these aircraft saw action during the invasion of Iraq.

RAAF classic Hornets were gradually replaced with 72 advanced F-35A Lightning II beginning in 2018, with No. 75 Squadron the last to operate the type which officially retired from RAAF service on the 29th November 2021.
This particular aircraft (A21-103) was the first F/A-18 assembled in Australia and made its first flight at Avalon on the 26th February 1985 reaching a speed of Mach 1.6 at 40,000 feet, before joining 2 OCU at RAAF Williamtown on the 17th May 1985.
It served with all operational Hornet squadrons over the following years, the last being No.3 Squadron whose markings it currently wears.

I thoroughly enjoyed visiting the Darwin Aviation Museum offering as it does a very Northern Territories and Australian take on the history of aviation in this very unique part of the world and it was great to see that history is being well looked after for future generations to appreciate.
If like me you are an aviation enthusiast and happen to be in Darwin then this collection would be well worth making some time to visit.
In my next and final post looking at our stay in Darwin I will take a look at the other military museum in town, the Darwin Military Museum at East Point.
More anon
JJ
Always an interesting read JJ. I can only imagine the effort involved in so painstakingly putting these together.
ReplyDeleteHi Lawrence,
DeleteThank you and yes there is a bit of work involved sifting through my photos and collected notes, but just over eighteen months after these visits there is a lot of pleasure to be had recalling them and I find that I learn so much more by doing these posts, in that I find out a lot of stuff that I didn't know when I was there and so it reinforces my own knowledge in my efforts to share it with others which to my mind is the best most enjoyable way to learn.
Cheers
JJ
Thank you for a fantastic read JJ.
ReplyDeleteLooking forward to the next installment.
Hi Ben,
DeleteThank you for your comment, it's so much more fun to share these visits with others and it's great to read remarks like yours that feed it back.
I've just finished editing the Darwin Military Museum pictures and will aim to have a post up as soon as, but there are a lot of other topics coming up in the next few weeks so bear with me.
Cheers
JJ
Thanks for writing this JJ. I am now torn between really wanting to go to the Darwin Museum when we next visit Australia, to wondering if I need to after such a fantastic write up and all your detailed pictures. Looking forward to your next updates.
ReplyDeleteHi Wayne,
DeleteThank you for your comment, and glad you enjoyed the post.
All I would say is these kind of posts are intended to fire the imagination and encourage folks like us to support these excellent collections by visiting them and talking and writing about them to get more people interested in their history.
I have often read other similar posts from very talented bloggers that have had me putting a certain venue on the 'must visit before I die' list and I can certainly say that you always manage to find something that someone else didn't mention.
I would on another occasion have included the history about one of the greatest female aviation pioneers, Amy Johnson who opened doors for women to fly, commercially and for pleasure and was the first woman to fly solo from England to Australia in 1930, landing at Darwin nineteen days later after an 11,000 mile flight, and she is remembered in the town with the very appropriately named Amy Johnson Avenue close by to the museum. Very sadly she was killed in January 1941 doing her bit for the war effort flying as an Air Transport Auxiliary after bailing out over the Thames Estuary.
Bear with me on the next update as there is a lot of stuff to come in the next month or so, but I have started my look at the Darwin Military Museum.
Cheers
JJ