

With the Camperdown collection finished last month and game planning and preparation worked up, I am now really looking forward to September during which I have a couple of big games arranged before Carolyn and I take some time out to enjoy a long look forward to Autumn break.

One of those games will see me joining friends at the Naval Wargames Society Meeting at the Fleet Air Arm Museum in Yeovilton on the Saturday 28th September to run the Battle of Camperdown with both fleets fully represented on a twenty foot by ten foot table using Far Distant Ships (FDS) written By David Manley and designed for fleet actions of this period, with David having written up the Battle of Camperdown scenario for the rules and which have informed my own game plan for the day.

I went through my game planning process and thinking for this game and have put a link to that post below if you want to see that post.
.jpg) |
| JJ's Wargames - All at Sea - Battle of Camperdown, Game Planning. |
The layout for the full battle is illustrated below with both fleets set up at about midday, that saw HMS Monarch under Vice Admiral Onslow break the Dutch line at about 12.45 that would see the fighting last for about three hours, before the surviving elements of the Dutch fleet broke off in retreat to the Texel.

FDS is a new set of rules for us to play and following my interest in them when first published a few years ago, I got together with Mike and Jack to play test them in anticipation for the full fleet battle at the NWS and I posted about my first impressions and how that game played back in January this year, link below.
 |
| JJ's Wargames - Battle of Camperdown Preparations, The Leeward Column Attacks! Playtest |
Needless to say a refamiliarisation was called for, not having played them since then, and Jack prompted me to organise a meet-up to reacquaint ourselves with them now that the fleet building part is finished and so we got together this week to give them another go.
For this game I turned to my plans for my Kiss Me Hardy game at this year's Clotted Lard meeting on the Saturday 21st September which will see the newest parts of the collection, Admiral Duncan's and De Winter's van divisions in action, so turning our attention to the other end of the Dutch line from that played back in January, but using FDS this time around.


 |
| Admiral Duncan's flagship Venerable 74-guns bears down on the Dutch line leading the her division and with Signal No.5 flying from her mizzen top 'Engage the Enemy More Closely'. |
Signalling is a key part of FDS, as it was for Admirals doing these battles for real, though often omitted from a lot of age of sail games, where multiple ships are in action and needing to be coordinated.
 |
| Note the distances shown between sender and recipient in this section of the FDS rules are my own conversion to suit 1:700 models, as the rules were written with smaller scales in mind. |
Orders for captains to operate under are important and the models are moved according to the last orders they received, such as heading, sail set, and combat instructions, with new orders required to be sent by the player commander should he wish his captains to do something different, with the order execution process shown above.
 |
| My additions to the Signal Book defines to players precisely what these 'General Orders' signals instruct the ships and their captains under their command to do or not do. |
These 'General Signals' are important in that if a commander has not issued 'Engage the Enemy More Closely' and that signal has been received and acknowledged, then a simple Engage the Enemy instruction will see them turn away at medium range to begin fighting.
 |
| I now have my FDS kit pulled together with all the markers required, orders of battle sheets, signal books and Command and Fleet Moral cards produced, some of which are seen here on the Dutch side of the table together with the dice tower and game turn clock. |
The other key point to ordering captains to put their commands at risk by taking them into very close proximity to the enemy is that once that happens, the captains involved may manoeuvre their ships as they see fit to fight their individual battles, thus causing the pell-mell that these big naval battles could turn into, with control over subordinates only able to be re-established once one side was beaten and in compulsory retreat and the need for 'Disengagement' and/or 'General Chase' signals to replace earlier instructions.
 |
| A page from Howe's Signal Book (left) in use at Camperdown and showing Signal No.5 (Engage the Enemy Closely) together with the section from the log of the British flagship Venerable, top right, showing the signal being hoisted at 12.5, about fifty-five minutes before Venerable opened fire as depicted in Derek Gardner's picture of the battle, showing said signal flying from her mizzen top. |
My game plan for Camperdown makes some assumptions in this regard in that the players briefing informs them that the situation presented is as a result of their historical predecessors signalling, namely Vice Admiral de Winter ordered at 09.00 his previous three columns of ships into line of battle, which is as seen on the table and intends to meet the British in that order as he heads into shallower water.
Similarly Admiral Duncan having perceived the enemy's formation and intent has signalled the following:
11.35 - Signal 41 - Bear up and sail large
11.53 - Signal 34 - Pass through the Line and Engage the Enemy to Leeward
12.05 - Signal 5 - Close Action
Thus the British captains are very well aware that they are to close with the enemy and pass through his line at the time our game starts, at just after midday on the 11th October 1797.
 |
| Yours Truly, rolling to find out if any of my Dutch ships were out of position as the British are about to press their attack, with the die rolls indicating two of my ships were indeed out of position producing gaps in my carefully prepared line. |
The next morning, following a brew, Jack and I went through the rules as we remembered them, with Jack taking on the role of Admiral Duncan and myself Vice Admiral De Winter as we started to work out way through the play sequence.
 |
| The basic ship statistics, with rates broken down into inferior, normal and superior that add or takes away in gunnery, AF(Attack Factor added to a d6 die roll in gunnery), DF (Defence factor, similarly used, as with the AF), BF (Boarding Factor usually '0' but could be added to for extra marines or troops on board or deducted because of a weak crew from +2 to -2 and obviously used in boarding melees added or deducted from a d6) |
As part of my reorganising FDS around playing them with 1:700 models, I slightly edited my own QRS to include the page number in the rules to be able to quickly find the appropriate rule section to better check on a particular phase of play, as the example below illustrates.

FDS is by no means complex, with my re-edited version comprising no more than forty pages, but its abstractions which allow a more rapid play in big battles, in my opinion by no means overly compromises the simulation; and as with our previous play through we found ourselves picking them up very quickly, and intuitively rolling through various factors around the combat calculations as the game progressed without any need to reference the QRS, which I take as a sign of a good set of rules.
The first two phases of play were completed quickly with no command points required for damage control or signalling, and with both fleets operating to their set up commands and so we got straight on with moving the fleets with Jack having the choice of moving first or second, he having the wind gauge, and a more effective commander, our 'house-rule' for deciding move priority, not so important at this stage of play, but more so when 'who moves first' becomes more important later in the game.
 |
| Jack moves Duncan's division into the attack, moving on a 'broad reach' wind bearing under battle sail on an ESE heading as the Dutch make slower progress 'close hauled' heading NE. Note the gap at the back of the Dutch line as the Staten Generaal was discovered to be out of position, further astern of the Vrijheid than she should have been, thus forcing the Wassenaer to take an avoiding course. |
Movement is very straight forward with Ships of the Line having a basic speed in 1:700 scale of 20-25cms, fifth-sixth rates 30cms, or smaller under the rates 35cms, adjusted accordingly as laid out in the table below. Obviously these are compromises and I could argue a case for small vessels not outpacing frigates, and the rules are flexible enough to cope with those kind of tweaks for the pedants of this world, like me.
 |
| My adjusted movement chart for use with 1:700, all distances in centimetres. |
The ships, like the historical ones they represent, sail on compass point headings using that heading to calculate their bearing to the wind to calculate their speed and this makes determining how fast our models will travel very easy to determine, using the following table below and the sixteen point compass.
Finding the vessel's heading on the left and reading across to the appropriate column for where the wind is blowing from gives you the ships relationship to it, namely running, broad-reaching, close-hauled and in-irons, and if the model points between two of the sixteen points as shown on the compass then the player can choose the most appropriate heading.
This is such a simple method of determining speed setting rather than other methods I have used and really works well.

Movement is done squadron by squadron and then independent ships, those ships either detached from a squadron formation through choice or forced to fall out of formation by damage. A ship in formation is counted as being supported by its comrades which implies benefits on morale checks, and firing and with ship formations firing and inflicting damage simultaneously whereas independent ships fire last and take any damage suffered first before they fire back in response.
 |
| Let battle commence! The first British ships break the Dutch line having successfully tested to do so, issuing stern rakes as they pass through and, as can be seen here, taking fire from some of the small Dutch frigates, corvettes and brigs, with them testing to see if they had the audacity to open fire on a ship of the line. |
This rule acts to encourage commanders to have their ships in formation to enable them to best bring them into battle and to re-establish those formations, if they are disorganised through combat, as soon as is practicable afterwards.
 |
| Formation descriptions supported in the text by the distances required between ships in a formation. |
As can be seen here in the pictures of our game, Duncan's ships pressed their attack and managed to break the Dutch line along its length causing several ship to ship melees to occur with close in exchanges of broadside's and the inevitable damage to accrue, with both sides turning to their command points to remedy the most serious situations as best they could, with never enough points to deal with them all and with no certainty of success when the points were spent on a given ship.
 |
| The best part of big battles, broadsides up close and personal with the damage starting to accrue. |
The picture above illustrates the chaotic nature of line breaking attacks coupled with close in exchanges of gunnery, with ships fouled or grappled, and with the model in the centre carrying a 'Confusion on the quarterdeck critical hit'.
There is no bookkeeping in FDS and markers are supplied with the rules, but I have produced my own together with additional ones that help us easily keep track of the game as we play, with markers placed on the ships bases as seen.

Gunnery is performed after movement and its effects as mentioned are simultaneous despite who fires first, this firing deemed to have been happening over ten minutes of movement and potential combat, the length of time each move in FDS represents.
 |
| The Dutch flagship Vrijheid already carrying medium damage fires her broadside at the oncoming British ships. |
That said we have adapted our play with another house-rule allowing ships to fire as they bear part way through their movement for situations such as rakes, placing smoke markers on all firing ships, thus ensuring that models don't fire twice in a phase of play; this together with the turning circles I use for KMH rather than the 45 degree angular pivot that is supposed to be used for a turning move at the beginning of movement.
The turn circles can be used at any time in the move to allow a captain to better manoeuvre his ship in the close in pell-mell actions seen here without compromising the number of centimetres available for movement, and we find that they work very well, with the larger ships using the larger turn circles.
 |
| My Gunnery Table suitably adapted for 1:700 |
Gunnery involves an opposed die rolling process with the scores achieved on a single d6 plus an Attack or Defence Factor (see Ship Statistics chart above) for the ship firing or taking fire modified further by damage, rakes and crew quality, with results compared on the table above.
 |
| Opposed die rolling process with the scores achieved on a single d6 plus or minus the appropriate factors |
One really clever concept in FDS that is seeking to represent the results of battle over ten minutes of action that each phase of play represents is coping with that inevitable concession with a 'damage escalation' concept that deals with vessels on one level of damage receiving the same level of damage in another firing attack, along with a nice mechanism for assessing critical events on both firers and targets.
Thus the table seen below illustrates that a ship with medium damage receiving another medium damage result automatically escalates to heavy damage, whereas a ship with light damage, receiving another light damage result will normally only escalate on a following die roll of 5+.
Thus the table seen below illustrates that a ship with medium damage receiving another medium damage result automatically escalates to heavy damage, whereas a ship with light damage, receiving another light damage result will normally only escalate on a following die roll of 5+.

The effect of this cumulative damage through Worn, Light, Medium and Heavy possibly culminating in a Strike Test is to introduce a struggle of who can pound the longest, with both sides looking to dish out the pain whilst hoping to remedy any damage received by targeted and effective use of Command Points in the following Command Phase.
The Damage Effects table below shows how this accumulated damage reduces the ability of the affected ship to fight and resist combat, with the -3 for heavy damage on attack and defence really crippling that ability, this assuming that the Strike Test that follows such damage is successfully passed.

This combat process produces the 'battle-management' style of game that really puts the player-commanders on the quarterdeck as an admiral or commodore rather than a ships captain, playing the game as the latter when ships lose formation and are engaged in the dog-fight of manoeuvre of close range battle, but then moved into the former role when the smoke clears in the next Command Phase, and decisions have to be made about which ships to attempt to repair, and any signals required to bring in reserves to a given fight or indeed to try and break off the battle and save what remains of the fleet.
 |
| The repair cost table. Note any Struck ship left to its own devices (outside of 30cm from the enemy) and not boarded may put up their colours and return to Heavy Damage, thus making it necessary to board them or leave ships to guard them whilst other continue the fight. |
A successful repair attempt results on a d6 roll of 3+ with the ships crew adding their CQM (Crew Quality Modifier) to the score attempt.


As the British attack developed in our game, I chose to fight it in the way De Winter did, keeping my line and supporting the ship ahead as best I could as the pell-mell developed but the British capabilities soon produced several critical outcomes along the line, this despite Jack doing his best to roll the worst dice possible, but me coming up with some abysmal command die rolls that left me short when it came to addressing my damage control.
 |
| Two of Jack's British squadron failed to pass through the Dutch line and so were forced to engage on the larboard side. |
If the battle damage management isn't enough to keep the commanders focus then a bit of the unexpected critical events and risks to those commanders certainly focusses the attention, as each combat situation sees opposed die rolls between the attacker and defender which, if that roll produces a natural '1' versus a natural '6', indicates something unfortunate has happened to the lower scorer, be they the attacker or defender, as illustrated in the table below.

In addition each time a flagship is hit, two d6 are rolled with a 12 indicating the quarterdeck has been hit, with a further d6 roll determining if that has caused confusion, and an inability to signal orders next turn, or the admiral or commodore has been killed, requiring a successor to take command.


For this game, I also included the Chance Cards mentioned in my previous Game Planning post, with Admiral Duncan drawing three cards and De Winter two, and they can be played as and when required to further add to the drama, which saw me make use of the 'Rallying Signal' card that increased the CQM of my ships required to take morale tests in a given turn, that helped to keep the Vrijheid in the fight a bit longer than might have been the case.
 |
| In the centre the little 24-gun corvette Minerva is fouled by a British third-rate, having rashly opened fire on British ships breaking the line. She would strike soon after with a crippling broadside ender her defiance. |
As the British attack developed in our game, I chose to fight it in the way De Winter did, keeping my line and supporting the ship ahead as best I could as the pell-mell developed but the British capabilities soon produced several critical outcomes along the line, this despite Jack doing his best to roll the worst dice possible, but me coming up with some abysmal command die rolls that left me short when it came to addressing my damage control.
 |
| Already carrying damage a Dutch third-rate receives a passing stern rake. |
This resulted in the Vrijheid inevitably suffering heavy damage, despite inflicting medium damage on the Venerable as she made her approach run and thus limiting her effect when she raked the Dutch flagship as she passed through the Dutch line. In fact the Dutch flagship lived up to her hard fighting reputation established in the actual battle, but cumulative attacks on her took their toll forcing a strike test.

Sadly Vice Admiral De Winter added nothing to the die roll, but his ship's crew, rated as veterans, did with a +1 CQM (Crew Quality Modifier), but even this was not enough to keep her in the fight and she struck at just after 2pm, putting the command responsibilities in the hands of Rear Admiral Treslong aboard the 74-gun Staten Generaal sailing astern.
 |
| The pell-mell in full swing. Rear Admiral Treslong aboard Staten Generaal, (bottom right of picture) is preferring discretion over valour by taking his ship close to the shallows off table, and keeping other vessels between him and the British. |
With Jack's eye very much on breaking the Dutch squadron's morale the race was on to take out further Dutch ships to cause a break off test and thus making their resistance to further attacks much less effective and so it was not entirely unexpected when a chance fouling with my little corvette Minerva, that had passed her test to obey De Winter's orders to open fire on British third rates, quickly struck to a broadside delivered at close range.
 |
| Albert Parker, naval historian and author, produced these thoughtful Fleet Preservation Rules and I find they work really well with FDS. |
With a simple percentage of loss applied to a fleet's/squadron's value based on the ships that compose it, one arrives at a number of points lost in ships struck or otherwise destroyed or with significant damage across the entire formation, that will cause said fleet/squadron to ask itself whether continuing the fight is worthwhile.
The loss of the Vrijheid and the Minerva had reduced my morale from six points to just two which would be wiped out with the loss of another ship of the line or two frigates/corvettes, and so the battle was moving into a situation of resistance for as long as was possible.
With the Dutch tottering on the edge of defeat, known to me but suspected by Jack, he not knowing exactly what the number was but thinking it must be close, the need to bring the British squadron into action as a whole to help finish things off took on greater urgency and with two of their number not able to penetrate the Dutch line, Jack signalled for them to pursue the unengaged Dutch ships whilst also ordering the frigate Circe to secure the Dutch flagship with a boarding party, as the battle moved on.
This enabled us to test the command structure of the rules to send and receive orders, which a longer, larger game may well demand and so it was helpful to look at the mechanism of play, with a record made of signals made that will also add to the narrative that FDS will no doubt generate from our game.
In the end Jack was not quite able to 'seal the deal' before our game drew to a close, but with eight turns played, or one hour and twenty minutes of battle, nearly half the entire historical fight we had certainly done our best to bend the rules out of shape and they had risen to the challenge by producing a very entertaining simulation of the actual events.
I also tried out some videoing ideas for our larger game, and I toyed with the idea of including cuts with this post, but with a trip to Colours this weekend, not to mention the need to edit out Jacks odd expletive at his disappointing die rolling, I decided to put that project on the back burner.
 |
| Vessels coming into base to base contact automatically stop their movement at that point and test for fouling or grappling. If either or both sides decide to attempt to board in another phase, that to is tested to see if the boarders can get across the tumblehome and possible boarding nets, with boarding attacks not a given by any means, better reflecting the relative rarity for such combats, certainly in fleet actions. |
The loss of the Vrijheid and the Minerva had reduced my morale from six points to just two which would be wiped out with the loss of another ship of the line or two frigates/corvettes, and so the battle was moving into a situation of resistance for as long as was possible.
 |
| The British third-rates Belliqueux 64-guns and Bedford 74-guns and the small frigate Circe 28-guns, range along the Dutch line in readiness to support those that have broken through it. |
 |
| This was very much a play-test game to try things out and take notes prior to the bigger event at Yeovilton, which explains the table clutter as we just concentrated on play rather than the appearance, with a bit of video testing as well. |
With the Dutch tottering on the edge of defeat, known to me but suspected by Jack, he not knowing exactly what the number was but thinking it must be close, the need to bring the British squadron into action as a whole to help finish things off took on greater urgency and with two of their number not able to penetrate the Dutch line, Jack signalled for them to pursue the unengaged Dutch ships whilst also ordering the frigate Circe to secure the Dutch flagship with a boarding party, as the battle moved on.
 |
| The battle moved along through the Dutch line as battles withing the larger battle reached a conclusion. The Dutch flagship Vrijheid, extreme left of picture with Admiral De Winter's flag atop the mainmast has already struck and a British boarding party from the frigate Circe has been sent across. |
 |
| Admiral Duncan became aware that several of the leading Dutch ships were attempting to disengage in preparation for escape and has signalled Belliqueux and Bedford to make sail and intercept them |
This enabled us to test the command structure of the rules to send and receive orders, which a longer, larger game may well demand and so it was helpful to look at the mechanism of play, with a record made of signals made that will also add to the narrative that FDS will no doubt generate from our game.
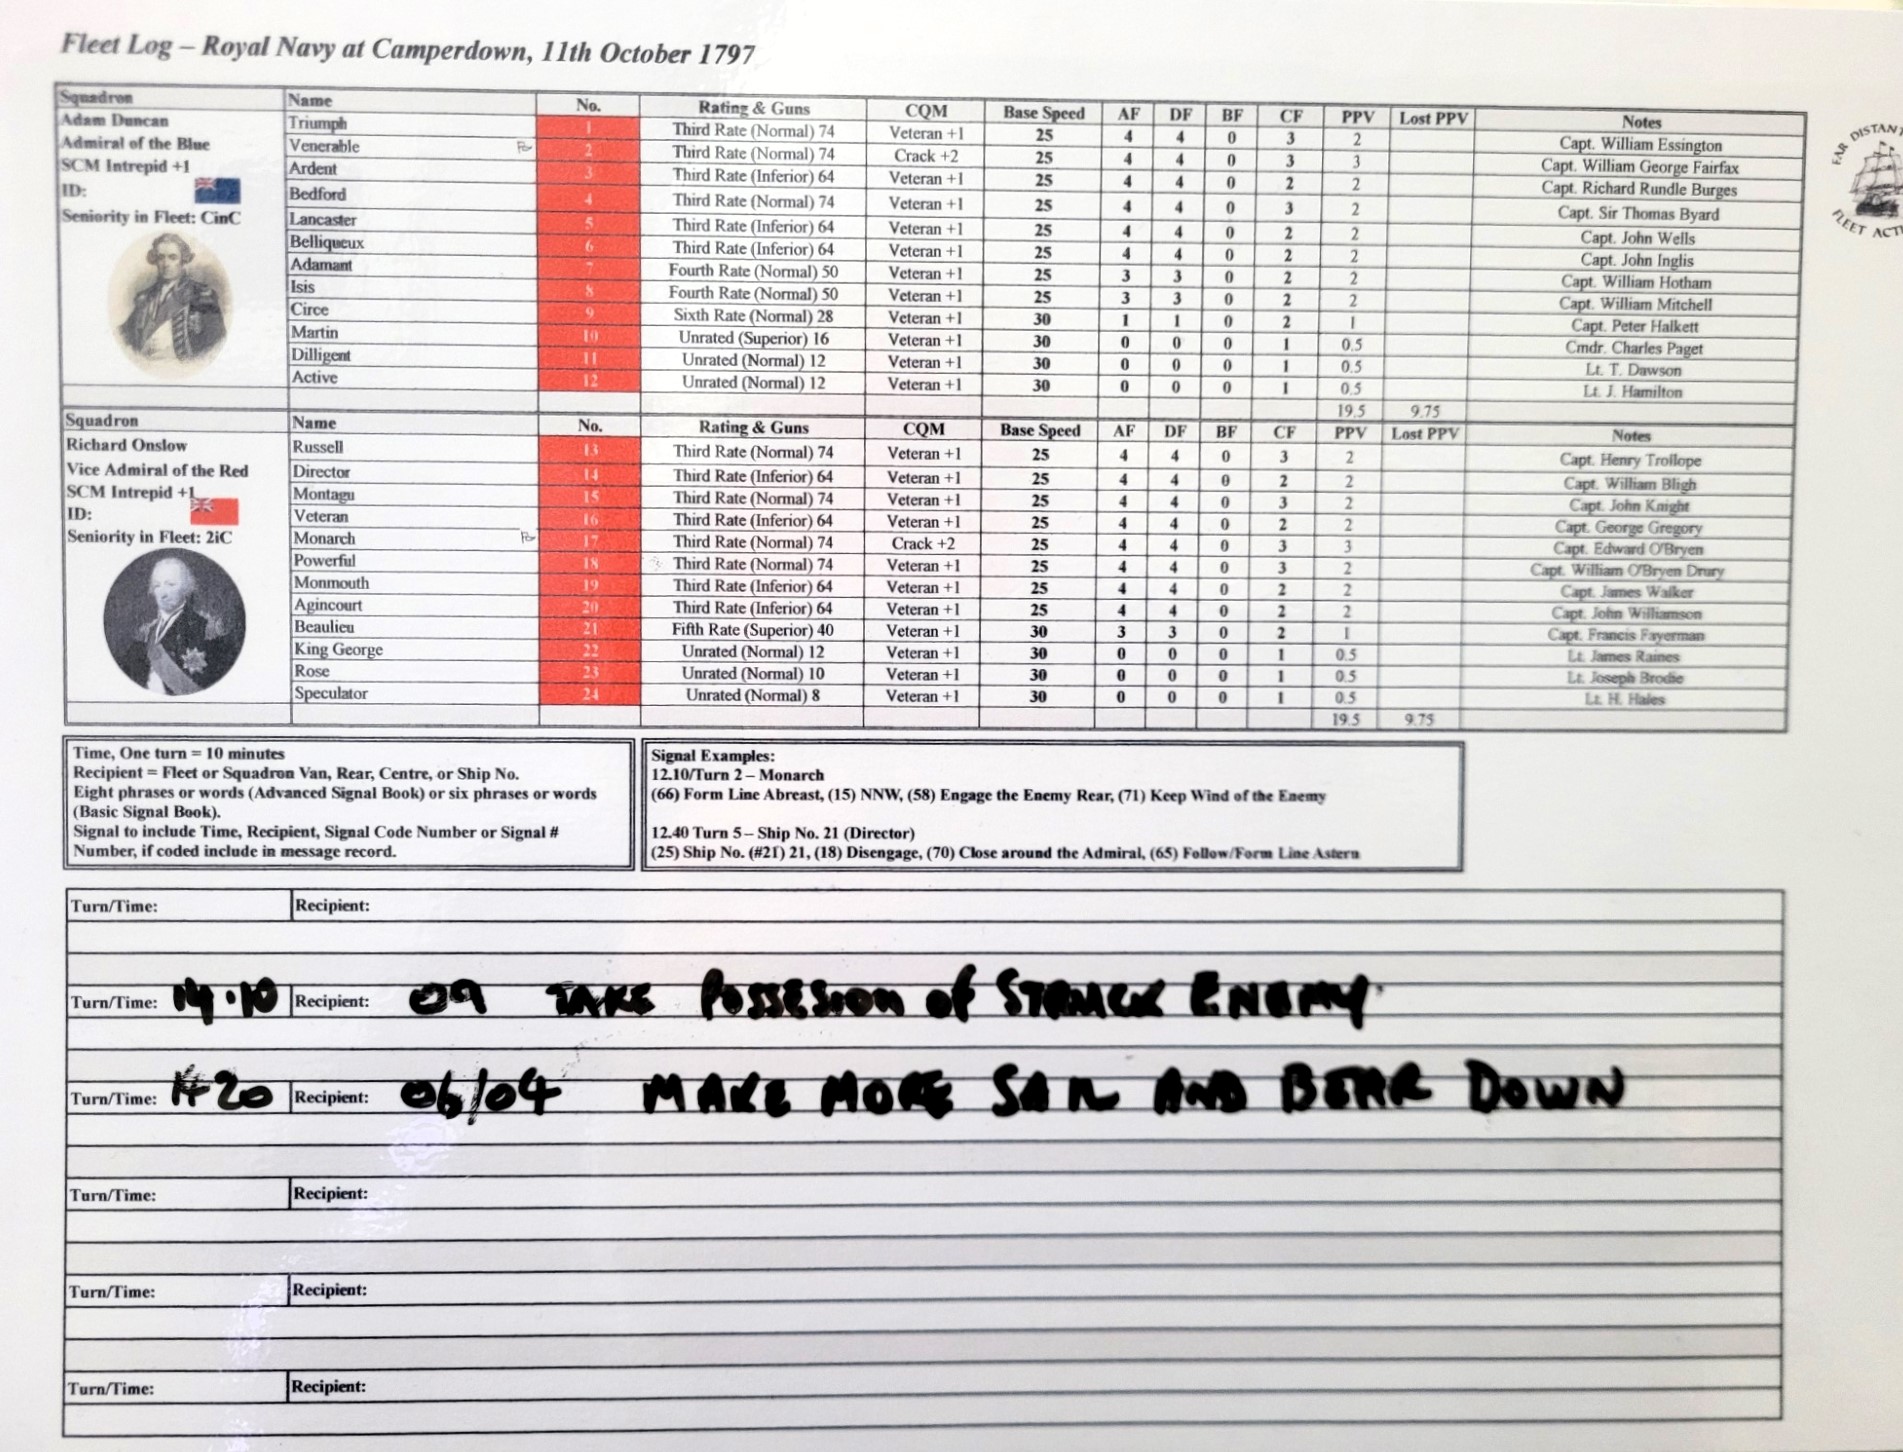 |
| The British Fleet Log where Jack has recorded his signals, with an order to Circe 28-guns Ship No. 09, at 14.10 to take possession of struck enemy, causing her to send a boarding party over to the Vrijheid, and at 14.20 ordering Belliqueux 64-guns, Ship No. 06 and Bedford 74-guns Ship No. 04 to make more sail and bear down on the enemy line. |
 |
| The Bedford 74-guns nearest camera and Belliqueux 64-guns have acknowledged the signal from the flagship and head off in pursuit of the Dutch ahead |
In the end Jack was not quite able to 'seal the deal' before our game drew to a close, but with eight turns played, or one hour and twenty minutes of battle, nearly half the entire historical fight we had certainly done our best to bend the rules out of shape and they had risen to the challenge by producing a very entertaining simulation of the actual events.
 |
| Bedford and Belliqueux spread their sails in hot pursuit. Indicating increased sail is important for recording the fact that the models are now in a higher speed bracket and that they present a better target for shots aimed at their rigging. |
That said, we learnt a few things and spotted some omissions we made in our play through that I have noted for our next game, together with a few additional counters to act as play aide-memoire's such as a marker to show when a ship has made a repair attempt, indicating that it may not open fire in the next round of play.
 |
| Bedford and Belliqueux close in and start to take effect by inflicting medium damage on the Dutch 64-gun Hercules left of picture as our game draws to a close |
I also tried out some videoing ideas for our larger game, and I toyed with the idea of including cuts with this post, but with a trip to Colours this weekend, not to mention the need to edit out Jacks odd expletive at his disappointing die rolling, I decided to put that project on the back burner.
 |
| The match is over and the covers are back on the pitch in readiness for the next game. |
I'm really looking forward to putting FDS to the ultimate test, namely running a big game with them, as they were intended for, although in this case, big also includes the scale, which they were not written for but I think will add to the visual appeal when seen on a very big table in a couple of weeks time.
 |
| My new arrivals from Only Games ready for a bit of cleaning up |
In the meantime, I'm off to Colours 2024 at Newbury this weekend so will aim to bring you a show report once I'm home, plus I have my War of 1812 small ships in the ship yard being constructed at the moment and this weekend my next batch of 3D printed small ships turned up from Turner Miniatures and Only Games, I having taken up the 25% Summer offer discount, so lots of work to get on with plus some great games to loom forward to in the coming months.

Until then, as always, more anon
JJ
No comments:
Post a Comment