Any wargamer worth their salt, if they are into building collections of figures or models eventually turn their mind to campaigning with their collection, and occasionally, time permitting, some of those ideas see the light of day.
As this blog illustrates, I am a keen boardgamer as well as a table-top figure/model wargamer and see it as another aspect of the hobby that often also offers the potential to be used as a campaign engine to bring context to our table-top games, and whenever I play am always conscious of that potential in a game.
The main factors that can influence that potential for me is how easy is it to translate what happens on the table to and from the board and where is the time and focus likely to be, as many boardgames will carry a level of detail and minutiae that is not required or desirable when it is simply being used for context in the tabletop world.
 |
| Collections of models such as this offers the potential to think about campaigns! |
However that balance is often a fine one, because if the boardgame is too simplistic it might not capture the feel of the period that you are representing on the table.
Needless to say with my mind very much focussed on the age of sail in recent months my eye has cast itself over the boardgame offerings in this subject and sadly it is a much under represented sector of the hobby, with little in the way of grand strategic naval games for the age of sail and with WWII naval predominating in games such as the old Avalon Hill game Victory in the Pacific and of course War at Sea.
 |
| The old WWII titles from Avalon Hill inspired my interest in Sovereign of the Seas for age of sail |
I have looked at the offerings from Jay Waschak and Phil Fry such as Victory by any Means (VBAM) and his own GMT game 1805 Sea of Glory, which have bag loads of detail and period feel but seemed to me to be perhaps a little too complex in their mechanics on several aspects of this period, although 1805 is perhaps the better of the two but I think if used for a miniatures campaign would see more time spent on the game mechanisms and their admin rather than on the movement and command of the model ships.
To quote the Too Fat Lardies, 'Making things simple does not imply simplistic' and the clever mechanics are the ones that incorporate all the detail and simulation that capture the essence of a period or historical theme in a very simple to use formula that keeps the game in that sweet spot of historical simulation but a fun game to play
Thus I have both VBAM and 1805 and, as well as being glad they are available, enjoy the attention to detail, but they are just not what I was looking for; but at least the naval gamer with a different opinion to me has some options here with these two offerings in what is a very sparse area indeed.
 |
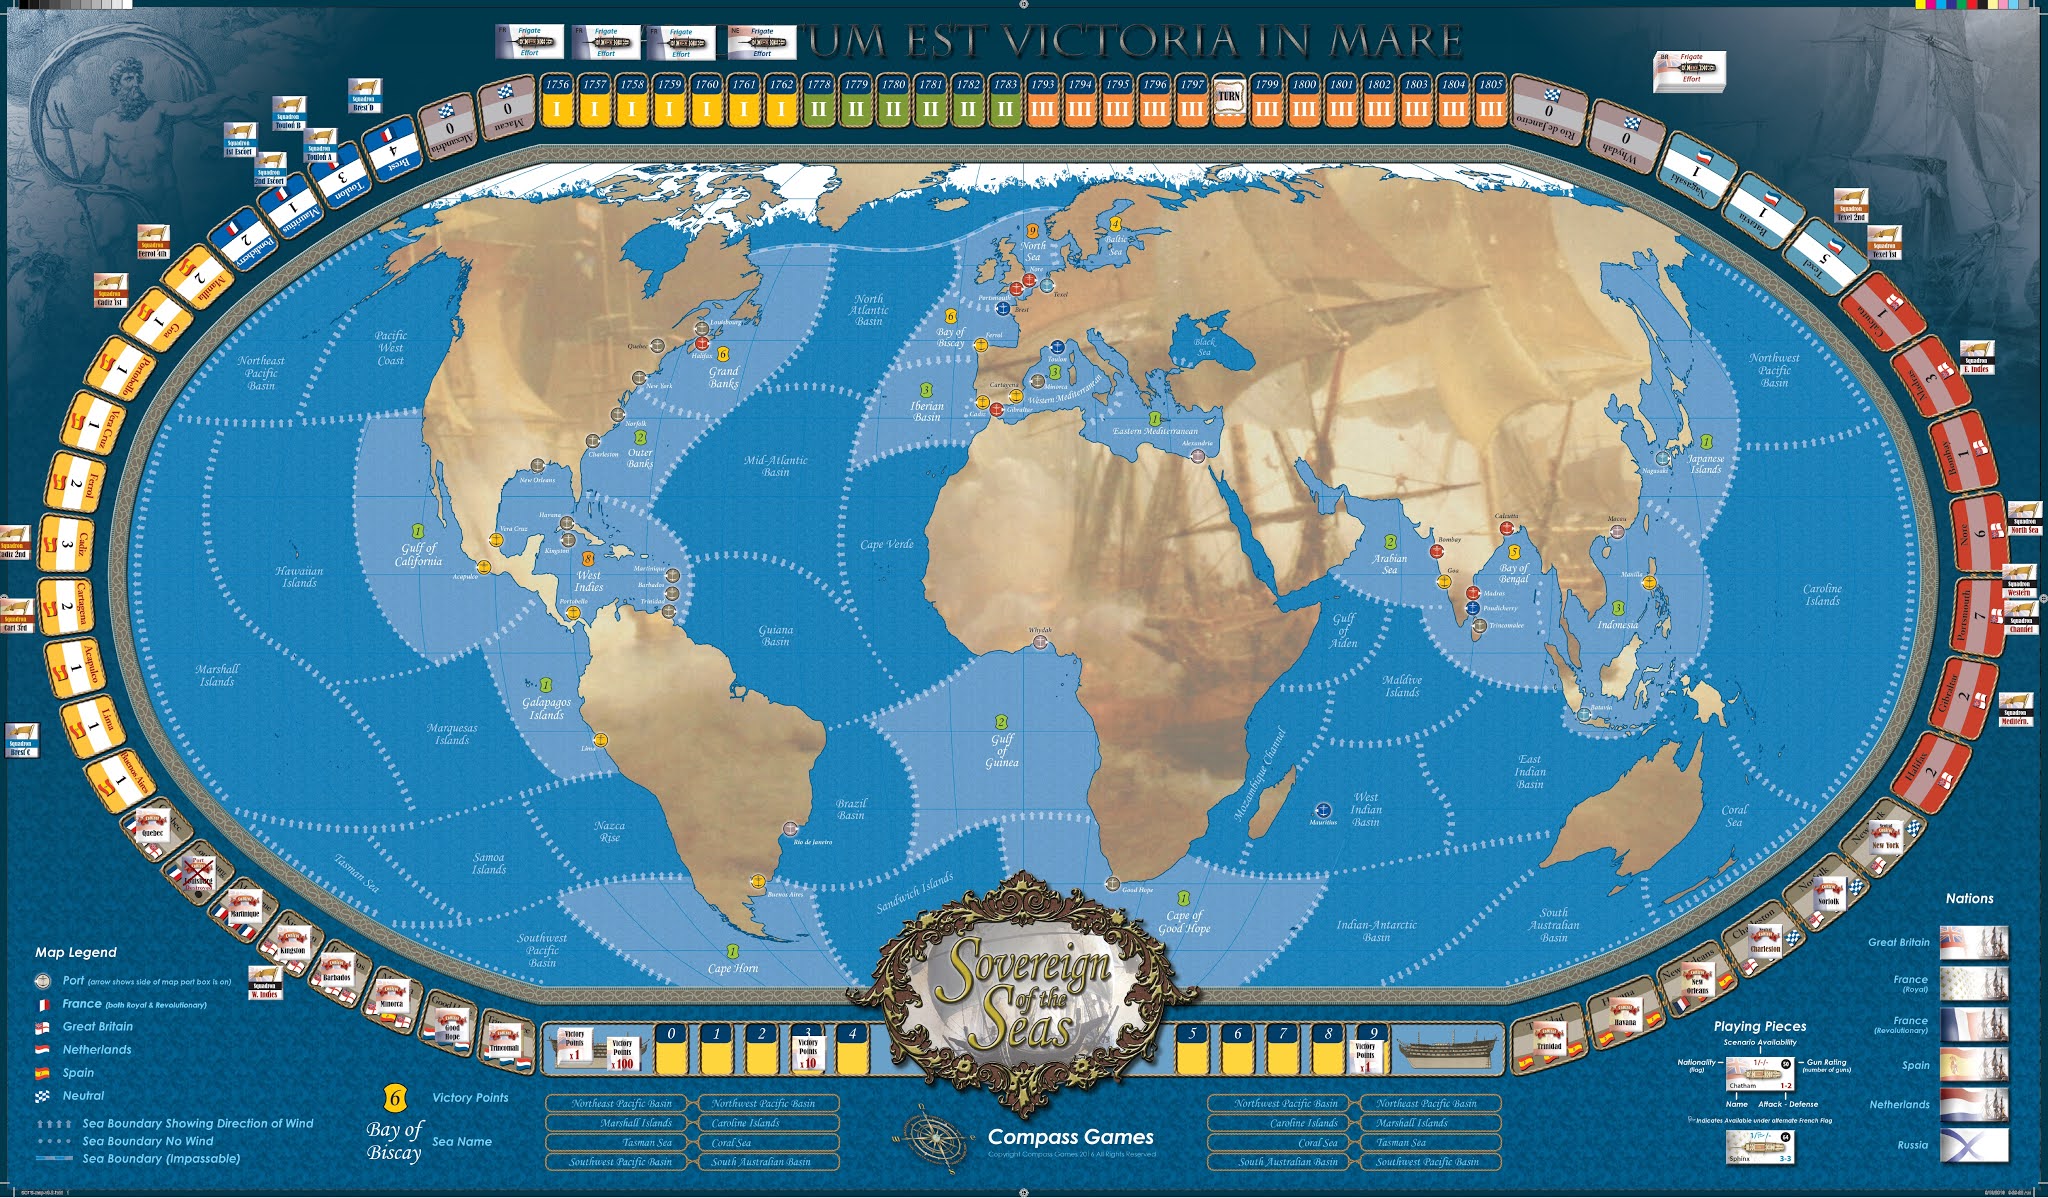
| The global nature of the war at sea is beautifully captured in the map for Sovereign of the Seas with the clever use of bordered sea areas replicating the various global wind patterns that help govern the movement of fleets and squadrons across the seas and oceans, with the various key ports and harbours shown on the map together with detailed boxes of their repair and defence capability together with their allegiance covering the Seven Years War, American War of Independence and the French Revolutionary War, around the border |
However I wanted to have the possibility of running large naval games within a 'wider war' context incorporating fleet management and the global nature of the First Great War that was the character of the Revolutionary and Napoleonic years, and Sovereign of the Seas (SOTS) from Compass Games seemed to offer that potential, bringing to it much of the design concepts of those earlier Avalon Hill WWII offerings but with very much an age of sail twist, and for those interested in earlier periods such as the Seven Years War and American War of Independence a chance to apply this game to those periods as well.
In addition, using Vassal, seemed to me to offer the opportunity of playing and coming back to the system around the table-top actions that the game might generate with a possibility of it modelling the small wall against commerce waged by the frigates and sloops together with the war of control and force projection waged by the great fleets, as well as overcoming some of the criticism of this game about counters being rather large for the map, amongst others.
 |
| The Allied (France, Spain and Netherlands) Fleet pools of ships and admirals that provide the source of the ships and commanders that will be parcelled out to the various squadrons in the different bases at the start of each year. |
Of course the only way to test the potential of the game was to play it and to see why some people love this game and why others less so, thus with my mind very open to possibility, I got together with Jason, another friend from the DWG, who is also very good at quickly dissecting games and how they play, and explaining to him my thinking, we started to play about eight weeks ago, starting in 1793 and working our way to 1805, the core years of the French Revolutionary and Napoleonic era.
With a quick die roll I took command of the Allies and Jason the British Royal Navy and we started the steep part of the learning curve with any unfamiliar game by working through the steps of game play which get repeated for each year of play, starting with randomly selecting the core of ships and commanding admirals from a national pool as seen above and then distributing them among the six squadrons for the British, French and Spanish/Dutch squadrons, with the option for the Russians to turn up as well.
One of the key parameters I use for estimating a game's design is how quickly and easily I and the other player/s move from unconsciously-incompetent play to unconsciously-competent play where you start out not really knowing what to do or how to do it, to that exquisite feeling when play becomes intuitive and the rules and strategies are married into the way you play, and we have quickly started to move through that learning curve which gives the game a big thumbs up from both of us.
 |
| My French fleet squadron display for the end of 1795 with a lot of damaged and sunk/captured ships following a dramatic clash with the British in the Caribbean. Note that I have admirals commanding with the Royalist flag on their counter as well as Revolutionary admirals as commanders such as Martin were around at this period and so we included them in our options for both sides, as the British would have commanders such as Howe and Gell left over from their hey-day during the American war. |
The French start the war on their own in 1793 but are soon joined by the Dutch in 1795 and the Spanish a year later, and to better capture the feel of the early war I added some of the Admirals included in the game for the American war to the mix with a note of retiring them as required such as Howe and Hotham who packed in in 1795.
The basic game play consists of six steps repeated for each year with;
Step One, the creation of the base force of ships and commanders established for any given year, representing the combat ready ships drawn from a larger pool of ships, with the balance representing ships left in ordinary or still being built and admirals unemployed and left on shore, lobbying their respective admiralty and friends for a job later on.
With the base force established the ships and commanders are distributed among the various bases and allocated to a particular squadron, for which it will have a small counter placed next to that base, seen around the edge of the map and, should it be successful in getting to sea, be placed in the sea area that it gets to through movement.
I am of course simplifying the description, as there are considerations later on about repairing damaged ships and demobilising down to a core collection of ships each year before adding a random number to bring the fleet back up to strength, looking to keep the better ships in commission, as well as putting less able admirals back on shore and hopefully having more able volunteers turn up to replace them, with the gradual process of producing a fleet of the best ships and commanders that you can use to achieve your war aims.
 |
| The first step of movement sees the frigate markers for the Allies and British get placed in key sea areas around the globe, with alternate placement, starting with the British. Note the various squadron markers set up in their corresponding base for the upcoming year, 1798 in this case. |
Step Two, sees the movement phase as the frigates and various squadrons are used to put into effect those war aims, which to my mind is very well modelled by the game by awarding victory points accordingly to encourage the players to use their forces very much like their historical counterparts.
For the British, the war objective is very straight forward, clear the enemy's fleets from the world's oceans whilst protecting commerce from enemy cruizers and the home islands and other key territories from invasion.
They can achieve this by making sure they have the only squadron or fleet of heavy ships at sea in a given area at the end of a year's turn of play, that effectively prevents the enemy from doing the same either with frigates or an enemy squadron and scoring points for doing so and by intercepting enemy fleets and squadrons, bringing them to battle and sinking or capturing as many of their ships as possible scoring points for the effort.
Of course certain sea areas are more sensitive in British strategy than others with a victory point (VP) allocation awarded to the allies should they get control of them commensurate with that importance, i.e. the British home waters having a VP of 9 with invasion of Britain and Ireland a distinct possibility if the Allies get control, only slightly more important than the sugar islands of the Caribbean with 8 VP. Control of all VP sea areas only awards those VPs to the allies and not the British.
 |
| The close up of frigate deployments for 1798 helps illustrate mine and Jason's different strategies, with the British six frigate counters having one in home waters two off Brest and Toulon and one in the Caribbean, thus helping to protect Britain and the Sugar Islands whilst making it very difficult for an Allied squadron to get to sea past a blockading British opponent without being spotted and brought to battle. Meanwhile the Allied four frigate markers (three French, one Dutch have gone to areas designed to force the British to deploy squadrons against them and hopefully keep them away from the main battle fleet deployments, whilst offering the chance of commerce raiding points at game end. |
For the Allies, the war objective is all about mission driven objectives with squadrons despatched around the globe to take control, even if temporarily of key sea areas thus facilitating land operations against neighbouring coasts and islands and if left unopposed allowing large numbers of Allied frigates and small ships to dominate trade routes in a key area of British friendly ports, only fighting the Royal Navy if forced to but preferring to achieve the mission before returning to base without risking valuable ships in battle.
 |
| Our situation map at the end of 1798 with Allied fleets (Spanish) in the Arabian Sea and the Bay of Bengal, with the Madras based British East Indies squadron failing to get to sea and both Allied squadrons managing to evade a search by a British squadron led by the man himself, Lord Nelson who sailed on into the Pacific to intercept and vent his wrath on a small French squadron I dispatched to the area as a bit of a distraction force, which sadly worked! |
Thus the Allies get less points for destroying Royal Navy ships, with the emphasis on sea area control by their squadrons or and/or frigates, with the later possibility of an immediate knock out victory if they control British waters in any year after 1802 to 1804 representing a Napoleon led invasion force having got across the Channel.
Following frigate placement, the various squadrons get their chance to get on station, with the British leading off. Movement is not automatic as we play the weather rule that can force some squadrons to remain in harbour, such as happened to the British Nore Squadron, allowing my weak Dutch to break out and head for the Baltic, not wishing to draw a major British unit against them by provoking an action in British home waters.
 |
| Opposing frigate effort in the Caribbean would seem to offer the potential of resolving this situation on the table as a small ship action. |
This part of the game is a brilliant 'cat and mouse' affair as the British can easily bottle up Allied squadrons, only two areas away from their base, giving them an 'on station' spotting advantage and with a blockade of a powerful squadron in say the Bay of Biscay and Western Mediterranean, together with a capable admiral and a couple of frigates, to make sure no one slips past, force the Allies to stay put; but if, often through the failure of a British squadron to put to sea, the Allies can send out fake squadrons (squadron markers that have no ships) that draw other British squadrons away, or get into an area with a large squadron and a capable admiral, able to avoid detection and forcing a failed intercepting British squadron to keep on moving to another area, then the map, after all squadrons have moved, can look like the one above, with the Allies sitting on a useful points haul.
 |
| The Battle or should that be Action in the Galapagos Islands, see the map above, at the close of 1798 as Nelson rounds up a marauding French squadron, capturing the L'Orient , but seeing the other two disabled French ships evade back to the Spanish port of Lima, and with the British losing the Royal George in the exchange of fire (We only allow a maximum of three ships to engage one enemy and Jason had a terrible game with the dice and should in most cases have taken out all three French ships, but only caused disablements in the first round of combat forcing the affected two French ships to withdraw to a friendly port.) |
The game cleverly, through its mechanics, produces occasional big battles similar to those that occurred historically, and thus between 1793 and 1798 we have had just three squadron size battles including the one above with the other two being an Anglo-French battle off Halifax in 1794, and a major British victory together with a significant clash in 1795 in the Caribbean, again a significant British victory both of which have seriously pegged back the Allied points total, and 1798 should have added to British laurels but for the success of the Spanish evading Nelson in the Indies, and as mentioned, Jason’s atrocious die rolls when it mattered, or rather the fortunes of war.
The number of big battle occasions is important, as in reality these events were surprisingly and relatively rare and organising a clash to be run on the table-top is an event for the players so as a game organiser you would want to keep things manageable, with a few significant big battle clashes mixed in with the occasional frigate action, and this game seems to offer that potential in buckets.
 |
| The Battle of Halifax 1794, our Glorious First of June and one of three clashes between 1793 to 1798, with the French overwhelmed by a powerful British fleet, the pegged back territorial success elsewhere. |
Step Three is the combat phase of the game as illustrated above and resolves the situation where one side has manged to intercept the other and forced an action or more rarely where both sides have looked for an action, and is resolved on the battle board, as illustrated above, with opposing ships battering each other with multiple dice looking to cause hits, damage and possible sinking/capture or disablement forcing a break off and return to port or elimination from the order of battle.
The straight forward representation of combat, using hits received compared to a defence rating gives a very easy to translate picture of the damage a ship has received should that need to be translated back from a tabletop refight to the game and used to help model the repair phase that follows.
 |
| Large battles in SOTS would be very easily translated on to the table-top but with the added tactical nuance that a simple battle board cannot hope to reproduce. |
However there is plenty of scope for the table-top representation to include the manoeuvre options and tactical set ups that cannot easily or best be represented in the simple battle board game mechanic that works fine for the game but would be only enhanced by refighting the forces on the table and providing for a much more nuanced result.
Given that we have been playtesting the game, the battles should not be seen as representative of those we might have generated had we known, as we do now, the better way of playing or avoided the errors of play we definitely made, harking back to my earlier comment about being unconsciously-competent.
 |
| As well as fleet scale actions we could both see how the game could generate a context for bringing a small frigate action to the table adding yet more drama to the game overall. |
That said the possibility of generating table top actions in a context of the larger war is definitely a possibility with SOTS and seeing the number of such actions replicating the historical actuality, with the frigate-effort/commerce raiding mechanic allowing for the odd ship to ship small action to also be brought to the table to resolve the advantage in Victory Points gained or not as the case may be.
The last aspect of the sea combats and area occupation resolution phase is the possibility of naval squadrons occupying areas next to enemy ports capturing them by naval landing operations, resolved simply in the board game by both sides rolling a dice and adding their senior naval commanders rating or the repair/defence factor for the port being attacked and comparing results with the attacker needing a higher score to succeed, but also providing an opportunity for a land based table-top skirmish should that be preferred.
 |
| Martinique, with a British control marker on it, falls to a successful naval assault in 1798 as the British got control of the Caribbean. Note the placement of squadron markers next to the ports they have returned to, with the defeated Brest Squadron C repairing in Lima. In the movement phase, squadrons who fail to sail or who opt to remain in port are placed on the port square to show that has happened. |
Step Four sees all the activities of the year after any combats have been resolved generate the victory point totals for the two sides and adjusting the overall total accordingly.
 |
| Our map at the end of 1798 with all the squadrons returned to an appropriate port, seen placed besides that port around the edge of the map and the victory point total adjusted at the bottom, and our frigate activity markers placed along the top of the map ready for deployment in the next campaign year |
When first reading the rules for this game, I couldn't see how the British wouldn't stop Allied gains in sea area control, simply by making sure they were in the key areas or intercepting Allied squadrons at sea that managed to evade their blockade, but playing the game has shown all the problems that both sides have to contend with when you don't know what the other side are up to, intermixed with the problems of moving ships around the world in an age of wind driven vessels subject to the vagaries of weather.
 |
| The Allied points tally at the end of 1798 slightly favouring a marginal Allied victory on 39VPs and all to play for. |
Steps Five & Six are the last two admin parts of the game that sees decisions about where at sea squadrons will base themselves with the next year in mind and looking to be in the best possible place to operate from, combined with decisions to repair certain key ships damaged in battle or storms and those that will simply be added to the demobilised pile and returned to the in ordinary pool hopefully, or not, to return to the fleet in a later draw down.
We have both really enjoyed playing the game and have come up with ideas for home rule mods to retire commanding admirals in line with their historical careers as well as restrictions on some of the better British admirals such as Nelson and Troubridge, who weren't available as senior commanders until the latter half of this period and perhaps should be represented at half their total command ability when they first arrive as junior commodores in, for example 1797, for Nelson rating a +2 command ability instead of the +4 he gets as a full rear and vice-admiral from 1798 onwards.
These very able British commanders make a big difference to the British abilities to go to sea and to intercept.
 |
| The British Fleet Pool and the ships shown from the pool in their readiness for war by rating in 1793 with those that were added in the later years covered by SOTS |
Before starting this playtest I sat down and took a look at the representative counter mix of the respective fleets and was very impressed at the orders of battle that obviously does not have every ship available for the period, but does contain many very recognisable ones and in a proportion of rates that readily represents the forces available to the navies of that time
Our campaign is now on the eve of the Peace of Amiens and to represent the peace talks succeeding earlier or later we roll a dice from 1799 onwards to see if the next year will be the peace, but our roll determined the war will continue on into 1799.
 |
| As with the British pool above I took a look at the Allied fleets and grouped them similarly to find an equally well represented group in the right sort of proportion of rates to model the respective fleets |
This game is a much better game than some commentators would give it credit for, and despite some of the production faults in the map and counter size and the poor proof reading of the rules that has left some mistakes in the final product we have discovered what other commentators have noticed, that there is a very clever and entertaining game in SOTS and one that has much to offer the table-top community wanting to bring some context to their big and small games.
The Vassal option for playing the game overcomes many of its hard-copy issues and we are looking forward to picking up next week to resolve 1799 in the French Revolutionary War at Sea.
Sources relevant to this post:
Next up on JJ's: Carrying on the nautical theme, the six sloops are now finished and have gone to the yard for rigging out, so I will be showing you how you can make these conversions look for the British, French, Spanish, Dutch and American navies or even to double up as merchant sheep in wolves clothing.
 |
| The six sloop conversions ready to be rigged this weekend |
In addition I've been doing lots of walking and making the best of the summer sun in the last week or two with two walks on Dartmoor exploring its amazing scenery and historical 'ruins in the landscape', and Mr Steve and I have been out battlefield exploring, carrying on our journey back to the 17th century and to the dark days of the English Civil in the company of like friends Sir William Waller and Sir Ralph Hopton as we pick up where we left off at the Battle of Landsdowne Hill and follow the armies to Devizes and the Battle of Roundway Down.
More anon
JJ


Impressive ship yard you have going there..
ReplyDeleteHi Gary,
DeleteThanks, its been a fun eighteen months putting the collection together and I’m looking forward to rolling out some games with them.
JJ