
 | |
|
The next stop on our journey through Australia took us to the Australian Capital Territory, a landlocked Federal Territory in New South Wales established in 1913 following the Federation of the colonies of Australia on January 1st 1901; and the conclusion of the dispute as to whether Melbourne or Sydney should be the new capital city, with the agreement to create a new Federal Capital called Canberra, as long as it was at least one hundred miles away from Sydney.
 |
| Map courtesy of https://www.freeworldmaps.net/australia/ |
The city is unique in Australia in that it is an entirely planned city, based on the design of American architects, Walter and Marion Griffin, who were selected, after an international design contest, to create the layout of this purpose built Federal Capital that would be the seat of government of the new nation.
To get a full impression of the creation of the city they created, Carolyn and I headed straight for perhaps the best views out over it, from the top of Mount Ainslie, before we found our way to our accommodation for the few days that we had to further explore this most interesting of capital city's.
 |
| The Federal Capital of Australia, Canberra lies majestically at the foot of Mount Ainslie. |
The stunning view looking south sees the Australian War Memorial directly below the tree line at the bottom of the mount, with Anzac Parade progressing up to Lake Burley Griffin, with King Edward Terrace on the opposite bank in front of Old Parliament House, with New Parliament House beyond.
 |
| Central Canberra, with the Australian War Memorial and the Anzac Parade stretching forth towards Lake Burley Griffin and the Parliament buildings beyond. |
Mount Ainslie reveals how Canberra is situated in native countryside and of course native birdlife and my camera was drawn to the birds, some remarkably similar to home but others quite different
 |
| We never got tired of seeing the Crimson Rosella's, Platycercus elegans, on our travels, with their high pitched three note whistle immediately causing a glance upward. |
 |
| The Australian Raven, Corvus coronoides, was quite common to see, and hear with its slow drawn out wail and gravelly rattle of a call. |
 |
| We first were acquainted with the Australian Magpie, Gymnorhina tibicen, in New Zealand where it was an introduced species. Its melodious warbling call was quite unexpected from a bird you would expect to 'caw' just like any other crow looking species. |
The next day we took the time to get acquainted with the parliamentary government buildings, old and new before making our way up Anzac Parade to the Australian War Memorial (AWM), where we planned to see the collection of items associated with Australia's military commitments from the Boer War to more recent conflicts in Vietnam and Afghanistan.
 |
| The opening of Old Parliament House in May 1927. |
 |
| Old Parliament House as seen today, was the Parliament of Australia from 1927 to 1988, now serving as a venue for concerts, exhibitions and lectures. |
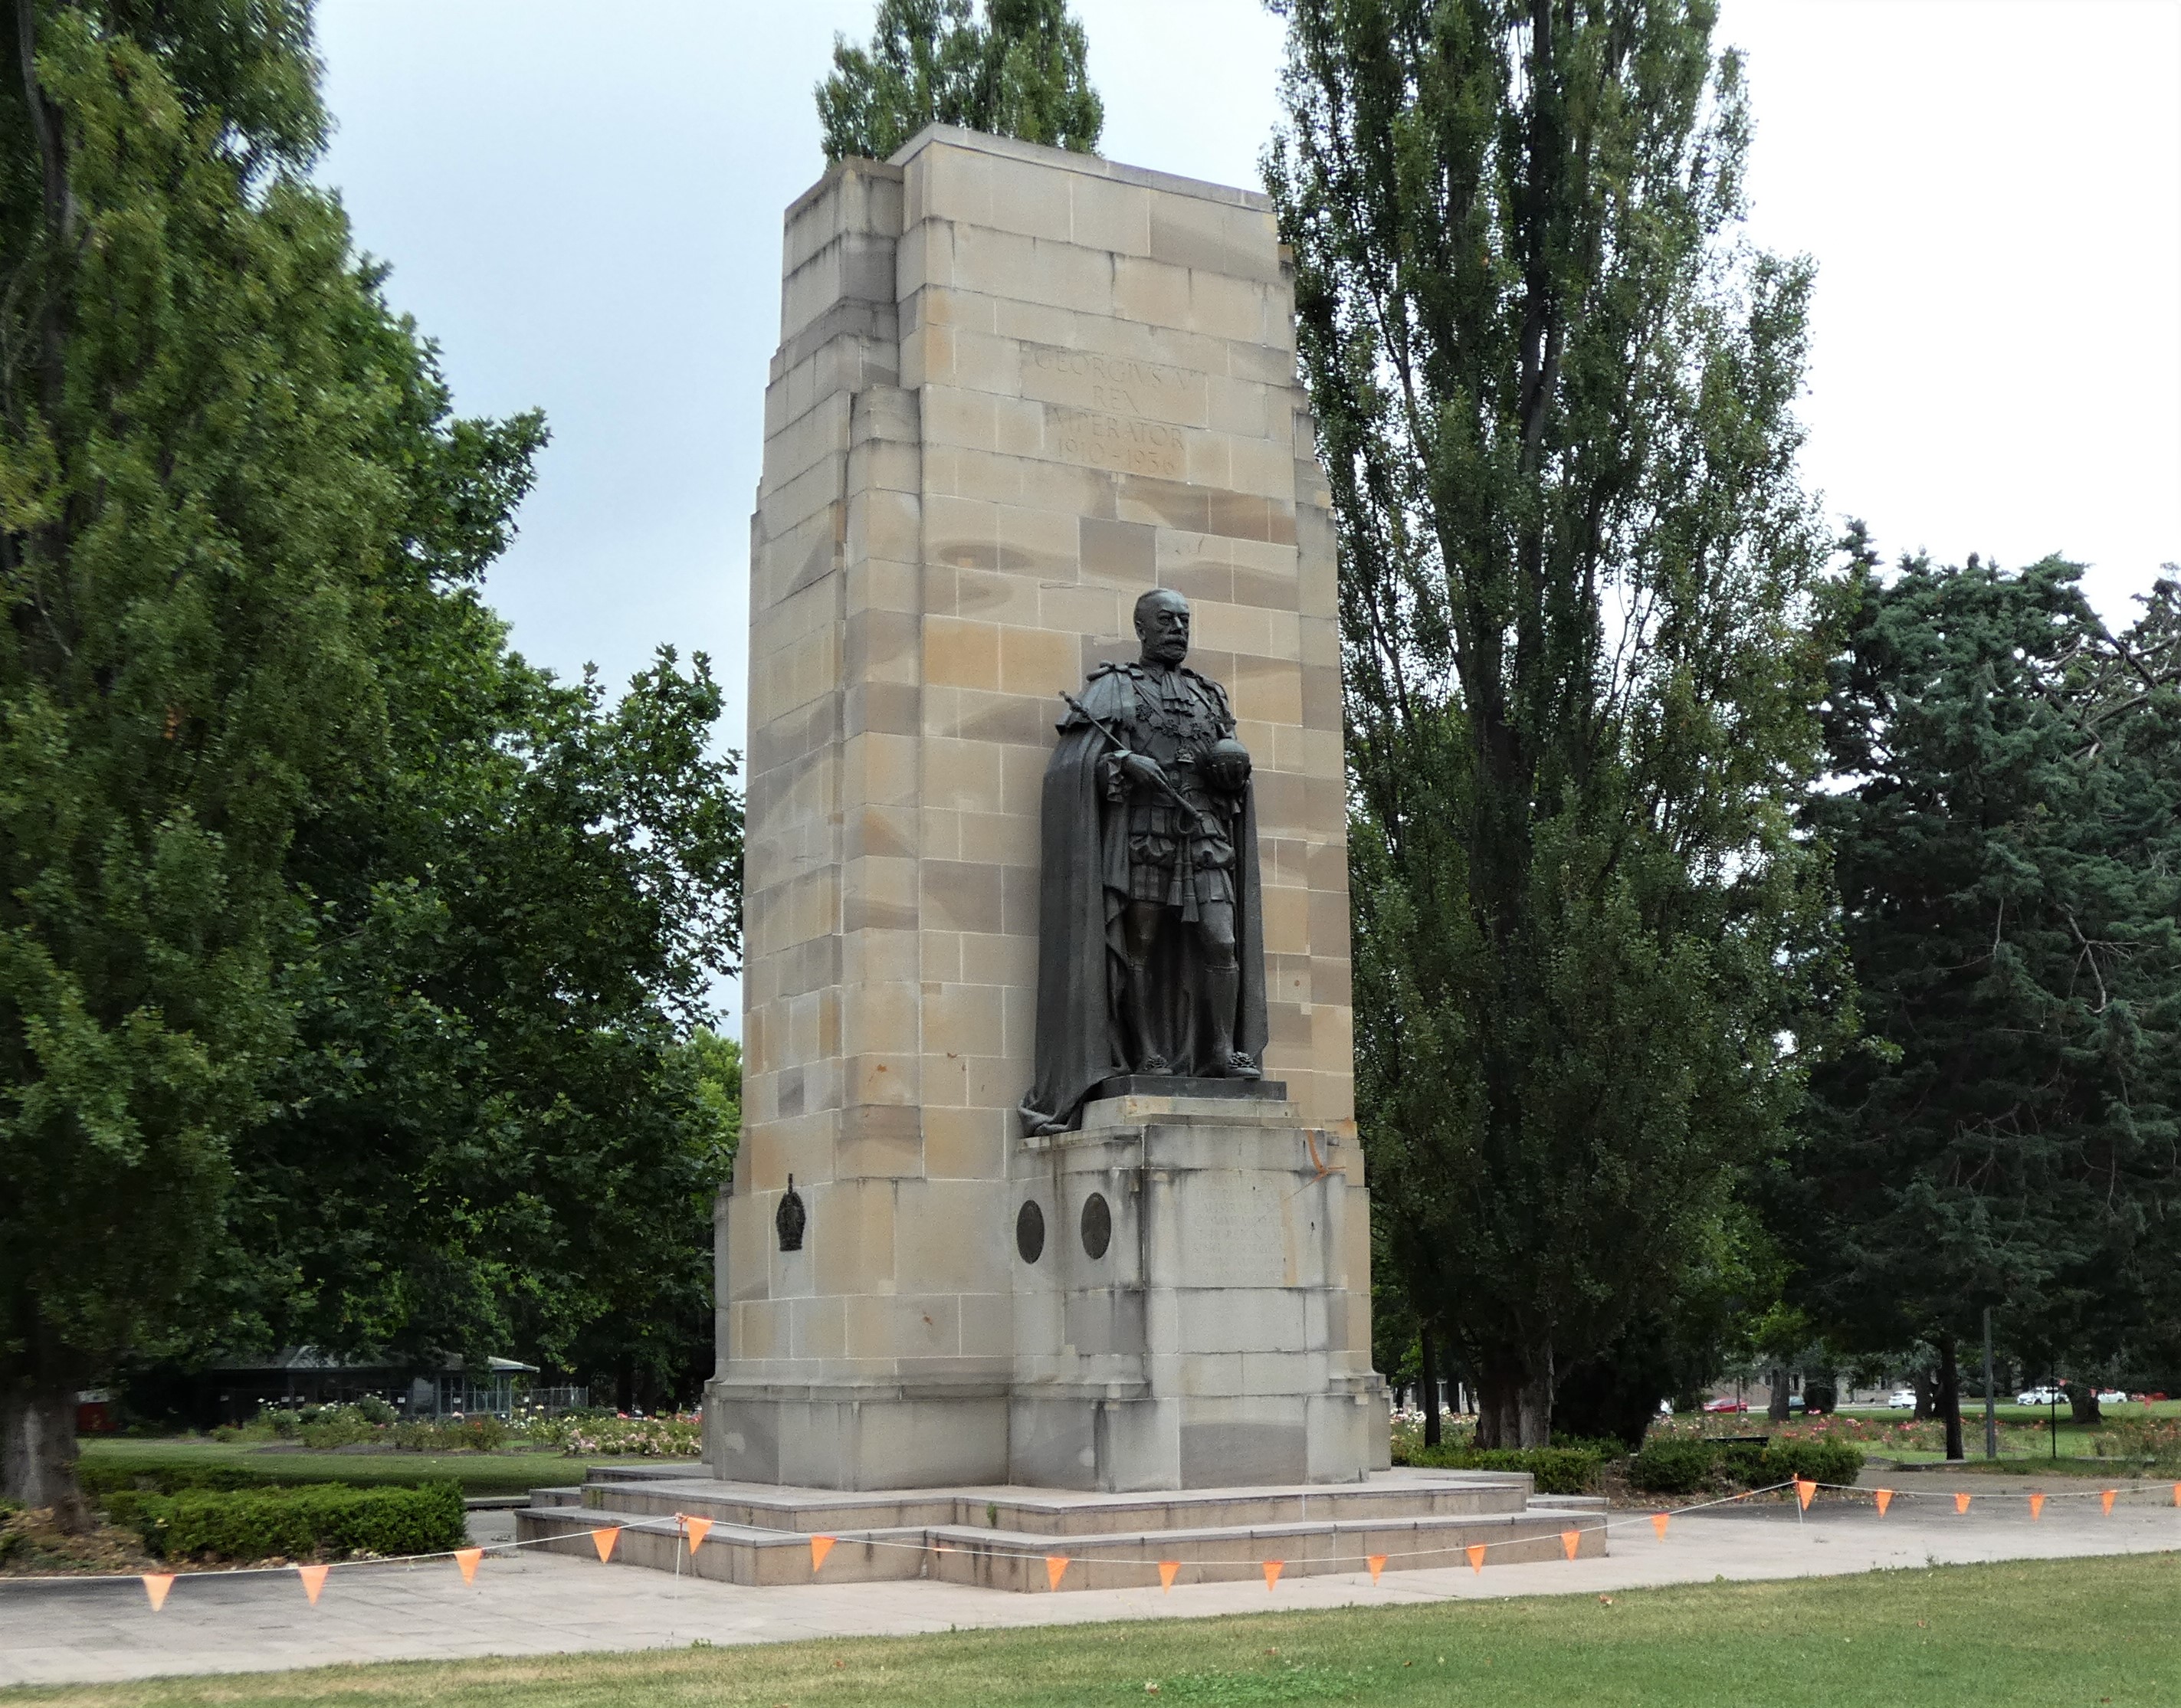 |
| King Edward VII, was king and emperor from 22nd January 1901 until his death in 1910, overlooks King Edward Terrace in front of the Old Parliament House. |
 |
| The New Parliament House or Capital Hill was opened on the 9th May 1988 by Queen Elizabeth II. |
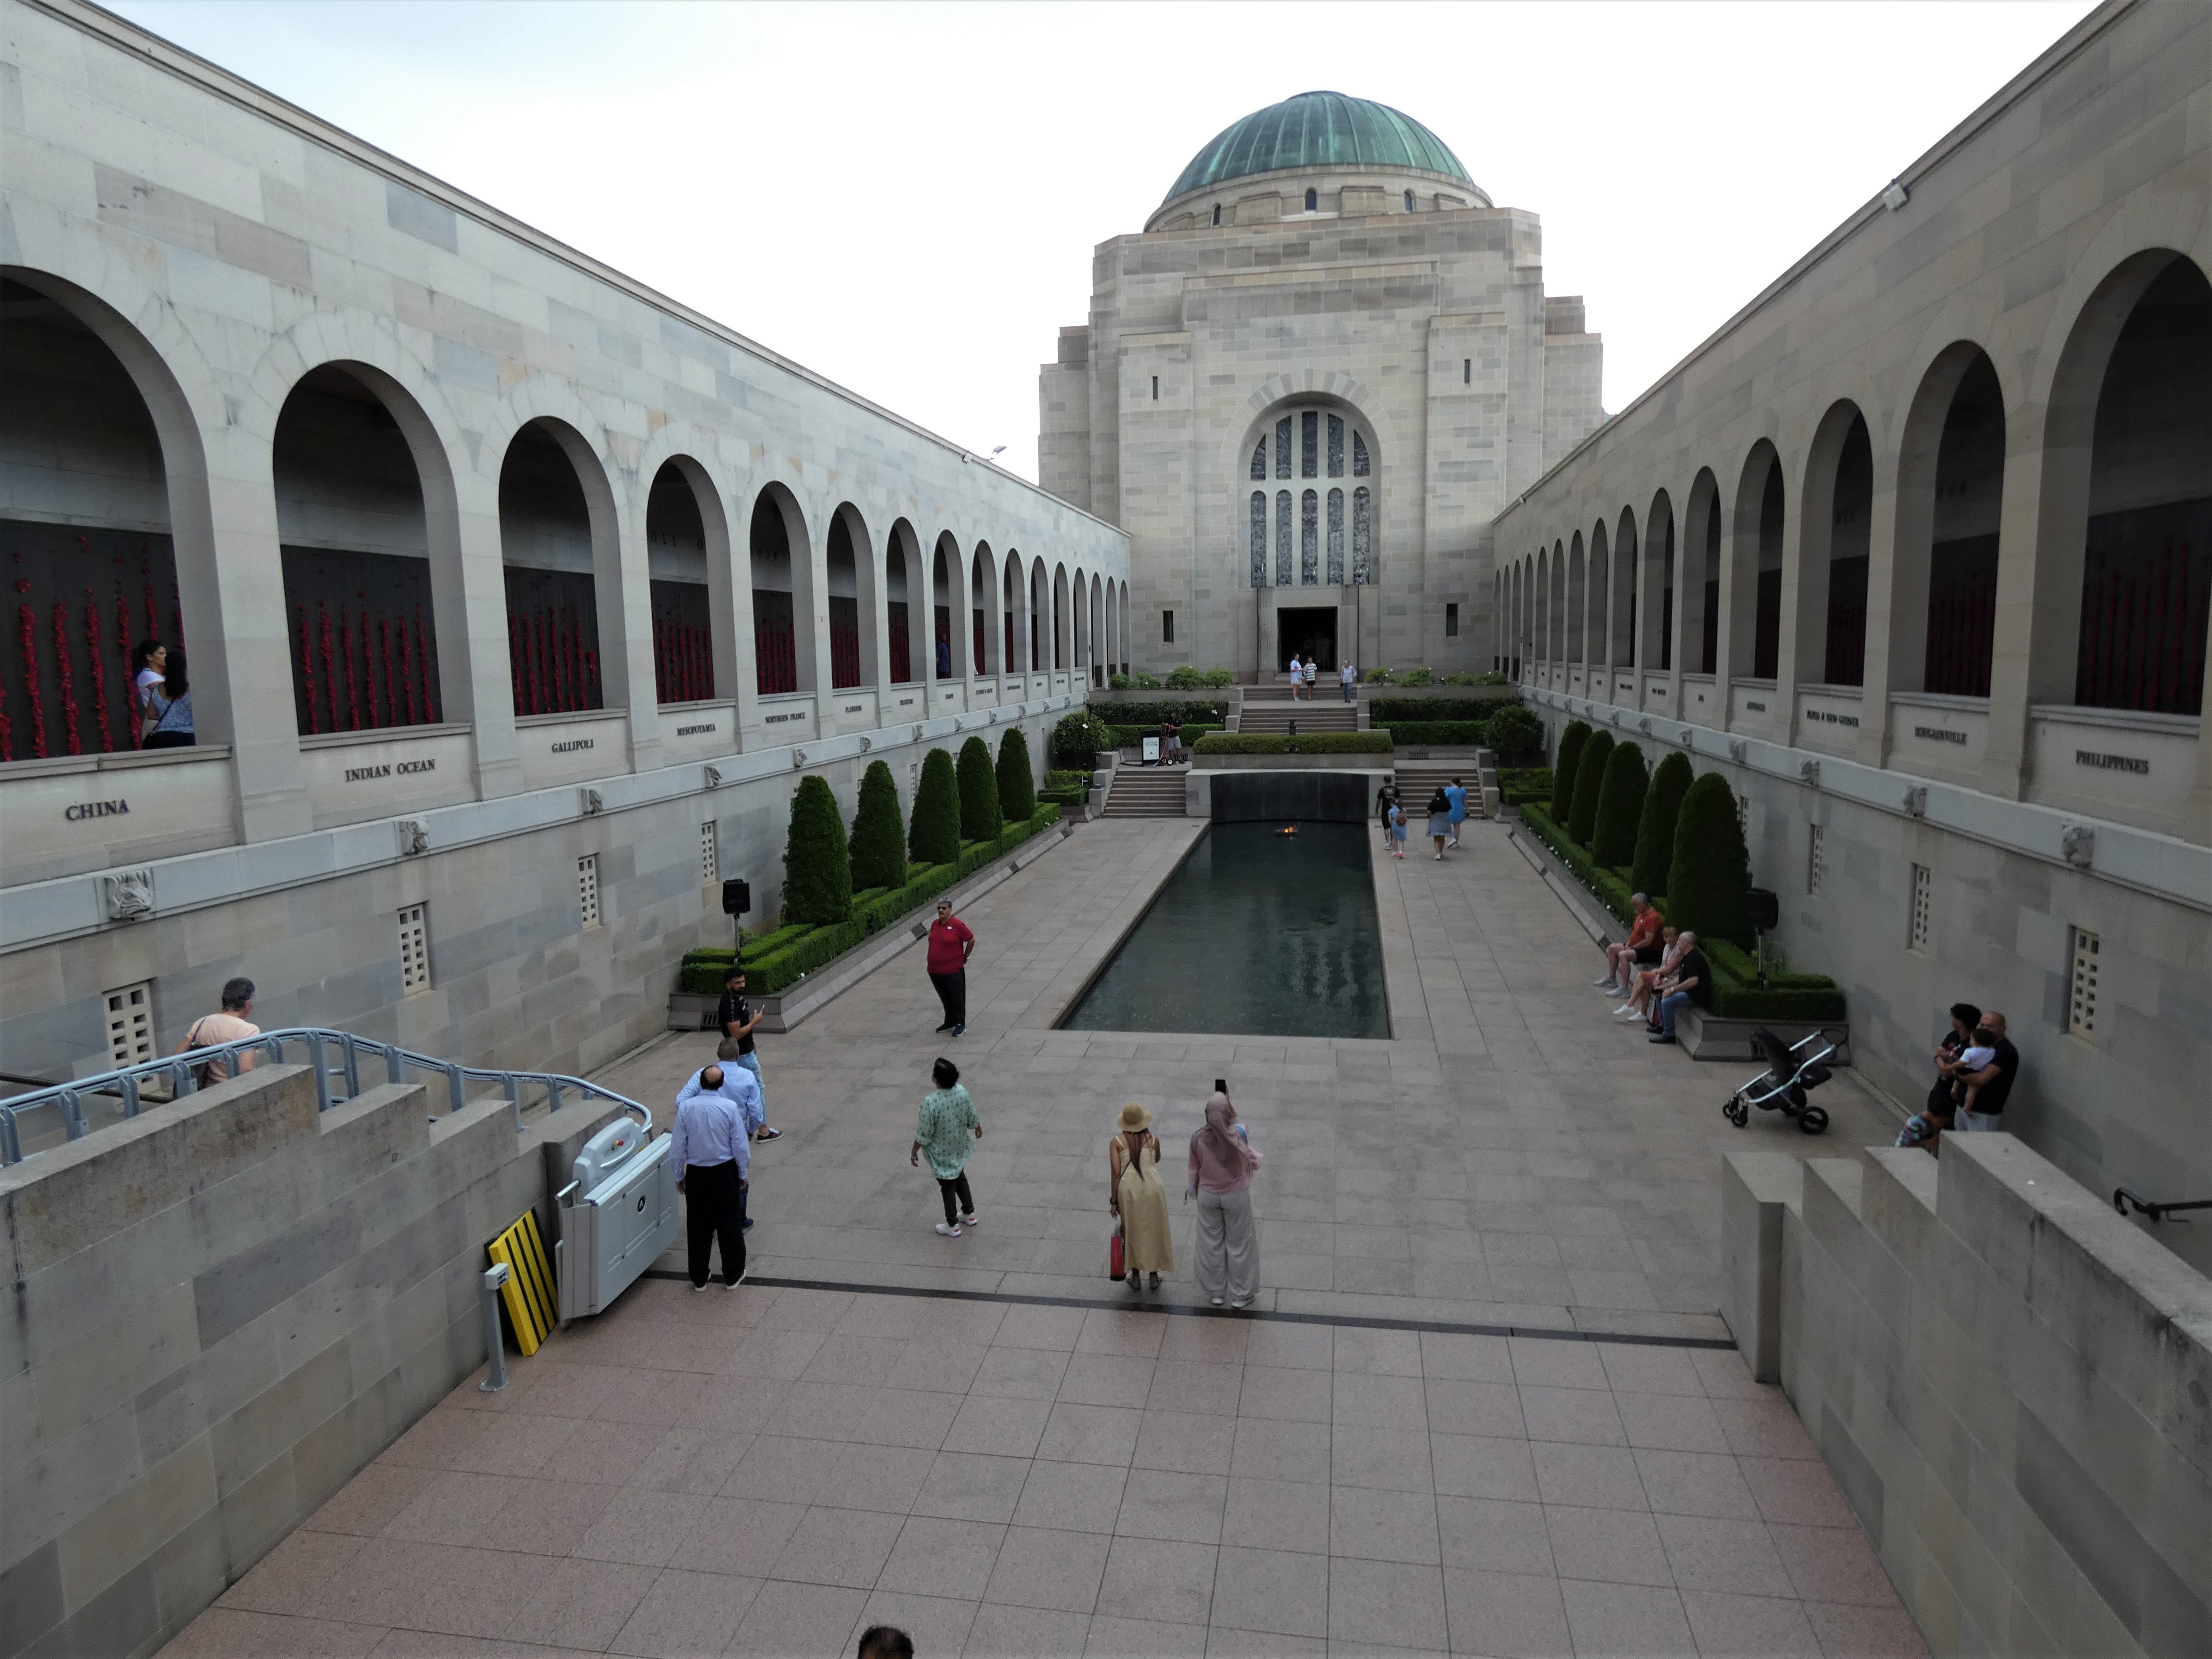
The AWM was the brainchild of war correspondent Charles Bean on the Western Front in 1916, to stand as a memorial to those that served the nation in war, as well as a museum and archive that would allow subsequent generations to better understand the experiences of the men and women that served.
It was interesting to compare and contrast the AWM with the Shrine of Remembrance in Melbourne that fulfilled a similar role when the latter city assumed the duties of the pre federal era up until Canberra took over the role of capital city and obviously allowing for the size of the collection in the AWM, there are very obvious similarities in the concept of museum and memorial, as indeed with the Imperial War Museum (IWM) in London.
 |
| The Australian War Memorial was conceived in 1916 to combine the roles of a shrine, museum and archive, with the main building being opened in 1941. |
However collections focussed on Australia's military past appear to be much more centralised than say in the UK which together with the main museums such as those in London, the IWM, the National Army Museum, The National Maritime Museum, Greenwich, and the RAF Museum in Hendon, there are multiple sites dotted around the UK with other extensive collections at places like Cosford, Portsmouth, Edinburgh, Hartlepool and all the Regimental Museums, many covered here on JJ's.
Of course British military history extends way back into the first century which would more than explain the need for this abundance of sites and collections, and as I will hope to show in future posts there are some very interesting military collections around other parts of Australia other than the main memorial museum collections in Melbourne, Canberra and Sydney.
 |
| https://www.awm.gov.au/articles/encyclopedia/george |
One of the items I was very keen to see in Canberra was Avro Lancaster G-George, formerly of No. 460 Squadron, RAAF of Bomber Command, which completed ninety operational missions between 1942 to 1944 and formed a central display piece for the AWM's 'Striking by Night' exhibition complete with three German Messerschmitt fighter aircraft, so you might imagine my disappointment to discover that the AWM was going through some rebuilding during our visit that required the 'Striking by Night' exhibits to be put into storage during the works that were going on.
That said I still had plenty to occupy my camera and as always have included a selection of the collection that particularly caught my eye.
The aircraft that were on display included some very interesting types that proved critical to Empire and later Commonwealth success in the air during WWII and the Korean conflicts, as well as another example of the classic Japanese fighter the Zero, of which I had already encountered two others, one in Peral Harbour, Hawaii and the other in Auckland, New Zealand.
 |
| Hawker Sea Fury FB11, VX730, used by the RAN Fleet Air Arm during the Korean War. |
The Hawker Sea Fury was a further development of the WWII RAF fighter, the Hawker Tempest, with modified wings and fuselage taken from the Tempest, originally following a request by the RAF for a Light Tempest Fighter, that was subsequently dropped at the conclusion of WWII, but found favour with the Royal Navy as a potential standard carrier based fighter for the Fleet Air Arm.

The Sea Fury ended up being the last propeller driven fighter used by the Royal Navy, and was one of the fastest reciprocating engine aircraft ever built, and would see service in the Korean War 1950-53 and with the Cuban air force during the 1961 Bay Of Pigs Invasion.
The only other Sea Fury I had seen prior to this RAN example, was that in the Fleet Air Arm collection at Yeovilton that sadly crashed in April last year.

The Hawker Sea Fury was powered by a Bristol Centaurus eighteen cylinder radial piston engine developing 2480 horsepower with its five bladed constant speed propeller, giving the aircraft a maximum speed of 460 mph at 18,000 feet, a rate of climb of 4,320 feet per minute and a service ceiling of 35,800 feet, and a range of 780 miles.
The main armament consisted of four 20mm Hispano Mark V autocannons to which could be added sixteen 3-inch rockets or 2,000 lbs of bombs.
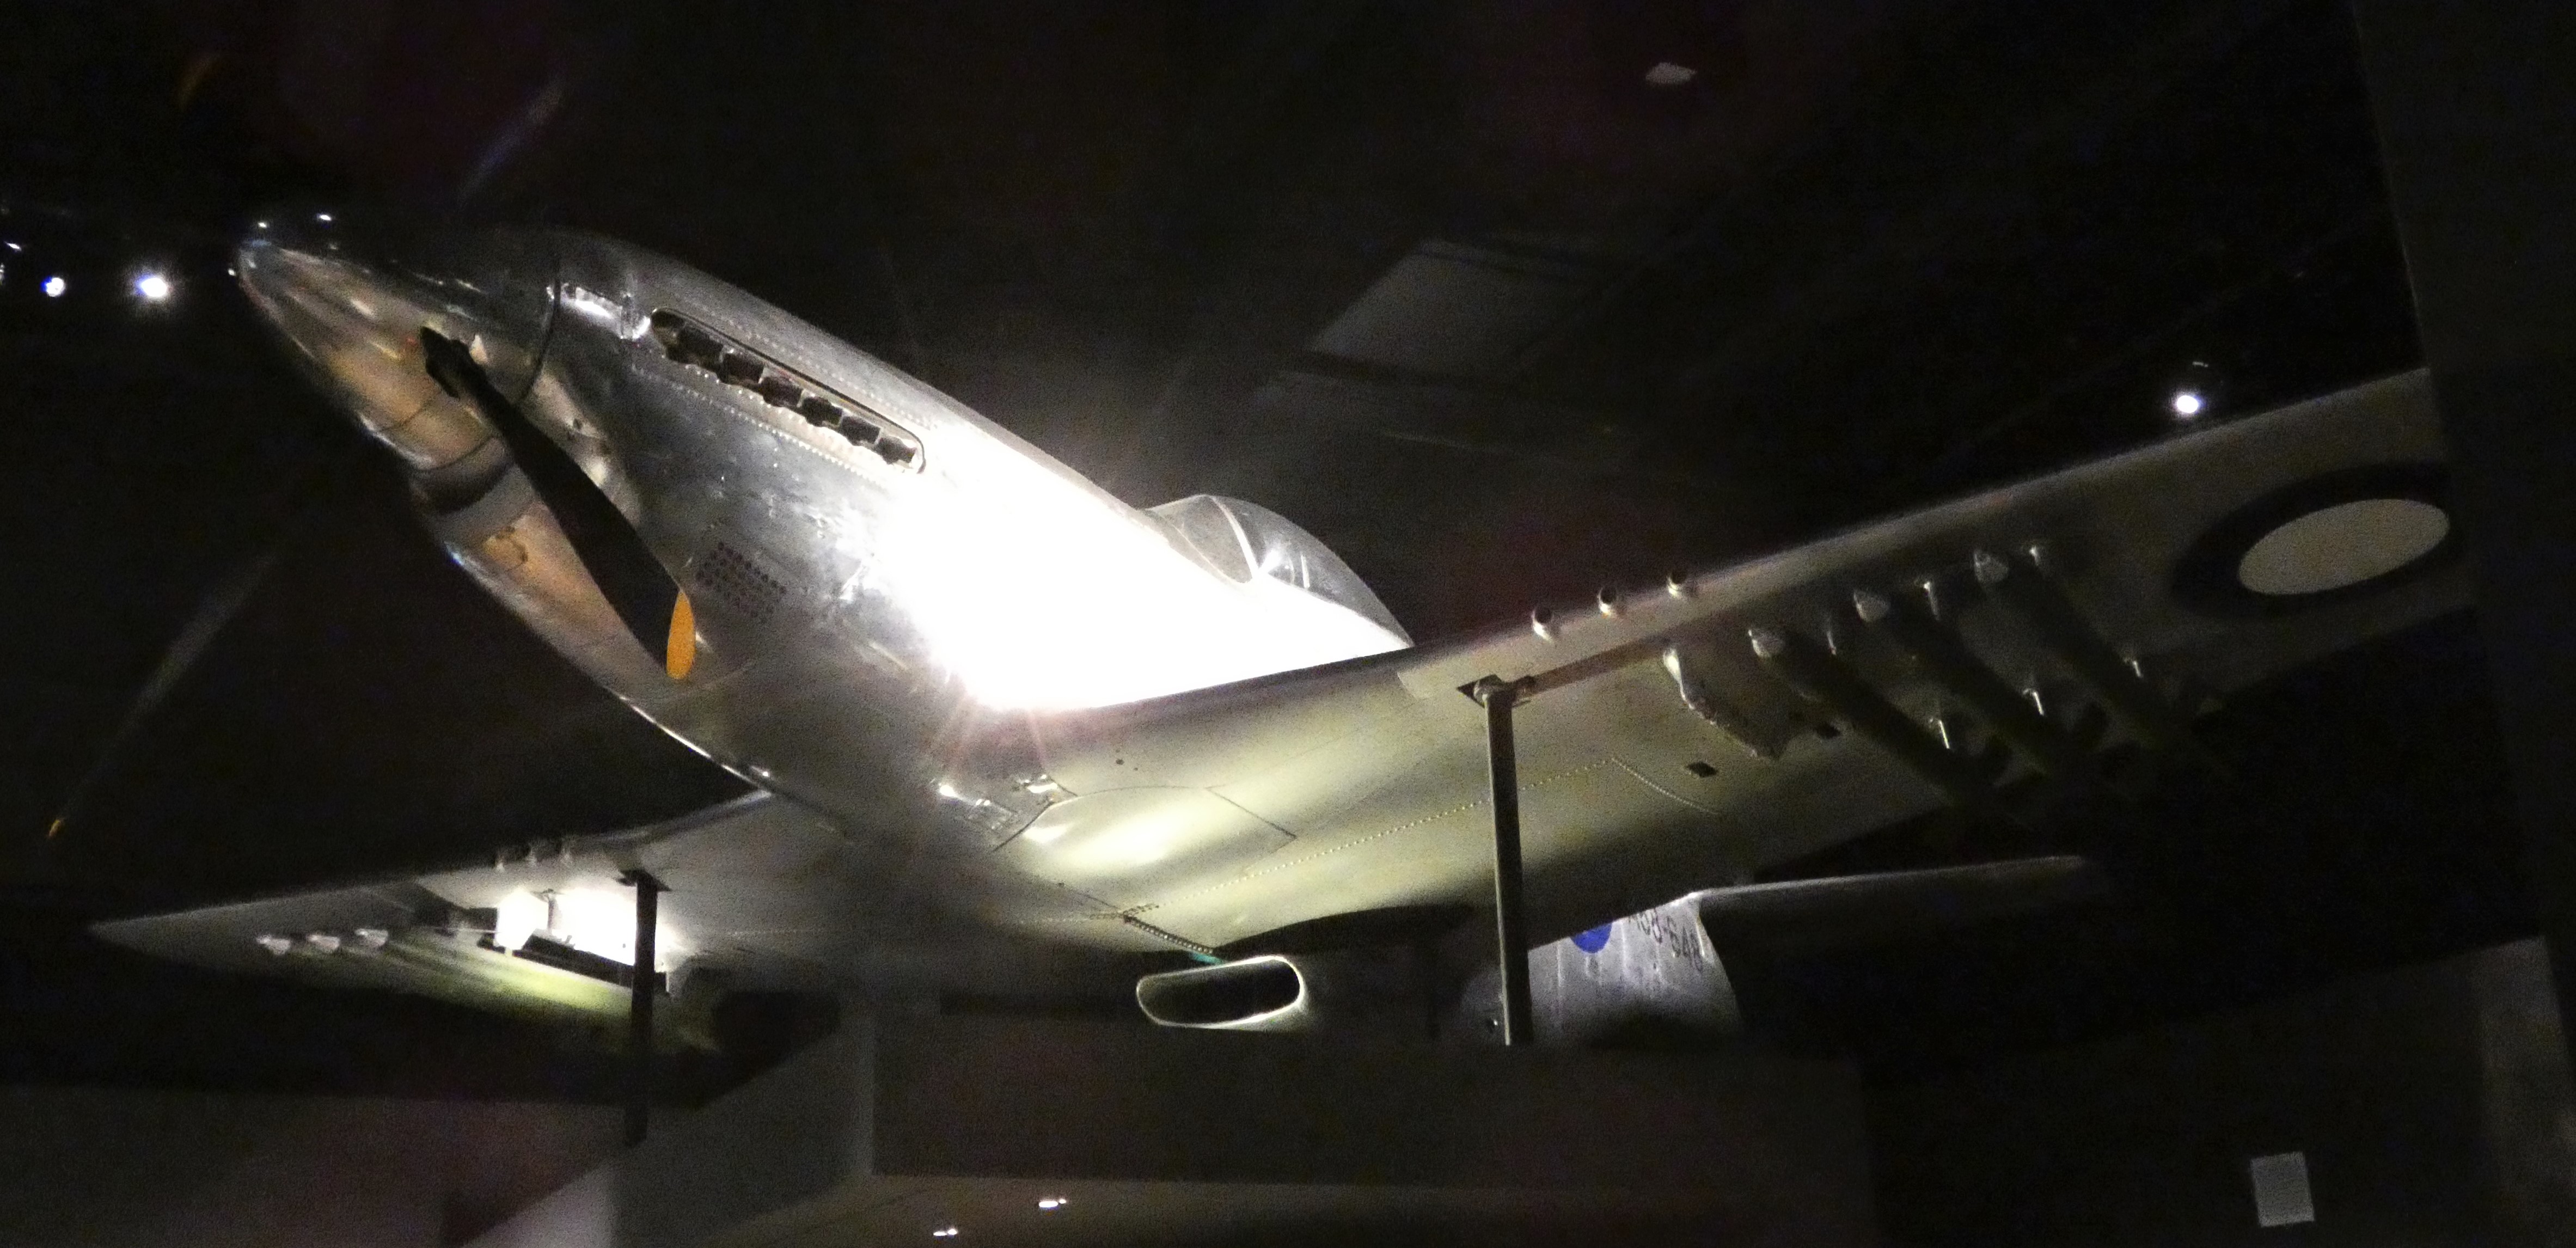 |
| P51D Mustang, RAAF. |
The RAAF started to equip with P51 Mustangs in 1944 with No.3 Squadron changing from its P-40 Kittyhawks, to the newer fighter in November 1944 for its operations in Italy and Yugoslavia until the end of WWII.
 |
| P51's of No.77 Squadron RAAF on the tarmac at Iwakuni, Japan. |
In the Pacific however the new fighter did not start to become operational until the war was over, however with the advent of the Korean War, No. 77 Squadron was deployed with the aircraft for use in the ground attack role until they reequipped with Gloster Meteors.
The Mustang was finally withdrawn from service in the RAAF in 1959.

 |
| Japanese Zero A6M2, a full restoration of a wreck recovered from Gasamata airfield in New Britain. |
Until coming on our little jaunt around the Pacific, I had not seen a Zero of any type, and it is quite a thrill to see this very famous WWII fighter in all its glory, close up.
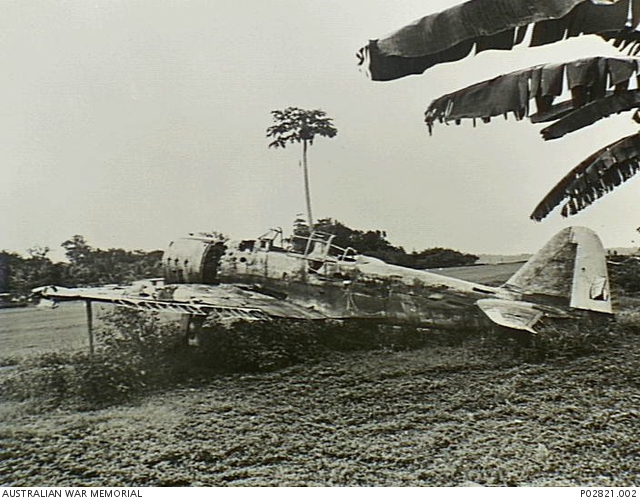 |
| Zero A6M2, serial No. 4043, abandoned at Gasamata prior to its recovery and full restoration. |
The obvious amount of work put in to saving this aircraft from the elements and bringing it back to the state it can be seen today is a tribute to those involved in the restoration.

The Supermarine Spitfire is not a particularly rare warbird to be seen these days with a remarkable number of flying examples to be seen, and we even have our own local Spitfire patrolling the skies over Exmouth each summer, when a private owner regularly bases his 'Spit' at Exeter Airport and indulges in regular flights along our local coast.
 |
| Spitfire Mk.IIA, Serial No. P7973 of 452 Squadron RAAF. |
 |
| Pilots of No.452 Squadron RAAF, the first RAAF squadron formed in Fighter Command, standing in front of a Spitfire IIA at Kirton-in-Lindsey, Lincolnshire. |
This particular aircraft, P7973, was flown by the RAF and RAAF in 1941, flying 24 operations with No. 452 Squadron RAAF over France and the English Channel, being flown by aces Keith 'Bluey' Truscott, Robert Bungey and Raymond Thorold-Smith. It seems however that P7973 was an unlucky aircraft with six pilots having accidents while flying it.


It takes guts to be a gunner
To sit out in the tail
When the Messerschmitts are coming
And the slugs begin to wail

Flight Sergeant Norman Williams, of Leeton in New South Wales, was the rear gunner of a Halifax bomber attacking Dusseldorf, when the aircraft he was in was attacked by two German night fighters, hitting him in the legs and body with cannon shells.

Though in great pain, he directed the pilot to evade the attack whilst having the composure to shoot down one of the fighters.
 |
| Flight Sergeant Norman Williams, GCM, DFM & Bar. https://en.wikipedia.org/wiki/Norman_Williams_%28RAAF_officer%29 |
When the Halifax landed, Williams, wounded, in great pain, and partly paralysed, had to be cut out of the turret, later being awarded the Conspicuous Gallantry Medal, becoming Australia's most highly decorated non-commissioned airman.
 |
| A section of the shot up gun turret that had to be cut open to extract F.S, Norman Williams, GCM. |
Australian forces landed on the beaches of Gallipoli on 25th April 1915, beginning an involvement in the First World War that would see Australian units distinguish themselves, serving in the Middle East and the trenches of France and Belgium, with at the end of the conflict, more than 60,000 Australians having lost their lives.
 |
| Lone Pine Diorama - Illustrating the assault on the heavily fortified Turkish trenches at Lone Pine, that saw some of the heaviest casualties of the Gallipoli campaign, and the Australian 1st Brigade losing more than 2,000 men and seeing seven Victoria Crosses awarded. |
 |
| From 1916 the AIF Division as part of the 2 million man British Army on the Western Front, relied on supplies sourced from Britain and moved to the front in vehicles such as this, the horse or mule drawn General Service Commonwealth Pattern supply wagons. |
 |
| The First World War on the Western Front was dominated by a constant back drop of artillery fire, and after the early years of the war when armies suffered from a lack of shells, technical aspects of using artillery advanced rapidly, with the horse drawn field guns, being relatively light and mobile, such as this 4.5-inch howitzer, and thus able to deliver plunging fire on enemy trenches and fortifications, being particularly useful in support of the Poor Bloody Infanty. |
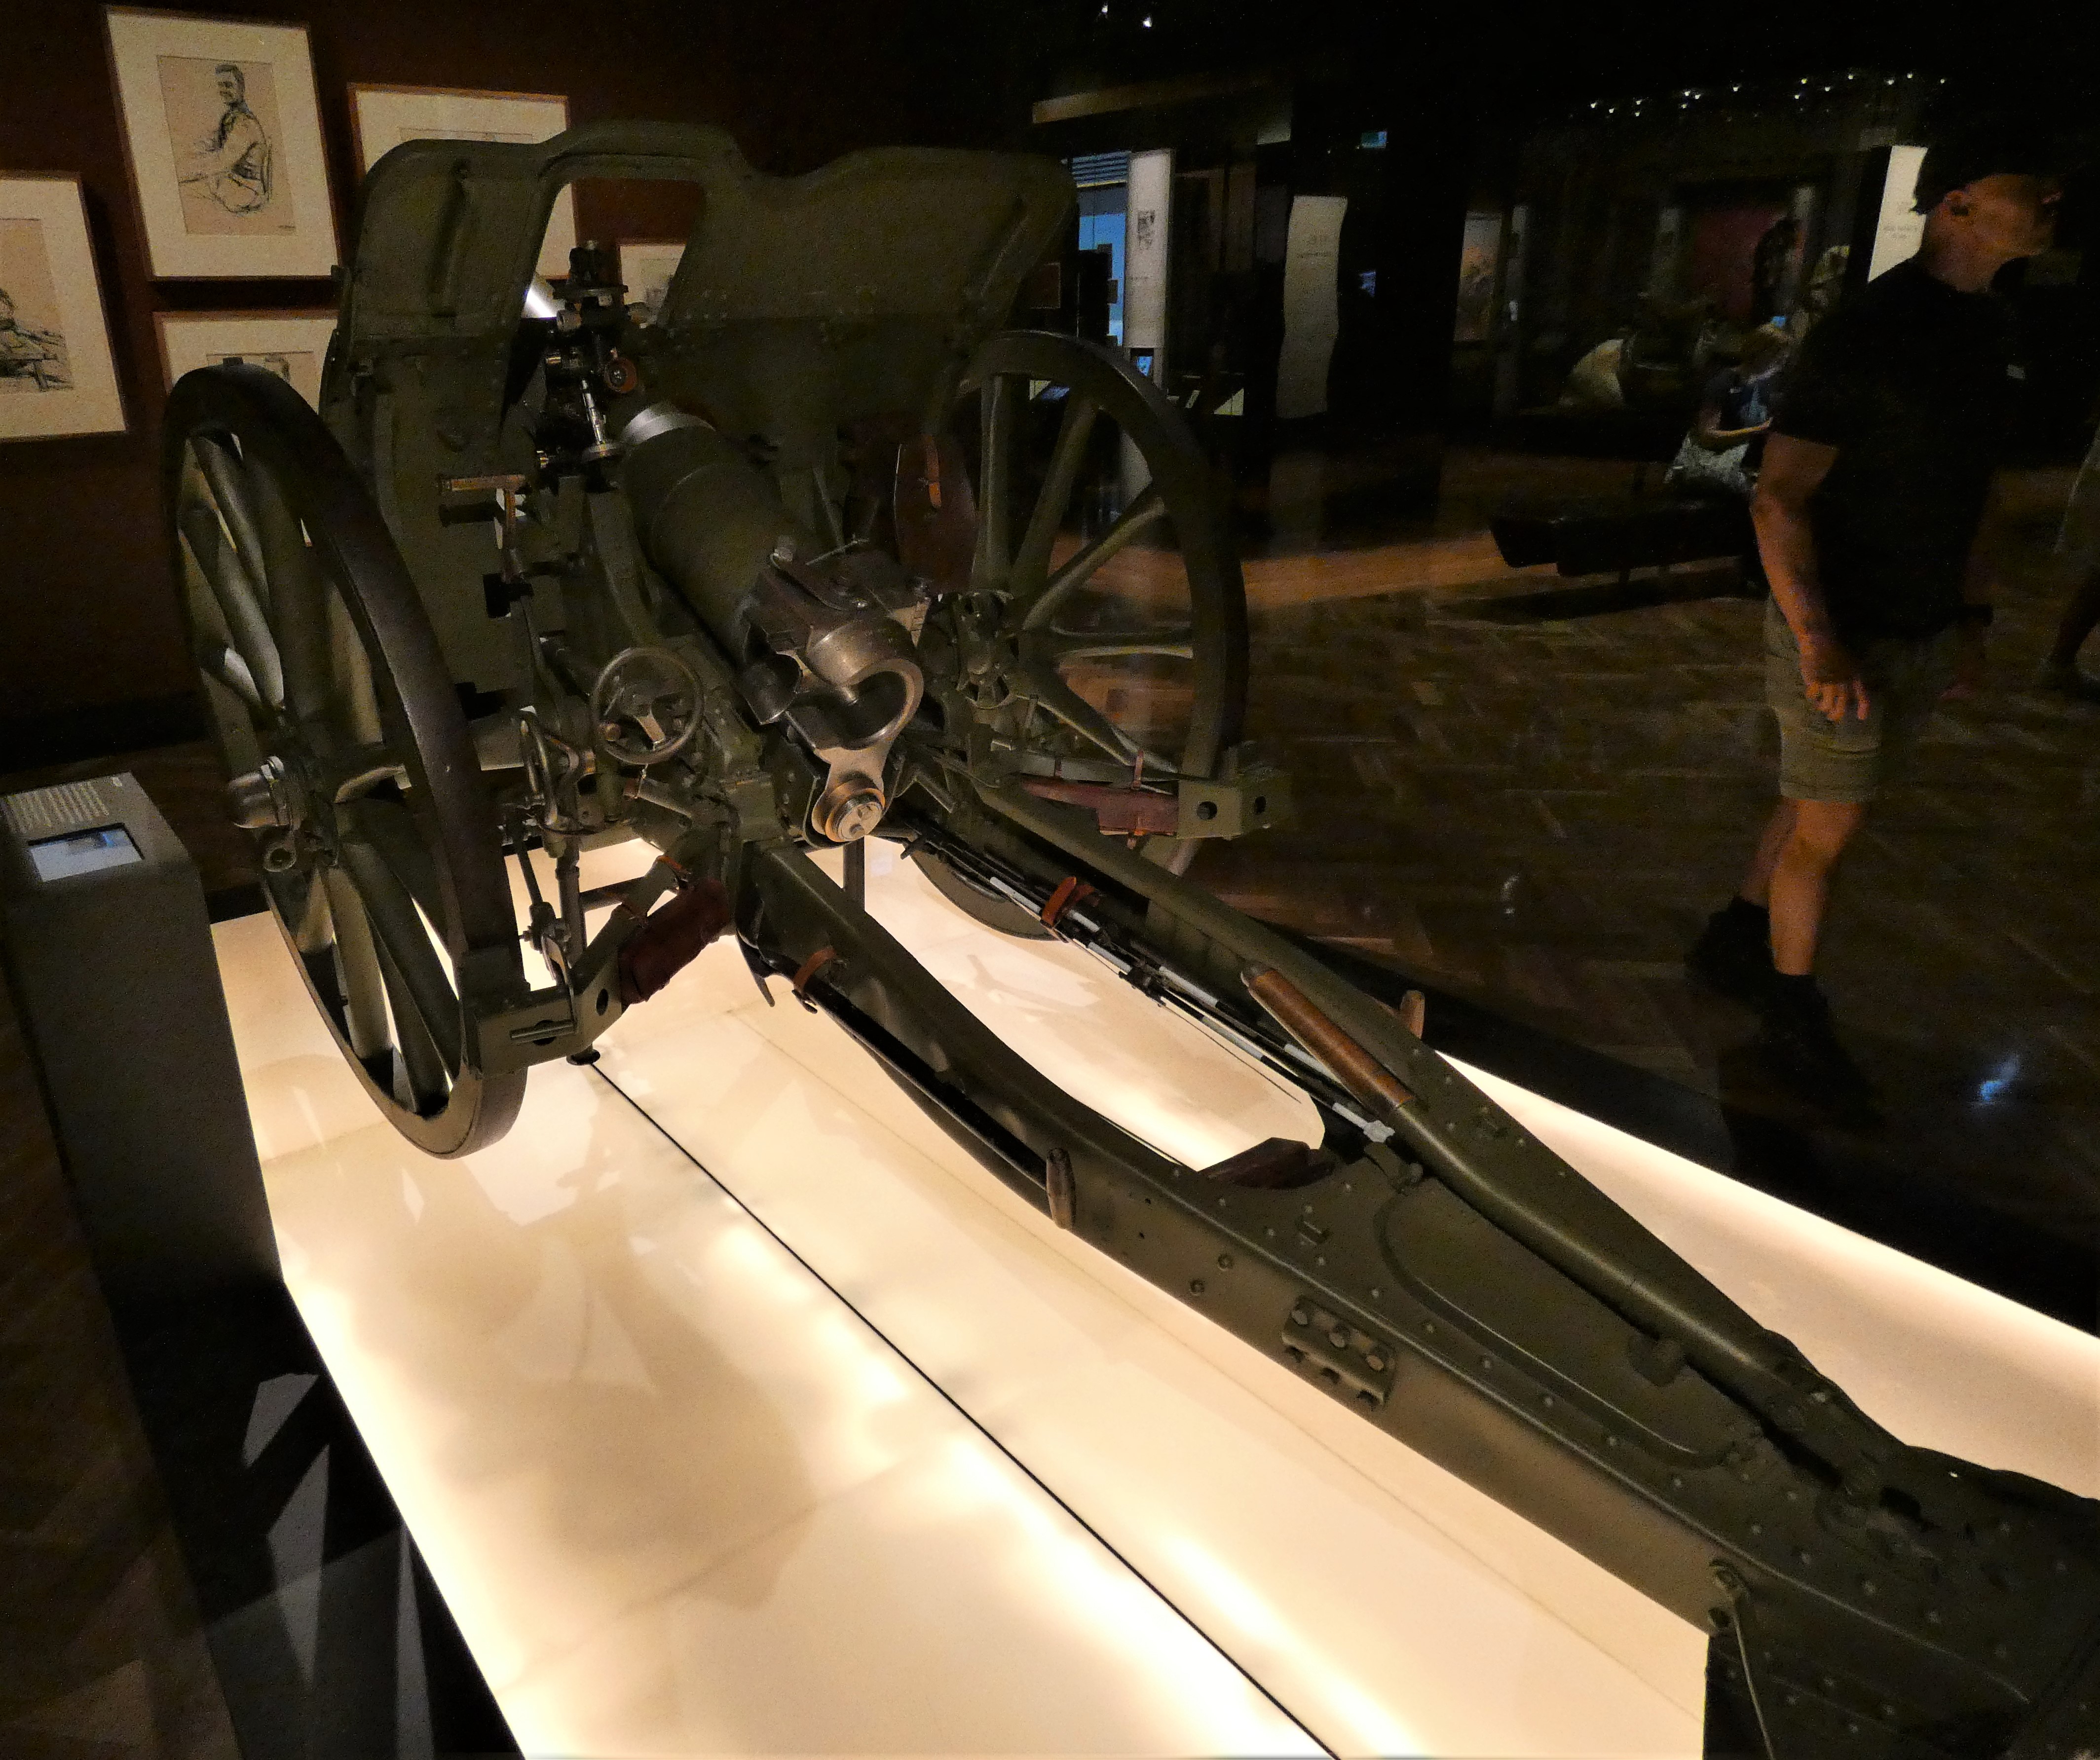 |
| The British 4.5-inch howitzer together with the 18-pounder field gun was one of the principal artillery pieces used by the AIF, one of the best and most modern field howitzers in the world at the outbreak of the war, making it a popular weapon and seeing more than 3,000 built. |
 |
| An FWD (Four Wheel Drive) Model B Truck, produced by the American Four Wheel Drive Auto Company was used by the British and Commonwealth forces predominantly for the haulage of heavy artillery, ammunition and pontoon bridge supplies, with 2,295 purchased by the British Army and 1,599 seeing service in France. |
 |
| The first flagship of the Royal Australian Navy's fleet was the twelve inch battle cruiser HMAS Australia, which was at the time of of the most powerful warships ever seen in the Pacific. This is the breech of one of her 12-inch/45 calibre Mk. X guns. |
 |
| The Australian Battlecruiser, HMAS Australia in 1914, armed with eight 12-inch/45 calibre Mk. X guns, on B VIII mounts in four turrets. Although never fired in combat, these guns remain the largest guns ever possessed by the RAN. |
 |
| I pictured a similar bronze plaque to this one outside the New Zealand Parliament buildings in Wellington, nicely replicated here for Australian VC recipients, here in the AWM. |
On the 14th September 1939, Australian Prime Minister Robert Menzies announced that a 20,000 strong expeditionary force, designated the Second Australian Imperial Force, under Lieutenant-General Thomas Blamey, would be formed for overseas service; initially formed around one infantry division, the 6th Division, and related auxiliary support units, it would be followed by the 7th and 9th Infantry and 1st Armoured Divisions for service in the Middle East, with the 8th Division retained at home as the war with Japan threatened.
 |
| In April 1941, the Australian 9th Infantry Division, alongside the British 7th Infantry Division's 18th Brigade, formed the core of the garrison of Tobruk as Empire forces were driven back into Egypt by the advance of German general Erwin Rommel's newly arrived Afrika Korps, that would see the garrison fend off repeated Axis attacks over a period of six months. |
The defence of Tobruk in Libya demonstrated by the Australian 9th Division was a particularly aggressive one that featured regular patrolling and raids on Axis positions designed to dominate no-mans land around the defences.
.jpg) |
| A patrol of the 2/13th Infantry battalion form up in an anti-tank ditch at Tobruk, September 1941. |
The defence of Tobruk cost 9th Division 3,164 casualties, including 650 killed, but drew admiration from British and German commanders alike, with the former via Churchill requesting the Australians be retained after the withdrawal of the 6th and 7th Divisions in 1942 for the war with Japan, agreed to by John Curtin's government when the American's stepped in to offer an American division for Australian service; and compliments from Rommel who declared that the 9th were among the best Empire soldiers he had come up against.
 |
| In 1940 Italy declared war on the Allies and commenced offensive operations in North Africa, with this Italian L.3/33 Tankette used during the war as a reconnaissance tank. |
 |
| The L.3/33 would be produced in several variants including a flamethrower and anti-tank rifle option, with this one being the more common twin machine-gun variant, operated by a crew of two, but with painfully thin armour of just 5-14 millimetres, this one was captured in Tobruk. |


 |
| German 2 cm Flak 38 anti-aircraft gun, the standard light anti-aircraft gun used by German forces for most of the Second World War, this example captured in North Africa and still wearing its original yellow paint. |
 |
| Chevrolet 1941 Model 41/E22 General Service Lorry, modified here to carry a captured Breda Model 35, 20mm anti-aircraft gun. With so many of these light AA guns captured by British and Commonwealth troops, they were often used to equip British and Australian light anti-aircraft batteries. |
The 19th Australian Infantry Brigade, part of 6th Australian Division, previously withdrawn from North Africa for service in Greece, under Brigadier George Vasey together with attached artillery and Greek troops were detailed to defend the Georgioupolis/Rethymnon sector during the battle for Crete in May 1941, which they did to great effect helping to repulse German attacks to take the airfield at Heraklion.
 |
| The Battle of Crete is nicely captured in this display with a Fallschirmjager studying a map of Allied deployments along the north coast of Crete and an Enigma machine, the code for which had been sufficiently deciphered to enable warnings of the impending German attack plans to be sent to the GOC Major-General Bernard Freyberg, VC. |
 |
| A nice rendition of an Australian 25-pounder gun crew in action in North Africa. |
In the Second World War the Royal Australian Navy started the conflict with a relatively modest force, consisting of two 8-inch County Class cruisers, three modified Leander Class 6-inch light cruisers, one old First World War era 6-inch Town Class cruiser, four sloops and five V-Class destroyers.
The RAN would grow throughout the conflict seeing action in all theatres from the tropical Pacific to the frigid Russian convoys and seeing its force of vessels of all types grow from the 13 it started with in September 1939 to 337 by June 1945.
 |
| German BM1000 (Bombenmine 1000 kilograms) was a parachute air-dropped anti-ship mine usually deployed by a Heinkel 115 seaplane or an He-111. When used against land targets a bakerite tail fin was added to control its downward trajectory and the blast effect was massive. |
Perhaps one of the greatest tragedies to occur to Australia in the Second World War, certainly one that shocked the national consciousness was the loss of HMAS Sydney off Western Australia in November 1941, which to give it a British perspective would appear to be similar to the shock inflicted on the Royal Navy and home with the loss of HMS Hood in May of the same year.
Both ships were the beloved representatives of their respective fleets that embodied the pride of their respective navies and nations, seemingly indestructible and thus adding to the shock of their loss, which proved to be absolute in the case of the Sydney, and with just three survivors in that of the Hood.
 |
| HMAS Sydney in action with the German Armed Merchant Cruiser, Kormoran, 19th November 1941. |
HMAS Sydney was a modified Leander Class 6-inch light cruiser built in Wallsend-on-Tyne, England in 1933 and launched the following year. Initially named HMS Phaeton she was purchased by the Australian government during construction and was commissioned into the RAN on the 24th September 1935.
 |
| HMAS Sydney alongside Circular Quay in Sydney Harbour, 10th February 1941. |
Later she was tasked with escorting an Anzac convoy to the Middle East and arrived in Alexandria in May 1940.
 |
| A piece of HMAS Sydney's forward funnel, recovered after the repairs carried out following her battle with the Italian cruiser Bartolomeo Colleoni, off Cape Spada. |
In Alexandria she was almost immediately commandeered by Admiral Cunningham, Officer Commanding the Mediterranean Fleet, and during her time in the Mediterranean would see successful actions against the Italians at the Battles of Calabria and Cape Spada, critically damaging the Italian cruiser Bartolomeo Colleoni, later finished off by British destroyers, and sinking the destroyer Bande Nere in the latter action.
 |
| Sailors from HMAS Sydney celebrate amid the only damage suffered by their ship at the Battle of Cape Spade, with a shell hole through her forward funnel stack. |
Sydney would be later granted the battle honours Calabria, Spada and Mediterranean 1940 for her service before departing for Australia, returning to Sydney in August 1941 where she would receive a rapturous home-coming welcome before she would resume her duties in home waters.
 |
| A marvellous 1:96th scale model of HMAS Sydney as she would have looked during her service in the Mediterranean in 1940. |
The Kormoran, under the command of Captain Theodore Detmers, with 399 crew aboard, was a converted merchantman, carrying six 15cm guns, two 3.7cm PaK 36 anti-tank guns, five 2 cm FlaK 30 anti-aircraft guns, six torpedo tubes, and four-hundred odd sea mines of various types; and was into an eleven month cruise during which she had already sunk ten merchantmen and captured another, and was now hunting in the Indian Ocean prior to a planned return to Germany the following year.
 |
| Captain Joseph Burnett (left) commanding, and pictured here on the bridge of, HMAS Sydney, Captain Theodore Detmers (top right) commander of Kormoran, and German Auxiliary Cruiser Kormoran (bottom right) formerly the merchant vessel Steiermark. |
The Kormoran was no match for the Sydney in a gunnery duel at range and could not hope to outrun the faster light cruiser, and her only chance was to lure Sydney close enough, by playing on her disguise as an innocent Dutch merchant ship, not understanding the requests to confirm her identity and take her time in replying, with confusing signal flags creating the illusion of a nervous merchant crew under the guns of a powerful cruiser.
The Sydney duly closed the range and it seems got broadside on until at about 1,400 yards the Sydney now requesting the stranger to give the secret identity code issued to all merchantmen for response to a challenge, Detmers dropped his disguise and opened up with his guns and torpedoes, quickly knocking out Sydney's two forward, A and B gun turrets and raking the bridge with fire from her smaller guns, no doubt killing Burnett and his command team in the first exchange of fire.
 |
| This badly shot up Carley float from HMAS Sydney together with two lifebelts found lying in it were recovered from the sea by HMAS Heros, 250 miles from Carnarvon, Western Australia, on the 27th November 1941. |
The Sydney managed to get off a reply from her two aft turrets and scored a critical hit on the mid section of Kormoran, hitting her funnel stack, that caused a flash fire into the engine room of the German ship, killing 82 of her crew and severely damaging the ship, knocking out her fire control systems, that would inevitably lead to her abandonment by Detmers and his remaining crew, watching their ship blow up as the fires caused her mines to detonate.
However with Sydney battered into silence with fires burning from stem to stern, torpedoes from Kormoran blew off her bow causing the Australian ship to sink taking all 645 of her crew with her. The action lasted about thirty minutes and the Germans would be rescued by Allied ships and made prisoners of war.
 |
| Approximate positions of the two wrecks confirmed in 2008. |
The remains of both ships were discovered in 2008 with a more fuller survey completed in 2015, disproving many of the conspiracy theories by the damage observed on the respective wrecks, but controversy still rages over the sinking of the Sydney with much debate as to why she came so close to the Kormoran.
 |
| A model of HMAS Warramunga, a Tribal class destroyer that entered service in late 1942, one of three built for the RAN in WWII. Her battle honours include, Pacific, New Guinea, Leyte Gulf, Lingayen Gulf, Borneo and Korea. |
 |
| A model of an ASW Bathurst Corvette of which sixty such vessels were built in eight Australian shipyards in WWII, between 1940 to 1942, with the majority crewed by Australians but seeing four used by the Royal Indian Navy. |
 |
| HMAS Perth in action with USS Houston and the Dutch destroyer HNLMS Evertsen in the Battle of the Sunda Strait 28th February 1942 that would see all three allied ships sunk after a fierce night action. |
Another of the modified Leander Class six-inch cruisers used by the RAN during WWII was HMAS Perth acquired by the fleet in 1939 and seeing service in the Atlantic and Mediterranean through the early war until her return to home waters in August 1941.
 |
| HMAS Perth pictured in February 1942 displaying her new angular camouflage pattern and anti-aircraft gun mounts atop her B and X turrets. |

That day came sooner than later for Houston and Perth, and both ships were sunk by midnight on the 1st March in a fierce night battle in the Sunda Strait after the two allied cruisers ran into the Japanese invasion force bound for the West Java coast, consisting of fifty eight troop transports protected by five cruisers and twelve destroyers.
 |
| Mr David Burchell discovered the wreck of the Perth lying on her port side on the sandy floor of the Sunda Strait and managed to recover more than two dozen relics, some on display here, icluding the ship's bell. |
The wreck of the Perth was rediscovered relatively intact in 1967 and the bell, seen below, together with some other items from the ship deposited in the AWM collection, however a return to the wreck in 2013 by divers revealed that it had been stripped of much of its superstructure by unauthorised Indonesian marine salvagers, so it is fortunate that these unique items can still be seen today in memory of a very brave ship.

Whilst the bulk of the AIF was deployed to the Middle East, the 8th Division AIF, raised in July 1940, saw the 23rd and 27th brigades of the division deployed to Malaya in February and August of 1941, respectively, as tensions with Imperial Japan grew and a request was made for the troops to join the Singapore garrison.
 | |
|
On the 14th January 1942 elements of the 8th Division went into action against the Japanese south of Kuala Lumpar, when the 2/30th Battalion enjoyed success at Gemencheh Bridge, carrying out a large scale ambush that managed to destroy a Japanese battalion.
 |
| Australian and Japanese helmets and water bottles recovered from the area around Gemas where the 27th Brigade fought the first Australian land battles against the Japanese in January 1942. |
In the several blocking battles fought by the Australians, the 2-pounder anti-tank guns similar to the one seen here were used very successfully to help defeat Japanese tanks in the ambushes near Gemas and Bakri in January 1942.
A record of the fighting around Bakri was written up by the 2/19th Battalion;
'Gear dumped - wounded packed on transport.
Withdrawal Road blocked 2 miles east of
Bakri. Japs brave - killed simply at close
quarters. Japs use civil (telephone) lines for
artillery fire. Infiltration.
Wounded collected. High morale. Men exhausted.
Ambush by Japs - run into open. Badly handled.
Held up at Parit Sulong. Relieving force coming?
Machine-gunning from air continuous.
 |
| The Ordnance QF (Quick Firing) 2-pounder or 40mm anti-tank gun had a crew of five and could fire 22 rounds per minute. It was a very effective anti-tank gun for the period, outperforming the German PaK 36, and Bofors 37mm guns and significantly better than other 25mm and 20mm weapons of that era. |
Attempt to send gas-gangrene cases through in
ambulances. Held at bridge. Japs say complete
surrender or will use wounded as road block.
Battalion losses: 15 officers, 359 ranks.
Jap casualties very heavy.
Non-relief at Parit Sulong. 45 Brigade wiped
out - no communications.'
The Japanese, enraged by the losses they had suffered in the severe fighting over the previous week, massacred a group of 163 Australian and Indian wounded left behind at Parit Sulong. Only two men survived.
The effective range of the 2-pounder was about 550 yards, although it could potentially engage successfully out to 1,500 yards, and in the the Battle of Bakri the Japanese tanks were engaged at a range of about only 100 yards, which with the small profile of this handy little gun used in the close terrain that typified the area, made the gun more difficult to spot before it opened fire, only enhancing its effectiveness.

This particular gun was built by General-Motors, Holden at Woodville, South Australia and was used by an Australian unit which faced the Japanese in south-east Asia, being used to defend the island of Ambon in the Dutch East Indies.

Japanese aircraft played a decisive role in Malaya and Singapore, bombing British air bases and easily outclassing the Buffalo fighters, and Blenheim and Hudson bombers.
 |
| Hudson Mk.IV’s of 8 Squadron RAAF with escorting Commonwealth Wirraway of No. 21 Squadron over Malaya. |
Three Australian squadrons formed part of the British air force in Malaya and were virtually destroyed with most aircrew killed in action whilst the majority of ground-crew ended up in captivity.
The engine seen below is the remains of the first Australian aircraft, a Hudson, to be shot down in the war against Japan.
 |
| The remains of a Wright GR-1820-G102A Cyclone nine cylinder radial engine from a RAAF Hudson IV lost in the attack on Japanese forces landing at Kota Bharu, 8th December 1941. |
Hudsons of No.1 Squadron RAAF spotted the Japanese invasion convoy approaching northern Malaya on the 6th December, and when the Japanese landed at Kota Bharu, immediately attacked them in the early hours of the 8th; that saw two of their Hudsons, each with a crew of four, shot down, and seeing only one man survive but later being captured. The seven aircrew lost were the first Australians killed in the war against Japan.
 |
| These British Royal Coat of Arms were originally fixed to the gates of Singapore's Naval Dockyard, until February 1942, when it was removed by Captain H.L. Howden of HMAS Hobart to prevent the symbol from falling into the hands of the Japanese. |
With the fall of Singapore, Australia's focus naturally turned to home defence and an alliance with the Americans to help drive the Japanese back from their borders and their occupation of parts of New Guinea and the Solomon Islands.

The Japanese forces were gradually driven back along the Kakoda trail and repulsed at Milne Bay, gradually allowing the Allies to go on the counter offensive.
 |
| Map illustrating key locations in the Lae-Salamaua area in New Guinea. |
The Battle of Bobdubi was a series of actions fought between Allied and Japanese forces in the Salamaua area, New Guinea, between 22nd April and 19th August 1943 fought to draw Japanese attention away from Lae before a planned combined amphibious and airborne landing planned for September.
On the 30th June 1943, the 58th/59th Battalion launched an attack on Bobdubi Ridge, New Guinea that saw fierce fighting as the Japanese poured machine-gun fire from fortified and camouflaged positions.
 |
| Taking Old Vickers Position, Bobdubi Ridge, 28th July 1943 - Ivor Hele, Official War Artist. |
The battalion managed to secure a position on the ridge within two days, from which they were eventually able to capture Old Vickers position on the 28th July, driving the Japanese from the ridge and opening the way to Salamaua.
The capture of this position was a major action in the Wau-Salamaua campaign and Hele's painting above shows the Australians struggling up the steep slope to take the Japanese bunkers and trenches.
 |
| Australian Commandos of the 2/3rd Independent Company shortly before making an attack on Timbered Knoll in the Salamaua area, 29th July 1943. |
Lieutenant Mick Sheehan was a commando with the 2/5th Independent Company when he travelled to New Guinea in May 1943.
 |
| Lieutenant Mick Sheehan, 2/5th Independent Company, travelling to New Guinea, May 1943. |
The two pictures below are illustrative of the kit carried at this time, with the emphasis on keeping it light with as few things as possible


Keeping things light for operations in the jungles of New Guinea even extended to the artillery, where the Australian order of battle for an Infantry Division based on the British system designed for deployment in Europe and the Middle East proved less than ideal for the close difficult terrain encountered, where the divisions motorised vehicles were often useless and left behind and where artillery had to be much lighter and easily broken down for transporting in this challenging environment.
 |
| Ordnance QF 25-Pounder Short, an Australian design based on the standard British QF 25-pounder but better suited for operations in the South West Pacific theatre. |
Six men could dismantle the gun in three minutes and reassemble it in four, providing an artillery piece that could go where standard guns could not, but at the cost of less accuracy and sturdiness displayed by the original 25-pounder.
 |
| Gunners of the 2/4th Field Regiment in action firing their 25-pounder Short at Japanese positions during the Battle of Balikpapan, July 1945. |
In September 1943 two guns from the 2/4th Field Regiment and their detachments were dropped by parachute into the Markham Valley to support American paratroop landings near Nadzab, with one gun being assembled and ready to fire within one hour of landing.

Another successful Australian designed weapon was the Owen gun, developed by Evelyn Owen in 1931, who completed his design in 1938 at the tender age of 23.
 |
| Private Evelyn Own |
Having enlisted with the AIF and ready for deployment to the Middle East, Owen was transferred to the Central Inventions Board in June 1941 to oversee the production of his submachine-gun, with tests later that year confirming the gun to be more accurate and reliable than competing designs such as the Sten and Thompson.
The gun mounted a 28-round magazine, with spare magazines carried in the pouches of a soldier's Pattern 37 webbing and proved itself a light and robust weapon in the jungles of the South West Pacific.
 |
| Australian Infantry at the Battle of Kapyong, 22nd to 25th April 1951, fought during the Korean War, were armed with a variety of weapons, including the short range Owen sub-machine gun that would continue in service with the Australian forces until 1971. |
Having watched the film 'Danger Close' recounting the exploits of the Australians at the Battle of Long Tan last year and having travelled to Vietnam back in 2016, see link below;
 |
| JJ's Wargames - Vietnam 2016 |
I have a passing interest in the conflict, still within living memory, as recounted to me by several Australian veterans I met during our travels, and the conflict has contributed some interesting pieces to the AWM collection including the example below, 'The Coral Gun'.

.png) | |
|
The howitzer was overrun during the first attack but was recovered the following morning, and was damaged by enemy machine-gun fire. Acquired from the army by the AWM in 1998, the gun is depicted as it would have looked when it was first flown into the base by a US Army Chinook helicopter.

As well as containing an impressive collection of military artefacts that recounts Australia's military heritage, with a very large collection of items that are not on show, if pictures on the net are to go by, the AWM was a fascinating visit, particularly when combined with the personal stories recounted in the various display cabinets such as the ones seen below.


We decided to combine our visit to the museum by staying on after closing to museum visitors and attending the evening Last Post Ceremony which is held at the end of each day in the commemorative area around the Pool of Reflection and the Sacred Flame.

On the evening we attended, the whole ceremony took on an even more compelling nature as it was accompanied by a vigorous display of echoing claps of thunder and dramatic flashes of lightening over the memorial, as the skies darkened and the heavens opened to a heavy rainfall, before the light levels lifted to be accompanied by the plaintiff notes of the bugler.


 |
| The Tomb of the Unknown Warrior. |

 |
| The ceremony gets underway as the rain storm starts to reach a crescendo. |
The next day we were set to leave Canberra to resume our travels in the direction of Sydney and the beautiful Blue Mountains, but not before we made the time to walk the length of Anzac Parade and to take in the many memorials to the various conflicts that Australia has been involved in over the years.
 |
| Anzac Parade, Canberra looking towards Mount Ainslie behind the AWM. |
 |
| The Rats of Tobruk Memorial was unveiled on the 13th April 1983 and includes in the centre of its central plinth a memorial stone originally part of the the memorial erected in the cemetery of Tobruk by Australian soldiers who took part in the siege between April to December 1941, and was originally one of the front steps of the Tobruk Post Office. |

The monument below was such an example, the National Boer War Memorial, unveiled on the 31st May 2017 to mark the 115th anniversary of the end of the Boer War.
 |
| The National Boer War Memorial - simply stunning. |


 |
| The Australian National Korean War Memorial - The rock in the centre of the contemplative space is from a Korean battlefield and the scrolls on either side record the twenty-one countries that committed combat or medical units to the United Nations Command. |

The three figures represent Australian soldiers, sailors and airman who served in Korea amid granite and gravel of white and grey tones recalling the harsh climate in Korea together with battlefield boulders set amid stainless steel poles which symbolise those who died


I look forward to sharing more of our adventure as the odyssey continues as Carolyn and I made our way north towards Sydney with a slight detour on the way to take in the delights of the Blue Mountains.
To be continued:
JJ
No comments:
Post a Comment