In the previous post covering our stay in Darwin in February 2023, I looked at the collection held by the Darwin Aviation Museum, preceded by posts that looked at the local area and natural history of Darwin and the Northern Territories, with a link below where you can check those posts out if interested.
 |
| JJ's on Tour - Darwin Aviation Museum, Northern Territory, Australia. |
This series of posts is part of a larger series journaling Carolyn's and my four month tour of the Pacific, that started in Vancouver, British Columbia, back in October 2022, arriving in Melbourne in December 2022 ahead of New Year, having come via Hawaii, Fiji and New Zealand's North and South Islands in the previous two and half months of traveling.
.jpg) |
Our route so far on our travels through Australia, starting down in Melbourne just before New Year 2023. Map courtesy of https://www.freeworldmaps.net/australia/ |
The former East Point military area and suburb of Darwin is of historic significance, with the area providing the last major ‘fortress’ built on Australian soil and is a reminder of a prominent element of Australia's only battleground; with East Point playing a particular role in the naval strategy of Australia and Britain. Also of significance was the role of the artillery units and the later establishment of a Royal Australian Artillery Association Museum at the site.
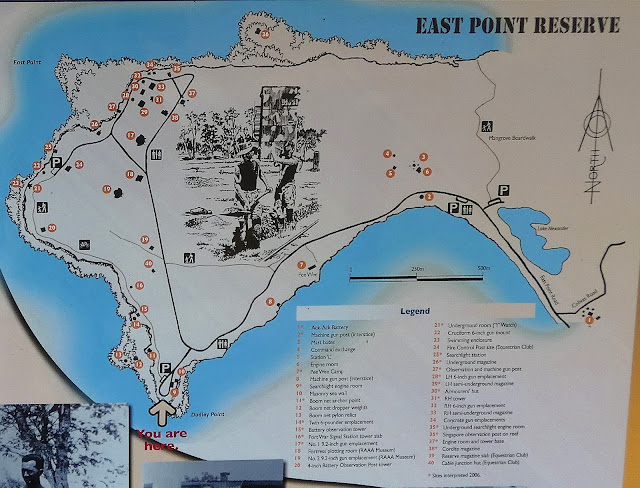
The Darwin Military Museum is located at East Point adjacent to the Defence of Darwin Experience with its aim to collect artefacts from all conflicts where Australian troops were deployed.
 |
| The town map of Darwin illustrating the position of the Military Museum at East Point Reserve in relation to the town and where we were staying at Wharf Precinct at the bottom of the map |
The Darwin Military Museum is located at East Point adjacent to the Defence of Darwin Experience with its aim to collect artefacts from all conflicts where Australian troops were deployed.
Dudley Point has considerable military heritage value, where it is possible to see wartime steel boom net relics, which in 1941 stretched just over 3.5 miles across the Harbour from East Point, designed to prevent entry of enemy submarines, being only lowered for friendly vessels.
Ruins of many facilities relating to the boom net are still at East Point, with the boom net anchorages and an observation tower still evident today. After the War the East Point area continued to be used by the military, with its chief use at this time for horse stabling. It was in the 1960s that the Royal Artillery Association commenced work on the artillery museum, which was eventually opened in 1969, and the aviation and naval sections followed in 1972 and 1974.
 |
| Typical dress for the climate around Darwin for Royal Australian, Army, Navy and Airforce personnel. |
In the entrance to the museum and the Defence of Darwin exhibition I was immediately drawn to the selection of manikins and items associated with the military personal that would have been based in the area during WWII.
The Japanese 550lb HE bomb seen below was one of seventy-one such bombs dropped by Japanese 'Val' dive bombers during the first raid on Darwin in 1942 and was recovered unexploded and made safe by RAAF Bomb Disposal Unit.
The Vals were tasked with bombing shipping in the harbour, where they worked in pairs and attacked at shallow dive angles often escorted by Zero fighters; in addition some of the dive-bombers went on to attack land based targets which mainly focussed on RAAF Darwin and the civil-aerodrome.
Having already walked the town of Darwin and visited many of its wartime sites together with a poignant visit to the Adelaide River War Cemetery where many of those killed during WWII are now laid to rest, I was very interested to start our visit to the museum by seeing the Defence of Darwin Experience with its many first person accounts of the history together with relics relating to it.
The first items that caught my eye related to the ships that were attacked in and close to Darwin Harbour on the 19th of February 1942 of which nine out of thirteen were sunk by Japanese bombs.
 |
| The cargo vessel "SS Fiscus", of similar design to the "SS Florence D", from which a 3" shell casing was recovered in 2011 shown below. https://www.ozatwar.com/japsbomb/florenced.htm |
 |
| HMAHS Manunda was commissioned as a hospital ship on the 22nd July 1940 under the command of Captain James Garden. She was damaged in the bombing of 19th February 1942. |
 |
| MV Neptuna was built in 1924 as a passenger liner - Australian War Memorial |
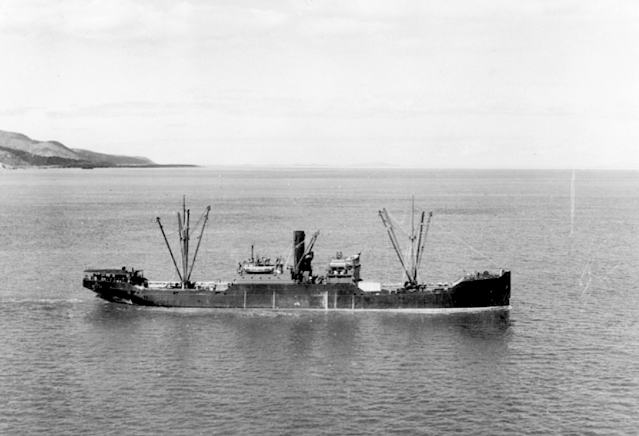
At the time of the Japanese air attack on Darwin on the 19th February 1942, MV Neptuna was moored against the Darwin Wharf with a hold full of military supplies including depth charges. It suffered three direct hits from Japanese bombers, and was surrounded by a surface fire fed by a broken oil supply line.
Eventually the cargo exploded. Forty-five men were killed, this toll including both crew and those on the wharf. The explosion was immense, with shrapnel blown hundreds of metres in various directions.
The items below are very much of their time and speak of a different age in the last decades of the British Empire.
The Darwin Hotel, pictured below was in its day described as luxury accommodation for passengers enroute to Sydney from London on the Qantas Empire Flying Boats, a route that ended with the fall of Singapore, thus forcing the premature closure of this and the other two hotels in town.
The hotel survived the war, and Cyclone Tracy becoming an iconic building in town, but following the discovery of concrete cancer it was infamously demolished in the dead of night in September 1999. I gathered from friends we met on our holiday that Australian heritage has regularly suffered from unscrupulous property developers taking matters into their own hands seemingly dismissive of any legal consequences for their historical vandalism.
 |
| Sadly this room key is all that is left of the iconic Hotel Darwin. |
As well as the attacks on the ships in the harbour, other attacks were made on shore installations, and civilian infrastructure, that eventually prompted a response from the limited anti-aircraft and fighter defences.
 |
| The blood stained Mae West worn by Lieutenant John Glover, a P-40 pilot with the 33rd Pursuit Squadron |
 |
| Souvenir panel section from a Mk.VIII RAAF Beaufort that crash landed at Gove Airfield NT in March 1945. |
 |
| My picture of the replica Zero on display in the Royal Flying Doctor Tourist building on Darwin's waterfront showing the drop fuel tank, as seen in the picture below. |
When the Japanese air raid commenced on the 19th February 1942, a battery of 3.7-inch heavy anti-aircraft guns situated on the Darwin Oval were the first to open fire on the enemy, being the first time that guns were fired in defence of the Australian mainland, and seeing over 1,000 rounds like the one seen below fired on the day.
 |
| A gun crew from the Australian Army's 14th Heavy Anti-Aircraft Battery loading a shell into their 3.7 inch anti-aircraft gun at Darwin, November 1942 - Australian War Memorial. |
 |
| Army issue leather wallet and ticket for the Star Picture Theatre belonging to Gunner Bob Heppell of the 14th Heavy Anti-Aircraft Battery. |
Weighing in at 28-pounds, each projectile could be fired to an altitude of 29,500 feet using proximity fuses for effect and with the detonated projectile seen alongside the complete round showing the thickness of the casing and the cavity that once contained the explosive filling.
 |
| 3.7-inch anti-aircraft round and projectiles next to a heavily corroded fragment of a Japanese 150lb incendiary bomb |
The remains of the Japanese incendiary bomb, seen above were recovered after it failed to detonate after hitting the ground, evidenced by the remains of the body casing having peeled back towards the tail cone, formerly having formed the structure that held the incendiary filling.
As a 'Pom', I am more than familiar with the legacy of WWII bombs turning up decades after the war, with the discovery of a Luftwaffe bomb in nearby Plymouth recently, that closed several roads in the town during its recovery and later disposal, and Darwinites have had to endure a similar legacy with this example recovered in August 2011.
 |
| Browning .50 cal. and Vickers Mk V .303 calibre machine gun |
The principle armament for WWII American fighters was the very effective .50 calibre Browning machine gun, seen in the photo above, six of which were carried by the P-40 Kittyhawk used over Darwin, with three guns in each wing. The other weapon on display at the bottom of the picture is a Vickers Mk V .303 calibre machine gun, manufactured in Australia and carried by the CAC Wirraway.
 |
| Australian Commonwealth Aircraft Corporation CAC Wirraway |
A Vickers Mk V machine gun was fired at a Val dive bomber by Wing Commander Archibald Tindal from a slit trench during the attack on RAAF Darwin on the 19th February 1942, during which he received return fire, hitting him in the throat and killing him in the process, making him the the first RAAF serviceman to be killed on the Australian mainland and seeing the RAAF base in Katherine named in his honour.
 | |
Wing Commander Archibald Tindal -
|
By the time of the first air raid on Darwin in February 1942, the town and area was already on alert for any possible Japanese invasion attempt and an according build up of military personal in the area rapidly followed.
But of course the arrival in town of large numbers of young servicemen could cause its own issues as the picture below illustrates.
Men like John Cassidy pictured below brought their skills to the aid of the authorities tasked with defending the area from attempted incursions and Japanese aircrew downed and on the loose, being part of the Northern Territory Patrol Service, a maritime policing unit set up in the thirties to arrest Japanese fishing crews and pearl boats operating illegally in Australian home waters, with their fast patrol boat, the Larrakia.
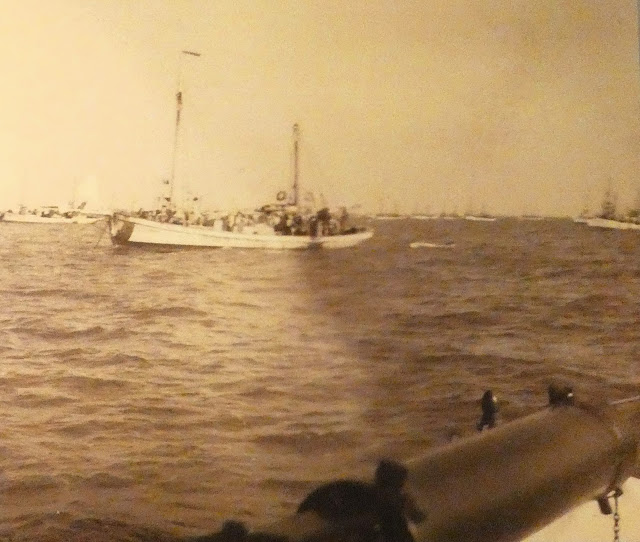 |
| A Japanese fleet of luggers in Boucant Bay, photographed from the deck of the Northern Territory Patrol Service boat Larrakia. |
In addition to the Northern Patrol, indigenous men were recruited into the Australian army to later form specialist units such as the Black Watch, bringing with them their undoubted skills in tracking.
The fears about invasion were raised to a higher pitch in the wake of the February bombing, given the previously demonstrated tactic of Japanese naval troops landing on other territories following such similar air attacks, and the Operation Order No.1, 27th March 1942 to the 43rd Battalion ordering the battalion to hold their area, the Darwin region, 'to the very end' reflects the anticipation of a similar event in or close to Darwin.
In the picture below is a Japanese flying helmet reputedly made of monkey-skin leather, and is of the same type used by the rear seat crew member of the Val two-seat dive bomber. To the left is a data plate recovered from the wreckage of the first Japanese aircraft shot down on Australian soil, and came from an Aichi D3A Val dive bomber #3304 that flew from the carrier Kaga on the 19th February 1942 and crashed after being hit by ground fire, with both aircrew killed.
 |
| A Japanese Betty bomber crew filmed as part of a propaganda movie. Note the aircrew goggles worn, similar to those pictured above. |
Alongside the C-53 id-plate are Japanese flying goggles found in a tree near the impact site of a Japanese Betty bomber on the Cox Peninsula in 1981. The Betty was one of a force of six such aircraft that attacked Darwin on the 4th of April 1942, escorted by six Zero fighters and intercepted by anti-aircraft fire and P-40 Kittyhawks of 9th Squadron, resulting in three bombers shot down and in the case of this aircraft resulting in the deaths of at least six Japanese aircrew.
You can see the remains of this aircraft held in the Darwin Aviation Museum in my previous post linked above.
During this time the weapon was modified to fire .22 calibre ammunition, and the leather holster is unique to this firearm.
 |
| Sergeant Hajime Toyoshima in the custody of Sergeant Leslie J. Powell, 23rd Field Company Royal Australian Engineers. The pistol that Powell is holding is Toyoshima's service pistol. |
 |
| A road sign produced in the 1980's to commemorate the building and sealing of the Stuart Highway during WWII and shows most of the towns and stops along 'The Track' as it is known. |
Following the bombing of Darwin, all sea lanes to the northern port were closed completely meaning all troops and supplies had to come overland over gravel roads not built to cope with the massive increase in traffic that started to cause them to disintegrate.
With the need to rebuild the road it was concluded that it needed to be bituminised to make it all-weather and the Allied Works Council assumed overall responsibility for this huge engineering project that brought in men and machinery from the state road authorities of Victoria, South Australia, New South Wales and Queensland together with the Civil Construction Corps and army engineering units to progress the work.
By mid-1944 the road to Darwin had been rebuilt and sealed that completed the logistical network to the Top End for the wider war effort.
.jpg) |
| John McDouall Stuart, the first European to have walked between Adelaide and the north Australian coast |
In August 2021 a contingent of enthusiasts drove restored military vehicles from Alice Springs to Darwin to commemorate the vital role plated by the Stuart Highway during WWII, visiting the staging camps and sites of interest that dotted the side of The Track on their journey north.
After soaking up the history captured in the Defence of Darwin Exhibition I was more than happy to move outside to explore the wider museum and exhibits as well as to soak up a bit more of the sunny Darwin weather, to discover that Carolyn had already found her way there and was enjoying watching the local birds getting a drink in the hot sunshine.
On exiting the reception building I was immediately drawn to parts of that defence system on display in the grounds outside.
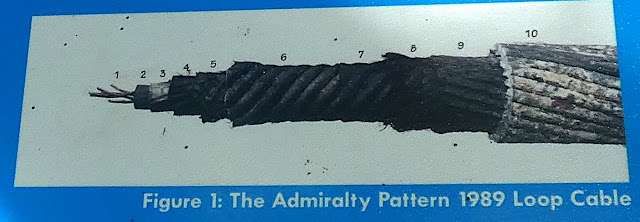
The cable sample above is from a submarine indicator loop, that could detect the magnetic current produced by a submarine that passed over it, even if the submarine had been degaussed; with this technology for defending anchorages from submarine attack having first been developed in Portland Naval Base in the UK back in 1915.
It would see the first deployment of the system in Scapa Flow, for defending the British Home Fleet, resulting in the sinking of the German UB-116 on the 28th October 1918 in a loop-controlled minefield with the loss of all crew.
 |
| The German submarine UB-40, sister to the UB-116 sunk in Scapa Flow on 28th October 1918 with a loop-controlled mine |
A loop-controlled minefield consisted of lines of mines, each surrounded by an electrical indicating loop, which if it indicating the presence of a submarine alerted an observer to scan the area for a potential surface vessel that might have triggered the alert, which if not present signalled the presence of an enemy submarine, as friendly boats always travelled in port on the surface, and thus the mines were manually detonated. This was how UB-116 was destroyed.
Below are the remains of one of the Boom Net Buoys that was used to suspend the huge cable for that anti-submarine net that spanned the entrance to Darwin Harbour in WWII
In a nearby ex Nissen hut was a display of items associated with the boom and net together with other nautical items discovered in the harbour since the end of WWII.
 |
| WWII depth charge |
 |
| A Mk 23 torpedo designed in the USA and used by the RAN in 1971. It was nitrogen filled and electrically driven with a 634lb explosive warhead and used on the Oberon class submarines. |
The net once stretched about four miles from here at Dudley Point to West Point and was at the time the longest net in the world, requiring four boom vessels to operate and maintain the system.
 |
| The remains of the anti-submarine boom net cliff mooring at Dudley Point. All nets and flotation were removed by December 1945. |
At first I thought the rather dilapidated boom buoy and a few artefacts retrieved from Darwin Harbour displayed near the reception area was all that remained of the mighty Darwin anti-submarine net until exploring further into the gardens, when to my delight the display seen below hove into sight giving a much more marked impression of the scale of this engineering marvel.
Ship-operated gates were used to allow accepted vessels through the barrier with two ships commissioned in April 1940, HMAS Kookaburra and Koala to be followed in time by HMAS Kangaroo and Karangi.
 |
| How the boom gate was operated, with two ships anchoring a section of the net that could be swung open and closed between them. |
 |
The Royal Australian Navy boom defence vessel HMAS Kookaburra |
 |
| The massive boom cable that suspended the net and was carried on the surface from buoy to buoy. |
As well as displaying military equipment the garden area at the back of the museum leading out to the gun emplacement and observation building also serves as a memorial garden to Australian service men and women and the odd animal, for they also serve.
 |
| My paternal uncle, who was ex Royal Artillery, had a boxer called 'Gunner' so my attention was caught by Gunner the Kelpie. |
I have to say that when I came to revue my pictures from the Darwin Military Museum it struck me that the place is rather unique in the somewhat eclectic collection of vehicles, militaria and other objects relating to the military history of the area it holds and the way it is laid out in a somewhat haphazard collection of former military buildings amid beautiful tropical lawns, and how to present the place in a coherent way.
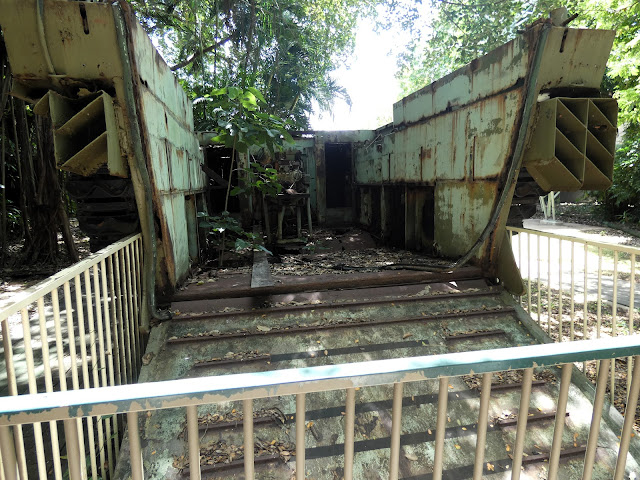
The Buffalo was originally of Australian design but its manufacturing rights were sold to the USA during the war. This particular example was modified to allow it to be operated from outside the driver's compartment, which could have gotten unbearably hot due to the tropical weather and the engine being mounted directly behind the driver.
Holes have been cut into the armour plating on the front and the steering columns, accelerator, and brake pedals have been extended up through these apertures, and it is likely a simple canvass 'roof' may also have been erected to provide the driver some form of protection from the hot sun.
Powered by a 250hp Continental radial engine, the Buffalo served as an amphibious transport vehicle during WWII, but while it had the potential to be an outstanding utility vehicle, its design did not allow it to operate in any but the calmest of seas without taking on dangerous levels of water.
The British designed Barr and Stroud Height and Range Finder mounting is pictured below, and was built to an Admiralty pattern and patent of 1920, but here is missing the two 'arms' each of which would sight a picture.
The British co-incident rangefinder produces two pictures of the target, which then are merged together in order to produce a uniform picture and thus computing the range in the process.
The WWII vintage paravane below was used in minesweeping operations, attached to a cutting cable and dragged at a predetermined depth behind a minesweeper.
The Bofors Gun was an anti-aircraft weapon designed and developed by the Swedish arms manufacturing company A. B. Bofors in the 1930s, and it became one of the most, if not the most, popular medium weight anti-aircraft weapon utilised by the Allied Forces in WWII and was also used by Axis forces.
 |
| A Mark V Bofors mount on HMS Belfast https://www.flickr.com/photos/ian_e_abbott/53398845634 |
The olive-green bell seen below was located during WWII at the RAAF base Darwin and was used, as what would be referred to in RAF language as a 'Scramble Bell', to sound a warning of impending Japanese air attack; and was rung at 09.58 on the 19th February 1942 by a Corporal who sighted the incoming Japanese naval aircraft, several of which were attacking the ten US Kittyhawk fighters operating out of the base near the harbour boom net.
The bell no doubt had regular service, with the 'Top End' of Australia raided over 100 times by the Japanese in 1942-43.
I remembered seeing photographs of similar bells seen on RAF airfields during the Battle of Britain, chalked up with the famous motto ' Don't come and tell, ring the bloody bell!'
The other silver bell is somewhat of a mystery and is believed to be a ship's bell that was discovered in Doctors Gully (see my first post on Darwin, where Carolyn and I walked to Doctors Gully to see the former Catalina flying boat base) during salvage work after WWII.
It is marked 'BVG 1918' and one of the eleven ships sunk in the first raid on Darwin in 1942 was the Mauna Lea which was launched in 1918, however the builder was a US company without the same intials.
Further research has suggested that the BVG could refer to the German casting company Bochumer Verein für Bergbau und Gußstahlfabrikation linking it to the ship MV Neptuna, which was sunk after a huge ammunition explosion in the harbour during the first Japanese air raid.
.jpg) |
| The wrecked wharf and Neptuna in Darwin Harbour |
With a minor change to the flash hider, they were designated "Mark I/2", and a production licence was acquired, with the gun converted from metric to imperial measurements, together with numerous other changes to the design so that it was more suitable for mass production, because the original Bofors was intended to be hand-assembled, with many parts labelled "file to fit on assembly", requiring many man-hours of work to complete.
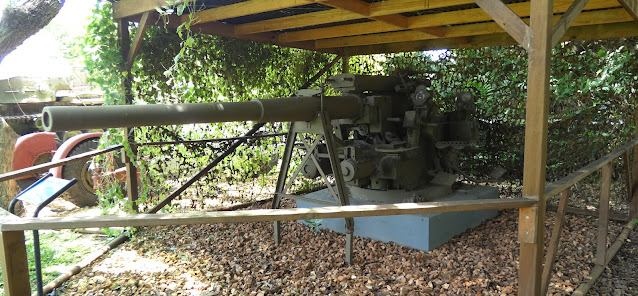
The Bofors Mk12/1 anti-aircraft gun seen below is often referred to as the Bristol Bofors due to the modifications carried out by the Bristol Aircraft Company to modernise the original dun design which along with several changes included the principle one to switch from manually operated elevation and traverse mechanisms to electric motor drive.
Thirty-six Mk1 Bofors underwent Mk12/1conversion in the late 1950's and would serve in the Australian Army into the late 1970's, with several guns deployed to Darwin in 1963 during the heightened tensions of the Indonesian Confrontation when members of the 121st LAA Battery deployed at the radar station at Lee Point and Emery Point overlooking Darwin Harbour.
In Australian service they were fitted in twin Mk XIX mountings as the secondary armament of the cruisers Australia, Canberra, Shropshire, Hobart and Perth, the Tribal class destroyers, Arunta, Warramunga and Bataan, carried in a twin mounting in the X position, whilst also equipping the Grimsby, Bathurst, River, Bay and Q class escorts in single Mk XX and twin mountings
 |
| HMAS Arunta, a Tribal Class Destroyer laid down in 1939 and commissioned into the RAN in 1942, and armed with two 4-inch QF guns as seen above. |
These barrels are single mount units as seen in the picture of HMAS Diamantina during our visit to Brisbane earlier in the trip, and they were manufactured in 1941 and 1943, with only 45 being made for the Royal Australian Navy, which sees ongoing research to find out which vessel they came from.
 |
| The single mounted 4-inch QF gun can be seen here on HMAS Diamantina, a River class frigate seen during our visit to Brisbane earlier in our trip. JJ's Wargames - City of Brisbane and the Queensland Maritime Museum |
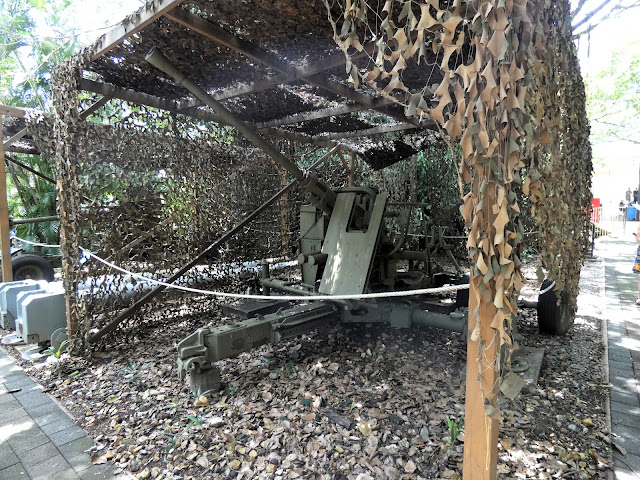
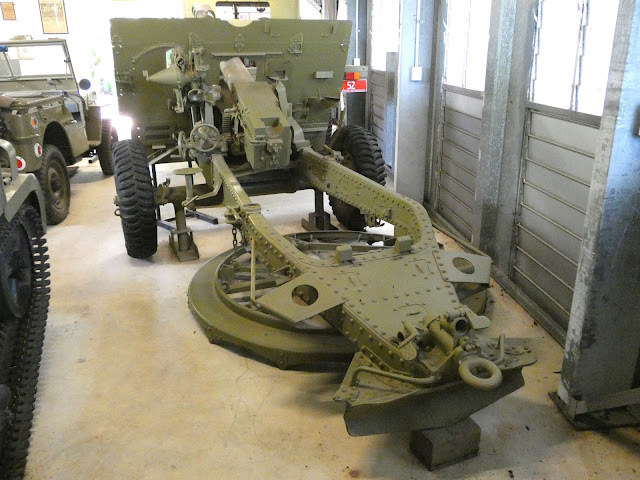
The Ordnance Quick-Firing 17-pounder (or just 17-pdr) was a 76.2 mm (3 inch) gun developed by the United Kingdom during World War II, and was used as an anti-tank gun on its own carriage, as well as equipping a number of British tanks.
Used with the APDS shot, it was capable of defeating all but the thickest armour on German tanks, and it was used to "up-gun" some foreign-built vehicles in British service, notably to produce the Sherman Firefly variant of the US M4 Sherman tank, giving British tank units the ability to hold their own against their German counterparts.
Guns like these were deployed extensively around Darwin during World War II as seen in the picture of the 14th Heavy Anti-Aircraft Battery previously, and were the first guns to engage the Japanese on the 19th February 1942 firing around 800 rounds in the first raid from 09.58 to 10.20.
 |
The British Army in the United Kingdom 1939-45 2-pounder anti-tank gun of 52nd Reconnaissance Regiment, Scotland, 3 September 1942. |
In its vehicle-mounted variant the 2-pounder was a common main gun on British tanks early in World War II, as well as being a typical main armament of armoured cars, such as the Daimler, throughout the war.
As the armour protection of Axis tanks improved, the 2-pounder lost effectiveness and it was gradually replaced by the 57 mm QF 6-pounder starting in 1942. It equipped infantry battalion anti-tank platoons replacing their anti-tank rifles until in turn replaced by 6-pounders but remained in service until the end of the war.
The six-inch Mark XI BL (breech loading) naval gun seen below was originally fitted on the First World War light cruiser HMAS Brisbane.
They were subsequently removed from the ship and deployed to East Point, together with three other six-inch guns to form part of Darwin's coastal defence during WWII.
 |
| HMAS Brisbane, commissioned in October 1916 and scrapped in 1936 - Australian War Memorial |
Following the end of the war, the guns were manned by a Commonwealth Militia Force unit, the 121 Medium Coast Battery, remaining in service until the unit was disbanded on the 30th June 1960.
The original site for this gun was on the cliff some 325 yards to the right of the museum.
The WWII tractors seen below was manufactured by the Cleveland Tractor Company, Ohio, USA in 1943, and was subsequently named the Cletrac by the company but ended up being nicknamed the Crawler by the service personnel due to its very low rate of speed.
The Cletracs were used in many roles during WWII including road building, road repairs and towing heavy bombers around airstrips, the latter purpose forming the role of this particular vehicle, seeing it abandoned post-war until its recovery and placing on display in the Pine-Creek township, whose council donated it to the museum.
The vehicle mounted workshop seen below was used by the 808th Engineers Battalion (Aviation) and its primary role was in airfield and ancillary maintenance by the Allied forces stationed between Adelaide River and Larrimah.
 |
| Another Barr and Stroud range finder mounting |
The ship gun seen below is thought to have been cast over 300 years ago, and likely to have arrived in Timor onboard a Caravel, a small, fast Portuguese ship.
The gun is a twelve-pounder and precise information about it is unavailable due to history records being destroyed during the Japanese occupation of Timor in WWII, from where this gun was donated to the museum by the Portuguese Timor Government.
 |
| A replica Portuguese caravel seen in Funchal harbour during our visit to Madeira February 2024 JJ's Wargames - Madeira 2024 |
The Ordnance ML 3-inch mortar seen below was the United Kingdom's standard mortar used by the British Army from the early 1930s to the late 1960s, superseding the Stokes mortar. Initially handicapped by its short range compared to similar Second World War mortars, improvements of the propellant charges enabled it to be used with great satisfaction by various armies of the British Empire and of the Commonwealth.
The Mark II mortar (Mark I was the Stokes) was the standard British mortar when the Second World War broke out in September 1939, but experience in the early part of the war showed that, although the Mark II was reliable and sturdy, it did not have sufficient range compared to the German 81 mm s.GW.34 mortar, but a series of experiments and trials using new propellants improved the range from 1600 yards to 2800 yards by about 1942; and, by 1943, the barrel, baseplate and sights had also been improved. The ML 3-inch mortar was carried on three packs by infantry or on Universal Carriers, and the Mark II remained in service with the British Army until replaced by the L16 81mm mortar in 1965.
"without the Bailey bridge, we should not have won the war."
 |
| Sir Donald Bailey, pipe in mouth, sits in his office and examines the model of a Bailey bridge which is resting on his desk, c 1944. |
Donald Bailey was a civil servant in the British War Office who tinkered with model bridges as a hobby, and he had proposed an early prototype for a Bailey bridge before the war in 1936, but the idea was not acted upon, however Bailey drew an original proposal for the bridge on the back of an envelope in 1940, and on the 14th February 1941, the Ministry of Supply requested that Bailey have a full-scale prototype completed by 1st May.
Following extensive trials and testing with an original prototype still in place as a functioning bridge on the marshland at the confluence of the River Avon and the River Stour in Christchurch, Dorset, full production began in July 1941, and the bridge was taken into service by the Corps of Royal Engineers and first used in North Africa in 1942.
In 2024, following the catastrophic landslide in Kerala’s Wayanad district, the Indian Army built a 190 foot Bailey bridge in the village of Mundakkai.
The Ferret was produced between 1952 and 1971 by the UK company, Daimler with a total of 4,409 Ferrets, including 16 sub-models under various marks, produced between 1952 and 1971.
 |
| The British Army in Burma 1944 A view of the 1,100ft bailey bridge across the Chindwin River as it nears completion, less than 12 hours after the 14th Army captured Kalewa, 2nd December 1944. |
Known by the title 'Projector Fortress' searchlights like the one pictured below were used to spot enemy ships so they could be targeted by shore guns. With a range of around 15.5 miles, depending on conditions, the lights burnt a magnesium rod that was reflected to give a brilliant light; and operating in conjunction with rangefinder crews who would communicate via the gun system's telephone network, once the target was illuminated and the range known, the enemy ship could be fired at by the guns.
The Centurion tank was the primary British and Australian main battle tank of the post-Second World War period, going into service in 1945 and being produced until the 1960s it remained in service with many countries until the 1980s.
 |
| Centurion Mk 3 Main Battle Tank |
It was a very successful tank design with good armour, manoeuvrability and armament and would see service with the Australian Army in Korea and Vietnam.
 |
| It is not known if this Centurion saw service in the Vietnam War, but it is thought to have been a command or training tank. |
Named 'The Iron Cathedral' by American crew members, the M3 Lee medium tank went into production in America in mid 1941 with the British variant, named 'Grant' fitted with an upper turret mounting a 37mm gun.
Approximately 500 Grants were shipped to Australia and in 2022 it is believed about 50 survive, mainly intact, around the world.
Leyland Ferret Scout Cars were used as a relatively fast and mobile means in forward areas for scouting operations and personnel conveyance, and were designed to be able to withstand reasonable punishment from small arms fire.
This is a 1954 Mk II model featuring the standard swivelling turret carrying a single .30 calibre machine gun and mounting a three-barrelled smoke grenade launcher, and having an all-wheel drive system.
 |
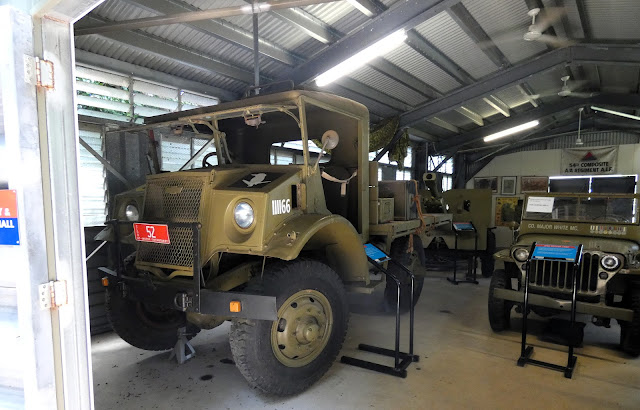
| A beautifully restored 1939 Chevrolet Blitz General Service Truck |
A vehicle not unfamiliar to a visiting Pom is the one seen below, the ubiquitous Land Rover, however this one has a more local resonance given that it featured in an Aussie TV series, sadly not seen in the UK, called 'Bush Tucker Man' which ran from 1987 to 1990, featuring Major Les Hiddins an Australian Army soldier and Vietnam veteran using said vehicle to travel through the bush demonstrating the art of surviving on bush-tucker, native foods.
 |
| Bush Tucker Man, Les Hiddins' Land Rover used in the TV Series of that name. |
The following two vehicles had no information about them but based on my limited knowledge of post WWII Australian military vehicles, the one seen below is an American designed M113 with a Vietnam era T50 turret installed on top.
 |
| Australian M113A1 in Vietnam |
The T50 turret was selected as the standard turret for Australian M113s, and M113A1s fitted with T50 turrets began to arrive in South Vietnam in August 1968, and eventually almost all of the Australian Army's M113A1s were eventually fitted with these turrets.
The turret was initially armed with two L3A3 machine guns (an improved version of the M1919A4), but some were later fitted with a M2 Browning and a M1919A3. The turret was regarded as unsatisfactory by soldiers, as it was cramped and it proved difficult to keep the guns aimed when the vehicle was moving, whilst also being very slow to rotate, which led to delays in engaging targets. The Australian Army is one of only two M113 operators to have fitted turrets to the type.
Used in the later stages of WWII in New Guinea, the Pacific and later in the 'Malayan Emergency' in the 1950's, the versatile 4.2" mortar seen below could be used with great accuracy in close mountain country and had the advantage of being man-portable when necessary, or could be carried and fired from the back of the Bren (Universal) Carrier.
 |
| The tactical markings shown here, 107 over diagonal red and yellow, would suggest a vehicle belonging to the 1st Armoured Personnel Carrier Troop/Squadron of the Royal Australian Armoured Corps. https://www.remlr.com/vehicle-markings.html |
The other seen below is clearly a WWII vintage field ambulance in the markings of the 3rd Australian Infantry Division that would see service in New Guinea 1943-44 and Bougainville 1944-45.
 |
| The Ordnance ML 4.2-inch mortar was a heavy mortar used by the British and Australian Army during and after World War II. |
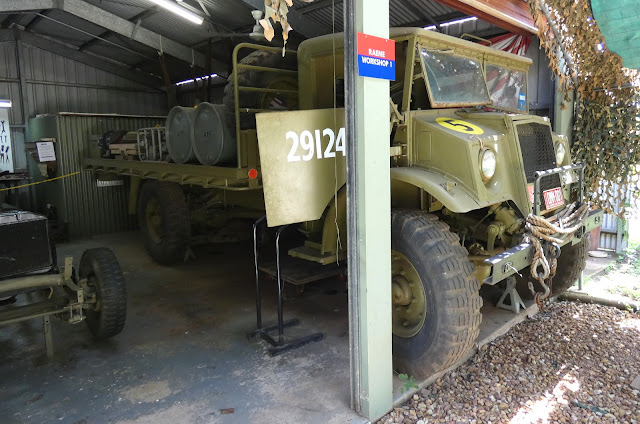 |
| Another nicely turned out General Service Blitz Truck |
The 7th Australian Infantry Division used the Kookaburra and Boomerang. The 7th Division was the second division raised as part of the 2nd AIF following the outbreak of World War II.
.jpg) |
| Giropa Point, Papua. Members of the 2/12th Battalion advance as Stuart tanks of the 2/6th Armoured Regiment, shell Japanese pillboxes in the final assault on Buna. |
Battle honours were won in and around Finschafen, Lae, Markham and Ramu Valley's and Madang and Hansa Bay areas.
 |
| A 1943 Mk II 25-pounder Field Gun. The 25-pounder medium gun was the standard piece of artillery for the Australian Army for WWII and beyond until the early 1960s. |
 |
| In the markings of the famous Australian 6th Infantry Division |
They were transported to the Middle East, to fight the Italians and Germans in Bardia, Tobruk, Derna, Giarubub and Benghazi, and after suffering great losses, and their first defeat after moving to Greece and Crete, the Division was moved back to Egypt.
After reequipping and re-manning the Division saw action against the Vichy French in Syria. Due to the threat of the Japanese to Australia, the 6th were returned to Australia in 1942, by orders of the Australian Prime Minister, much to the chagrin of the British Prime Minister, Winston Churchill who wanted the 6th to remain in the Middle East. It was immediately sent to New Guinea and fought the Japanese around Buna, Salamaua, Danmap River and Wewak. The 6th Division is arguably the most famous of the Australian Divisions.
 |
| The rear deck space on this carrier showing the engine compartment |
In the picture below is the transmission and gearbox for a Leopard Tank worth about $1.2 million (Australian) or just over £600,000.
 |
| Transmission and gearbox for a Leopard Tank |
 |
| Camouflaged Pattern Parachute Silk |
The Land Rover is a British brand of predominantly four-wheel drive, off-road capable vehicles created in 1948 by the Rover Company for a utilitarian 4WD off-road vehicle.
 |
| Formation badge 'Land Command' |
The M2A2 105mm field howitzer seen below was first manufactured in Rock Island Arsenal, USA in the late 1950's, and this make and model of artillery piece was the standard artillery weapon used by most field regiments in the Royal Australian Artillery during the Vietnam War, with this particular weapon seeing service in Vietnam in 1967-69, and later being decommissioned in 2014, and being purchased by the museum a year later.
 |
| US made M2A2 105mm field howitzer and Vietnam veteran. |
 |
| Public Address System, used at RAAF Darwin. |
 |
| A museum expert in camouflage - first you see me then you don't! |
During our visit to the Darwin Aviation Museum I took some time to examine their collection of artefacts relating to the wartime history of the area and the various squadrons that operated and it was interesting to see the memorial created at the Darwin Military Museum, pictured below with bits of wreckage collected as a monument to those times, relating to the Hughes Airstrip.
The wartime units that were based at Hughes included Nos. 2, 13, 34 and 82 Squadrons RAAAF, and it was attacked three times by Japanese bombing raids on the 23rd August, 26th and 27th November 1942.
More anon
JJ




_burning_at_Darwin_1942.jpg)








.jpg)










.jpg)


No comments:
Post a Comment