

This post is the second part of a post that I wrote looking at the collection of items held by the Darwin Military Museum as part of a series of posts covering Carolyn's and my four month tour across the Pacific in 2022-23 that started in Vancouver, British Columbia, back in October 2022, arriving in Melbourne in December 2022 ahead of New Year, having come via Hawaii, Fiji and New Zealand's North and South Islands.
 |
| JJ's Wargames - Darwin Military Museum, Part One |
If you want to start with the first post and indeed trace back on previous posts in the series then just follow the link above.
So having explored the Darwin Experience exhibition and the vehicle and gun collections displayed around the museum grounds, I intend here to look at the various ex-military buildings used to display the collections of militaria held in the museum collection together with the restored 9.2-inch gun emplacement.
Australian cavalry saw action in the First World War when the 4th Light Horse Mounted Infantry participated in a mass charge against Ottoman positions at Beersheba on the 31st October 1917.
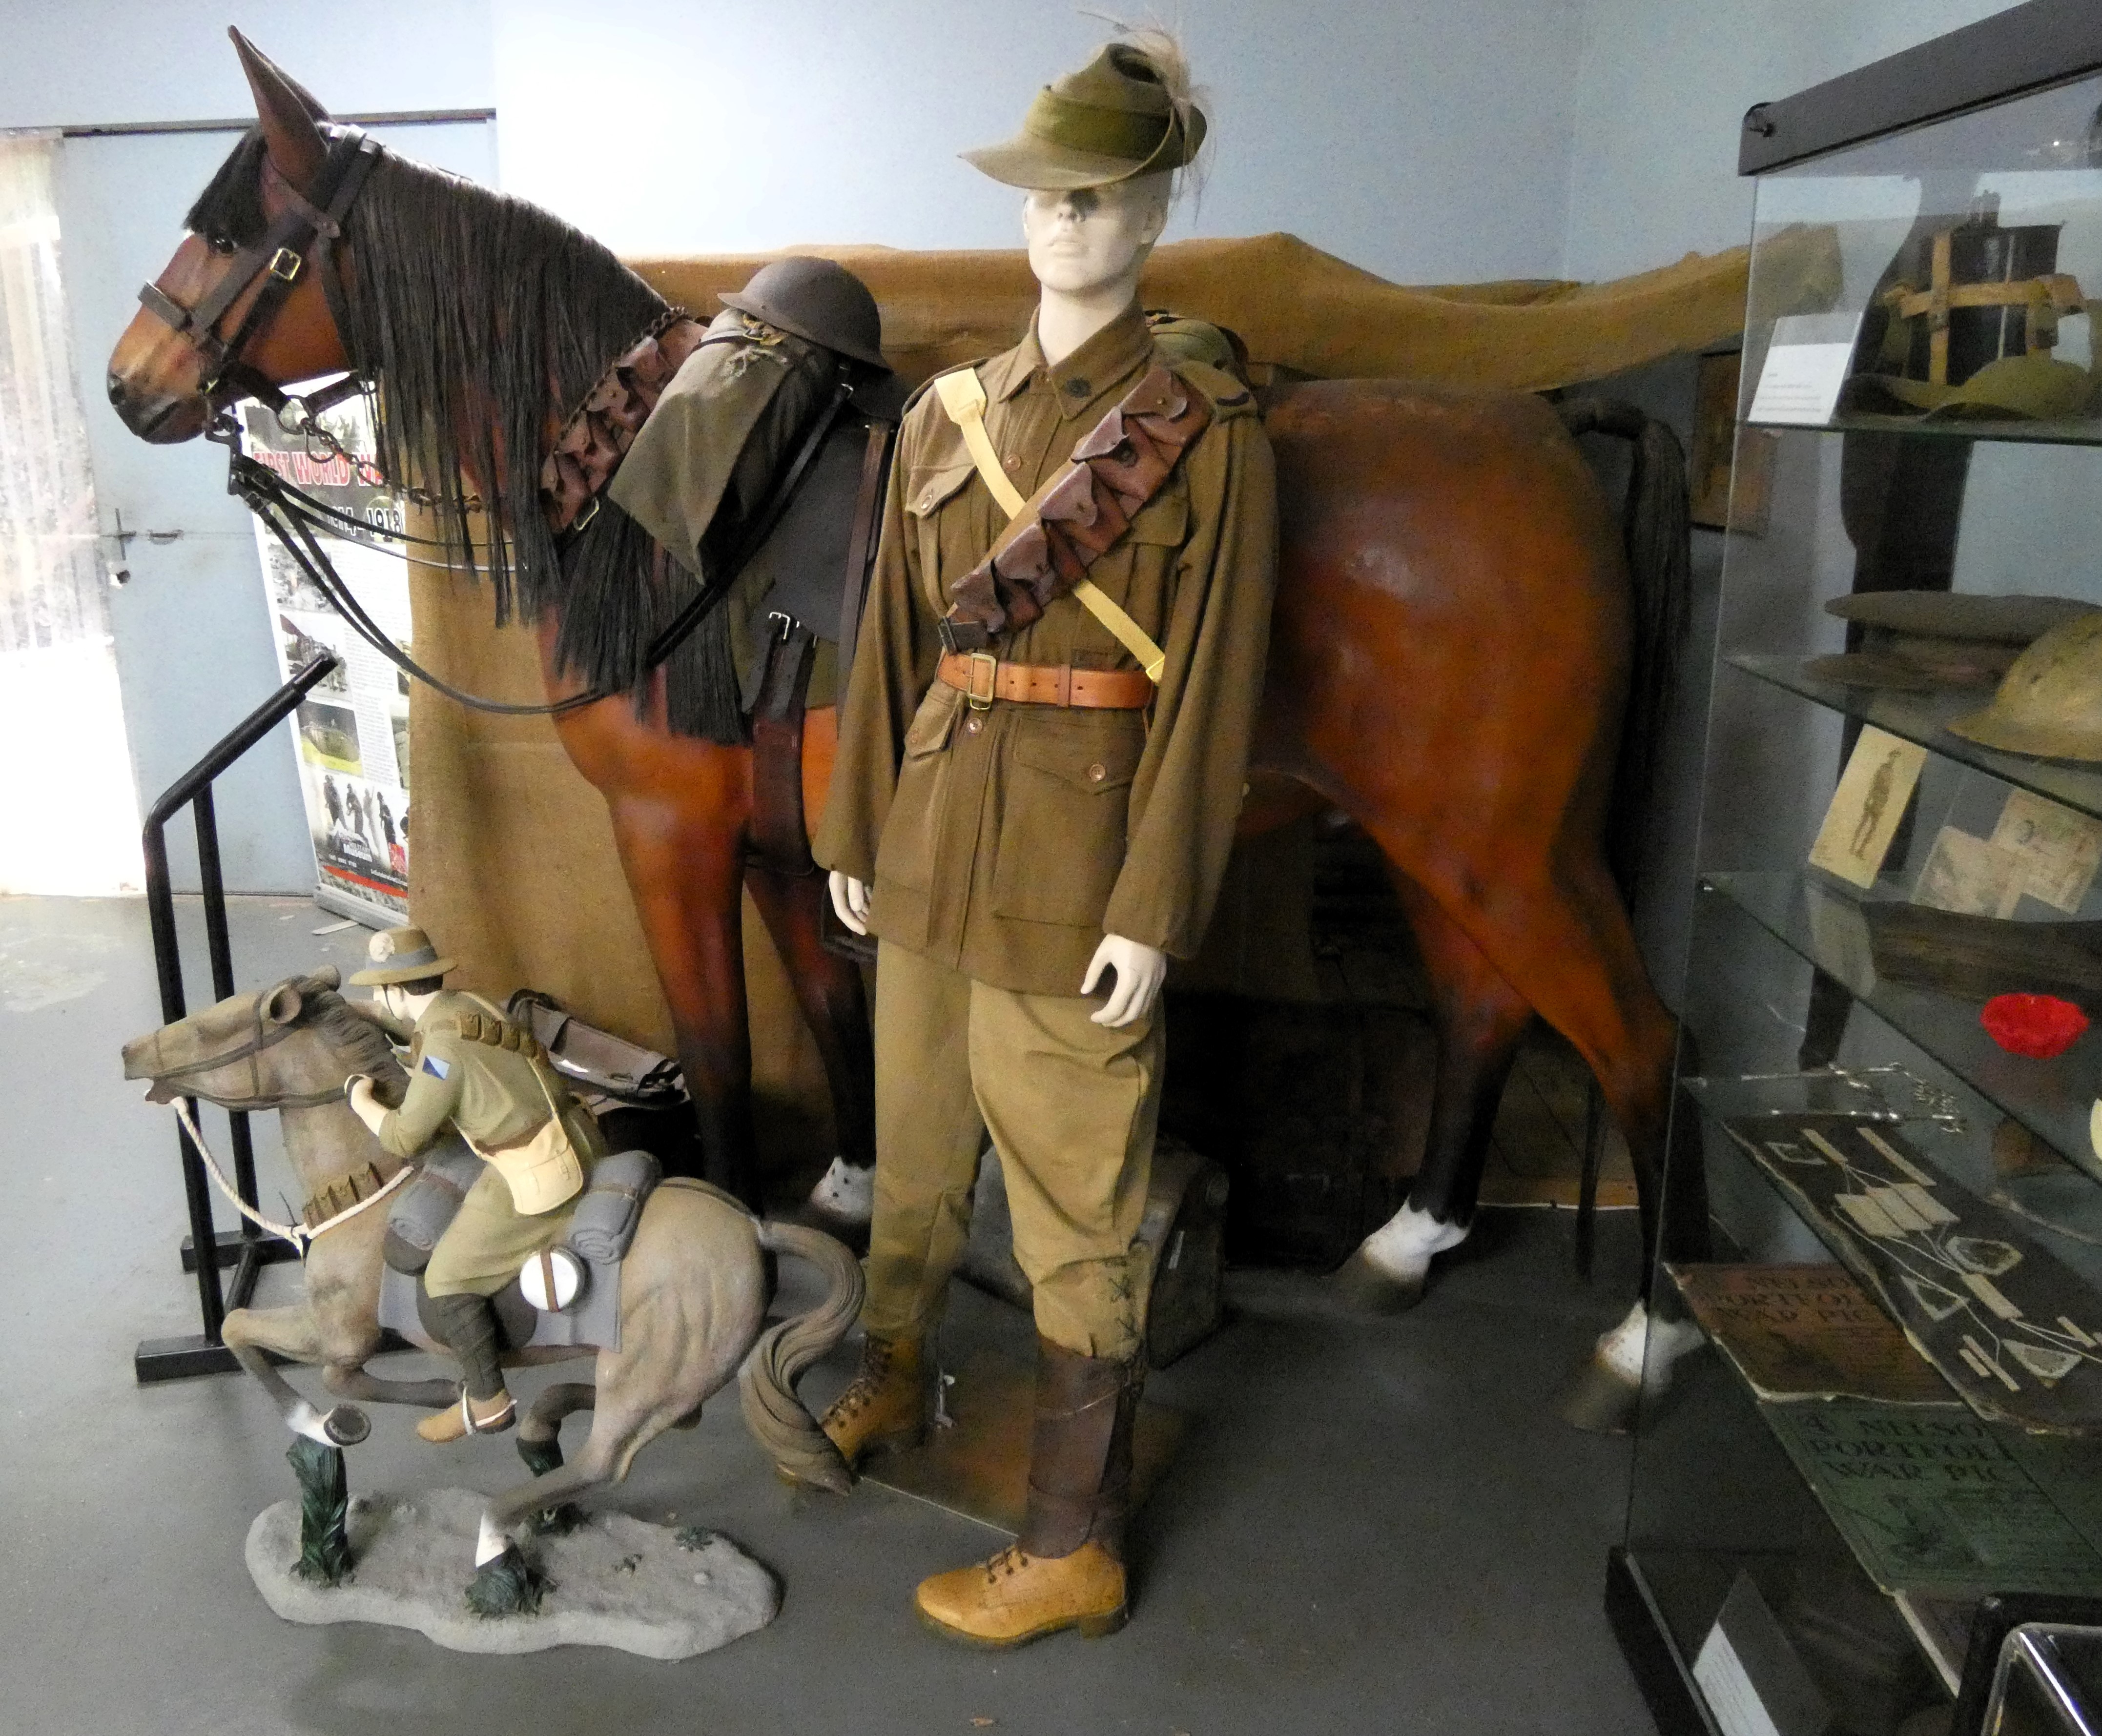
Little is known about the men and some 1500 horses of the secret 2/1 North Australia Observation Unit that were stationed in the Top End during WWII, with the men and their mounts - wild horses known locally as 'Brumbies' stationed in remote locations to watch for enemy activity indicating a possible invasion of Australia.
 |
| A sergeant of the North Australian Observation Unit (NAOU) or 'Nackeroos' mounted infantry in the Northern Territory during WWII, wearing summer uniform, including slouch hat and armed with a .303 rifle and bandolier. |
The men resided in harsh remote areas for years living off the land with their trusty steeds in lonely isolation without lights or power.
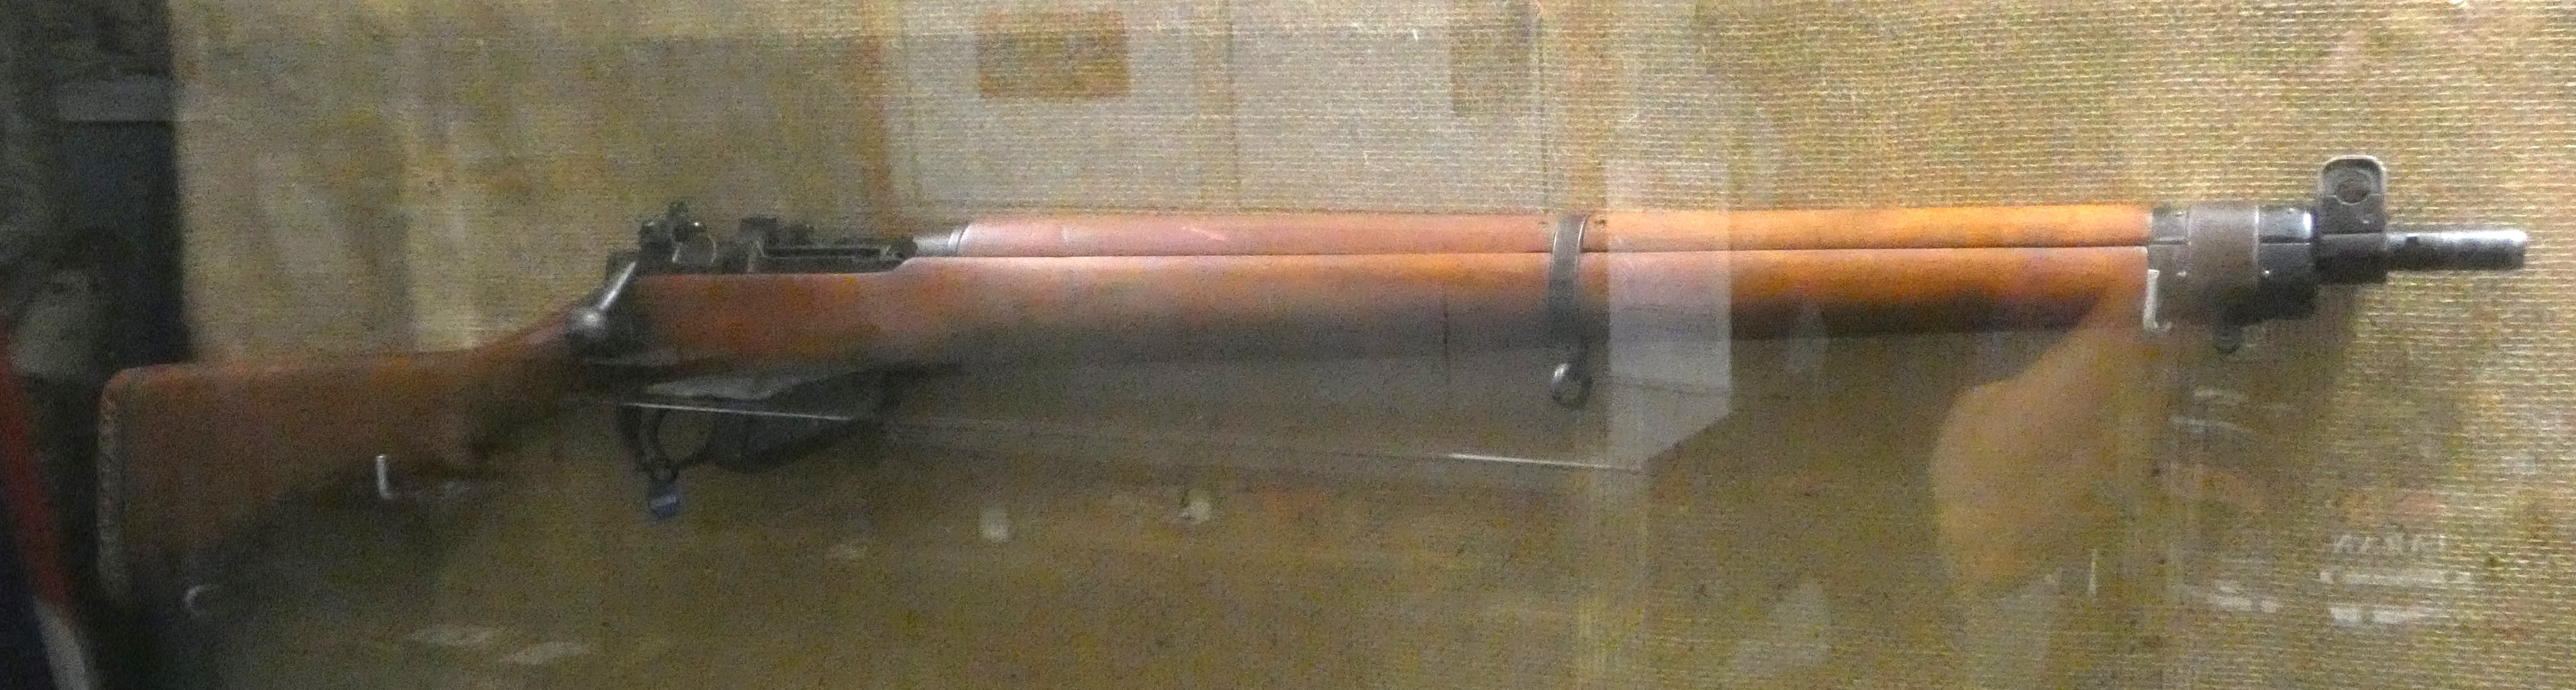
A cabinet close by had a display of Lee-Enfield rifles, with the one seen directly below, the 1943 Mk IV, No.1, which brought back memories for me as a young Air Cadet back in the seventies travelling to Bisley to shoot one of those things and recalling how it kicked like a mule, that even stuffing our beret's into our battle dress tops did little to reduce.
 |
| 1943 Lee-Enfield Canadian Mark IV No.1. |
 |
| Lee-Enfield Jungle Carbine (missing bolt). |
The Mark III seen below was also a JJ cadet-memory from my youth as we were given an instruction in the dangers of blanks fired by these weapons in close proximity, with our then instructor demonstrating with his personal Lee Enfield Mk III as seen below what a blank could do to a coke can placed on the muzzle when fired into the air, and I distinctly remember that can flying high and far, landing with a clatter together with a barked order not to fire the 'bloody thing' near anyone!
 |
| Lee Enfield Mark III with bayonet - The rifle issued to troops in the First World War with the very long bayonet, typical for that period, with the later WWII Mark IV having the much shorter spike bayonet. |
 |
| Lee Enfield Mk II 1907 Civilian Version. |
Born in the small village of Borung, Near Bendigo, Victoria, Borella was one of 64 Australians to receive the Victoria Cross for their actions during the First World War, doing so while serving with the 26th Battalion around Villers-Bretonneux in July 1918.

After the war, Borella returned to Australia, initially farming a property in Victoria before re-joining the Army during the Second World War and serving in a number of garrison units in Australia.
He was demobilised in 1945 and worked as a public servant until he retired in 1956. He died in 1968 at the age of 86.
 |
| Albert Borella's medals include for his WWI service the Victoria Cross, Military Medal, 1914-15 Star, British War Medal 1914-20 and the Victory Medal. For WWII he was awarded the War Medal 1939-45, Australian Service Medal 1939-45, Elizabeth II Coronation Medal and the George VI Coronation Medal. |
The origins of the war lay in the ashes of WWII when the Allies took control of Korea after 35 years of Japanese occupation, with the US and the Soviet Union accepting mutual responsibility for the country and with the latter taking control of the north and the former the south, that would see the two halves growing estranged from the other as both adopted their sponsors forms of government coupled with a growing distrust of the other.
 |
| Left, US Marine, centre, Australian Infantryman and right, North Korean or Chinese Infantryman. |
 |
| Australian troops move through the wreckage of a North Korean town, 1950 - AWM. |
In the adjoining gallery there was a WWII collection of uniforms and items illustrating the look of particular units and relating to the wider conflict.

Above and below is an interesting example of a 1944 WWII US petrol fired field kitchen designed to cook for twenty men, complete with cooking and serving utensils, a soldier's food tray ('dixie') and drinking pannikin.


The items shown here include a variety of Japanese Naval medical equipment and medicines found in a cave hospital just outside the city of Rabaul.

Japanese military equipment seen here include an Arisaka rifle, bayonets, a Nambu pistol, water bottle and gas mask found in the vicinity of the family home on 2/22nd Street, named in honour of the Australian 2/22nd Infantry Battalion that resisted the Japanese invasion but were eventually forced to surrender with tragic consequences.


Nearby were several manikins representing the dress of opposing forces from WWI to the present day.
 |
| Left to right - Australian Infantry WWI, British Paratrooper WWII, Australian Peacekeeper East Timor 1999-2000, US Army Infantryman WWII, US Army Paratrooper WWII. |
 |
| Left to right - Italian Infantryman WWII, German Infantryman WWI, Turkish Infantryman WWI. |
 |
| Left - Australian Infantryman Afghanistan, Right - Japanese Officer WWII. |
 |
| Left to Right - Japanese Officer WWII, Japanese Infantryman WWII, German Afrika Korps Infantryman WWII. |
Other manikins commemorated Women's service in wars past and present represented from the factory worker, Australian Army Nurses, Australian Women's Army Service and the Women's Royal Australian Army Corps, (WRAAC) and Women's Royal Australian Naval Service.


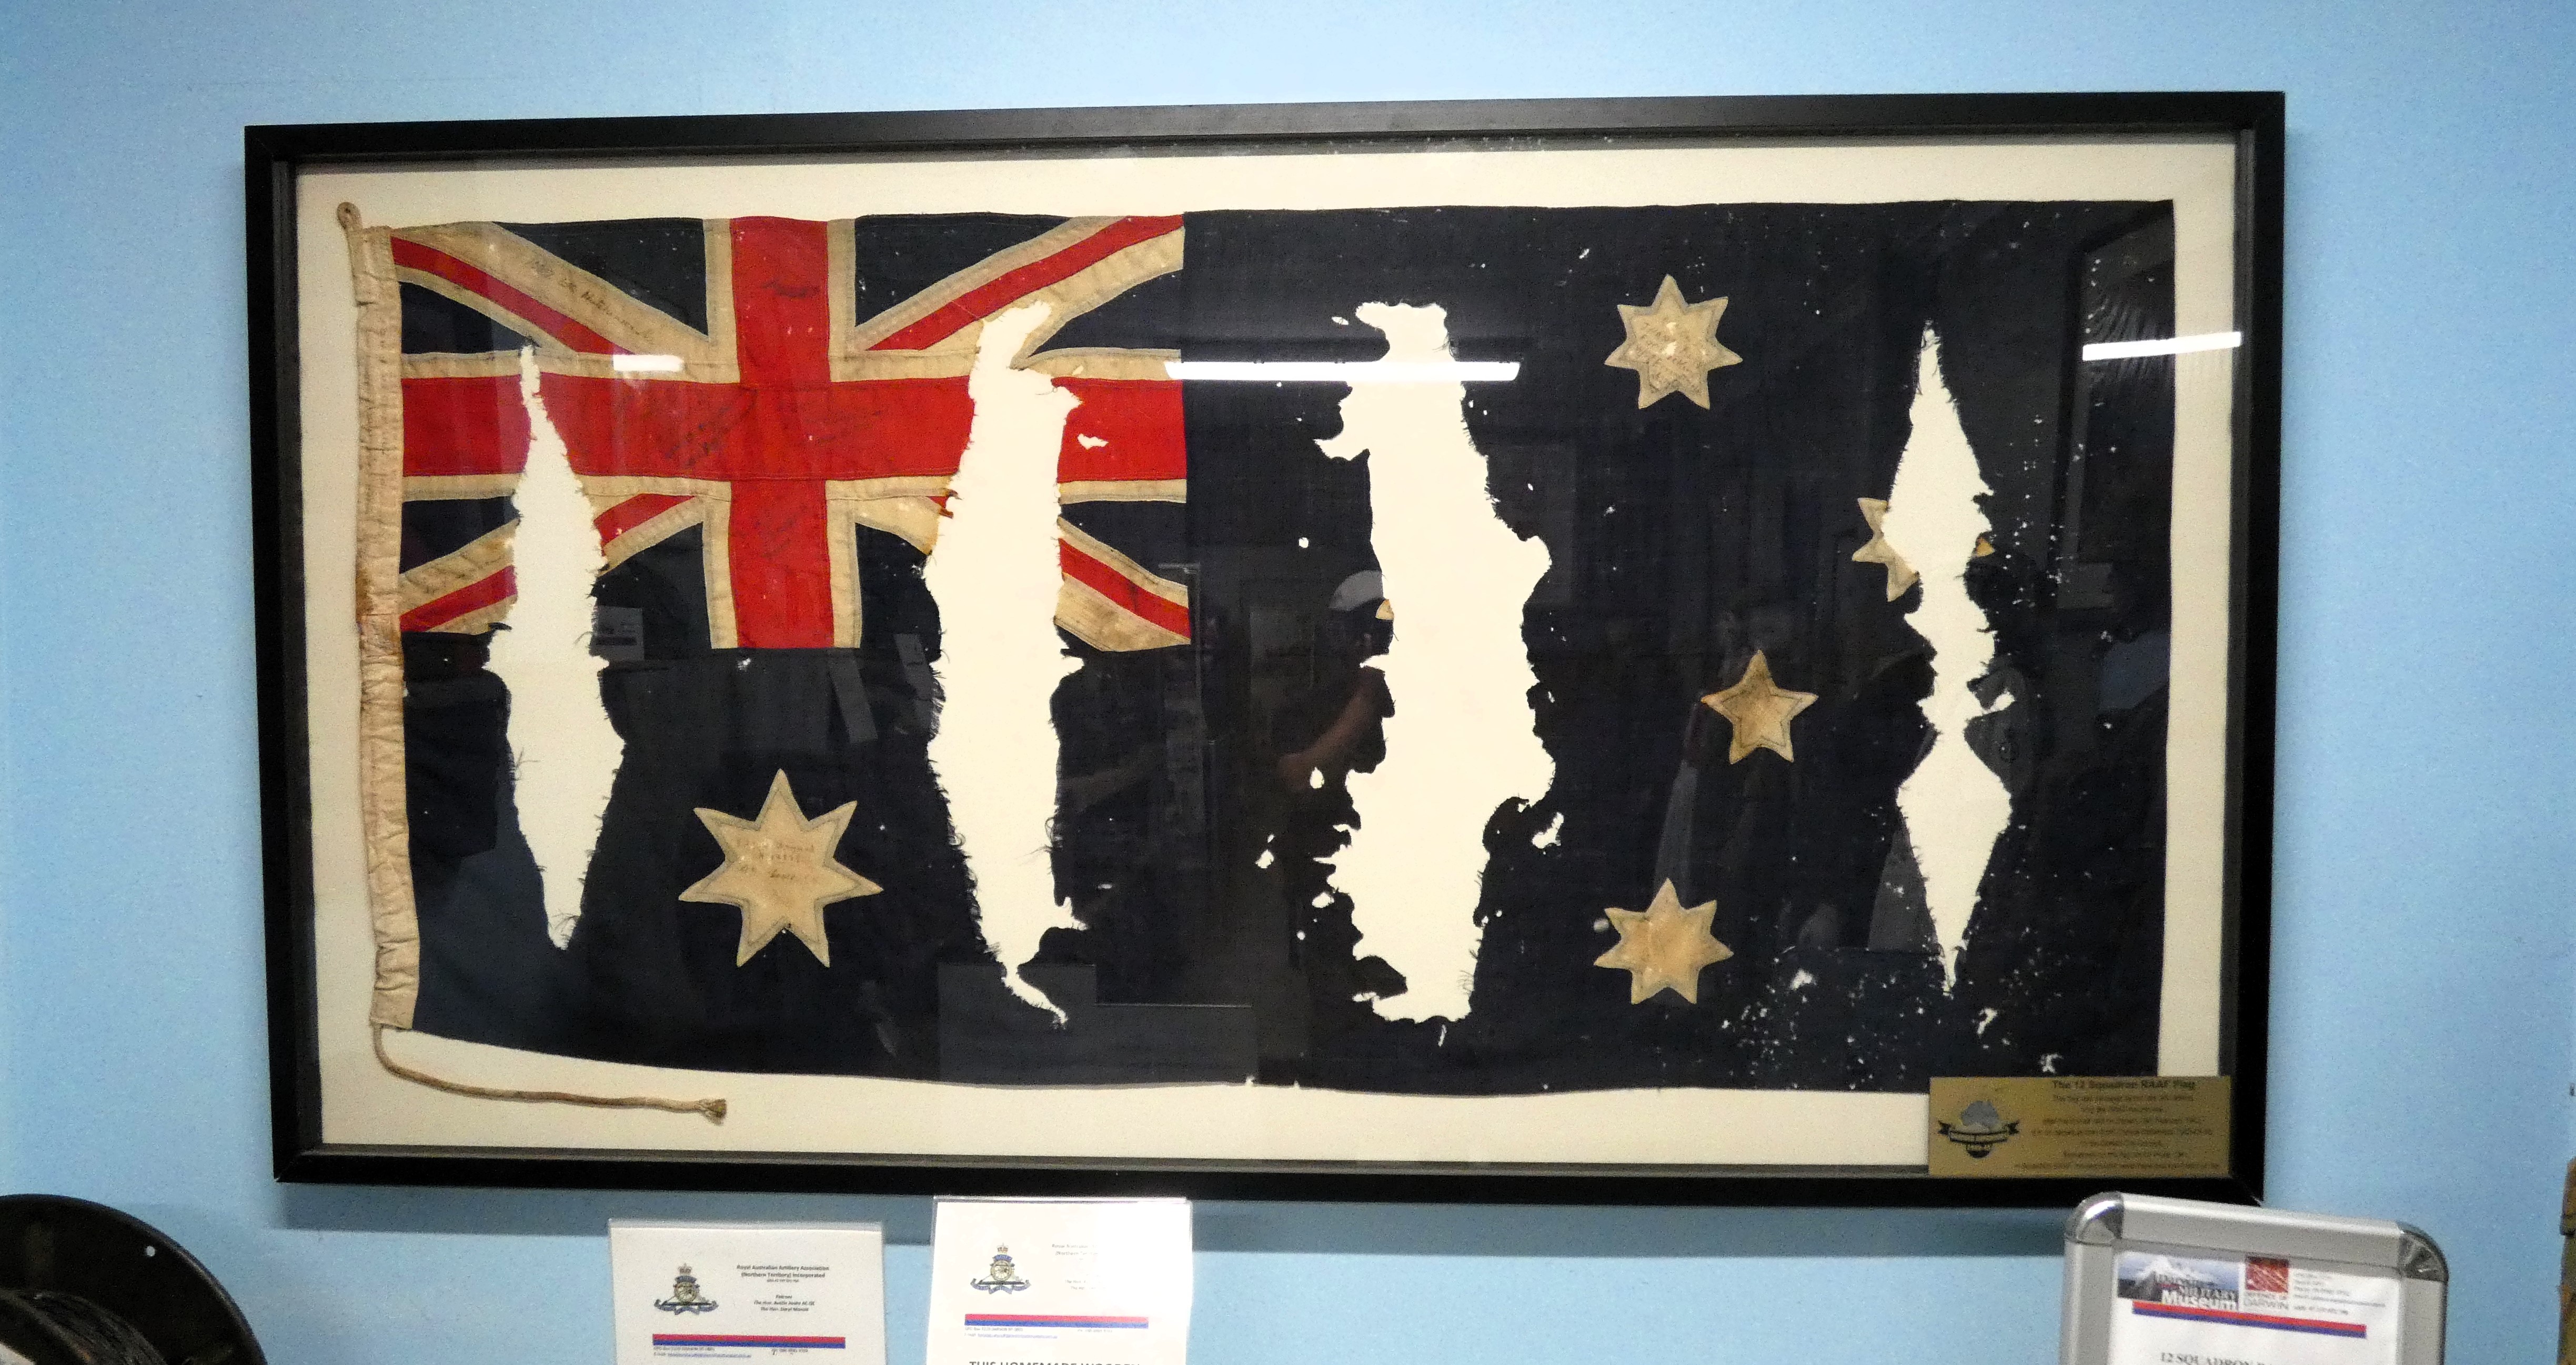
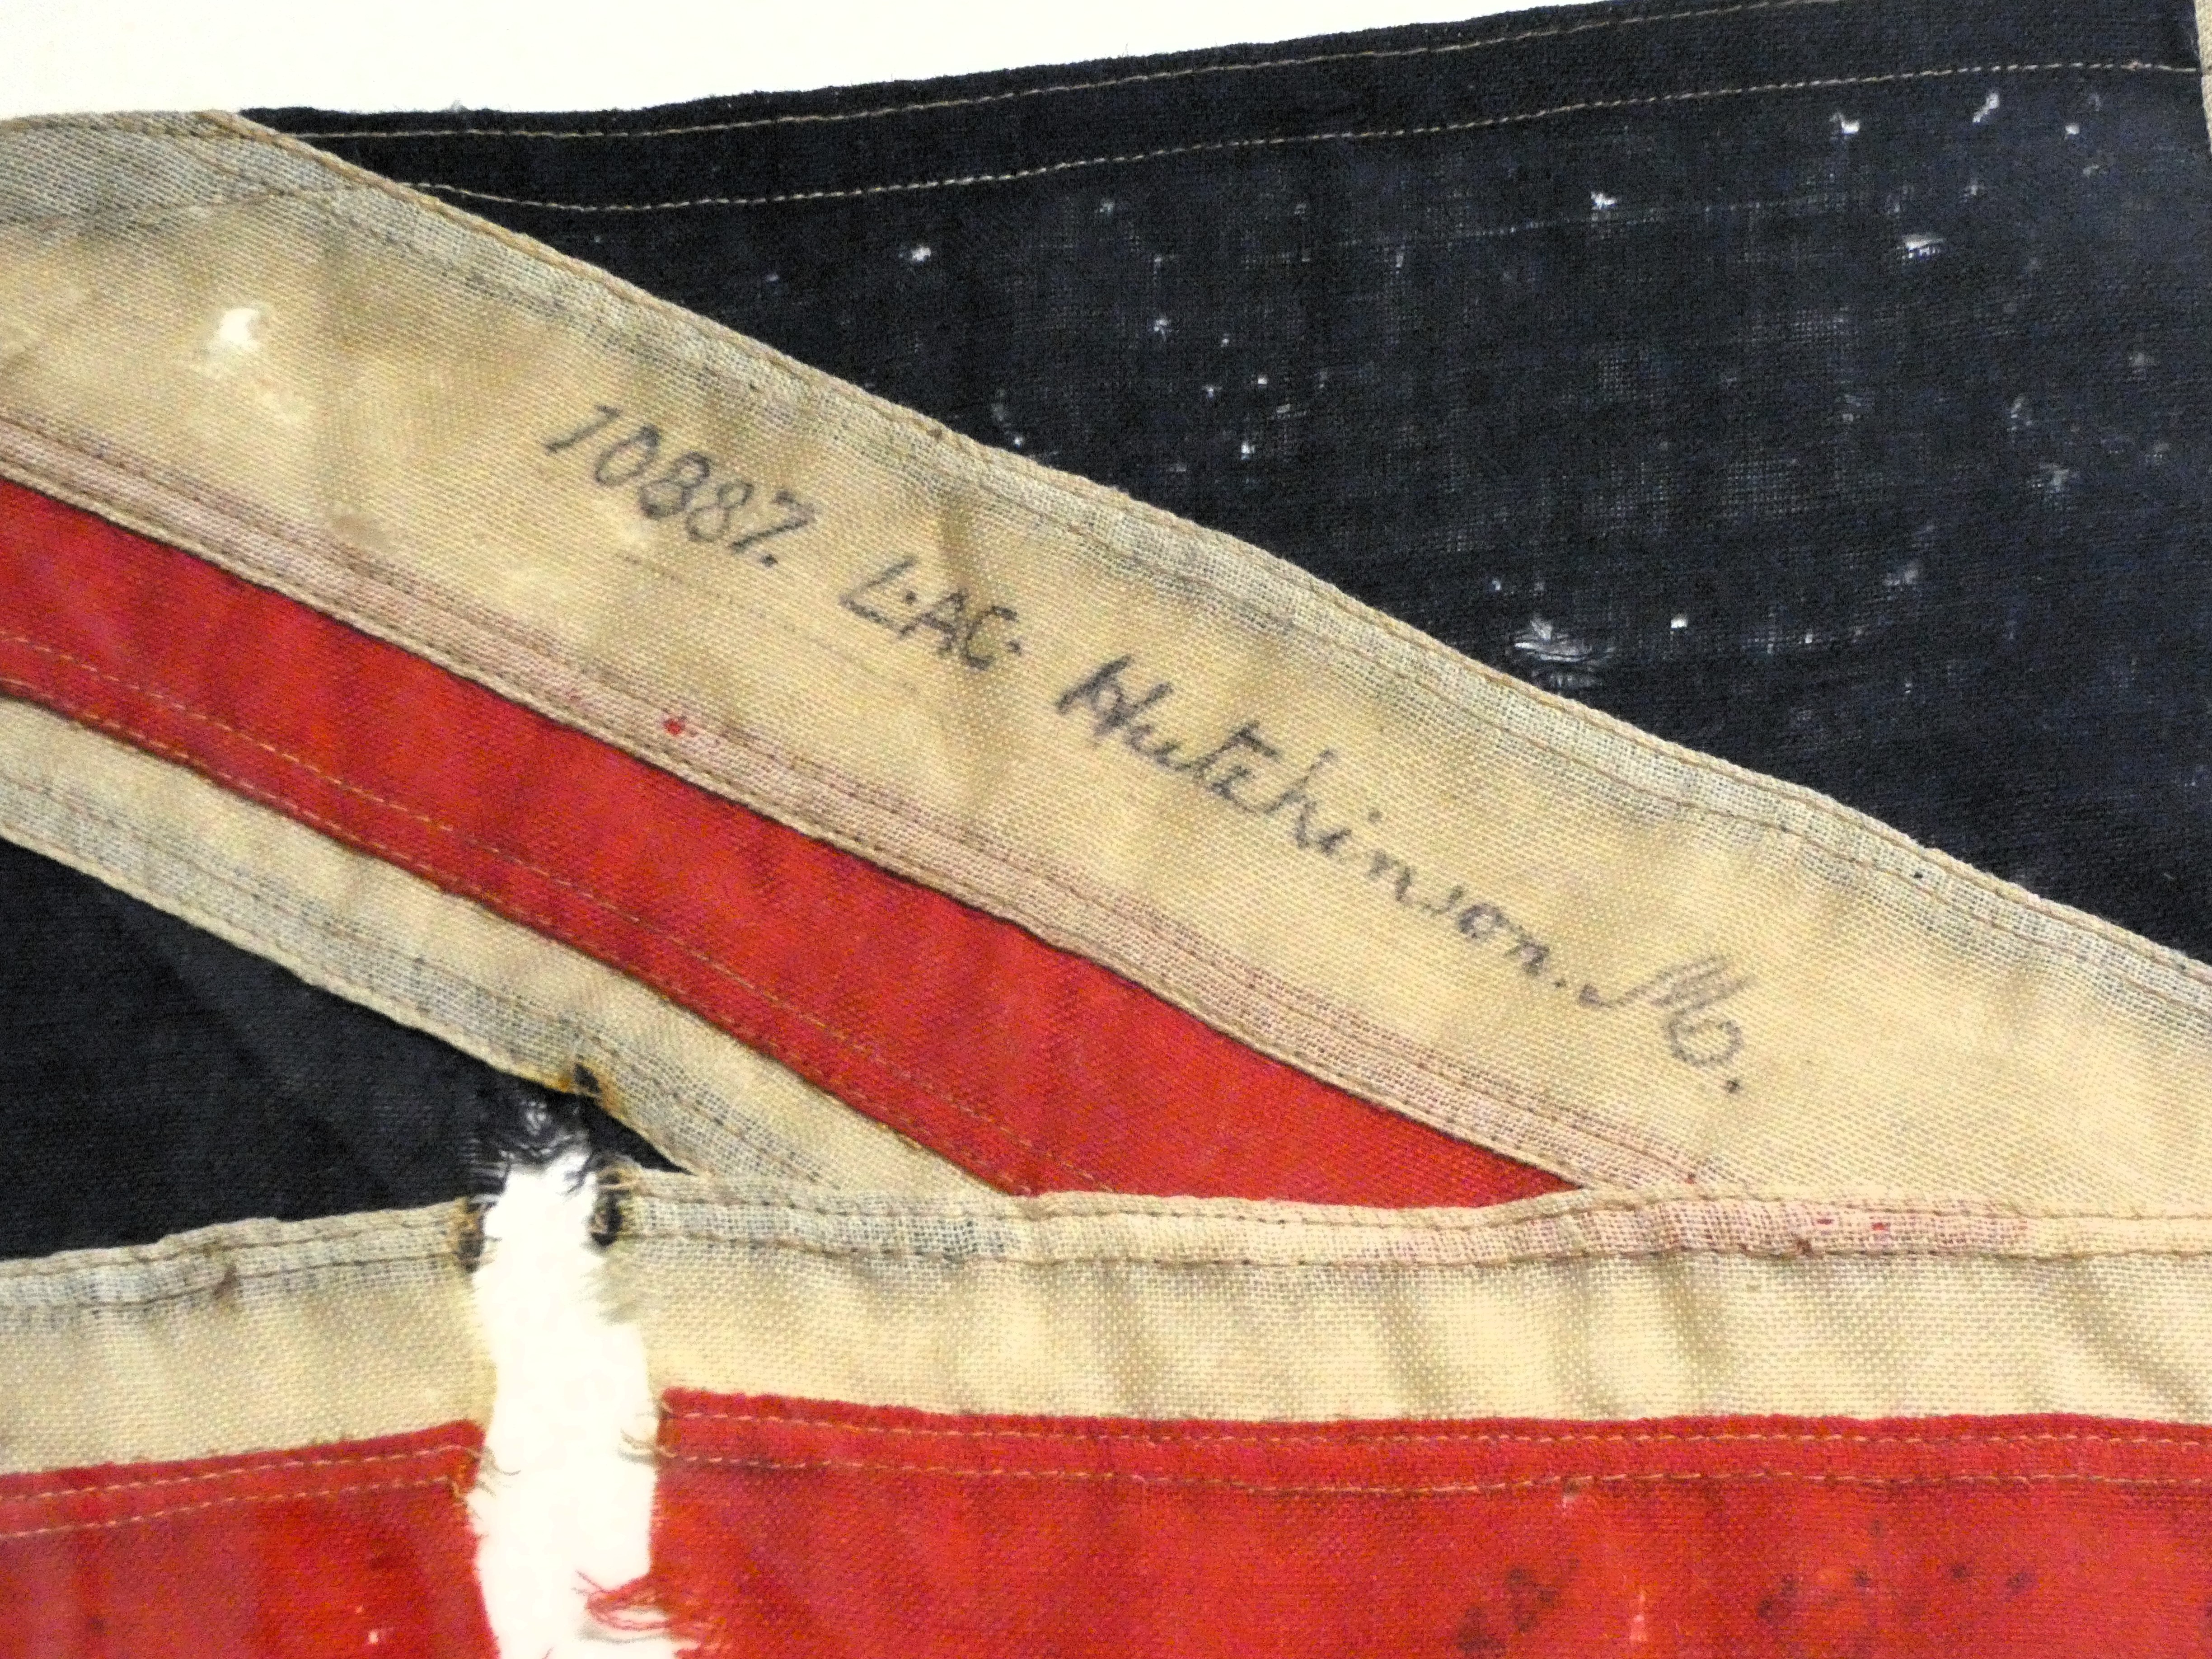
In June 2014, the Council presented the flag to the Darwin Military Museum for display and safekeeping, and it carries the signatures of members of 12 Squadron who were present on the day of the raid.

 |
| No. 12 Squadron RAAF Wirraways at the Civil Aerodrome in Darwin, January 1941. |
'A large flight of aircraft heading toward Darwin - I don't think they are friendly'
The message was received at RAAF Base Darwin at 09.58 on the 19th Feb, logged and ignored. The first Japanese bomb fell on Darwin at 09.58 with devastating effect.

Along with the radio and its historic connection with Darwin seen above, close by was an interesting display of other 'Comms and Signals' paraphernalia.

Having spent a good part of 2021 running my Target for Tonight Battle of Berlin Campaign, I had more than a casual interest in one of the radio sets on display.

The T1154 Transmitter was a UK manufactured transmitter that was installed in a wide variety of Allied aircraft including Lancaster, and Wellington bombers and Spitfire and Mosquito fighter planes.

 |
| The T1154 Transmitter carried aboard Lancaster and Wellington bombers in WWII. |


The .303 calibre Lee Enfield rifle was the standard Australian Infantry Forces rifle issued in WWI, WWII and the Korean War, with the example seen below discovered in a swamp, locally shortly after the end of WWII, containing a spent round in the breech, which might explain why it had been dumped.
 |
| A .303 calibre Lee Enfield rifle discovered in a local swamp and bearing Canadian military markings, remains as another mystery of Darwin's wartime experience. |
As mentioned in the preamble the Darwin Military Museum is principally housed in buildings that are an important part of the history of the site, none more so than the former Command Post for the 9.2 inch guns that commanded the straits nearby, and serving as a location for the fire direction equipment and a battery observation post in a tower on top of the building that housed range finders and and range and speed analogue computers.
 |
| The former Command Post for the 9.2 inch guns, now serves as another exhibition building in the museum. |
The Command Post building houses some very interesting exhibits and models relating to the naval and air war conducted in and around Darwin during WWII.
 |
| A rather nice model of USS Peary, that was sunk in Darwin Harbour together with wreckage from other vessels that suffered a similar fate on 19th February 1942. |


 |
| The Australian Bathurst class corvette HMAS Deloraine seen here in 1944 - AWM. |
In January 1942 she evaded an attack by the Japanese submarine I-124 north-west of Darwin and was jointly credited with the submarine's sinking after inflicting the initial damage. She was also present at the bombing of Darwin and survived unscathed.

In January 1942 four giant vessels of the Sixth Submarine Squadron’s Imperial Japanese Navy were deployed to northern Australian waters. Built by Kawasaki Heavy Industries, the four submarines of the Sixth Submarine Squadron were armed with twelve torpedoes in four 21-inch bow tubes and a foredeck 5.5-inch gun. They carried 42 mines, launched through torpedo doors in the stern. Under the leadership of Commander Endo, they made their way south, and deployed quietly around Bathurst and Melville Island.

Darwin was a harbour of considerable strategic importance. Sweeping south after the assault on Pearl Harbour, and carrying all before them, the Japanese knew the deployment of any Allied warships or aircraft from the northern port would be a dangerous attack on their right flank as they drove east to secure New Guinea.

On the 20th of January 1942, the United States destroyer USS Edsall, escorting the American oiler USS Trinity (AO-13), reported a Japanese submarine was in the area after an unsuccessful attack on the oiler, and the submarine, I-124 of the Imperial Japanese Navy, tried and failed to torpedo Deloraine at 1:35 pm, with Deloraine locating the submarine on asdic.

 |
| HMAS Deloraine's Record of Proceedings, marked 'Most Secret', the Record officially charting the ship's actions in her fight with I-124. |
After two depth-charge attacks the submarine briefly broke the surface. Deloraine then observed 'large bubbles of oil and air'.
 |
| A photograph of Lieutenant-Commander Kouichi Kishigami, commander of I-124, next to the Hagoita ceremonial doll presented by his daughter Atsuko to Dr Tom Lewis who completed research into the submarine resulting in the book Sensuikan 1-124. |
Sister ships Katoomba and Lithgow arrived in the area; the two ships continuing to patrol and depth-charge the area while Deloraine reloaded, and they were eventually successful with the four ships jointly credited with the kill of I-124, the first enemy submarine to be sunk in Australian waters, going down with all 80 members of her crew.
 |
| Model of the Japanese fleet that launched the first air raid against Darwin, made by the museum's curator, Mr John O'Connell, with the carriers painted by Mr Bob McRae. |
With the attack on Pearl Harbour, Hawaii, in December 1941, and the occupation of Singapore, on February 15th 1942, Japanese High Command was further emboldened and looked to secure its southern flanks from counterattacks.


Losing only three planes, the raid was over within an hour, meanwhile 54 Japanese land-based naval bombers were flying towards Darwin from the Celebes, bombing the town at 11.50 am with devastating effect, leaving 251 people dead in the first and worst of 64 raids that the Northern Territories endured until the end of 1943.
 |
| Imperial Japanese Naval Hat, manufactured March 1943 and issued in August 1943 to Hiro Hikita, Volunteer No. 25664. The Tally band reads: Great Japan Imperial Navy. This style of hat was standard issue to all naval seamen including submariners in the IJN. |
In another display there were artefacts that recalled Darwin's air war.
 |
| A 20mm cannon which would have been fitted in pairs to Spitfires and Boomerang fighters. |
 |
| Air crew helmet with intercom lead, a survival map with button compass and US Army Air Force officer's cap and sunglasses. |
 |
| Crashed G4 Mitsubishi Betty bomber wreck at Munda airfield in 1943. |
Aircraftsman Charles King seen in the photograph below, was stationed at Pell airfield in WWII and was part of a group visiting the wreck site of a Japanese aircraft shot down some time before. As was customary, soldiers were always after souvenirs, and King took a glove from the remains of the pilot, whilst another member of their party took some money from elsewhere in the plane.

Charles King, and his wife Myrtle, kept the glove for years before their deaths in 1987 and 2009 respectively and their grandson Mr Ashley Brooks donated the glove to the museum.

In the next cabinet there was a very handsome display of Japanese Army items.


The bugle seen below was recovered from a Japanese soldier mortally wounded during a firefight in New Guinea, sustaining damage after the owner fell on it and crushed the front.

The split toe boots seen below are certainly unusual in their look, but the boots provided the user with exceptional grip when walking through mud and mangroves.
 |
| Japanese issue split toe boots. |

 |
| Japanese infantry in action in New Guinea. |
Due to a lack of power in its 6.5 x 50mm SR Arisaka cartridge, it was partially replaced during the war with the Type 99 rifle, but both rifles saw usage until the end of the war.

The Type 92 heavy machine gun is a Japanese heavy machine gun, related to the Hotchkiss machine gun series. It entered service in 1932 and was the standard Japanese heavy machine gun used during World War II.
Problems with this weapon included the use of 30-round feed strips, which did not allow for as high a volume of fire as a belt-fed gun, and the oiler, which enabled better extraction in clean conditions but could bring dirt inside the gun in the field.
The Type 96 light machine gun was a light machine gun used by the Imperial Japanese Army in the interwar period and in World War II, and was first introduced in 1936, firing the 6.5 x 50mm Arisaka round from 30-round top-mounted magazines.
The Type 94 pistol was designed for (and popular among) Japanese tank and aircraft crews who preferred a smaller, lightweight design. Japanese weapons experts have subsequently criticized some design elements of the Type 94; in particular the pistol can be fired unintentionally before the breech was fully locked if the sear bar on the side of the receiver is depressed while the pistol's safety is disengaged.
Below are a selection of Japanese Katana swords carried by Officers and NCO's. My paternal uncle who served in the Far East in WWII came back with a couple of these at the end of the war, following the weapons being surrendered into Allied hands.

From Japanese kit, the next cabinet was a display of that of the Aussie 'Digger', with an interesting display of sub-machine guns Aussie style.

 |
| Australian soldiers from the 2/2nd Machine Gun company using a captured Japanese 7.7mm Type 92 machine gun to attack Japanese positions on Joyce Feature, Tarakan. |
Problems with this weapon included the use of 30-round feed strips, which did not allow for as high a volume of fire as a belt-fed gun, and the oiler, which enabled better extraction in clean conditions but could bring dirt inside the gun in the field.
 |
| The Type 92 heavy machine gun. |
 |
| IJA troops using the Type 96 light machine gun, September 1941. |
A combination of unimpressive ballistic performance and a lack of reliability caused the Imperial Japanese Army to try to replace the Type 96 with the Type 99 light machine gun, though both saw major usage until the end of the war.
 |
| The Type 96 light machine gun. |
The Type 94 pistol was designed for (and popular among) Japanese tank and aircraft crews who preferred a smaller, lightweight design. Japanese weapons experts have subsequently criticized some design elements of the Type 94; in particular the pistol can be fired unintentionally before the breech was fully locked if the sear bar on the side of the receiver is depressed while the pistol's safety is disengaged.
 |
| The Type 94 Nambu 8mm pistol. |
Below are a selection of Japanese Katana swords carried by Officers and NCO's. My paternal uncle who served in the Far East in WWII came back with a couple of these at the end of the war, following the weapons being surrendered into Allied hands.


The example of the Sten SMG Mk II was instantly recognisable with its simple rudimentary tubular design recalling its heritage of using bike parts from the Raleigh Bicycle Factory in Nottingham in 1942; and memories of a veteran from 6th Airborne recalling how dangerous a weapon it was to the user as well as the enemy, when it worked, recounting one of his comrades coming across a ruined house in a French village in Normandy occupied by Germans, and not having grenades, simply lobbed his Sten in through a lower window with the safety catch off.
The resulting clatter of 9mm shots from the weapon hitting the floor inside managed to kill or wound all the occupants in the room apparently.
 |
| The Sten (top) and Owen (bottom) sub machine guns. |
The weapon seen above at the bottom of the picture is the Australian home grown Owen sub-machine gun which along with the Sten were ideal weapons for the close country encountered in New Guinea for example, but with the Owen proving a much more reliable and thus popular option than the Sten, that proved itself in the harsh conditions encountered together with a simplicity in design and maintenance that facilitated its use by locally raised New Guinea troops as evidenced below.
 |
| 25th January 1945, Bougainville Island. The Owen’s mechanical and operational simplicity made it well suited for primitive native troops who joined the fight against Japanese invaders. Sergeant R.J. Trott, Armorer of “A” Company, 1st New Guinea Infantry Battalion, inspecting the barrel assembly of Private Koro’s Owen Gun - AWM. |
The final weapon on display was the Australian reworking of the Sten, named the Austen Sub Machine gun or carbine, the name deriving from Australian-Sten, with just short of 20,000 being produced by Diecasters Ltd of Melbourne and W. T. Carmichael Ltd of Sydney as Australia sought to overcome the European war demand for British produced weapons.
The Austen was an improvement on the Sten but never achieved the level of reliability and popularity of the Owen.
 |
| Austen sub-machine gun. |
One other item that gave the Digger a distinctive look from other British Commonwealth units was of course the Army Hat as seen below.

The wonderful model seen below is of HMAS Canberra, the Kent Class, 8-inch Heavy Cruiser, that was sunk off Savo Island on the 9th of August 1942; and was carved with a pocket knife by RAN Leading Steward Eric Maurice Baget while serving aboard HMAS Orara (Minesweeper) between 9th October 1939 to 7th March 1941.
 |
| A model of HMAS Canberra, carved with a pocket knife by RAN Leading Steward Eric Maurice Baget. |
Resuming operations in Australian waters, she was quickly reassigned to convoy duties, following Japan's entry into the war, operating around New Guinea, interspersed with operations in Malaysian and Javanese waters, later joining Task Force 44, and taking part in the Guadalcanal Campaign and the Tulagi landings.
On the 9th of August 1942, Canberra was struck by the opening Japanese shots of the Battle of Savo Island, and was quickly crippled, and according to the crew, she was torpedoed by friendly fire. Unable to propel herself, listing heavily and burning, the cruiser was evacuated and then sunk in Ironbottom Sound by two American destroyers.
_underway_off_Tulagi,_circa_7_August_1942.jpg) |
| The Royal Australian Navy heavy cruiser HMAS Canberra (D33) underway off Tulagi, during the landings there, 7-8 August 1942. Three transports are among the ships visible in the distance, with Tulagi and Florida Islands beyond - US Navy. |
On the 9th of August 1942, Canberra was struck by the opening Japanese shots of the Battle of Savo Island, and was quickly crippled, and according to the crew, she was torpedoed by friendly fire. Unable to propel herself, listing heavily and burning, the cruiser was evacuated and then sunk in Ironbottom Sound by two American destroyers.
 |
| HMAS Canberra sinking following the battle of Savo Island 9th August 1942. A failure of Allied intelligence and vigilance resulted in this screening force being surprised by a determined group of seven Japanese cruisers and a destroyer near Savo Island just before 2am on the morning of the 9th August 1942. The Canberra as the lead ship of the screening force was the first to be attacked and received the full force of the Japanese barrage. In the darkness and confusion the rampaging Japanese attackers wreaked havoc with other Allied vessels before withdrawing. |
Very appropriately given the former use of the building it was very interesting to see the plotting table for the 9.2-inch guns which combined with the other machines in the Command Post formed the fire control system designed to defend the harbour beyond East Point.
 |
| The plotting table. |
By the use of rangefinders, and computers to calculate the effects of temperature, humidity, air pressure and a host of other factors, the guns were able to fire shells to a distance of around just over 16.5 miles and hit their moving targets, once on at least three times out of five.
Until the advent of the aircraft carrier such as those of the Japanese and their off shore airstrike capability that allowed enemy ships to remain well out of range of such guns, this system of shore-based defence with its calculating computers was the state of the art in defensive systems.
 |
| The fall of shells fired by the battery were plotted on the artillery board seen on the wall in the picture above. |
The fire direction table, seen below under a fine display of edged weapons and bayonets was in use with the 9.2-inch heavy battery during WWII and was electrically driven as well as hand assisted for computing such information as the speed of the target, wind direction, add or drop gun elevation, changing bearing of target and allowance for crossing or going away, amongst other things.
From the information provided by the fire direction table, that in turn was gathered from the range finders and observation reports, the gunners were able to lay the gun on correct bearing and elevation and hopefully hit the target, with the fall of the projectile being plotted on the artillery board seen on the wall in the picture above.
 |
| The WWII vintage fire direction table, seen under a fine display of edged weapons and bayonets was in use with the 9.2-inch heavy battery. |
On another wall, the close relationship was outlined, that has been built between Aussies living in the Northern Territory and their American allies since the arrival of the first Americans in 1942 to first aid in the defence of Darwin and then to pursue the retreating Japanese; to more recent times with US Marines being based in Darwin in 2012 to carry out training exercises with Australian defence personnel, further cementing cooperation between allies.

 |
| A copy of an original flag bearing the names of twenty-one former students from Nagakute School who remain missing to this day. |
 |
| Japanese air-crew navigational map. |
The answer was simple; Australia would often employ Japanese topographers to map the northern coastal areas because of their extensive knowledge of the southern Pacific, with it is believed, Japanese pearl divers and fishermen having had fifty years of previous visits to the shores of the Northern Territory having plenty of additional knowledge to contribute.

On leaving the former Command Post, the next building to hove into view housed the Ferret Scout Car covered in the first post, as well as a display of items relating to the air war in the area with some more interesting items and memorabilia from those times.
 |
| Items from the air war over Darwin along with the Ferret Scout Car (left) covered in the first post on the museum and its exhibits. |
The map seen below is a WWII Top-Secret map prepared by Allied Command indicating potential airstrip sites between Darwin and Katherine in the event of a Japanese invasion in 1942 or thereafter.
 |
| A WWII Top-Secret map prepared by Allied Command indicating potential airstrip sites between Darwin and Katherine in the event of a Japanese invasion in 1942. |
The map was safeguarded by RAF 54 Squadron's Adjutant, Flight Lieutenant Ernest Weatherhead at the Nightcliff camp and at the end of the war taken home to England as a souvenir, to be later donated to the museum by his son Malcolm Weatherhead.


 |
| The dual .50 calibre machine gun assembly originally installed in an electrically operated Bendix upper turret of a B-24 bomber. |

 |
| The layout of the B-24 Liberator and its various gun turrets. |
 |
| Model of a Douglas C-47, clad in Invasion Stripes. |

The two RAAF Spitfire units, Nos 452 and 457 Squadrons, were ordered to move immediately, together with Battle of Britain veterans, No 54 Squadron, RAF.

The three Spitfire squadrons left Britain on the 21st June and eventually arrived in Melbourne on 13th August. However, much to Churchill’s irritation, their original complement of aircraft was commandeered for the Middle East while in transit. The tropicalised Spitfire Vcs finally arrived in early October and the three squadrons reassembled to form No 1 Fighter Wing, often known thereafter as the ‘Churchill Wing’, commanded by Group Captain Alan ‘Wally’ Walters with the leading RAAF ace, Wing Commander Clive Caldwell, as the wing leader.

The Allison V1710 engine and propeller assembly seen below was recovered from a P-40 Kittyhawk, aircraft No. 68 after it separated from the fuselage during a forced landing conducted by Second Lieutenant W.B. Harris on the 15th June 1942, he fortunately surviving the landing.
 |
| Spitfire Mk Vc Tropicalised of 54 Squadron RAF, No.1 Fighter Wing being pushed into its camouflaged bay at Parap airfield, Darwin in June 1943. This aircraft was the aircraft of the Commanding Officer of 54 Squadron, Squadron Leader Eric Malcolm “Bill” Gibbs DFC - AWM. |
No 54 Squadron began moving to Darwin in mid-January 1943, followed by the Australian units. The oppressive humidity and thunderstorms made life difficult for both men and aircraft at the remote strips in the bush. The first, albeit uneventful, scramble took place on 26th January, but the Spitfire’s inaugural action in Australia was not long in coming, as on 6th February Flt Lt Bob Foster of No 54 Squadron shot down a Mitsubishi Ki-46 ‘Dinah’. It was the first of 65 Japanese aircraft credited as being destroyed by the wing’s Spitfires over the next nine months, albeit for the loss of 15 pilots in combat.

In the memorial garden was a plaque commemorating those personnel lost by No. 54 Squadron RAF, Darwin's first Spitfire Squadron.
 |
| A plaque commemorating those personnel lost by No. 54 Squadron RAF whilst in Darwin. The Squadron's Latin motto 'Boldness endures anything'. |
 |
| Spitfire prop-blade in front of the engine exhaust manifolds, with another Zero drop tank behind. |
 |
| Allison V1710 engine and propeller assembly. |
The single-engine Kittyhawk was usually no match for the Japanese Zero, but those operated by the 49th FG managed to provide some deterrence to incoming enemy bombers during 1942, Versions with a turbocharger gave excellent performance at high altitude in the twin-engine Lockheed P-38
 |
| United States Army Air Forces (USAAF) P-40 Kittyhawks of 49th Fighter Group lined up during their air campaign over Darwin from March to September 1942. |
In the cabinet below is an original USAAF tropical issue flying suit, which would have been worn by US pilots operating over Darwin in 1942, it is seen complete with original flying goggles, utility belt and leather holster marked US.
 |
| USAAF WWII tropical issue flying suit. |
 |
| A Continental W-670-9A, radial engine adapted for use in armoured vehicles, principally the M3 Stuart light tank and the LVT-4 (Landing Vehicle Tracked) Buffalo, behind a Zero drop tank recovered in 2011. |
The Briggs Ball Turret seen below, housing two .50 calibre machine guns and a gunner lying on his back, would have been mounted in the belly of a B-24 bomber.
 |
| Briggs Ball Turret, housing two .50 calibre machine guns. |
The tri-cycle undercarriage arrangement on the B-24 Liberator gave an extremely low ground clearance when taxying, requiring these turrets to be able to be hydraulically lowered once airborne and raised before landing, unlike those fitted to the B-17 Flying Fortress which were in a fixed position.

The 1942 vintage AR7 RAAF radio receiver was manufactured by the Kingsley Company in Melbourne to a specification developed by the RAAF who ordered twenty such units designed to enable communication with other RAAF ground units across Australia as well as aircraft in flight.
The Australian Army also adopted the receiver as the Reception Set Number 1, with the AR7 also being supplied to the Dutch Navy, that would see the Kingsley Company produce over 3,200 sets.
 |
| 1942 vintage AR7 RAAF radio receiver. |
with some particularly fine looking models HMAS Armidale and USS Melvin.
.jpg) |
The Bathurst class Corvette, HMAS Armidale, in Port Moresby harbour, after successfully convoying troopships and supply vessels from Australia, circa September 1942 - AWM. |
HMAS Armidale (J240), named for the then town of Armidale, New South Wales, was one of 60 Bathurst-class corvettes constructed during World War II, and one of 36 initially manned and commissioned solely by the Royal Australian Navy (RAN).


In late November 1942, the RAN was called on to evacuate the commandos of the 2/2nd Independent Company (an evacuation attempt in September failed when the destroyer HMAS Voyager grounded, then was destroyed by Japanese aircraft), a contingent of Dutch troops, and over 100 Portuguese civilians, while delivering a relief contingent of Royal Netherlands East Indies Army and Australian soldiers.

The corvettes sailed from Darwin at midday on the 29th November, leaving just as Japanese aircraft flew over the harbour. At 09:00 on 30 November, the two ships were located by a Japanese reconnaissance plane, but were unable to shoot it down. Because of the likelihood of attack during the day and the distance from the destination, the ships radioed Darwin and suggested that the mission be aborted, but Pope instructed they were to continue after steering away from their intended destination for an hour, and promised fighter support.

At 13:00, five approaching Japanese dive-bombers were sighted by Armidale, and two aircraft were damaged by the corvette's guns, while the other three missed while attempting to evade fire. A second air attack occurred at 14:00; five Zero fighters distracted the corvette's weapons while nine torpedo bombers made attack runs. At one point, a late-released torpedo passed over the bridge before hitting the water. At 15:10, the ship was hit in the port side by two torpedoes in quick succession: the first into the mess deck, killing many of the soldiers there, the second into the engine room.
As the soldiers and sailors began to evacuate into the water, the Zeroes stopped attacking the sinking corvette and began strafing runs on those in the water.
Ordinary Seaman Edward "Teddy" Sheean, who had been wounded in the initial attack, strapped himself into one of Armidale's 20 mm Oerlikons and opened fire on the aircraft, causing one Zero to crash into the sea and damaged at least two others; continuing to fire until he went down with Armidale.

The survivors remained together until midday on 2nd December, when one of the boats, with the commanding officer aboard, set out for Darwin in an effort to find rescuers. At 10:15 on 5th December, they were spotted by a reconnaissance aircraft, and the 22 aboard were rescued by HMAS Kalgoorlie.
Forty personnel from Armidale and sixty embarked men of the Royal Netherlands East Indies Army were killed.

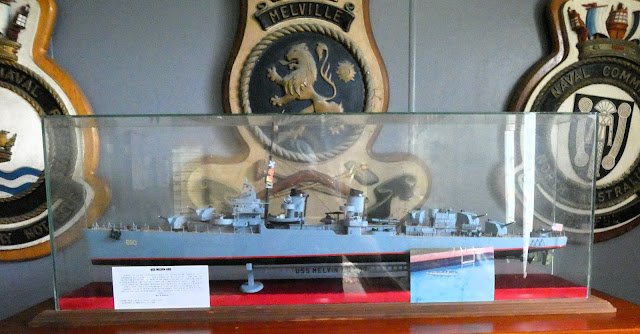
USS Melvin (DD-680) was a Fletcher-class destroyer and the second ship of the United States Navy to be named for Lieutenant, junior grade John T. Melvin (1887–1917), who was killed on the 5th November 1917 while serving on the USS Alcedo in World War I and is recognized as the first American naval officer to die in that war.


This exhibition in the entrance to the gun emplacement had an array of kit and dress worn by the various combatants, Vietnamese and Australian, with the first item that caught my eye being the M60 machine gun, this being the helicopter mounted version rather than the standard infantry issue model.
The M60, officially the Machine Gun, Caliber 7.62 mm, M60, is an American general-purpose machine gun firing 7.62×51mm NATO cartridges from a disintegrating belt of M13 links, and was partly derived from German guns of World War II (most notably the FG 42 and the MG 42), but it contained American innovations as well.

Entitled 'Stuck in the boonies - The Jungle Camp', the display below portrays the look of a typical Australian soldier, with camouflage netting, radio, entrenching tool, cooking equipment, an Owen submachine gun, captured NVA pith helmet and an optimistic Australian flag.

The various posters from the era really caught the period feel of that time and had me humming a bit of Jimi Hendrix as I perused the display.


The magazine area seen below consisted of several shell lockers and a mini-rail system for loading the munitions into the shell hoist to the gun emplacement above, with examples of the various types of 9.2-inch shells on display.


On the next shelf of the display was a gas mask, binoculars case, officer's sword or Katana, mess kit, soldier's haversack and a water bottle and bayonet atop a Japanese battle flag.


In 1925, recommendations were made to establish a battery of 9.2-inch guns in Darwin and following the outbreak of war approval was given to commence construction in 1941 with work proceeding on the emplacements and installation of the guns with three proof rounds being fired on the 10th April 1941 from No. 1 Gun and on the 23rd March 1945 from No. 2 Gun, these being the only rounds that the guns fired, before their sale for scrap in 1959.

On our departure back into town I wondered around the back of the museum area to get some pictures of the second gun emplacement, complete with its anti-graffiti white paint to get a better impression of the one we had just visited.


Launched in early 1942, and initially assigned to convoy escort duties, Armidale was transferred to Darwin in October 1942.

The corvette was attacked and sunk off Betano Bay (9°9′52″S 125°43′30″E), on the south coast of Portuguese Timor, (now East Timor) by 13 Japanese aircraft on 1st December 1942, while attempting to evacuate Australian and Dutch soldiers and deliver a relief contingent. She was the only Bathurst-class corvette to be lost to enemy action.

Armidale, sister ship Castlemaine, and the auxiliary patrol boat Kuru were assigned to the operation by Commodore Cuthbert Pope, Naval Officer in Charge Darwin, with Castlemaine the commanding ship.
.jpg) |
| The Northern Territory administration vessel Kuru in Sydney Harbour in 1938. The ship was commissioned into the Royal Australian Navy as HMAS Kuru in 1941. |
The plan was for Kuru to reach Betano Bay early on the night of the 30th November, offload supplies, and take on the civilians, whilst the two corvettes were to arrive two hours later; Kuru would deliver her passengers to Castlemaine, which was to head for Darwin at first opportunity, then shuttle relief troops aboard Armidale to shore while evacuating the soldiers.

Armidale and Castlemaine were attacked at midday by 14 Japanese bombers, but these were driven off by a force of Bristol Beaufighters, which then returned to Australia. Another attack came at 14:00, but neither side was able to do damage. Delays from the evasive course and two air attacks meant the corvettes reached Betano Bay after 02:30 on the 1st December, with no sign of Kuru, and retreated to sea. Kuru was sighted at daybreak, sha having assumed the corvettes were not coming, her commander chose to sail for Darwin with the civilians, and the civilians were transferred to Castlemaine.
Although as senior ship, Castlemaine's commanding officer felt he should return to Betano Bay with the soldiers, the troops were aboard the other corvette, and at 11:00 he ordered (with Commodore Pope's approval) Armidale and Kuru to return by separate routes and attempt the operation again that night.

As the soldiers and sailors began to evacuate into the water, the Zeroes stopped attacking the sinking corvette and began strafing runs on those in the water.
 |
| Ordinary Seaman Edward ‘Teddy’ Sheean VC. |
Ordinary Seaman Edward "Teddy" Sheean, who had been wounded in the initial attack, strapped himself into one of Armidale's 20 mm Oerlikons and opened fire on the aircraft, causing one Zero to crash into the sea and damaged at least two others; continuing to fire until he went down with Armidale.

In 2020, he was posthumously awarded the Victoria Cross for his actions.
Low on fuel, the Japanese aircraft headed for home, and the survivors found that the ship’s two boats survived the sinking, and were able to fashion a raft from debris.
 |
| HMAS Armidale under aerial attack, 1st December 1942 - John Ford |
On learning that more men were still at sea, an air search was organised, and the auxiliary patrol boat Vigilant was to stand by off Melville Island. That same day, the other boat, with 29 aboard, headed for Darwin, leaving the raft, with 49 aboard, behind. At 16:00 on 8th December, a PBY Catalina flying boat sighted the raft, now with about 20 aboard, and the second boat. The aircraft was unable to land to assist either group of survivors because of rough seas, but directed Kalgoorlie to the boat. However, the raft could not be located again, and the search effort was called off on 13th December.
 |
| Despite exhaustive air and sea searches and the rescue of other survivors, these pictured survivors photographed on the 8th December 1942 were never seen again after the Catalina departed from the area - AWM. |

The model below is of the Fletcher Class destroyer USS Melvin

_underway_c1943.jpg) |
| The U.S. Navy destroyer USS Melvin (DD-680) underway, circa 1943 - USN. |
During the Pacific campaign in WWII the USS Melvin compiled an impressive battle record over a period of two year duty and the 2,100 ton destroyer became better known to her crew as the 'Merciless Melvin'; participating in eleven major sea battles including the campaigns of Saipan, Guam, Palau, Leyte, Lingayen, Iwo Jima, Okinawa and the Battle of the Surigao Strait.
While operating with 'The Big Blue Team' the Melvin started on its famous career of destruction of the enemy, and her heroic contribution prompted the commander of the fleet to give her the nickname 'Blue Devil'.
I immediately recognised this model as the 1/125 scale kit from Lindberg, as I have the very same model partly constructed, sat up in my loft at home, with a plan to bring it to completion some day, certainly prompted to get on with it after seeing the pictures of this one afloat in 1998.

The final building to explore on our tour of the Darwin Military Museum was before us as we stood at the imposing entrance to the 9.2-inch gun emplacement complete with lower level magazine and crew areas, now partly given over to a Vietnam exhibition area.
 |
| The entrance to the 9.2-inch gun emplacement. |
The Australian experience of Vietnam is yet another unique viewpoint of this war that dominated the news most evenings in the UK through the 1960's and 70's as I remember it as a boy growing up at that time.
 |
| JJ's Wargames - Vietnam 2016 |
That experience for me was brought sharply into focus on several occasions since, perhaps the first being on Carolyn's and my honeymoon to the States in 1988 when we visited the newly opened Vietnam Veterans Memorial in Washington DC, with its polished black granite walls bearing the names of those lost in the conflict.
 |
| Will making friends in Vietnam back in 2016. |
More recently I got an even more distinct impression and understanding of the conflict from the 'other side of the hill' when we visited Vietnam back in 2016, where Carolyn Tom, Will and I met some wonderful folks and came away with a deep appreciation for the people and culture.
Then on this particular trip, on our visits to Melbourne and Canberra, meeting Australian veterans of the conflict during our visits to the various memorials and museums in those cities where veterans now act as guides for visitors and were happy to share some of their impressions of the war.

 |
| The M60 machine gun, helicopter mounted version. |
 |
| A RAAF Iroquois helicopter crewman has his M60 machine gun cocked and ready as the helicopter swoops low over the fortified village of Bu Dop, two miles from the Cambodia-Vietnam border - AWM. |
Adopted into service in 1957 and issued to US units in 1959 it has been replaced or supplemented in most roles by other designs, most notably the M240 machine gun in U.S. service, but continues in production with modifications for other nations.


 |
| The Australian national flag is alleged to have been souvenired from the bow flag mast of HMAS Tobruk by US personnel while anchored at Vung Tan during the Vietnam War, and was subsequently gifted to the museum. |

Further into the lower magazine area of the redoubt I came across this diorama depicting the WWII look of the battery site at East Point with Japanese aircraft circling over the area.
The Command Post building can be seen between the two 9.2-inch emplacements, with the one to the right fully emplaced with an earth surround, for added protection and concealment, whilst the one to the left appears to be in preparation for similar work, whilst around the area are dotted the various ancillary buildings, some of which house the displays of the museum today.
 |
| A model of the look of the East Point battery site in WWII with Japanese aircraft circling over the area. |
Post-war the earth emplacement was gradually removed, and the right hand emplacement banded with white against graffiti as seen in pictures below.

Although the 9.2-inch guns were not operational at the time of the attack on the 19th February 1942, the several 6-inch guns around Darwin Harbour, East Point, West Point, Waugite and Emery Points were, as shown in the map of the area below, and it is thought that together the whole shore gun defence system was likely a reason the Japanese attacked with aircraft carriers rather than surface ships.

 |
| 9.2-inch shells on display in the magazine and hoist compartment of the emplacement. |


 |
| The shell hoist shaft leading to the gun emplacement above. |
Around another corner in the magazine area was a display of WWII era Japanese kit, with picture directly below showing a couple of flags, an officer's uniform, boots and helmet, three bayonets and a couple of belts.


The very top shelf of the display cabinet had examples of Japanese leather ammunition pouches.

In 1959 the Australian Federal Government sold the 9.2-inch guns to Japan for scrap and so on entering the gun emplacement the visitor is presented with a mock-up of the original piece, alongside a couple of the Projector Fortress searchlights designed to illuminate targets out to just short of sixteen miles.


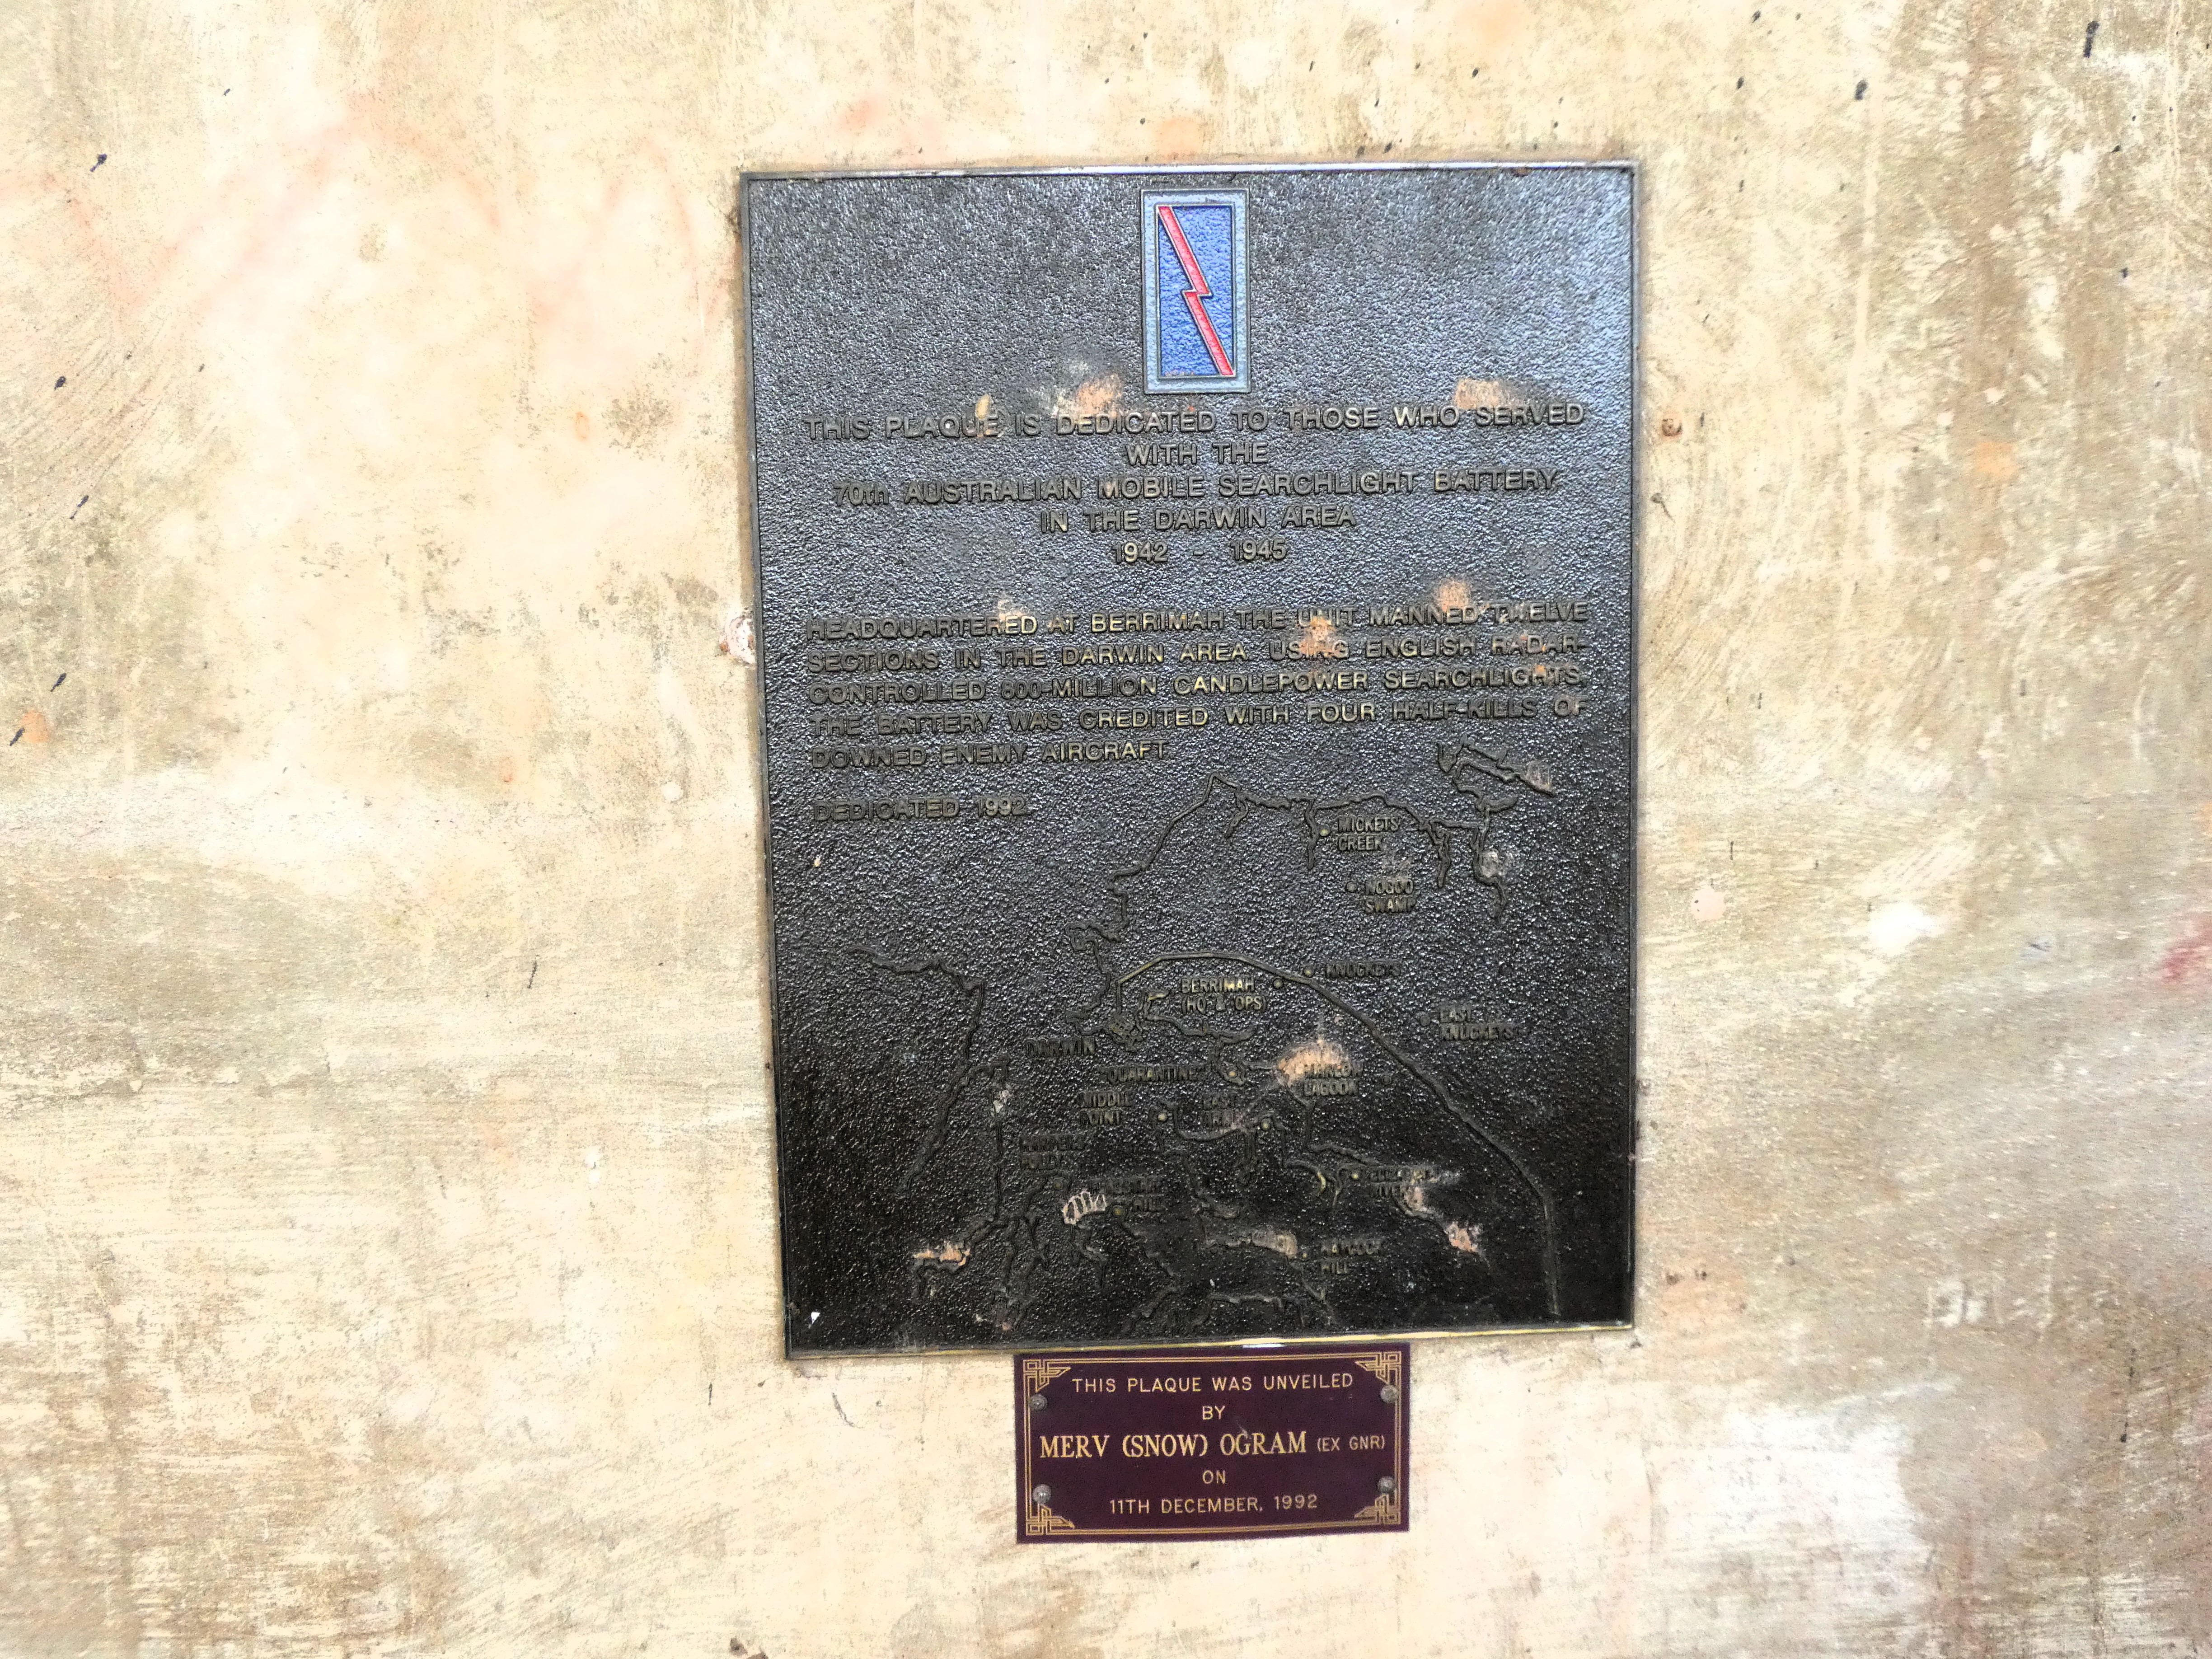 |
| Plaque dedicated to the 70th Australian Mobile Searchlight Battery who served in the Darwin Area 1942-45. |
In 1925, recommendations were made to establish a battery of 9.2-inch guns in Darwin and following the outbreak of war approval was given to commence construction in 1941 with work proceeding on the emplacements and installation of the guns with three proof rounds being fired on the 10th April 1941 from No. 1 Gun and on the 23rd March 1945 from No. 2 Gun, these being the only rounds that the guns fired, before their sale for scrap in 1959.
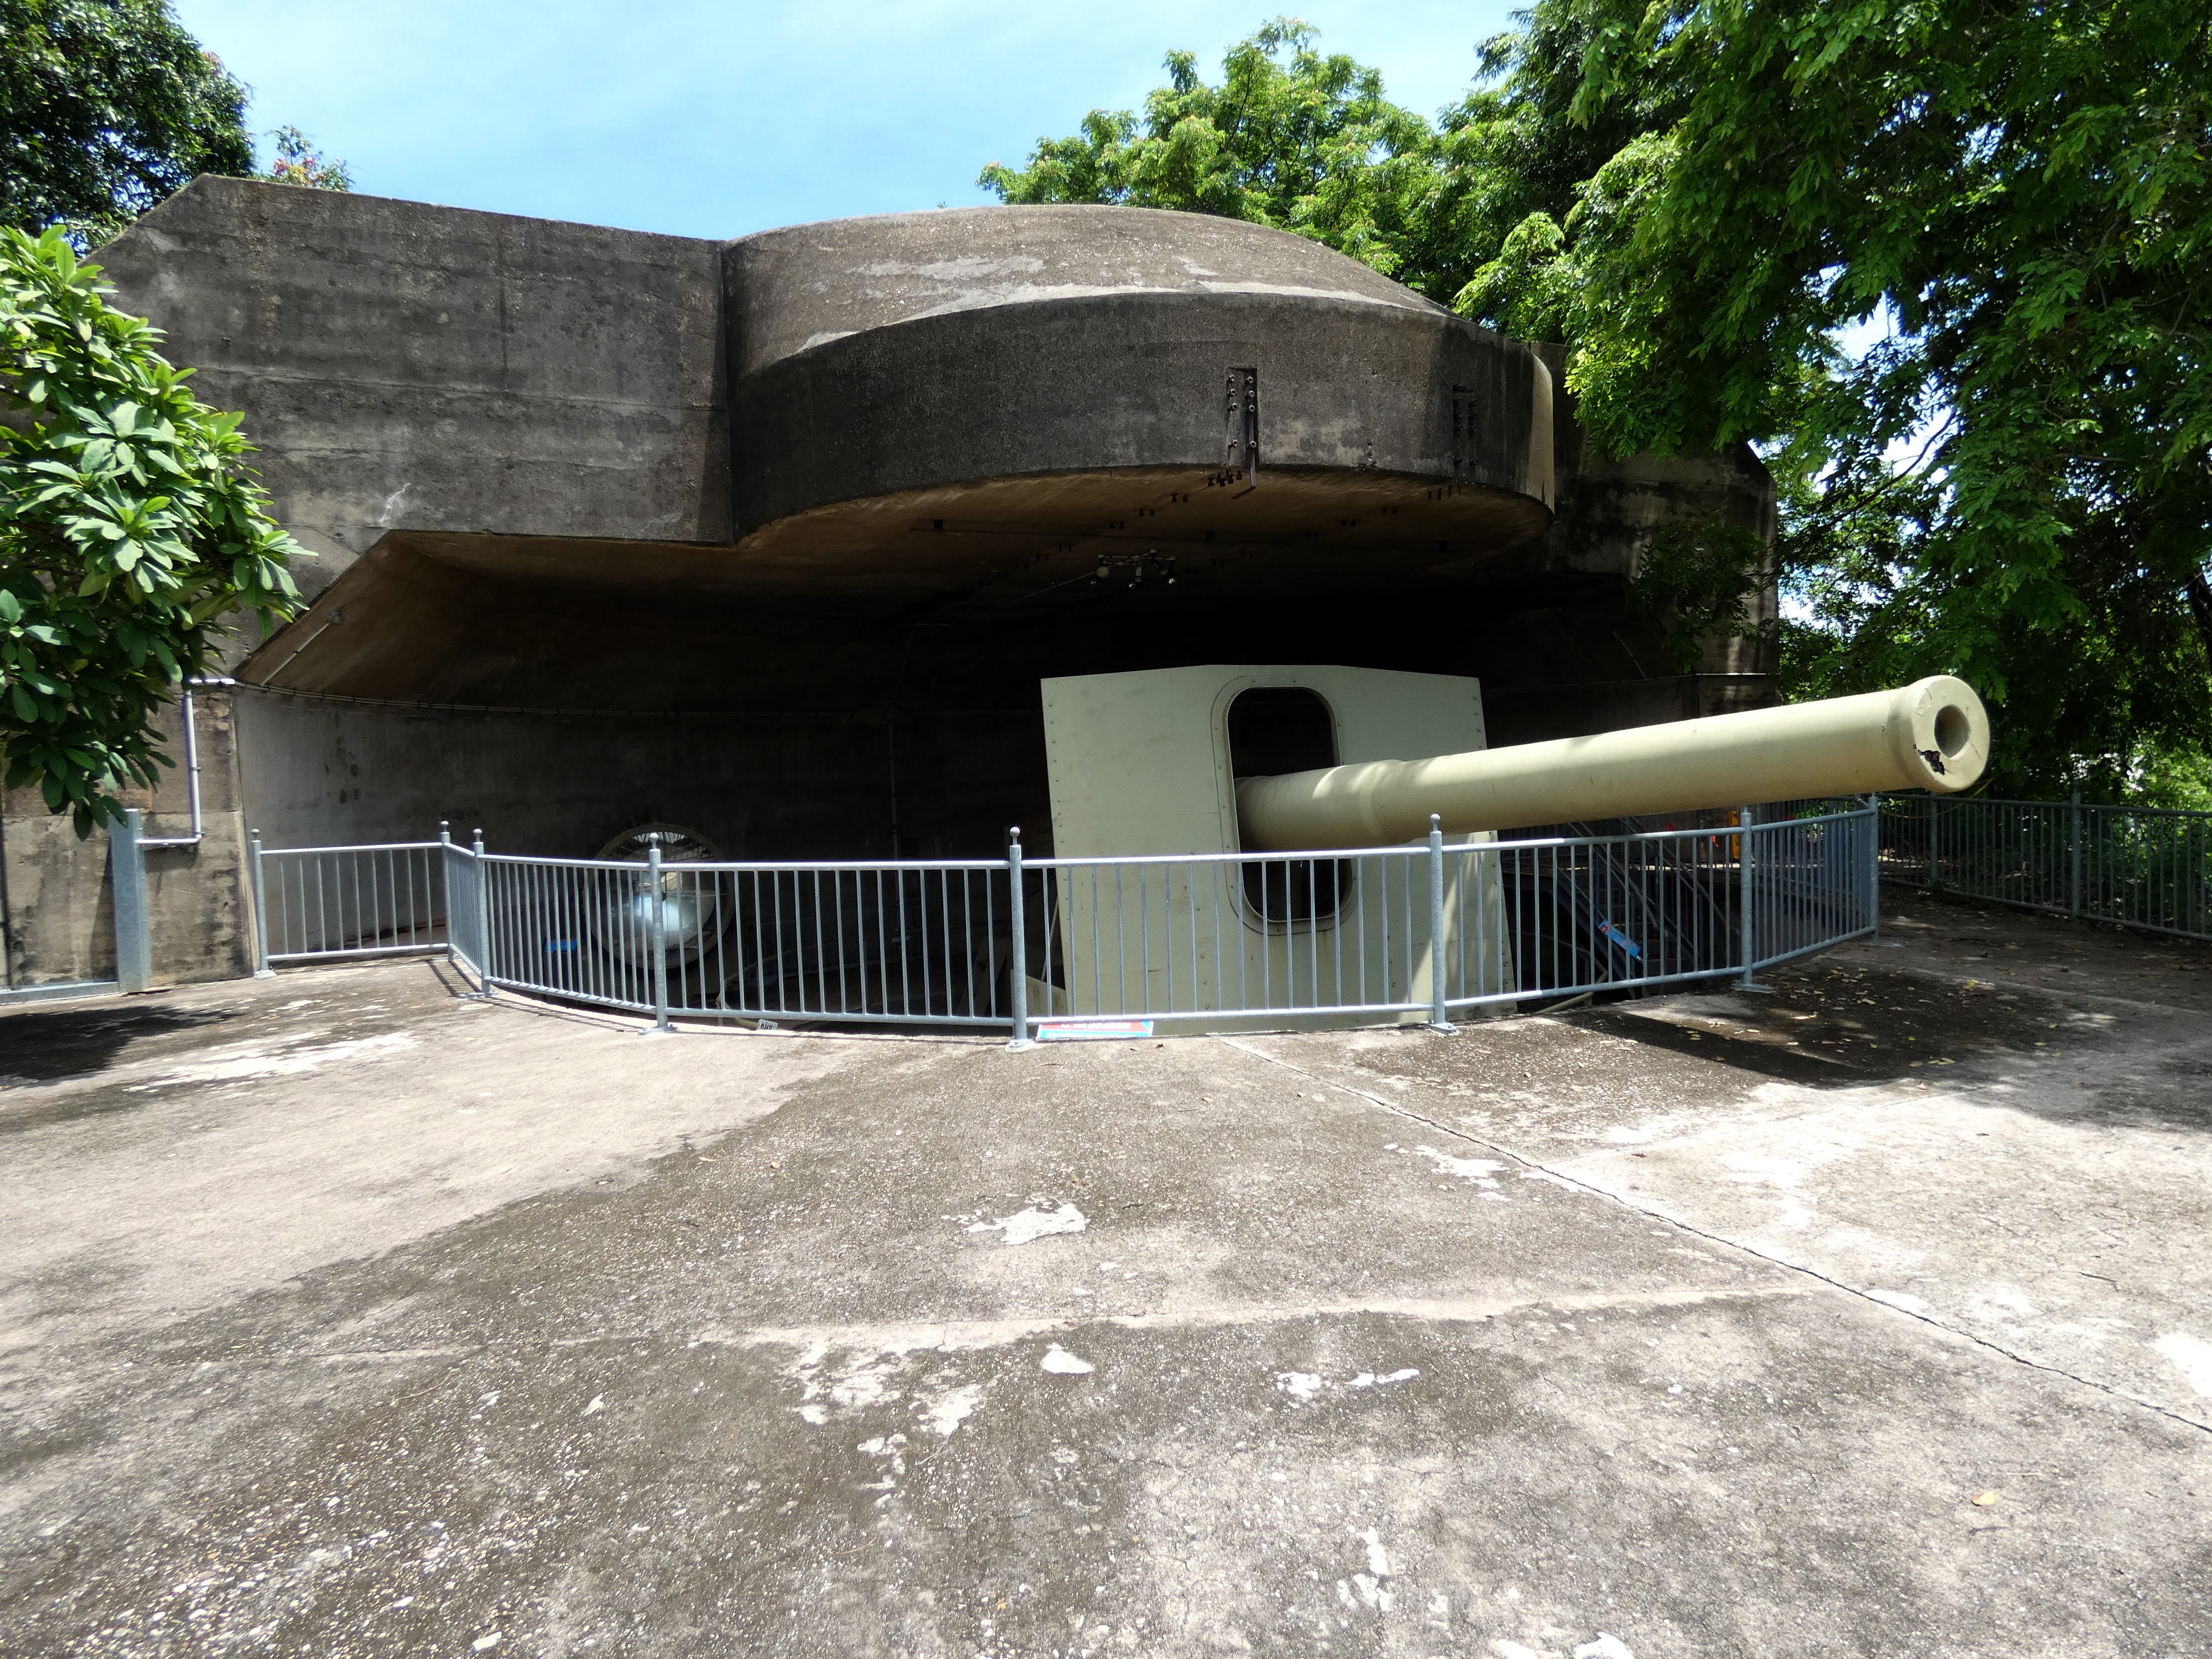 |
| From the front, the mock 9.2-inch guns are rather effective and capture the look of the former battery |

 |
| The rear view of the second gun emplacement, complete with its anti-graffiti white paint. |
Close by were some familiar friends we first encountered during our stay in Port Douglas, the strange looking to a Pom's eye, Magpie Geese, and a bird that I will always fondly remember from this part of our stay in Australia.
 |
| Magpie geese (Anseranas semipalmata), first encountered back in Port Douglas, Queensland, happily grazing on the grass close by to the East Point Gun Battery. |

We had a wonderful time during our stay in Darwin, and the town and indeed the Northern Territory was a very special memory from our time in Australia, but our time 'Down Under' was fast concluding and we were due to board a plane bound for the northern hemisphere and our final stop-over before heading back to 'Blighty' in the historic city of Singapore, founded by Sir Stamford Raffles in 1819 as the commercial centre of the British Empire in the Far East.
 |
| Sir Thomas Stamford Bingley Raffles by George Francis Joseph |
So in the final posts covering Carolyn's and my Pacific adventure I will take a look at this wonderful part of the world and the history we got to explore during our stay back in February 2023.
As ever, more anon.
JJ
great post, thanks for putting this up
ReplyDeleteHi,
DeleteThank you, much appreciated and glad you enjoyed the read.
JJ
Great Stuff JJ, I have not visited the museum since the eighties, thanks for the pics
ReplyDeleteCheers
Matt
Hi Matt,
DeleteThanks mate, I gather from your comment on LAF that things have changed there quite a bit in the years since you visited.
I must say putting these posts together covering the collection caused me to pause at first, given its broad spectrum of vehicles, weapons and militaria covering land, sea and air, across the last hundred odd years, and spread out across the site; having to figure out how to present it in a coherent way.
Cheers
JJ