Friday, 18 July 2025

The World Turned Upside Down - 3rd New York Continental Regiment.


The 3rd New York Regiment was authorized on May 25th 1775 and organized from June 28th to August 4th from the counties of Ulster, Dutchess, Orange and Suffolk under the command of Colonel James Clinton for five months service in Canada. The enlistments of the first establishment ended on December 31st 1775.

General James Clinton, depicted in 1861.
The first colonel of the 3rd New York Regiment

The second establishment of the Regiment was authorized on January 19th 1776, and was raised a third time in December 1776 under the command of Peter Gansevoort.


The regiment saw action in the Invasion of Canada, New York Campaign and Fort Stanwix, and was merged into the 1st New York Regiment on January 1st 1781.

Peter Gansevoort 1794 - Gilbert Stuart.
Commissioned as a major in the 2nd New York Regt. in 1775,
serving under General Montgomery in Canada. Gansevoort was promoted
to colonel of the 3rd New York at the age of 28, distinguishing himself 
at the siege of Fort Stanwix, and ending the war as a major-general of
New York militia

At the Battle of Oriskany the British loyalists under Major Stephen Watts, wearing their coats inside out tried to penetrate the American lines by pretending to be reinforcements from the 3rd New York Regiment at Fort Stanwix. They achieved this by reversing their coats, revealing their grey lining and green facings which were the same as the 3rd New York.

Battle of Oriskany, August 6th 1777 - Adam Hook, Osprey, Saratoga 177.
Men of Sir John Johnson's, King's Royal Regiment of New York, wearing green coats at the time, attempted to infiltrate Rebel lines by turning their coats inside out to look like men from the 3rd New York Regiment.

It was Captain Gardenier of Visscher’s Regiment at the American rear which spotted the ruse when one of his men went out to greet these "friends” and was promptly captured. Gardenier, armed only with a spontoon and sword, rushed forward and killed his man’s captor, and desperate hand to hand fighting followed between the loyalists and the American militia, as Gardenier shouted "they are not our men - they are the enemy! Fire away!".


Both sides withdrew to recover, as three cannon shots were heard in the distance. Herkimer and his men knew instantly what this meant, that the 3rd New York at fort Stanwix had raided and sacked the loyalist camp; thus already demoralized by heavy losses, the threat to their possessions persuaded the remaining Iroquois warriors to leave, and with insufficient numbers to fight on, Sir John Johnson and the King's Royal Regiment of New York also decided to withdraw.


The 3rd New York Regiment that defended Fort Schuyler (Stanwix) against the British in 1777 had been reorganized and established from other New York Regiments on January 26th, 1777, with the regiment under the command of Col. Peter Gansevoort, and with Lt. Col. Marinus Willett as second in command. 

Marinus Willett - painting by Ralph Earl

The regiment initially consisted of eight companies, with the men primarily drawn from Duchess and Ulster Counties and the New York City area, and was mustered at Fishkill before its first posting to Constitution Island, opposite West Point. 

The 3rd NY had its first taste of battle on March 22nd, 1777 when it helped drive off a raiding party of 600 British troops at Peekskill, suffering its first battle casualties, with two killed and four or five wounded.


The first detachment of the 3rd NY, under Major Robert Cochran, reached Ft. Schyuler on April 12th, 1777, and Col. Gansevoort took command of the fort on May 3rd, whilst the remainder of the regiment (200 men) under Lt.Col. Willett, departed Constitution Island for Ft. Schuyler on May 12th. 

Willett's detachment travelled up to Albany on three sloops, then marched from Schenectady to Ft. Schuyler, escorting the regiment's baggage train of seven wagons up to the post; the detachment reaching the fort on May 26th, after having Capt. Dewitt's Company posted to Fort Dayton at German Flatts (this company remained at Ft. Dayton until July). 


The regiment was engaged in the constant work of repairing and rebuilding the fort from May through August, and in August of 1777, the 3rd NY helped to successfully defend it in a 21 day siege by a British force of 2,000 regulars, Germans, loyalists, and allied Indians. 

During this time, a detachment of the regiment under Lt.Col. Willett took part in a raid on the main loyalist and Indian camps to the south and east of the fort, and on the detachment's return to the fort, they skirmished with British troops attempting to cut off their retreat. 

Cannon fire from the fort, combined with the detachment's own 3-pounder gun, finally drove the British off, and the raid destroyed the main loyalist and Indian camps, which resulted in the further capture of a great deal of equipment and severely cooled the Indian's desire for further fighting. During this raid, the regiment did not lose a single man. 

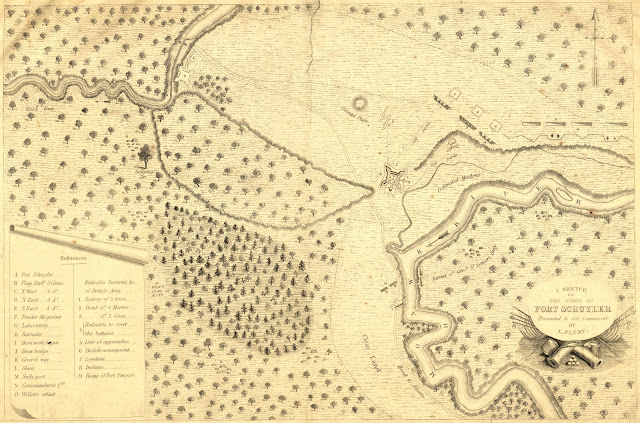
Sketch of the siege of Fort Schuyler, Presented to Col. Gansevoort by L. Flury.
This map depicts the positions and movements at the 1777 Siege of Fort Stanwix (also known as Fort Schuyler).

After the siege, the regiment continued to garrison the fort through December of 1778, when it was relieved by the 1st NY Regiment, and was sent down into the lower Mohawk-upper Hudson Valley area.

In 1779, the 3rd NY Regiment received a gift from Col. Gansevoort in the form of a regimental flag, and it was carried for the remainder of the war, later serving as the basis for the present day New York State flag. 

On campaign, the regiment made up part of the troops committed to the various expeditions against British allied Six Nations settlements, and in April 1779, the light infantry company returned to the Mohawk Valley as part of a detachment sent from Ft. Schuyler to destroy the principle Onondaga Indian villages. 


From August through September, the entire regiment was part of the Clinton-Sullivan expedition that destroyed the principle Cayuga and Seneca Indian villages in western New York, participating in the Battle of Newtown, which resulted in a major defeat for the Indians and the loyalist troops supporting them.  


In September, the 3rd NY once again returned to the Mohawk Valley, having been given the task of destroying the Mohawk village near Fort Hunter and retrieving the expedition's baggage, and with the approach of winter, the regiment re-joined the main army under General Washington for the hard winter encampment of 1779-80 at Morristown, New Jersey.


Throughout 1780, the 3rd NY was engaged in garrison duties, with various detachments of the regiment posted to the Mohawk Valley, the upper and lower Hudson Valley, and West Point. 

In December of 1780, the 3rd NY became part of the 1st NY Regiment, as the five New York regiments were consolidated into two for the remainder of the war, and as part of the 1st NY, the men of the 3rd NY Regiment took part in the siege of Yorktown in October of 1781. 

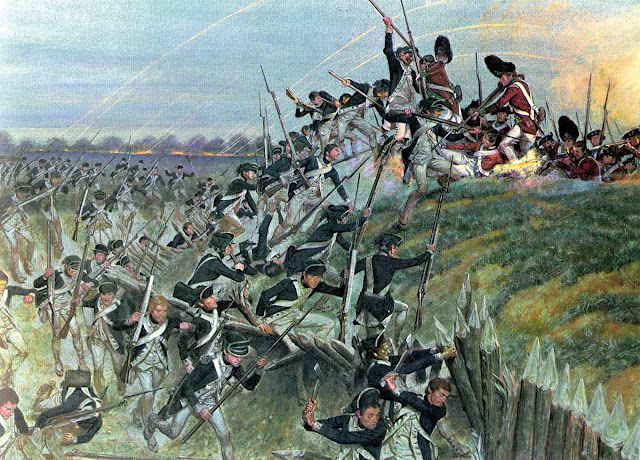
The Final Assault on Redoubt No.10 at Yorktown - H. Charles McBarron.

The New York Light Infantry companies made up part of the force that successfully attacked Redoubt Number 10, which helped bring about the British surrender, and after Yorktown, the New York troops went into winter quarters at Pomona, New Jersey.


In the spring of 1782, the two New York regiments went into final quarters at New Windsor, New York, as the war wound down, and in June, many of the men were furloughed home.

In November 1783, with the coming of peace, the men of the old 3rd NY Regiment were honourably discharged and became citizens of the new United States of America.


My interpretation of the 3rd New York sees them in the majority dressed in the classic grey-green faced coats that Mollo reports as the early incarnation of the look of the regiment in 1775, but that is followed by a second illustration showing a change to a blue faced green jacket only a year later.

My Continental regiments will never be turned out in a uniform manner to, I think, better capture the look of the reality that faced these units trying to work to a uniform with the limited resources available and the realities of the wear and tear of campaign, with hats and coats used as available with a good mix of civilian attire as required.

My 3rd New Yorkers in action in their first battle at the Devon Wargames Group.
Devon Wargames Group - Battle of Telegraph Hill

The figures are the plastic continentals from the Perrys, carrying the 3rd NY flag presented to the regiment by Colonel Gansevoort in 1779 beautifully rendered by GMB, all brought together on my low profile sabot bases from Supreme Littleness Designs.

More anon

JJ

Friday, 11 July 2025

The Battle of Plymouth, 28th August 1652- General at Sea.


During mine and Carolyn's little sojourn to Kefalonia and Ithaca, Capt. Steve has been getting his marvellous collection of 1:1200 Anglo-Dutch warships back out on the table using General at Sea to recreate another battle from this interesting period of age of sail naval warfare. 

Naval battle sites during the First Anglo-Dutch War, illustrating the position of the Battle of Plymouth in 1652.

Continuing from the previous AAR covering his refight of The Battle of Livorno or Leghorn fought on the 4th March 1653, Steve sent me his most recent solo refight covering the Battle of Plymouth fought on the 28th August 1652, which I am sharing here.

Lieutenant-Admiral Michiel de Ruyter (1607–1676) - Ferdinand Bol.

This battle heralded the introduction to the English of a certain Dutch admiral who would become a thorn in the flesh to English ambitions of naval dominance over the Dutch and a legendary naval commander in his own right, Michiel Adriaanszoon de Ruyter.

JJ's Wargames - The Battle of Livorno (Leghorn), 4th March 1653

Prior to his refight, and no-doubt aware of my flimsy knowledge of battles from the First Anglo-Dutch War, Steve sent me a link to a short twelve minute video summary of the battle and the background to its being fought, which I have linked below, if like me you are equally on the learning curve when it comes to this period of age of sail naval warfare.


As in the previous refight I have also copied out Steve's orders of battle and map set-up for the start positions of both fleets, with the orders of battle reflecting the explanation covered off in the previous AAR of how General at Sea works.


This effectively sees the respective fleets grouped into fighting units of between three to four vessels represented by a model on the table and thus allowing the large actions that were a peculiarity of this period to be better managed as a tabletop game.

The setup for the Battle of Plymouth 

I should also add that Steve is playing these games using Iain Stanford's as yet unpublished General at Sea Supplement, which, as well as including twenty-seven additional battle scenarios, also has a few rule changes which includes a doubling of all movement rates and gunnery ranges to better reflect the area occupied by the respective models plus some changes around tacking, breaking the line and head to head contact.

English Order of Battle

This short battle had the unexpected outcome of a Dutch victory over the English as General-at-Sea George Ayscue attacked an outward bound convoy of the Dutch Republic commanded by Vice-Commodore Michiel de Ruyter. 

Admiral Sir George Ayscue (ca 1616–1671) - Peter Lely
Ayscue and 
De Ruyter had been personal friends before the war.

The Dutch were able to force Ayscue to break off the engagement, and their convoy sailed safely into the Atlantic while Ayscue sailed to Plymouth for repairs.

Dutch Order of Battle

A notable incident occurred during the battle when the largest Dutch vessel, the Dutch East India Company warship Vogelstruys, by Dutch standards heavily armed with a lower tier of 18-pounders, got separated from the rest of the Dutch fleet and was attacked by three English ships at once and boarded.

The Dutch East India Company warship Vogelstruys under her captain, Douwe Aukes in action at the Battle of Plymouth.

Her crew was close to surrendering when her captain, the Frisian Douwe Aukes, threatened to blow her up first, and thus faced with this alternative the crew rallied, drove off the English boarding team and put up such a fight that the English vessels, much damaged with two in a sinking condition, broke off the attack.

Turn 1, The setup with the English (right) barrelling towards the enemy on a quarter wind.

In the picture above Steve has arranged the two fleets as per the setup map that sees the English barrelling towards the enemy on a quarter wind with their leaders to the fore and the rest of the force following in their wake in no particular order, as was the practice of the time.

Turn 2, Ayscue has decided to concentrate on the Dutch centre and rear, leaving the van to have to tack back.

In turn two it can be seen that Ayscue has decided to concentrate on the Dutch centre and rear, hoping to overwhelm them before the Dutch van can tack and intervene.

Turn 3, and the Dutch rear turns to deliver bow rakes on Ayscue.

In turn 3, the Dutch rear turns to deliver bow rakes on Ayscue and prevent him breaking through, however the Dutch fire from their lighter class ships proves ineffective against the heavy timbers of the English second-rates.


In turn 4, the Dutch van turned ready to begin its tack to come to the aid of their hard pressed comrades.

Turn 4, and the Dutch van has turned, extreme right, ready to begin its tack.

However as seen in the picture below Ayscue has broken through a stand of Dutch merchantmen, centre left, leaving it disrupted and damaged, indicated by the mast section on its bow, but other English stands have been forced to turn away due to the presence of a second Dutch stand beyond their target and have had to alter course.

To the right of picture the English van under Haddock have passed behind the Dutch and began to turn.

Turn 4, The Dutch centre and rear are hard pressed by the English attack.

By the end of turn 5 the Dutch van had successfully tacked, and De Ruyter has begun to turn in preparation to tack next turn, but heavy fighting is going on with the Dutch rear, that sees the English taking some damage that has left two stands Disrupted, but with the Dutch coming off worse with one stand Scattered and another Disrupted on a Damage Level 1, but managing to pass its Squadron Control Test.

Turn 5 and the Dutch van had successfully tacked, and De Ruyter has begun to turn in preparation to tack next turn, but heavy fighting is going on with the Dutch rear, nearest to camera.

With De Ruyter successfully tacking the Scattered Dutch stand tried to escape towards their commander, with the Dutch centre following, but leaving the Dutch rear hard pressed and with the English commander, Vice-admiral Haddock having a clear path to the table edge to attack the Dutch convoy beyond, but he failing a Control Test is forced to delay such a move as he focusses on taking prizes amid the Dutch rear.


Turn 5 and the Dutch rear is under severe attack and the English commander Vice-admiral Haddock, extreme right, has a clear route ahead off table to attack the Dutch merchant convoy.

The battle concluded on Turn 6, with Haddock having left the table to attack the Dutch convoy, and De Ruyter unable to intervene in time to save his rear squadron which suffered yet more damage seeing one more stand Scattered and the resulting Squadron Reaction Test, seeing the squadron as a whole scattering in response.

The battle concluded on Turn 6, with Haddock having left the table to attack the Dutch convoy, and De Ruyter unable to intervene in time to save his rear squadron.

Steve's conclusion to this game:

'Both sides have lost a squadron - one to battle damage and the other to indiscipline. De Ruyter is in a position to attack with his two remaining commands but has failed in his main aim of protecting his convoy, so I decided to call it quits at this point with an English tactical victory.' 


He also summarised some key learning points from the game:

1. Have the English arrive in three straggling lines, warships to the fore and slower hired merchantmen behind. Some accounts mention this. This means that the initial shock will be by three strong stands, which will give the Dutch a better chance of holding them off. If the English breakthrough - as they did in the action - the rest of their commands will be out of command range/line of sight creating headaches for Ayscue and his subordinates.

2. The Dutch should try to form a rough line with their centre and rear.

3. The Dutch van should stretch out as fast as they can to get into a point where they can tack and then head east.

4. Don’t put stands too close together in pre line of battle - it limits manoeuvrability and increases risk of friendly collisions.

5. Good Dutch morale plus an exceptional c-in-c does make a difference in holding them together.

6. The advanced combat system worked well. Lightly armed 28-gun Dutch escorts did little damage to heavy English second rates but hired merchantmen were more vulnerable.

Good fun game and shows how good de Ruyter was in fending off Ayscue - and then following him with intention of attacking him in Plymouth South - foiled only by unfavourable wind.

Steve

Friday, 4 July 2025

The World Turned Upside Down - Rebel Militia Brigade.

 
The creation of my Rebel Militia brigade picks up the work I did over the Xmas of 2021 into 2022 using an idea from the Perrys to rapidly create multiple units of militia for an AWI campaign they had decided to run, and using the plastic continental miniatures suitably adapted to give a militia look to the new force. 

JJ's Wargames - Mohawk Valley Collection, American Militia

At the time I was focussed more on producing a large force of Tryon and Albany County Militia that figured large in the Mohawk River valley campaigns of Sir John Johnson and other British and Loyalist forces, raiding that area of the northern frontier with Canada.

JJ's Wargames - Mohawk Valley Collection, Albany and Tryon County Militia

With my attention recently turned to creating forces capable of representing larger battles fought during the American War of Independence, the creation of my three new battalion sized units simply required the addition of a few drummers, standard bearers and officers together with some suitable colours from GMB flags, and hey-presto, I present by new three battalion brigade of New England militia or any other militia, Rebel or Tory, simply by changing the colours as required.


My sabot based units also facilitate an easy quick change of colours, plus perhaps a few more uniformed characters, some with bayonets, and these units can quickly take on the appearance of motley Continentals if required.


To give these chaps more of a militia look, I purposefully only have them carrying muskets without bayonets and removed any hints of bayonet scabbards from the the rear left leg of each figure.


On masse the brigade looks quite formidable, until you appreciate their limited abilities as raw civilian soldiers.


The brigade had its initiation to battle in our recent game run at the Devon Wargames Group, where some of my militia posed as Continentals and the irregular forces they actually are modelled for, and also leaving some figures available to be brought over in service of the king, acting as Tory militia scouts.

Devon Wargames Group - Battle of Telegraph Hill


I have been away from my desk these last two weeks soaking up some glorious Ionian Summer Sun, swimming in warm seas, enjoying grilled octopus, red snapper and sea-bream for dinner, whilst also taking in the odd piece of ancient Greek and Roman archaeology, but am now looking forward to getting back to work.

Carolyn and I dining out during our two weeks in Kefalonia and Ithaca.

The view of the Ionian Sea from the Palace of Odysseus in Ithaca, identified in 2010, and likely looking from Penelope's former window

The exquisite remains of a Roman villa mosaic floor,
one of several such villas we visited during our stay.

As always, more anon.

JJ