
 |
No Turning Back - Robert Taylor A very suitable header to start the post of our final game in our eight game Battle for Berlin Campaign with a Lancaster of 61 Squadron, piloted by Flight Lieutenant Bill Reid under attack from a Freejagd FW190 en-route to Dusseldorf on the 3rd November 1943, the very raid we were recreating in our final campaign operation and a climactic one to end our campaign on. |
This weekend I was at the DWG monthly club gathering and got to run the final game in an eight game campaign recreating the largest of the twelve Bomber Command operations over Germany that heralded the start of the Battle of Berlin; using the game rules Target for Tonight by David Wayne Thomas, originally intended to represent single Lancaster aircraft as part of a squadron on night operations which I have modified to include the range of British bombers used from mid 1942 and to represent the operations at a group level instead.
Of course I couldn't really know how playable my modifications were until they had been tested and so I have been very fortunate to have had a group of players in the club who have played the rules through each game to see how well they fitted with the original game system and how easy they are to get the hang of.
 |
| Flight Lieutenant William Reid, VC, 61 Squadron |
So that exercise came to an end this weekend with the playing of our Op to Dusseldorf recreating the historical attack carried out by 589 aircraft on the 3rd-4th November 1943 that would see the loss of eleven Lancasters and seven Halifaxes or 3.1% of the raiding force together with the award of the Victoria Cross to Flight Lieutenant William Reid of 61 Squadron who was attacked twice by a nightfighter on the way to the target.
Pressing on over the next 200 miles to the target with his aircraft badly damaged, most of its guns out of action, his navigator dead, a fatally injured wireless operator and with himself and his flight engineer also wounded, he obtained an 'aiming point' photograph over the target before turning for home.
The return flight was no less perilous with a shattered cockpit windscreen, no oxygen supply, and with both he and the flight engineer, Sergeant J.W. Norris, lapsing into semi-consciousness as they took turns to fly the plane but with Reid recovering enough to land it in misty conditions in Shipdham in Norfolk, even though he could not see properly with blood running into his eyes from a head wound.

The final alarm for that night concluded with the undercarriage collapsing after what turned out to be a successful landing.
Flight Lieutenant Reid was an exceptional pilot and very brave officer who would go on to serve later in the war with 617 (Dambusters) Squadron and surviving a Tallboy bomb destroying his aircraft after it had been dropped by another above him on a raid to destroy a V-Weapon storage dump at Rilly-la-Montagne, seeing him successfully bail out and end up a prisoner of war in Stalag-III west of Berlin
 |
| The list of the early raids for the Battle of Berlin period taken from the 'Bomber Command War Diaries' and used to generate the eight games we have played since March 2019, culminating in this one |
If you are just joining our campaign in this the final post, you can follow all previous seven ops in the links below with Op 1 played back in March 2019 before Covid rather than bad light stopped play.
Our campaign has seen our Bomber Command force take a commanding lead in the early attacks on Berlin back in August with the Nachtjagd in disarray after the summertime firestorm attacks on Hamburg in July and with the use of Window (aluminium foil strips) dropped by bombers wrecking the previous ground radar directed intercepts; and forcing a change in German tactics with the nightfighters having to adopt a 'freejagd' intercept with their own airborne radar set to guide them after being directed as best as possible by ground radar into the suspected bomber stream.
However the Nachtjagd have clawed their way back with a mix of these improved tactics and just bad luck for Bomber Command on some of its target marking and drift consequences that have seen increased losses of bombers for poorer bombing results and the campaign hanging on a minor German victory with the following pronouncement on the result of the operations so far.
Bomber losses outweigh the damage inflicted
 |
| The raid planning map, part of the 'air-officers commanding' briefing notes sent out prior to each op with the last mission to Hannover reducing the average score per op to 7.6 VPs and the current situation |
Obviously senior command could not possibly tolerate this situation with Bomber Harris keen to prove his theory that a land invasion of occupied Europe will be rendered unnecessary following a German capitulation once his 800 strong main-force of night bombers has fire-stormed its way through Berlin and the the other major German cites of the Reich.
Thus with Mainforce responding to the call for an all out operation and with squadrons pulling out the stops to put as many aircraft into the air the groups managed to muster a magnificent turn out for this last op in our campaign with just three novice and one experienced crew talking part and with the rest all veteran crews with no less than 14 operations to their credit and with two second tour elite crews one from Halifax (P-Popsie) from 4 Group and a Lancaster (R-Roger) from 5 Group each with 47-ops and 38-ops respectively.
Given the importance of this particular mission Bomber Command have insisted on a Very Heavy bomb lift at the expense of fuel given the close proximity of the target and relatively short flight time to and from and with the weather reports showing broken cloud over home airfields and clear skies over the Rhur Valley only offset by the persistent haze that covers the area all year round, much is expected from the attack.
With our last op taking place at the end of September, a month has passed in the technological war and thus in October we find our Mainforce bombers equipped with H2S Mark II ground mapping sets for the first time, enhancing navigation and target identifying at night, but offset with the German introduction of Naxos Z radar sets, better able to pick up the downward beams emitted from the bombers and thus aid their location in the dark.
With the table set up and the commanders briefed, the bomb load was constructed and call-signs allocated to each model together with an extra call-sign marker used to indicate the photo flash on the bomb run.
Our op began as every op begins with bombed up aircraft rolling down runways in eastern England to climb into a dusk sky as the bomber stream assembled before setting course for the enemy coast.
The stream set its heading over the North Sea to appear to be making a track for the German coast at Wilhelmshaven before abruptly altering course midway and turning directly for the Dutch coast which seemed to have the effect of confusing German radar and seeing no interference from nightfighters enroute to the target.
However the flight into Germany was not without its alarms and losses with Elite crew Lancaster R-Roger showing some complacency on this, their forty-eighth Op by failing to monitor their climb rate out over the coast causing alarm at the possibility of encountering ice and having to abort, only mitigated by a particularly mild October evening with normal icing conditions only occurring at a much higher altitude.
With no other losses the stream turned on to a course for the southern approach to Dusseldorf reporting a fierce barrage in the flak zone and the German searchlight batteries ominously shining their beams on to the underside of the Rhur Valley haze to create a ground glass screen that would silhouette the enemy bombers to any nightfighters patrolling over the city.
The first bomb drops were very accurate and grouped in and around the target markers clearly visible in the night sky above the haze below, but with the crews very aware of their feeling of nakedness standing out against the backlight below and keen to get in and get out as soon as possible.
Then it began with a series of nightfighter encounters with freejagd FW190 single seat fighters taking full advantage of the conditions conducting fast moving raking attacks against bombers lining up on their target drop.
The only compensation for the heavy losses sustained over the target was a heavy concentration of bombs delivered to the southern oil works, rail yards and city centre, with multiple fires reported by returning crews.
However before the night was over, two more aircraft would be lost with the veteran crew Halifax Z-Zebra on their twentieth Op falling to the guns of a rookie NJG3 Ju88 nightfighter north of Aachen when it lost control after the port inner engine caught fire after suffering hits in the hydraulics after the first surprise attack, only three of the crew managing to bail out.
Well what an Op to end on and with a series of games that have been thrilling in their own right but now with the added consequences of the effects on the overall campaign as the context for each game.
So with the situation left at Bomber Command sitting on a tally of 53 points over seven games to produce and average score of 7.6 points per Op and needing to get that score up to 12 per Op for a draw, we see this final game produce the following score.

 |
| This is what a maximum effort by Bomber Command can look like and giving every chance for a punishing last Op to Dusseldorf |
The winds over the target were predicted as light and from the south, perfect for accurate bombing with only the haze interfering and requiring the use of 'Parramatta' target indicators rather than the ground marker 'Newhaven' flares, thus with a slight chance of drift, offset by the clear weather, the city falling under OBOE coverage and offering a good ground looking radar signature.
Dusseldorf is located at the confluence of the Rivers Rhine and Dussel and the seventh largest city in Germany and is a key oil refining centre with the Rhenania Ossag refineries located in the southern Reisholz district of the city together with the Mannesmann tubular steel works on the northern outskirts.
 |
| Our target map representing the city of Dusseldorf and with the 'Parramatta' target indicators yet to be placed by our pathfinders, ordered to mark the suburbs of Reisholz to allow for any potential drift north over the city centre and rail yards. |
With our last op taking place at the end of September, a month has passed in the technological war and thus in October we find our Mainforce bombers equipped with H2S Mark II ground mapping sets for the first time, enhancing navigation and target identifying at night, but offset with the German introduction of Naxos Z radar sets, better able to pick up the downward beams emitted from the bombers and thus aid their location in the dark.
 |
| All our Mainforce bombers would be carrying H2S Mk II navigation radar sets together with Fishpond attack warning modifications. |
In addition the survivability of the bombers is enhanced with Fishpond nightfighter attack warning radar and with the support of 100-Group now flying ABC Airborne Cigar frequency jamming aircraft to interfere with German ground to air direction communications which has forced the Nachtjagd to adapt, using Morse Code transmissions as a stopgap measure to overcome the interference, now being countered by 'Drumstick', seeing RAF operators filling the gaps in the Morse signals with dots and dashes of their own.
 |
| The intel sheet used to determine the latest technological developments in night bombing used to brief the players |
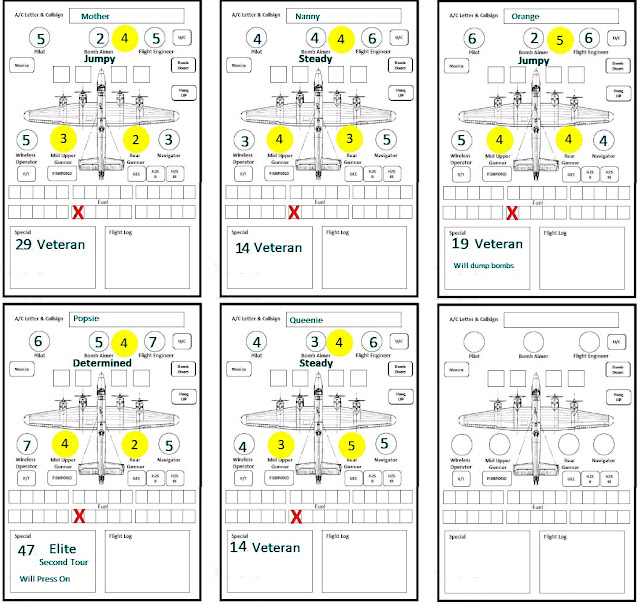
As part of the briefing the group commanders all get a copy of the prepared group aircraft stat sheets, an example of which is shown below, showing each aircraft by call-sign and allowing them to mark off hits to any aircraft from flak or nightfighters, plus fuel used inflight and the factors indicating crew efficiency at their particular role or their gunnery skill in yellow, together with crew experience and any other particular factors that might affect their flight.
 |
| A very experienced turn out from 4-Group and their Halifax squadrons, with Bomber Command Royalty in the mix in the shape of P-Popsie ready to lead the way and prepared to press on regardless. |
 |
| All the models set up ready to go |
Our op began as every op begins with bombed up aircraft rolling down runways in eastern England to climb into a dusk sky as the bomber stream assembled before setting course for the enemy coast.
All our aircraft assembled, save one, Halifax Y-Yoke from 6 Group, that successfully managed to abort the take-off run after problems with the landing gear were discovered.
 |
| The bomber stream assembles after take off, less Halifax Y-Yoke, which aborted with landing gear problems |
The stream set its heading over the North Sea to appear to be making a track for the German coast at Wilhelmshaven before abruptly altering course midway and turning directly for the Dutch coast which seemed to have the effect of confusing German radar and seeing no interference from nightfighters enroute to the target.
 |
| The bomber stream climbs hard towards the English coast. Altitude means safety from nightfighters. |
This was followed soon after as the stream crossed the Dutch coast with the loss of Lancaster B-Beer, on their thirtieth Op and looking forward to leave following it having achieved their first tour, making a navigation error that caused them to stray too close to the flak batteries near Rotterdam.
The subsequent flak barrage lit up the starboard outer engine, with all but the pilot, bomb aimer and wireless operator escaping in the bail out that followed as the aircraft went out of control.
 |
| Individual bombers in the stream would be tasked with laying 'Window' to mask to approach route to German radar. |
 |
| A good grouping of bombers turns in over the target to begin their bomb runs. The key was to get in quick and leave just as quick, whilst bombing accurately to the TI's. Note the position of Lancaster E-Eddy which bombed successfully but drifted off track and failed to get back on it, running out of fuel and crashing near the Dutch coast. Just another hazard of night-time navigation! |
 |
| A 3-Group Stirling over the target with previous bomb runs marked by the photoflash chits showing which aircraft have bombed and where. The TI marker helps the players gauge where they are in relation to the target map, hoping for none but allowing for drift or an error in laying by the pathfinders. |
Seven aircraft would succumb to these attacks three Lancasters, three Halifax and a Stirling, together with the loss of Lancaster T -Tommy that collided with another bomber in the mayhem causing an explosion in the bomb bay that only added to the sense of disaster with falling aircraft that was observed by the rather shattered survivors that pulled away from the burning city.
The nightfighters didn't have things all their own way and the sharp eyed gunners of Halifax N-Nanny were able to shoot down one of the attackers before their aircraft fell due to the damage it sustained in the battle.
 |
| A radar equipped single seat FW190 closes on a 3-Group Stirling from behind, likely G-George the only aircraft lost by the group, a novice crew on its sixth op and with only the bomb aimer, flight engineer, wireless operator and rear gunner able to bail out over the city. |
The only compensation for the heavy losses sustained over the target was a heavy concentration of bombs delivered to the southern oil works, rail yards and city centre, with multiple fires reported by returning crews.
 |
| 6 Group Halifaz Z-Zebra under attack from a Ju88 near Aachen on the return leg. |
This was followed by the loss of novice crew Lancaster V-Vick on its fourth Op limping home after taking flak hits earlier that damaged the fuselage and hydraulics and subsequently becoming uncontrollable from that earlier damage with just three of the crew baling out near the Dutch coast.
Finally the last loss of the night occurred to veteran crew Lancaster E-Eddy another thirtieth OP crew looking forward to ending their first tour and a well earned leave, succumbing to the limited fuel allowance the very heavy bomb lift incurred and with a navigation error leaving the aircraft well off track, never able to correct the error, it was forced to bail out on the Dutch coast due to empty fuel tanks with all the crew safely contacting the Dutch resistance.
 |
| The survivors limp home having to land at different airfields due to fog. The carnage of the night is displayed in the models to the side of the airfield. |
The map below is the final analysis of the bombing results that, given myself and the players were looking forward to a well earned pint in the pub was only a top line assessment at the time, indicating that with the losses sustained and the bombing damage caused, a potential draw was in the offing but that I could only confirm things once I had sat down and totted up all the points.
 |
| The final situation over the target with the number of bombs dropped and fires started in relation to the target indicators that proved to be dead on target. |
Bomber Command - 2VP for the target, 56VP for 14 major fires caused in Dusseldorf, 32VP added for major fires in the Industrial and Transport areas, Four additional bomb types that hit the targets but did not cause fires for 4VP = 90VP in total.
Less the score for the Nachtjagd with bombers destroyed - 2 Novice Crews 4VP, 8 Veteran Crews 32VP = 36VP in total.
Thus Op eight generated 54VP added to the 53VP scored previously brings the total to 107VP divided by eight operations delivering an average score of 13.4 VP per Op and a handsome draw to Bomber Command in this bloody final operation to Dusseldorf, thus leaving the historical record showing
'Mounting losses cancel out the effect of the bombing'
The remarkable and pleasing aspect of this campaign playthrough is how very similar the raid results have been to their historical predecessors and that if the result in the last game had not produced the disastrous drift to the TI's that it did and also did in the historical attack, then Bomber Command would be looking at a major victory at this stage, so each series of games in any campaign should leave things all to play for right up to the end in most cases.
To emphasise my point about similarities between the game results and the historical outcome, the Bomber Command War Diary makes interesting reading with its conclusions on the result of this particular OP;
'The main weight of the raid fell in the centre and south of the city but it is difficult to obtain precise results of the outcome; like some other German cities, Dusseldorf's records start to show a deterioration under pressure of the severe raids of 1943. There was certainly extensive damage both to housing and to industrial premises but a detailed resume is not possible. The same problem exists with casualties. An early local report says that 23 people died but this appears to have been altered to 118 at a later date. The United States Bombing Survey gives a figure of 622 dead and 942 injured for the whole month of November; there were no more other attacks on Dusseldorf in that month.'
I hope you have enjoyed following our progress through this series of games and my intention now is to pull the campaign rules together into a more user friendly format for other to use with plans to run another similar campaign for the earlier Battle of the Rhur and with Steve Land, a fellow TfT enthusiast, putting together a Dambuster project to be worked on in the New Year.
It leaves me just to thank my fellow DWG club members Steve Land, Bob Connor and Ian Toogood, who joined me in this game and to others in the club who have played in the seven other games that preceded it. Many thanks for your enthusiastic playing, help and input into what has been a very fun time and to give an idea on how our games have progressed over the campaign you can see a short clip below of this game with the guys getting the bomber stream moved with Bob trying his best to crash R-Roger and Steve explaining the delights of dodging nightfighters on the bomb-run!
I will also end with a thank you to my fellow TfT enthusiasts on the Facebook Group who have also been following the progress of this little series of games and for the generous availability of their ideas to modify and improve on the original game, many of which can be found on the page and by simply joining the group.
More anon
JJ
No comments:
Post a Comment