

For the English Civil War enthusiast, the South-West of England provides plenty of opportunity for battlefield exploration, being as it was very much front and centre as a key battleground between Charles I and his Parliament and over the years of this blog I've posted about those I've visited which really illustrates that point, and through the dates of the battles how the war waged up and down the peninsular, culminating in the final battle of the First English Civil War at Stow in 1646.
In addition if the English Civil War is your thing then you might also be interested in links to other ECW battlefields visited and posted on here on JJ's in the links below;
Last summer during our brief respite from national lockdown, Mr Steve and I made the most of a glorious summer and our travel release to explore the battlefield of Lansdown Hill near Bath (see link above) and some associated skirmish sites, before the second winter of home arrest prior to the vaccine roll-out programme which seems likely and hopefully to make the need for similar lock downs a thing of the past.
So this summer with a gradual relaxation of restrictions, we again jumped at the opportunity to get out and about again and picked up where we left off, with the end of the Battle of Lansdown that had left, on July 6th 1643, a slightly battered Parliamentary army under General Sir William Waller ensconced in Bath, requesting reinforcements from the garrison in Bristol, whilst a rather badly burned General Sir Ralph Hopton, having suffered the ill-effects of being too close to an ammunition wagon that exploded soon after the battle, was left recovering along with his army in camp near the village of Marshfield, from where they had marched prior to the battle.
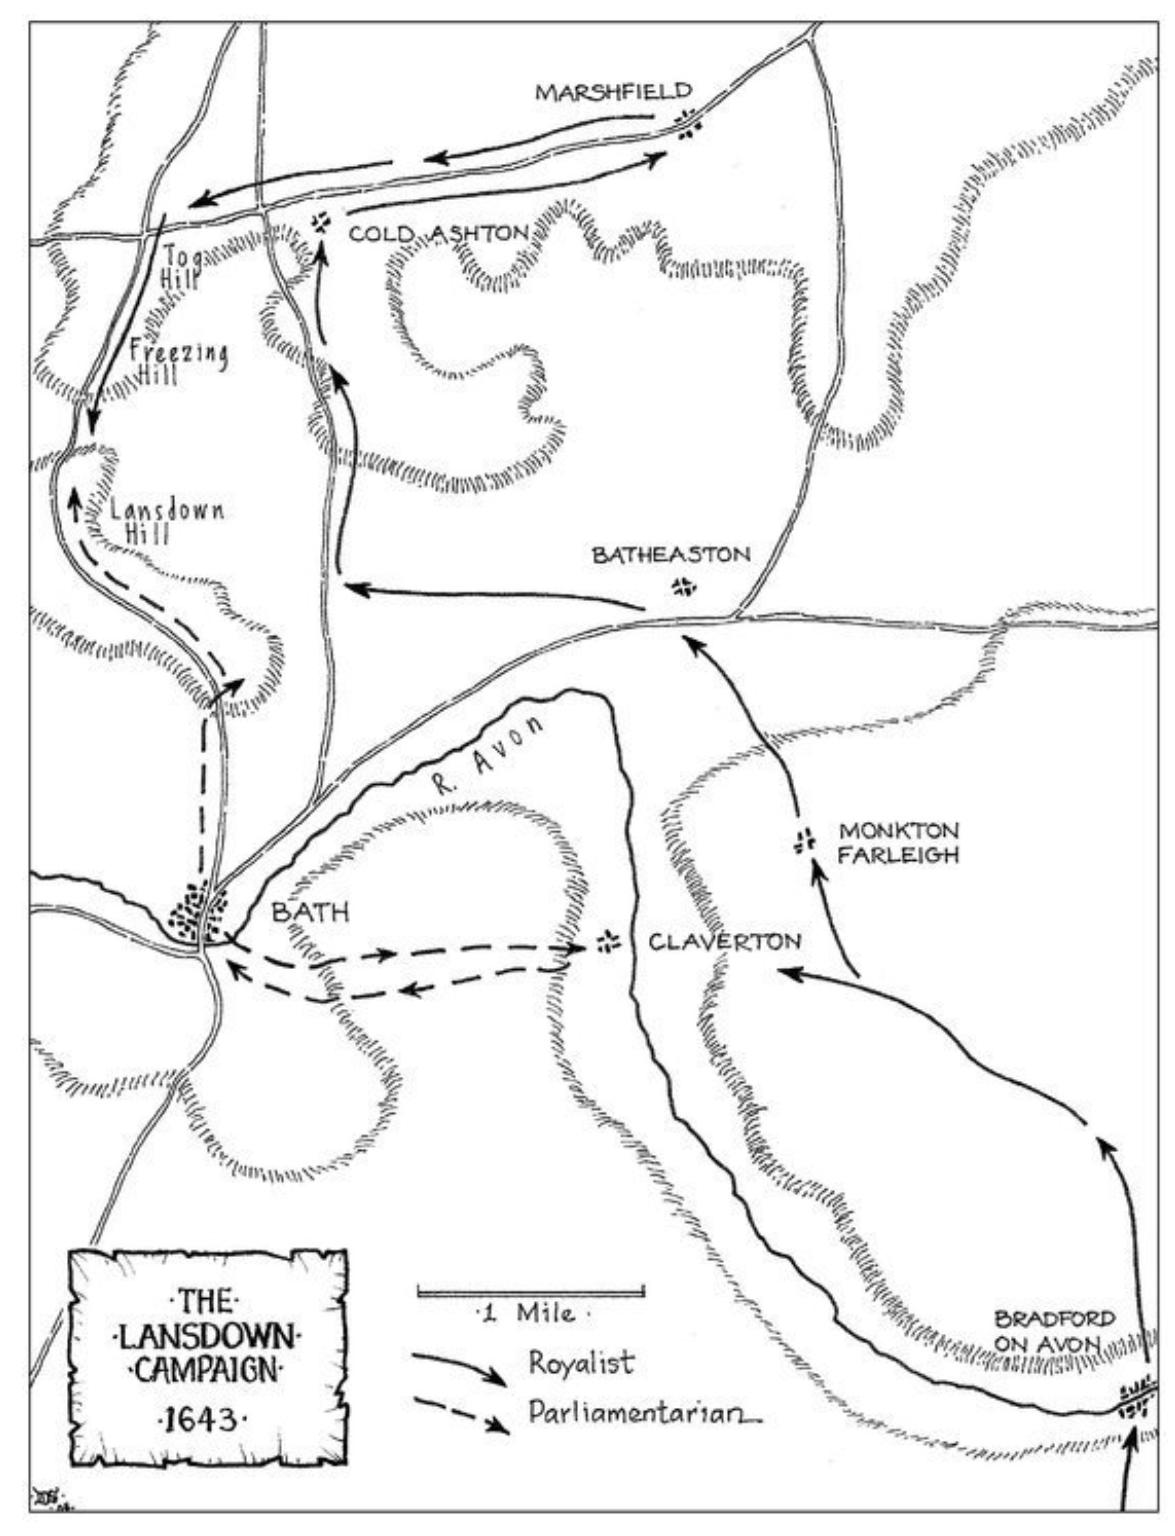
The Royalists claimed the victory with Parliament's casualties of 200 dead and 300 wounded starkly in their favour, suffering themselves just 21 dead and 56 wounded, but with their own failure to take Bath and the loss of their talismanic Cornish infantry commander Grenville not to mention the poor performance of the cavalry, the key Cornish infantry had taken a large dent to their morale; and with the exploding ammunition cart that had left their army commander so badly injured they now found themselves desperately low on powder, as recounted by Captain Richard Atkyns in his description of the state of the Royalist army when he went on to state;
'The Foot and Cannon(by the loss of Ammunition) became wholly unserviceable to us.'
 |
| The route of my two hour drive up to Devizes helps illustrate the theatre of operations for Generals Waller and Hopton in 1643, with Bath, Bristol and Chippenham all key nodes along the march route of the armies and with the King's capital not far from the area at Oxford in the Thames Valley, just beyond Swindon. |
The time at Marshfield was spent burying the dead and making preparations for a retreat back to Oxford, whilst Waller encouraged by the reports of Royalist misfortunes received 500 reinforcements from Bristol on July 7th, setting off in pursuit of Hopton's army as soon as they arrived in the hope of cutting them off en-route to Oxford, before they reached the Royalist capital or received reinforcements.
 |
| The routes of march for the respective armies during the Lansdown and Roundway campaign, with Parliament (Waller) in red - The English Civil War Atlas, Nick Lipscombe |
On the 8th July Waller caught up with the Royalist rear-guard at Chippenham, but Hopton had won the race to the bridge over the River Avon, and with the retreat recommenced the next day, there followed a series of sharp clashes between the opposing horse on the road from Chippenham to Devizes, with the Parliamentary force breaking the Royalists outside Chippenham and in the pursuit taking prisoners from the rear-guard horse.
About three miles from Devizes the Royalist horse made another stand at a ford over a stream near the village of Rowde, with the Royalists braking at the first charge but rallying under Prince Maurice and counterattacking, with Atkyns recounting;
'Lieutenant Colonel (Richard) Neville (of the Earl of Carnarvon's horse) was commanded to bring up the rear, which he did with that gallantry, and good conduct.'
 |
| The sharp skirmishing between Chippenham and Devizes and the robust rear-guard fought by the Royalist horse at Rowde, allowing Hopton's army to retire into Devizes, resurrected the reputation of the Royalist horse in the eyes of the Cornish foot after previous performances at Lansdown. |
Lord Mohun's Regiment of Foot defended the hedgerows near the ford for half-an-hour, sustaining forty casualties, and with Atkyns noting;
'. . . that we killed as many of the enemy as they did of us.'
The resistance put up by the Royalist horse was long enough to allow the Cornish foot to retire into Devizes and drew a note of vindication from Atkyns when he recounted;
'. . . instead of calling us runaway horse (following their performance at Lansdown) they called us gallant horse; for the Cornish foot knew not till then the service of the horse.'
Despite the respite gained by the Royalist occupation of Devizes on the evening of the 9th July, the skirmishing would continue the next day with an action at Beckhampton, east of Roundway Hill when a Royalist relief column, from Oxford, of eight wagons and carts carrying fifteen barrels of powder and slowmatch was ambushed by Waller's troops, capturing five of the wagons and routing the 600 Royalist horse and dragoons that were escorting it.
Following this action, Waller, concerned at the ease with which the Royalists in Oxford could send a relief column so quickly to Devizes, wrote to the Earl of Essex, whose army was watching Oxford, to impress upon him the importance of preventing any further intervention from the Royalist capital, as he lay siege to Devizes, a seemingly inciteful assessment that would have dire consequences with the failure of this request being met.
 |
| My interpretation of one of the earlier interpretations of the Battle of Roundway Down using a Google sat-map of the area to help orientate ourselves on arrival (Parliament in Red, Royalists in Blue). I should say my technique for preparing a walk like this is to come prepared with both saved satelite maps, as above, and my View Ranger walking app, as you can never be over supplied with images to help you know exactly where you are and saved references work when app coverage doesn't. |
Arriving at the little carpark, mid-morning, close to the Millennium White Horse on the very edge of Roundway Down overlooking Devizes, Steve and I orientated ourselves around our various maps of the battlefield with a view to walking the suspected location for the battle and then retracing our steps to follow the retreat route of Waller's army as it eventually broke under the pursuit of Royalist horse and having its own guns turned against it.
Following that, it was likely we would need to find a suitable 'watering-hole' for a well earned lunch before we headed off into Devizes to look at landmarks that featured during the short Parliamentary siege and assault on the town, prior to the battle and a visit to the local museum to see what treasures they might be holding.
 |
| The Roundway Campaign movements, courtesy of the British Civil War Project, showing the arrival route of Maurice and the Royalist relief cavalry force marching from Oxford via Marlborough. http://bcw-project.org/military/english-civil-war/west-country/roundway-down |
On the the 10th July 1643, Sir Ralph Hopton held a council of war in Devizes during which it was decided that he would hold the town with the infantry and artillery whilst Prince Maurice rode to Oxford for reinforcements, with Lords Hertford and Carnarvon, taking with them the remaining 300 cavalry and breaking out at midnight that day; riding the forty-five miles to Oxford in one night, and on arrival discovering the main army was in the Midlands operating under Prince Rupert and the Queen and that a convoy of powder, the one ambushed at Beckhampton, had been dispatched to Devizes earlier.
After a day recovering from their exertions the night before and in the previous days of retreat to Devizes, Lord Wilmot took command of the relief force of 1500 horse, plus Maurice's 300 horse together with two brass cannon and powder, with no infantry from the garrison being spared to join them.
Marching immediately, the Royalist force assembled at Marlborough on the 12th July and arrived before Devizes on the afternoon of the following day as described by Captain Atkyns;
'The next Morning I had Orders that the Rendezvous was about Marlborough, whether I went with several Horse quartered at Farringdon, and came timely thither: The Lord Wilmott was sent with a recruit of Horse from oxon (Oxford), and I suppose all the Horse at that Rendezvous were about 1800 and two small pieces of Cannon: We lost no time, but March'd towards the Enemy, who stood towards the top of the Hill; the Foot in the middle between two Wings of Horse, and the Cannon before the Foot: There were four Hills like the four corners of a Dye (die), in such a Champaign, as 40000 men might Fight in. Upon one of the Hills we discharged our Cannon, to give notice to our Foot that we were come to their relief.'
 |
| My interpretation of the latest estimation of the battle site as presented on the Battlefield Trust site, an invaluable resource to British battlefield walking. https://www.battlefieldstrust.com/resource-centre/civil-war/battleview.asp?BattleFieldId=36 |
In the meantime, following a day of negotiations, Waller who had set up his army outside on the eastern approaches to Devizes, with his guns set up on Coatefield Hill, suspecting a ploy by Hopton to waste time, assaulted Devizes on the 12th July but after fierce fighting was repulsed by the Royalist garrison; and after reorganising his forces was preparing a further assault when he recieved reports from his scouts on the 13th July of the approach of the Royalist relief force from Marlborough.
Drawing off his entire army of some 2,500 infantry, a similar number of horse and dragoons together with eight field guns and leaving a rear-guard force to guard the baggage, he immediately marched on Roundway Hill, deploying conventionally as described above by Atkyns.
Suspecting the withdrawal by Waller was a stratagem to draw him from the town, Hopton and his infantry stayed put as the opposing forces gathered on the high ground to the east.
 |
| The view of the battlefield of Roundway Down, taken from the view point shown on the satellite picture above and looking towards the the Royalist lines |
The battle started at 3pm on the afternoon of the 13th July, with the initial Royalist charge on the forward skirmish groups of dragoons, prompting a charge by Waller's cavalry in support described by Atkyns;
'Then Forlorn hopes out of each Army were drawn out, and the Lord Wilmotts Major, Paul Smith Commanded ours, who did it Round with that gallantry, that he beat them into the very Body of their left Wing, and put them out of Order; which we took advantage of, and immediately charg'd the whole Body; the Charge was so suddain that I had hardly time to put on my Armes, we advanc'd a full Trot 3 deep, and kept in order; the Enemy kept their Station, and their right Wing of Horse being Curiaseers, were I'me sure five, if not six deep, in so close Order, that Punchinello himself had he been there, could not have gotten in to them.'
 |
| Map of the Battle of Roundway Down, English Civil War Atlas - Nick Lipscombe |
Wilmott's brigade was met by the cuirassiers of Sir Arthur Heselrige, whose flanks were overlapped by the Royalist cavalry and gave ground in the attack, to be rallied by Heselrige, only then to break from the field on seeing the second Royalist brigade ready to support Willmot.
 |
| Captain Richard Atkyns attacking Sir Arthur Heselrige - Graham Turner |
In the pursuit of Heselrige and his men Atkyns described a famous encounter between him and the Parliamentary commander:
'Twas my fortune in a direćt line to charge their General of Horse, which I suppos'd to be so by his place; he discharged his Carbine first, but at a distance not to hurt us, and afterwards one of his Pistols, before I came up to him, and mist with both: I then immediately struck in to him, and touchd him before I discharged mine; and I'm sure I hit him, for he staggerd, and presently wheel'd off from his Party and ran.
... it was Sir Arthur Haslerigge. When he wheeld of, I persu'd him, and had not gone Twenty Yards after him, but I heard a Voice saying, ’Tis sir Arthur Haslerigge follow him; but from which Party the Voice came I knew not they being joyn'd, nor never did know till about Seven Years since, but follow him I did, and in Six score Yards I came up to him, and discharg'd the other Pistol at him, and I'm sure I hit his head, for I touch'd it before I gave fire, and it amazed him at that present , but he was too well Armed all over for a Pistol Bullet to do him any hurt, having a Coat of Male over his Arms, and a Head-peece (I am confident) Musquet proof, his Sword had two Edges and a Ridge in the middle, and mine a Strong Tuck; after I had slackned my pace a little, he was gone Twenty Yards from me, riding three quarters speed, and down the side of a Hill, his posture was waving his Sword on the right and left hand of his Horse, not looking back whether he were persued or not, (as I conceive) to daunt any Horse that should cọme up to him;
about Six Score more I came up to him again (having a very swift Horse that Cornet Washnage gave me) and stuck by him a good while, and tryd him from the Head to the Saddle, and could not penetrate him, nor do him any hurt; but in this attempt he cut my Horses Nose, that you might put your finger in the Wound, and gave me such a blow on the inside of my Arm amongst the Veins that I could hardly hold my Sword;
 |
| Taken from the same position but looking back towards the Parliamentarian line on the forward slope of the hill to the left of the track. |
he went on as before, and I slackened my pace again, and found my Horse drop Blood, and not so bold as before; but about Eight Score more I got up to him again, thinking to have pull'd him off his Horse; but he having now found the way, struck my Horse upon the Cheek, and cut off half the Head-stall of my Bridle, but falling off from him, I run his Horse into the Body, and resolv'd to attempt nothing further than to kill his Horse; all this time we were together hand to fist.
 |
| The slope close to the 'white horse' depicted as the likely retreat route for Heselrige and his men, as shown above in Lipscombe's map of the battle, and described in Atkyns account of his pursuit. |
In this nick of time came up Mr Holmes to my assistance, (who never fail'd me in time of danger) and went up to him with great resolution, and felt him before he dischargd his Pistol, and though I saw him hit him, 'twas but a flea biting to him; whilst he charg’d him, I imployed my self in killing his Horse, and run him into several places, and upon the faultring of his Horse his Head-peece opened behind, and I gave him a prick in the Neck, and I had run him through the Head, if my Horse had not stumbled at the same place; then came in Captain Buck a Gentleman of my Troop, and discharged his Pistol upon him also, but with the same success as before, and being a very strong Man, and charging with a mighty Hanger, storm’d him and amaz'd him, but fell off again; by this time his Horse began to be faint with bleeding, and fell off from his rate, at which said Sir Arthur,
"What good will it do you to kill a A poor Man" ,
Said I,
"take quarter then",
with that he stopt his Horse, and I came up to him, and bid him deliver his Sword, which he was loth to do; and being tyed twice about his wrist, he was fumbling a great while before he would part with it; but before he delivered it, there was a run-away Troop of theirs that had espied him in hold;
Sayes one of them My Lord General is taken Prisoner; Sayes another, Sir Arthur Haslerigge is taken Prisoner, face about and Charge; with that they Rallied and charg'd us, and rescued him; wherein I received a Shot with a Pistol, which only took off the Skin upon the blade bone of my Shoulder.'
Prior to planning our visit to Roundway Down and researching various sources, I came across a very interesting and entertaining presentation from the chaps at the Royal Armouries in Leeds that really helps explain why Sir Arthur Heselrige was so able at withstanding several close range pistol shots to his head and body, together with other techniques that might have been employed against him
With Heselrige's cuirassiers routed, Waller led forward the cavalry brigade on the left and they soon followed suit as they were counter-charged by Sir John Byron supported by Lord Crawford's reserve, with Byron ordering his troopers not to fire their pistols until they were among the Parliamentary horse.
'By this time we were come very near to Waller's brigade, and the command I gave my men was, that not a man should discharge his pistol till the enemy had spent all his shot, which was punctually observed, so that the first they gave us a volley of their carbines, then of their pistols, and then we fell in with them, and gave them ours in their teeth, yet they would not quit their ground, but stood pushing for it a pretty space, till it pleased God, (I thinke) to put new spirit into our tired horse as well as into our men, so that though it were up the hill, and that a steep one, we overbore them, and with that violence, that we forced them to fall foul upon other reserves of horse that stood behind to second them, & so swept their whole body of horse out of the field.'

Waller's cavalry soon broke and were pursued across the downs to the precipitous slopes at the rear where many were driven over the edge to their deaths in an area now known as 'Bloody Ditch'.
With his cavalry routed, Waller stayed on the field to rally his infantry into defensive squares, fending off attacks by Wilmot's cavalry for over an hour, but as the attacks grew more concerted and with the approach of the Cornish infantry from Devizes, now fully alert to the battle on the heights above the town, he was forced to order a retreat eastwards.
 |
| Some modern day equestrians, enjoying a glorious morning for a ride across the downs, stand in for Captain Atkyns and Lord Wilmot! No horses were injured in the making of this post. |
It seems the Parliamentary infantry made an ordered withdrawal at first but with the pressure of the situation and the Royalist horse turning captured cannon against them, order was lost and the infantry broke in a rout towards the cover of the wooded slopes, close to Oliver's Castle, an Iron Age hill fort on the rearward slopes of the downs; many being cut down in their flight over the slopes and beyond adding yet more grisly casualties to 'Bloody Ditch', this as Waller and his generals fled the battlefield, bound for Bristol.
Sir John Byron described the final chapter of the battle as the Parliamentary withdrawal turned to rout;
' . . . but when they saw my horse rallied together again before them, & the Lieut. Gen. continuing still in the rear of them, and that Cornish foot began to sally out of the town, they thought it not fit to stay any longer, they began first gently to march off, their officer marching before them, amongst which (as I have been told since) Sir W.W. himself was, & Popham.
With that I advanced towards them with those troops I had rallied, & shot at them with the cannon I had formerly taken, their officers thought it not fit to stay any longer, but such as had horses rid away as fast as they could, & the rest blew up their powder & threw down their arms & betook themselves to their heels, our horse fell in amongst them & killed 600 of them, & hurt many more, and took 800 prisoners & all their colours, & this was the success of their great conqueror.'
 |
| This satellite image shows the route of the Parliamentary rout over the downs from the scene of the original battle and the archaeological finds that have been discovered in the intervening years, and the track we followed leading back past the White Horse out to Roundway Covert and Oliver's Castle. The Bridge Inn is shown from where we saw the battlefield side on. |
Roundway Down does reward the battlefield walker in helping to explain the passage of the battle and its results, in the terrain seen on the ground at the soldiers eye level.
The battle site clearly shows that the Parliamentary troops held a height advantage in their initial positions, perhaps explaining Heselrige's enthusiastic charge down its slopes to meet Wilmot's attack on the advanced dragoon skirmish line.
In addition the precipitous slopes, particularly to the extreme rear of the downs directly above Devizes show why so many met their deaths trying to evade down them whilst being pursued by vengeful cavalry; and the distance the Parliamentary foot tried to cover in their squares under constant attack by horse and later guns on a plateau devoid of cover explains the eventual breaking of ranks as the woods came into site as perhaps the Cornish infantry did at about the same time, and with the subsequent rout giving rise to the Royalist name for the battle 'Runaway Down'.
The result of Roundway Down was the virtual destruction of Parliament's Western Army, presenting the King an opportunity to complete the conquest of the West, but in the end not as decisive as it might have been, with the reduced garrison of Bristol falling to attack, but Gloucester resisting and thus sustaining Parliament's hopes for the future.
Royalist casualties numbered some 40-150 killed, depending on the source relied upon, while Parliamentarian casualties are estimated at 600 killed, 400-700 captured, together with 900 horses and the baggage train and its store of official documents, and of course not forgetting the wounded Sir Arthur Heselrige;
'. . . who received a wound in his arme, and an hurt in his eare, but not dangerous: he fought very bravely.'
 |
| Devizes seen from the rear slopes of Roundway Down, with the spires of St James and St John's churches easy reference points from the time of the battle and which featured in the loose Parliamentary siege and assault that preceded it. |
Following in the footsteps of the Parliamentary foot, Steve and I retraced our route checking out the gentler slopes near the White Horse over which Heselrige and his men made their escape, to the wooded path along the back slope that provided relief from a very hot mid-morning sun as we walked out to Oliver's Castle.
 |
| The view from the rear of Oliver's Castle with the wooded slopes to the left to which the Parliamentary foot sought refuge in their flight and the steep slopes to the right over which many of them and the horse before them tried to escape but over which they met their end. |
 |
| The view of 'Bloody Ditch' from the heights of Oliver's Castle, with the steep descent down clearly seen in this picture, difficult enough for man or beast to make at the best of times but obviously much harder when running for your life. |
The walk out to Oliver's Castle paid as much in dividends to understanding this battle as did seeing the battle site itself and by the time we had got back to the cars we were more than ready for a bite of lunch and a suitable beverage and we found the perfect place to stop; at the Bridge Inn, dating back to 1800 which was later extended into a flour mill and bakery in 1810 as the Kennet and Avon Canal was built alongside it, facilitating the loading of working barges that would stop there on route.
 |
| The historic Bridge Inn at Horton on the Kennet and Avon Canal, a perfect spot for lunch in the beer garden before we headed off into Devizes before the second part of our day exploring. |
Not only great history, food and beer, but our stop also provided a great side on view of the battlefield as the views below looking out over the fields towards Roundway Down illustrate, with the slight hill occupied by Waller seen close to a wooded copse and a possible smaller hill to the west a likely spot from where Wilmot's Royalist force fired their two small cannon to alert the Devizes garrison of their arrival.
 |
| The view over the road and fields next to the Bridge Inn with Roundway Down battlefield on the horizon, extreme right of picture, with the village of Bishops Canning between. |
Suitably refreshed with our lunch we were ready to start the next part of our adventure, to check out the likely parts of Devizes fought over between Waller and Hopton's soldiers as the former pressed his assault on the town looking to take advantage of the latter's distress, being desperately short of powder and shot, and likely to surrender if not relieved in time.
 |
| A 1773 map of Devizes, probably not much different from Devizes in 1643 and showing the key landmarks of the two churches mentioned in accounts of the assault by Waller's men on the 12th July. |
In the accounts prior to the Battle of Roundway Down and the occupation of the town by Hopton, it is clear that Waller was looking to resolve the situation speedily and with as fewer casualties as possible, by first offering a field battle by pulling off from the town to allow Hopton to meet him up on Roundway Down, and then when this failed, to reach a negotiated surrender with a display of force before it, which resulted in the assault on the 12th July when Waller could see that Hopton was playing for time, which indeed he was.
 |
| The extent of the modern developments that have occurred since 1773 are obvious in this satellite view of the same area covered by the map, but with the churches, the green and Morris Lane, the furthest extent of the Parliamentary attack clearly identifiable among the newer buildings. |
Waller didn't have a large enough force to employ anything but a fluid siege of the town, explaining Maurice's ability to exit it with his 300 horse on his escape to Oxford.
 |
| The Church of St James, around which Waller set up the main part of his loose envelopment of the town and close to which he set up his gun line to bombard prior to his assault. |
Waller, placing his guns on Coatesfield Hill, near St James' Church opened his bombardment on the 12th July, but due to heavy rain didn't begin his assault until the afternoon, that started with an attack on the Royalist skirmishers defending the hedgerows outside the town.
 |
| The view from the church of St James out over the green to the town outskirts, broadly as it was at the time. |
The town was heavily barricaded as described in the account by the acting commander of Lord Mohun's Foot. Lieutenant Colonel Walter Slingsby;
'The next morning Waller draws his whole force close to the Towne and beleaguers us round, lying in many places within Carabine shot; rais'd a batterye upon a hill neare the Towne, and then incessantly day and night pours greate and small shott into us.
There was no better works then hedges, yet had wee so barricaded the Avenues that their Horse could not charge in upon us, neither durst their Foot attempt us, we being almost twice their number, and better Foot. Our match failed us and we were forced to use all the bed-cord in the town, which being prepar'd with rossell served well.'
 |
| Street Fighting in the English Civil War - Steve Noon |
After 'four hours of fighting the outworks and guards were carried' by Waller's men driving the Royalist skirmishers back, after their fierce resistance 'and the Parliament's horse charged up into some of the streets' but could not advance further, with the fighting thought to have reached up to Morris Lane and the Church rectory, forming part of the main line of the Royalist defence.
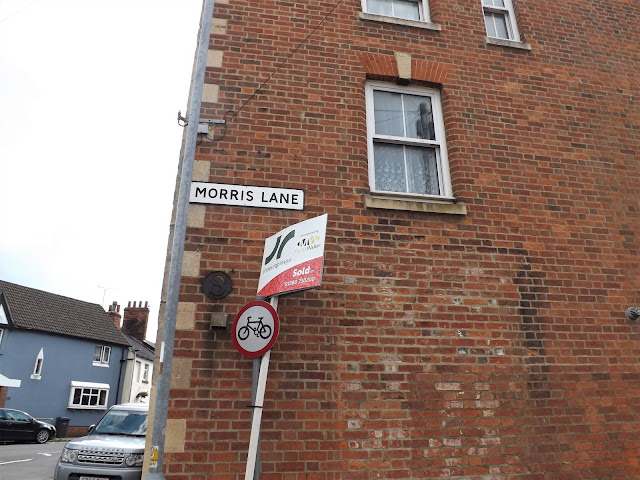 |
| Morris Lane the likely high-water mark of the assault made by Wallers troops on the 12th July and repulsed by Hopton's Cornishmen. |
At this point the Royalist defenders 'demanded a parley of two hours, which after some hesitation was granted; and when this was expired, as their object was to spare ammunition as well as to gain time for sleep, they induced Waller to extend it during [an] other six hours.'
 |
| The spire of of St, John's church peeks above the trees lining Morris lane, and a key location for both sides, as it was a likely magazine for the remains of Hopton's dwindling powder and shot reserves. |
'We hope God will not destroy this mighty army of the West. He wrought wonders for us, and we hope the Lord will keep us from the great strength they expect from Oxford.'
The next morning Waller found his plans in disarray as scouts warned him of the approach of Wilmot's relief force.
 |
| St John the Baptist Church, another battlefield veteran and still bearing the scars of its role in the conflict fought around it in 1643. |
 |
| Bullet and shot marks still scar the outside stonework indicating the ferocity of the fighting around it |


 |
| This part of the town just below the castle is one of the oldest, as indicated by the 1773 map and the remaining buildings from medieval Devizes are easily located. |

That said the museum holds a fascinating display of other items ranging across the history of the wider area from the prehistoric 'Beaker People' to more modern times and is well worth a visit should the opportunity present.


 |
| The likely path of the Parliamentary rout is well illustrated by the trail of battlefield finds leading to the rear slopes of Roundway Down. |

Our visit to Devizes and Roundway Down was the culmination of an ambition to explore the English Civil War history of the area held for many years, as Steve and others who have joined me on trips to the Devizes Wargames Club's annual show 'Attack' can easily confirm, with any plans to quickly 'pop over to the battlefield' very much undone by lack of time spent enjoying the company and the delights of a very pleasant show.
That said it was so nice to be able to dedicate a day to purposefully explore the locale and have such a nice day, weather wise to do it on, and I would recommend anyone else with similar aspirations to do the same and dedicate at least a day to soak up the history of the events at a leisurely pace.
Sources consulted for this post:
The 1643 Campaigns for the South West - Robert Giglio
The English Civil War Atlas - Nick Lipscombe
The Praying Captain - A Cavaliers Memoirs (Captain Richard Atkyns) https://www.jstor.org/stable/44222262
Spectacular posting!
ReplyDeleteLove the maps and combination with a modern view of the ground.
Hi Murdock,
DeleteGlad you enjoyed the post.
The blog is very much my own journal and I put these posts together as much as for me as for anyone who cares to read them, thus I try to create a post that will be something I would want to read years later, when I’ve forgotten exactly what it was I was doing, and it’s great to hear when others enjoy it as well.
All the best
JJ
Absolutely superb battle-logue ! 👍. Very much enjoyed that. Great account of Roundway, with all of the modern day pics.
ReplyDeleteHi FOGH,
ReplyDeleteThank you for your comment and glad you enjoyed the post which for me was a labour-of-love, having very much enjoyed the day Steve and I had getting to see the delights of Devizes and its history.
Cheers
JJ
Excellent - have been twice, and am always struck by how beautiful these battle fields are now - Roundway in particular is lovely though on a summer day, with the sounds of the birds.. bit of a difference to the events on the day I suspect!
ReplyDeleteHi Steve,
DeleteThank you, and I’m not surprised your familiarity with Roundway as I know you have a keen interest in this period, and yes it is a paradox in many ways to enjoy the fantastic countryside and surroundings when you are very conscious of the history and that you are on a battlefield; something that Steve and I were reminded off when chatting to the ladies out riding, who were totally unaware of that history and the events that took place only a few hundred yards away from where they were enjoying exercising their horses..
Perhaps that’s another role our interesting hobby has in informing others of our mutual history.
Cheers
JJ