
 |
| Officers of the 31st Foot at Albuera, a similarly buff faced silver laced regiment to the 61st. Note the buff cross belts and turn-backs seen sported instead of the usual white. |
So on with part two of this three part tutorial and on with the first highlight. As a reminder, the colour manufacturer code is VJ = Vallejo, CD = Coat d'Arms, H = Humbrol, CT = Citadel. Oh and by the way you've just got to love the names of the new Citadel range, I mean "Pink Horror" and "Emperor's Child", really?
As I mentioned in the tutorial on French infantry, the brush you use is critical in getting the best results and you really do need a brush that will hold its tip in spite of the thrashing it will get over time. You can check out my recommendation here,
http://jjwargames.blogspot.co.uk/2013/04/tamiyas-small-pointed-brush-update.html
This need for a good brush is illustrated in the first highlight I tend to apply which is the Citadel Kislev Flesh. These AB figures have exquisite detail and with careful application you can highlight above the top lip under the nose to bring out that detail - only with a good brush.

One thing I didn't include in the block work from part one, put it down to my age, is the Coat d'Arm Dark Grey applied to the musket slings, which I applied after I had written up the post. I tend to highlight the white lace areas and white straps with Vajello Ivory, and you will see I have started to so the back packs and musket slings, bit have left off the jacket lace. This is because I want to apply the third highlight to the tunic before adding the lace.
Likewise on the Colonel's jacket there is a great set of silver buttons to highlight but I will do those last.

Just with the first basic highlights you can see the depth created to the colours, particularly the black items, shako, back pack, ammunition pouch, scabbards and boots. I often see requests from people to find a good colour to highlight black and the Vajello Dark Sea Blue is a perfect first option.
Remember a highlight is just that and we are not looking to cover up the original base colour but accentuate the top surface where the light strikes and draws the eye to it.


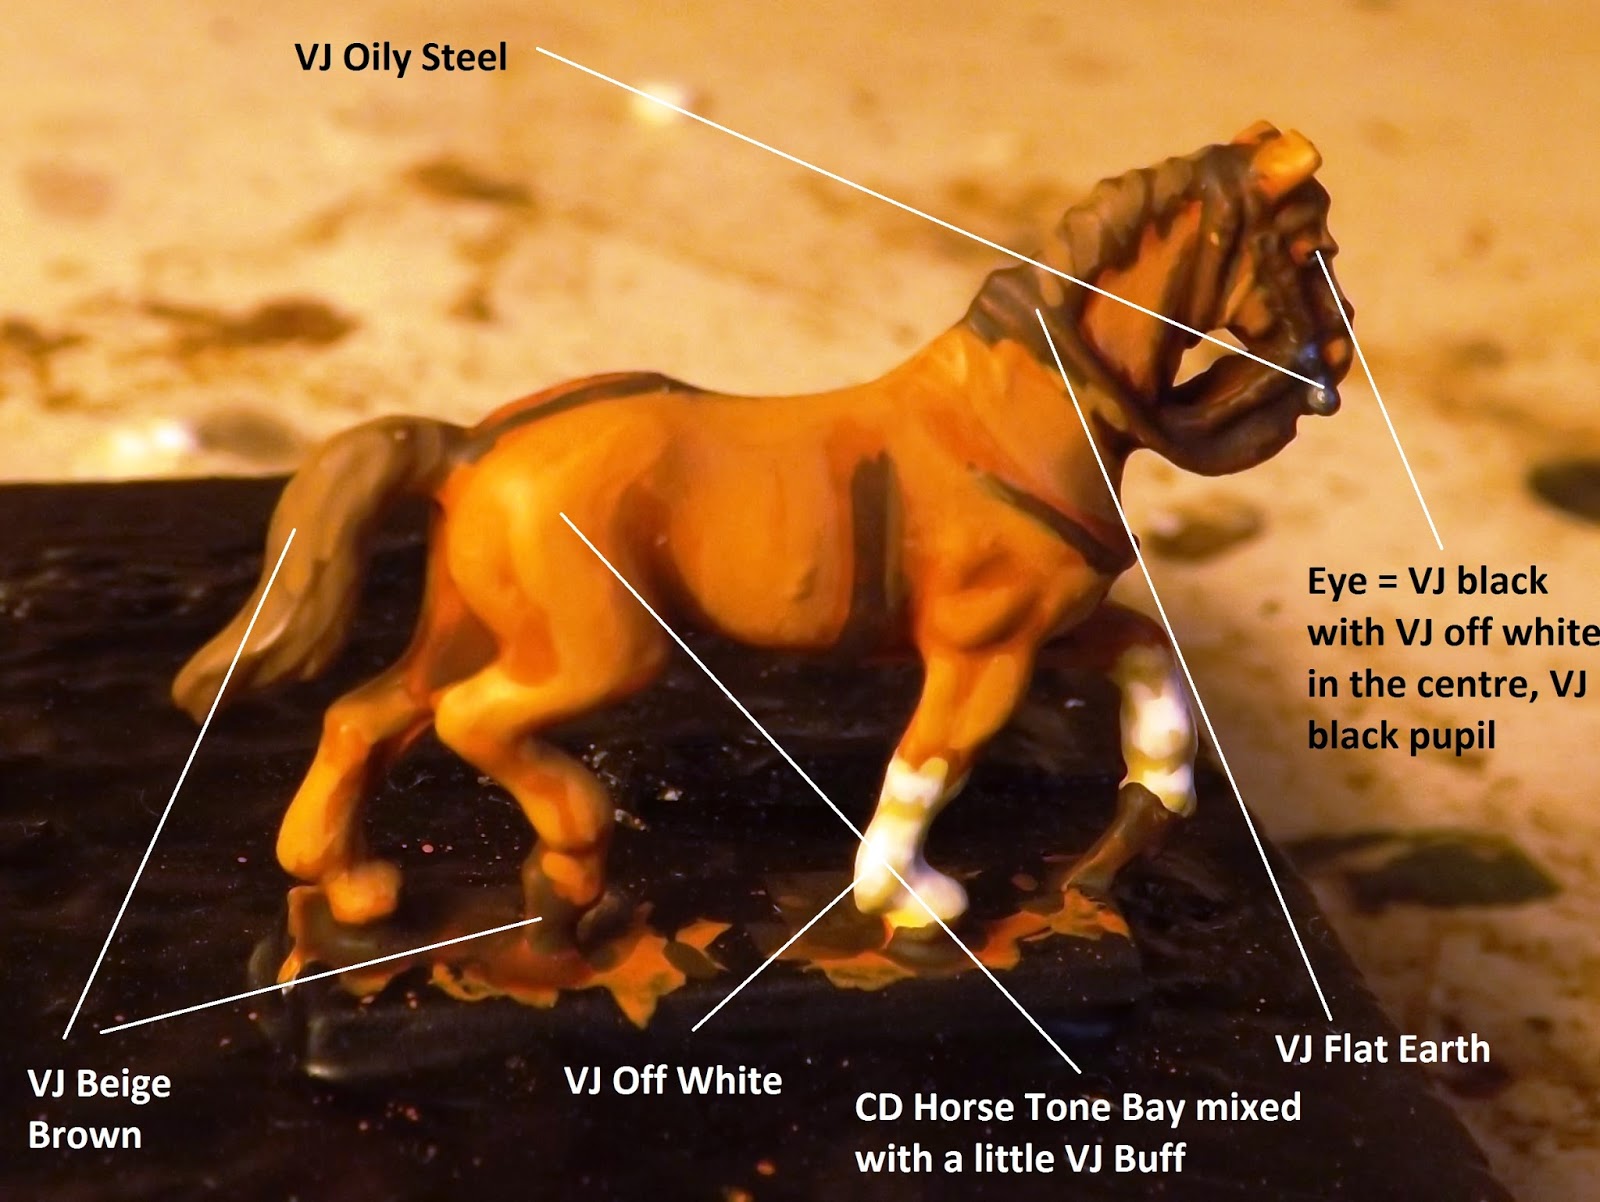
I am quite pleased with the horse tone and wash and think it does produce a lighter effect. I think I will experiment with different shades of wash just to see what the potential is.

I have just noticed that I could have done the straps on the Colonels saddle roll, but will pick it up on the third highlight phase.
So there we are, next up it's time to make these chaps pop and come alive with a third and final colour choice.
Thanks for the info. Nice and clear with good examples. I like the horse explanation as there is not a lot of help with horse colours and where to paint them for best effect...cheers!
ReplyDeleteEnjoyed this one as well .
ReplyDeleteRegards Gavin .
Your a master Jonathan, great tutorials!
ReplyDeleteCheers
Paul
Excellent as always JJ!
ReplyDeleteThis comment has been removed by the author.
ReplyDeleteNice informative posts as usual.
ReplyDeleteMy attempt at a Buff faced regiment, the 31st in 28mm (full url this time)
http://i1381.photobucket.com/albums/ah211/Jabbamiles/Wargame_minitures/Napoleonic_British/IMG_0767_zpsphqdp6oi.jpg
Very detailed step-by-step tutorial on your painting process, Jonathan.
ReplyDeleteFun to peek under the hood!
Thanks for your comments chaps. This process works for me and if others find it useful then I guess I've shared the love as they say.
ReplyDeleteJJ
I was just rereading many of your blog entries and somehow I managed to miss this one. Great tutorial, makes me want to get started on my British.
ReplyDeleteThank you, that what this blog is all about, sharing the love and encouraging everyone to get painting
Delete