

Talavera Dawn Attack Game One
Talavera Dawn Attack Game Two
Yesterday was a day of firsts and what turned out to be a great day's wargaming. In fact one I would describe as one of the most enjoyable games I have ever played. The company and banter was first class, the game played in a great spirit that pushed the scenario to its limits, and a game that seemed to model the events of over two hundred years ago very well.
It was a first in terms of the most figures from the new Napoleonic collection in action on the table in one game, with practically half of the two opposing armies going at it and a true test of C&G's ability to manage this size of game and indeed the potential to run the full thing next year.
We knew we would need a full day of gaming to see what this scenario could offer and we may need to take even longer for the full afternoon battle, so this would be an important test.
 |
| Map to illustrate the set up for the Dawn Attack scenario |
It is probably worth saying that we are not looking to design a nicely balanced game. The reality is that real battles don't tend to be like that and so we have to make our victory conditions measure how well our table top commanders have performed against their historical predecessors and try as much as possible to present some of the key issues that they had to deal with.
So some gamers might not choose to attack the British line with less than half of the French infantry on the table, but in reality that is what happened and we have tested that scenario in the previous two games. This game was set up to test the alternative scenario that sees General Villatte wholly committed to supporting General Ruffin and thus having the British line facing the force of two of the three infantry divisions in Marshal Victor's I Corp, plus the massed light cavalry and artillery of the French army as a whole.
In the final draft of this scenario the French attack plan will be selected randomly and only known to the French commander/s and then only when a decision is required from General Villatte and his command. Thus General Ruffin should be leading the attack on the British line not sure with what French total force will be involved and with the British totally unaware of French force commitment. In our test game, the British were aware that they would be facing a full out attack and that must be born in mind as that uncertainty about what the French are up to is another important aspect that will keep this scenario fresh and interesting, particularly if played in a linked up manner as part of a mini-campaign.
To test a game like this you need to employ the services of the 'A' Team and it was nice to see that the players presented themselves in full dress uniform for the forthcoming clash of titans.
Both sets of players are now veterans using C&G seeing service in the Vimeiro and Oporto Campaigns and that experience was clear to see in the way the two armies were wielded yesterday.
So, introducing our commanders who were carefully picked for the attributes they would bring to their respective roles, we had Marshal Victor played by Chas, better known to his friends as "Mad Dog". A very seasoned, aggressive commander, perfect for the role and ably supported by an equally aggressive General of Division Ruffin, played by Will who popped back from University to take part in this final scenario play test.
The French Command Team
 |
| Frrench Commander Claude Victor-Perrin, Duc de Belluno, Marshal of France, a.k.a. Chas |
 |
| General de Division Francois Amable Ruffin, a.k.a. Will |
The British Command Team
The British army fielded a no less experienced command team very aware of the strength and solidity of the army they commanded and confident in their ability to see off, yet again, the French coming on in the old familiar way. Vince took the role of Sir Arthur Wellesley ,"Old Hooky", bringing his phlegmatic, cool under pressure, skill set.
He was likewise ably supported by a general always able to get the best from his men, and a commander who can always be expected to produce the unexpected, General Rowland Hill, played by Steve M.
 |
| British Commander Lieutenant General Sir Arthur Wellesley, better known in social circles as Vince |
Sir Arthur Wellesley, the youngest Lieutenant General in the British army and the "Wunderkind" of his generation. Aloof and with friends in high places, he is the very model of a Tory Peer. Preferring to keep his distance from the lower ranks, the soldiers have come to respect his abilities on the field of battle and the French commanders who have faced him are learning a new respect for the so called "Sepoy General".
 |
| Major General Rowland (Daddy) Hill, loved by the men, a.k.a Steve M. |
The Dawn Attack - Talavera 0500
If you have followed the progress of this scenario in the preceding games, you will be familiar with the set up of the two armies glowering at each other across the valley of the Portina stream and the picture below of the French army from the British lines illustrates the set up at 0500 with the firing of the French signal gun that announced the commencement of a forty-five minute bombardment by the massed French artillery.
 |
| 05.00 and a single signal gun announces the start of the French attack |
New orders were quickly dispatched to French commanders and within half an hour the rapid beat of the "Pas de Charge" or "Old Trousers" in British circles, could be heard echoing across the valley from French lines, announcing the advance of the French infantry columns.
 |
| The French guns seek out likely targets as their smoke and a quickly descending mist blots out the British line |
 |
| The French columns close on the British line shielded by the poor visibility due to the morning mist |
This attack was different in its scale, to others experienced so far, as the volume of French skirmishers made it difficult for their British opposite numbers to keep all of them away from the British line beyond. The poor visibility allowed the French to infiltrate the lines and in turn prevented the British screen to take full advantage of the range of their rifle companies to play similarly of the advancing French columns.
 |
| With the threat of Will's advance in the northern valley developing, British heavy cavalry move off in their direction over the Cerro, centre top left. |
If you want to see the effects of poor visibility on a Napoleonic battlefield, check out the pictures from this year's Waterloo re-enactment with the audience struggling to see anything through all that black powder smoke. That was on a clear sunny day, so you can imagine the issues early morning mist would add.
 |
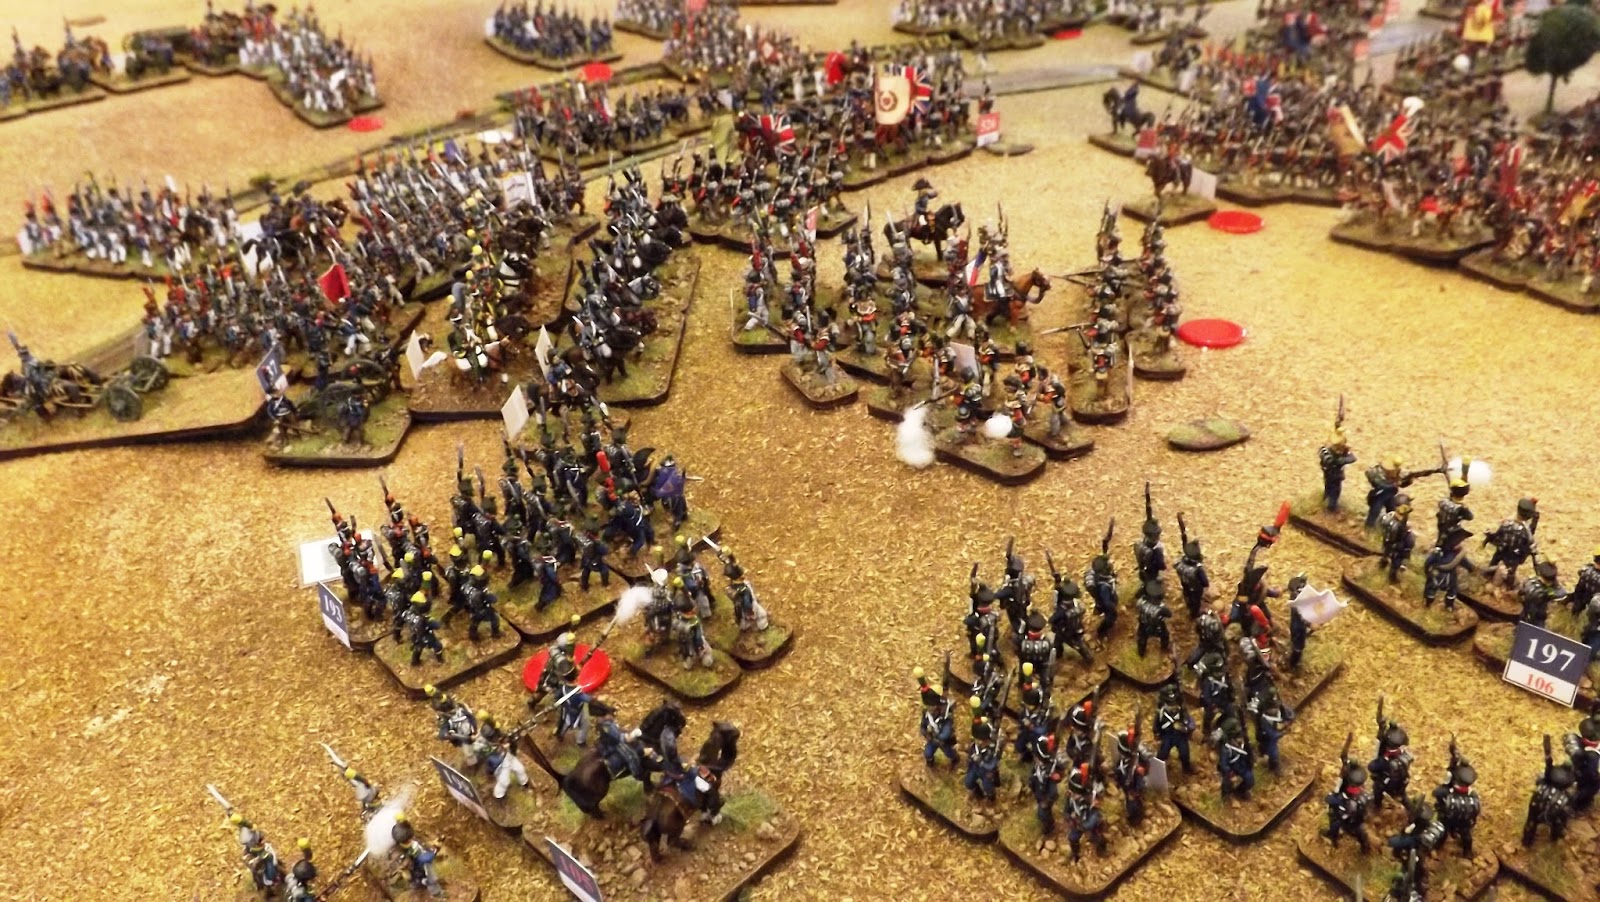
| The arrival of so many French troops in front of the British line at one time was awe inspiring and appeared unstoppable. |
 |
| The 27e Legere and 63e Ligne of General Cassagne's brigade cross the Portina. The 94e Ligne and 95e Ligne of General Puthod's brigade are echeloned back to their left. |
 |
| First contact as the voltigeur screen of Cassagne's brigade emerges from the mist |
Both sides braced themselves as the British command issued their fire orders and awaited the results. The fire when it came was strong but not devastating. The French commanders look stunned for a moment, but quickly recovered from their surprise and equally quickly issued orders to charge in.
The next half an hour of battle saw a "Montgomery" style crumbling attack as the weight of numbers and continual charges pushed the British line back beyond their supports, leaving several of their battalions shaken and badly disorganised. The French onslaught caught two of the three British artillery batteries unlimbered and now without support and they were quickly overcome.
Many French battalions had suffered in the fight and the skirmish battle and it became unclear which side had the advantage, although the French were still, in the main, advancing and able to issue charge orders if with a declining number of units.
 |
| The first exchanges of canister and skirmish fire as the two sides clash |
The British had a problem on the Cerro de Medellin as the rapid advance and attack of both French divisions had prevented them from completing a double line of battalions out to their extreme left flank. Their only remedy had been to order General Fane's heavy cavalry to move in that direction to try and impede General Ruffin's advance.
 |
| With the range closing between columns and lines, the skirmish screens fall back |
 |
| Fire! The British line steps forward and unleashes its first volley |
 |
| The yellow marker is a small counter indicating a charge carry through position for the French infantry as the intensity of close up battle takes effect |
 |
| Amid the smoke of battle and the shrieks and cries from the dying and wounded, General de Brigade Meunier leads from the front |
 |
| The pressure builds along the front as the both sides commit more troops to the fight |
 |
| The sprinkling of casualties and a flowering of red markers (indicating units on halt or retire reactions) along the front indicate which way the tide of battle is turning |
To counter the serious threat the British light dragoons posed, the French brought up General Merlin's light cavalry and two squadrons of the 14th Light Dragoons were met in the charge by two squadrons of the Vistula Lancers, with the lancers getting the best of it losing eight of their number but inflicting eleven casualties on the 14th Light Dragoons and pushing them back.
 |
| The British were reaping their fair share of coloured markers as the British heavy cavalry draw near forcing French troops into square |
 |
| Sir Arthur Wellesley right and General Hill left busy stabilising the defence of the Cerro de Medellin |
 |
| Marshal Victor amid the ranks of the 24e Ligne encourages his men forward, for France and the Emperor |
 |
| As the mist finally clears it reveals General Villatte's division in retreat and disarray among the British on the Cerro de Medellin |
 |
| With two squares of the 9e Legere to their front, Fane's heavy cavalry grudgingly give ground as they come under increasing French fire. |
 |
| Game end and General Villatte's Division have been repulsed |
 |
| Game end and the British are struggling to maintain a hold on the Cerro de Medellin |
When the other factors were put into C&G the result reversed to, as I had correctly assessed, a Minor French Victory, which would sit well in a linked game scenario for the French and clearly illustrated that the scenario has plenty to offer both camps based on the previous games.
The game from a viewers perspective was a feast for the eye and roller-coaster in terms of the swings in fortune throughout, causing all of us to be unsure of who had it in the bag. The French attack took full advantage of the visibility, which finally lifted to a clear day with a light rain on turn ten, by using it to get their skirmish line into the face of the British defence. This approach clearly unsettled the forward British battalions causing them to under perform at the crunch moment. When this was coupled with the multiple targets presented that split their poorer firing "the writing was on the wall" and the French attack was in the ascendancy.
This worked really well for Ruffin's division up against a single line of defenders who couldn't get a respite from the continual French attacks, but to the south, Villatte's division hit a slight wall when it came up against Donkin's and Tilson's brigades in behind the two KGL brigades who together effectively snuffed out their attacks and indeed were counter-attacking towards the end, hoping to put the light cavalry in to "seal the deal".
A fantastic day that will live long in the memory and thank you to Will, Chas, Vince and Steve for making it one to remember and to Nigel Marsh the designer of C&GII for a great set of rules that enables a large game like this to flow seamlessly.
What follows is the Game summary together with the "butcher's bill" for both sides which has some new improvements in the information provided to gamers and I have included a little explanatory example below so you can see what they all refer to. The honours ratings (number in brackets) now show, which is a very useful system to show which units over performed in the game above what would have been expected.
Talavera Dawn Attack, As of Game Turn: 10
Legend:
[D] Denotes dispersed
[Y] Denotes In rout
[R] Denotes halted in disorder, in retirement or retreat
[W] Denotes no advance unless accompanied by officer
Example Leader/Unit Stats.
ID Number: General Officer: Condition of Officer: Quality: Command Range
501] Lieutenant General Sir Arthur Wellesley - Active A [1500 paces]
ID : Unit Title: Losses/Strength: Unit Quality: Formation Status: (Honour Rating) Morale/Fatigue
[502] 3rd Dragoon Guards B 5/ 268 C+ Formed ( 1) Good Acceptable
British Army -Talavera Dawn Attack, As of Game Turn: 10
Army Sir Arthur Wellesley
[501] Lieutenant General Sir Arthur Wellesley - Active A [1500 paces]
[D] [550] Eliott's Brigade 151/ 0 C D'persed Broken Tiring
[D] [551] Rettberg's Brigade 144/ 0 C D'persed Poor Acceptable
[552] Heyse's Brigade 17/ 132 [ 6] C Formed ( 3) Average Acceptable
Division William Payne - Defend
[503] Lieutenant General William Payne - Active C+ [725 paces]
Brigade Henry Fane - Defend
[504] Brigadier General Henry Fane - Active B- [400 paces]
[501] 3rd Dragoon Guards A 0/ 255 C+ Formed Good Fresh
[502] 3rd Dragoon Guards B 5/ 268 C+ Formed ( 1) Good Acceptable
[503] 4th Dragoons A 5/ 274 C Formed ( 1) Good Fresh
[504] 4th Dragoons B 0/ 271 C Formed Good Fresh
Brigade Stapleton Cotton - Defend
[505] Brigadier General Stapleton Cotton - Active B+ [500 paces]
[505] 14th Light Dragoons A 11/ 229 C [sk] Formed ( 5) Average Tiring
[506] 14th Light Dragoons B 0/ 229 C [sk] Formed Good Fresh
[507] 16th Light Dragoons A 0/ 253 C [sk] Formed Good Fresh
[508] 16th Light Dragoons B 0/ 271 C [sk] Formed Good Fresh
Brigade George Anson - Defend
[506] Brigadier General George Anson - Active B- [400 paces]
[509] 23rd Light Dragoons A 0/ 229 C [sk] Formed Good Fresh
[510] 23rd Light Dragoons B 0/ 224 C [sk] Formed Good Fresh
[511] 1st Light Dragoons KGL A 0/ 220 C+ [sk] Formed Good Fresh
[512] 1st Light Dragoons KGL B 0/ 228 C+ [sk] Formed Good Fresh
Division John Coape Sherbrooke - Defend
[507] Lieutenant General John Coape Sherbrooke - Active B- [800 paces]
Brigade Ernest Baron Langwerth - Defend
[510] Brigadier General Ernest Baron Langwerth - Active B- [350 paces]
[519] 1st KGL Line Battalion 16/ 528 C- [sk] Formed ( 5) Good Acceptable
[W] [520] 2nd KGL Line Battalion 5/ 605 C- [sk] Formed ( 7) Average Tired
[R] [521] Langwerth's Bde. Light Bn. 33/ 201 C [sk] Shaken Broken Tired
Brigade Sigismund Baron Low - Defend [No Advance]
[511] Brigadier General Sigismund Baron Low - Active C+ [450 paces]
[R] [522] 5th KGL Line Battalion 97/ 452 C- [sk] Shaken Broken Exhausted
[523] 7th KGL Line Battalion 75/ 426 C- [sk] Formed ( 4) Average Acceptable
[524] Low's Bde. Light Bn. 4/ 113 C [sk] Disorder Average Fresh
Division Rowland Hill - Defend
[512] Major General Rowland Hill - Active B- [950 paces]
Brigade Christopher Tilson - Defend
[513] Brigadier General Christopher Tilson - Active C+ [350 paces]
[R] [525] 1/3rd Foot 47/ 624 C+ [sk] Shaken Poor Acceptable
[526] 2/48th Foot 9/ 501 C- [sk] Formed ( 3) Good Fresh
[527] 2/66th Foot 4/ 469 C- [sk] Formed ( 5) Good Tiring
[R] [528] Tilson's Bde. Light Bn. 11/ 226 C [sk] Disorder Average Acceptable
Brigade Richard Stewart - Defend [Retire]
[514] Brigadier General Richard Stewart - Active B [450 paces]
[529] 29th Foot 119/ 419 C+ [sk] Disorder Good Tired
[R] [530] 1/48th Foot 26/ 700 C- [sk] Shaken Poor Exhausted
[D] [531] 1st Battalion of Detachments 246/ 302 C- [sk] D'persed Broken Exhausted
[532] Stuart's Bde. Light Bn. 5/ 197 C [sk] Formed ( 4) Average Fresh
Brigade Rufane Donkin - Defend
[516] Colonel Rufane Donkin - Active B- [350 paces]
[537] 2/87th Foot 0/ 539 C- [sk] Formed Average Fresh
[538] 1/88th Foot 0/ 539 C- [sk] Formed Good Fresh
[539] 5/60th Rifles 5/ 215 B- [sk] Formed ( 5) Good Fresh
[540] Donkin's Bde. Light Bn. 4/ 171 C [sk] Formed ( 4) Good Fresh
Strengths:
losses/active
706/ 7227 Bayonets
21/ 2951 Sabres
312/ 132 Artillerists
12/ 6 Cannon
1039/ 10310 Total of all arms
22 Standards present
 |
| British Stand Out Performers - 2/66th Berkshire Regiment of Foot |
 |
| British Stand Out Performers - 1st King's German Legion Line Infantry Regiment |
French Army - Talavera Dawn Attack, As of Game Turn: 10
Corps Claude-Victor Perrin
[104] Marechal d'Empire Claude-Victor Perrin - Active B- [1300 paces]
[101] 6/8me Artillerie a Pied 0/ 193 [ 8] C Formed ( 1) Good Fresh
[102] 2/6me Artillerie a Cheval 3/ 153 [ 6] B- Formed ( 1) Good Fresh
[103] 1/8me Artillerie a Pied 0/ 195 [ 8] C Formed ( 1) Good Fresh
Division Francois Amable Ruffin - Attack
[105] General de Division Francois Amable Ruffin - Active D+ [650 paces]
[190] 4/8me Artillerie a Pied 0/ 209 [ 8] C+ Formed Good Fresh
Brigade Claude-Marie Meunier - Attack
[106] General de Brigade Claude-Marie Meunier - Active B- [400 paces]
[191] 1/9me Regiment de Legere 0/ 467 C [sk] Formed ( 3) Good Acceptable
[192] 2/9me Regiment de Legere 29/ 468 C [sk] Formed ( 3) Good Fresh
[193] 3/9me Regiment de Legere 3/ 488 C- [sk] Formed ( 7) Good Acceptable
[194] 1/24me Regiment de Ligne 59/ 413 C [sk] Formed ( 8) Good Tiring
[195] 2/24me Regiment de Ligne 86/ 385 C [sk] Formed ( 2) Average Fresh
[196] 3/24me Regiment de Ligne 14/ 483 C- [sk] Formed Good Fresh
[197] 9me Regt. Voltigeur Bn. 9/ 299 C [sk] Formed ( 2) Good Acceptable
[198] 24me Regt. Voltigeur Bn. 43/ 265 C [sk] Formed ( 4) Average Tiring
Brigade Pierre Barrois - Attack [Retire]
[107] General de Brigade Pierre Barrois - Severely wounded B [450 paces]
[R] [ 199] 1/96me Regiment de Ligne. 94/ 419 C [sk] Shaken Broken Exhausted
[R] [ 200] 2/96me Regiment de Ligne. 87/ 420 C [sk] Shaken Broken Tired
[201] 3/96me Regiment de Ligne. 0/ 476 C- [sk] Formed ( 2) Average Fresh
[202] 96me Regt. Voltiguer Bn. 4/ 284 C [sk] Formed ( 4) Average Fresh
Division Eugene Villatte - Attack
[111] General de Division Eugene Villatte - Active B [875 paces]
[120] 2/8me Artillerie a Pied 0/ 198 [ 8] C+ Formed Good Fresh
Brigade Baron Louis-Victorin Cassagne - Attack [Retire]
[112] General de Brigade Baron Louis-Victorin Cassagne - Active C+ [400 paces]
[121] 1/27me Regiment de Legere 41/ 383 C [sk] Formed ( 2) Average Fresh
[R] [122] 2/27me Regiment de Legere 74/ 335 C [sk] Shaken Broken Tired
[Y] [123] 3/27me Regiment de Legere 151/ 277 C- [sk] Rout Broken Tired
[R] [124] 1/63me Regiment de Ligne 37/ 395 C [sk] Disorder Poor Tiring
[125] 2/63me Regiment de Ligne 5/ 406 C [sk] Formed ( 6) Good Acceptable
[R] [126] 3/63me Regiment de Ligne 34/ 388 C- [sk] Shaken Broken Tired
[127] 27me Regt. Voltigeur Bn. 3/ 258 C [sk] Formed ( 3) Average Acceptable
[128] 63me Regt. Voltigeur Bn. 5/ 256 C [sk] Formed ( 5) Poor Tired
Brigade Jacques Puthod - Attack [No Advance]
[113] General de Brigade Jacques Puthod - Active C [350 paces]
[129] 1/94me Regiment de Ligne 15/ 399 C [sk] Formed (11) Ex'lent Tiring
[R] [130] 2/94me Regiment de Ligne 130/ 304 C [sk] Shaken Broken Fresh
[131] 3/94me Regiment de Ligne 0/ 441 C- [sk] Formed Good Fresh
[Y] [132] 1/95me Regiment de Ligne 159/ 288 C [sk] Rout Broken Exhausted
[R] [133] 2/95me Regiment de Ligne 61/ 386 C [sk] Shaken Broken Acceptable
[R] [134] 3/95me Regiment de Ligne 154/ 265 C- [sk] Shaken Broken Tired
[135] 94me Regt. Voltigeur Bn. 2/ 249 C [sk] Formed ( 1) Average Fresh
[136] 95me Regt. Voltigeur Bn. 16/ 234 C [sk] Formed Good Fresh
Brigade Louis Carriere, Baron Beaumont - Attack
[114] General de Brigade Louis Carriere, Baron Beaumont - Active C+ [400 paces]
[137] 1/3me Artillerie a Cheval 0/ 144 [ 6] B- Formed Ex'lent Fresh
[138] 2me Regiment de Hussards A 0/ 228 C [sk] Formed Good Fresh
[139] 2me Regiment de Hussards B 0/ 243 C Formed Good Fresh
[140] 5me Regt. Chasseur a Cheval A 0/ 259 C Formed Good Fresh
[141] 5me Regt. Chasseur a Cheval B 0/ 255 C [sk] Formed Good Fresh
Division Antoine Christophe Merlin - Attack
[123] General de Brigade Antoine Christophe Merlin - Active C- [725 paces]
Brigade Jean Baptiste Alexandre Strolz - Attack
[124] Colonel Jean Baptiste Alexandre Strolz - Active D+ [300 paces]
[178] 10me Regt. Chasseur a Cheval 0/ 327 C [sk] Formed Good Fresh
[179] 26me Regt. Chasseur a Cheval 0/ 216 C [sk] Formed Good Fresh
Division Francois-Leon Ormancey - Attack
[125] Colonel Francois-Leon Ormancey - Active C- [650 paces]
[180] 1st Vistula Legion Lancers A 8/ 216 C [sk] Formed ( 5) Good Tiring
[181] 1st Vistula Legion Lancers B 0/ 206 C [sk] Formed Good Fresh
[182] Westplalian Light Horse 0/ 210 C [sk] Formed Good Fresh
Strengths:
losses/active
1315/ 10131 Bayonets
8/ 2160 Sabres
3/ 1092 Artillerists
0/ 44 Cannon
1326/ 13383 Total of all arms
7 Standards present
 |
| French Stand Out Performers - Vistula Lancer Regiment |
Like General Ruffin's continual attacks on the Cerro de Medellin forced back General Hill's troops successfully unhinging the British defence.
 |
| French Stand Out Performers - General Francois Ruffin's Division |
Talavera Dawn Attack - Final Result
Minor victory for the French Army
As of Game Turn: 10
The British Army has suffered losses of:
[11%] 1341 men of all arms
incl.[ 6%] 687 prisoners of all arms
[12%] 1008 bayonets
[0%] 21 sabres
[70%] 312 artillerists
12 cannon[s] lost
Honours: [520] 2nd KGL Line Battalion
The French Army has suffered losses of:
[12%] 1891 men of all arms
incl.[1%] 195 prisoners of all arms
[16%] 1880 bayonets
[0%] 8 sabres
[0%] 3 artillerists
Honours: [129] 1/94me Regiment de Ligne
Losses include 1 General[s]:
[107] Pierre Barrois - Severely wounded
That's all the testing done for the Dawn Attack and I now know what the final scenario should look like. It's now on to an additional scenario I want to create for C&G which focusses on the German Division's attack on the Pajar de Vergara, which I will play through as I complete the forces for the full afternoon attack.
Bravo! Excellent AAR and photos of your fabulous troops. I wonder what might have happened if the French had shook a few battalions out into line rather than relying on assault columns?
ReplyDeleteThank you, glad you enjoyed the post.
DeleteFrom experience the French struggle to out shoot the British in a line on line engagement, due to various factors including, third ranks, often smaller battalions, better British fire discipline, aiming and all that stuff. We have played with l'ordre mix, most notably in our Corunna game and frankly I can see why even Boney didn't bother with it. As at Maida in 1806 the British will quite happily meet French lines and shoot them up.
The best tactic from a French perspective is to do what their book of tactics tells them to and try to overwhelm the skirmish screen on a part of the British line and get at their infantry before the columns arrive. If you can get some artillery and a bit of light cavalry up as well you can really upset things as Will demonstrated.
Talavera is interesting because it is not ground where Wellesley would have typically chosen to defend upon, ie most of his line is not tucked away out of sight on a reverse slope, so there is more opportunity for the French to apply their standard MO than would normally be the case, ie loads of artillery fire and skirmish attacks to soften up the line pre the columns moving in and is a stern test for the British commander. Even Wellesley ended up losing 5,000 men he could ill afford to on this ground and he still managed to pull of a win, so the wargamer has to go some to match that performance.
The full game will hopefully produce a similar test of technique.
Great looking battle JJ, finally reaping the reward's for the hours of painting. Three of our club members did the full afternoon battle in 15mm using the Age of Eagles ruleset round one member's house. The summary and pics for that are on the club facebook page (New Buckenham Historical Wargamers)
ReplyDeleteHi Tony, thanks mate. Yeah the collection is getting to the point where some other big games start to figure in the calculation, with only having to add the odd few extra units that tell you that this a particular campaign. I think I saw your posting about the Talavera game when the chaps did it and looked a very nice game. It certainly is an interesting battle to play.
DeleteThat was probably our 28mm game using Black Powder, the 15mm game was only last week.
DeleteWhat can be said besides "Spectacular!" Truly outstanding sight and BatRep.
ReplyDeleteThis is a replay I will return to read again. Very well done!
Hi Jon, that's very kind. I'm glad you enjoyed the read. Thank you
DeleteJJ
What can I say ? We wuz robbed !
ReplyDeleteSeriously though, it was a good game played in the right spirit. The angle of our line in square 13 of the map was always going to be the point of maximum effort and so it proved. The visibility really caused us some problems. We were not able to bring our firepower to bear untill the French were within 200 yards and so there was much more hand to hand fighting than I would have wished. That said, the French pressed their advantage aggressively and the fighting was fierce.
Also that collar was really starting to chafe by days end !
"Old Nosey" Vince
Cheers Vince.
DeleteI think your assessment is pretty spot on and the visibility badly restricted your opportunity to soften up those French columns on the way in that made it harder and more costly to stop them grinding forward. An attritional battle is the last thing the British wanted to get into, and at the end of our game it is worth remembering that there was no effective British reserve, whilst Victor still had another division of twelve fresh battalions just across the valley.
I have to say I think you should wear red more often, it matches your eyes!
JJ
Many thanks Jonathan for taking so much trouble to produce a fine battle report and the photos bring it all to life . A really good read with fantastic attention to detail .
ReplyDeleteRegards Gavin .
Thanks Gavin, I'm glad you enjoyed the read as I really want to entertain with these game reports and try and give a clear idea of what the heck was going on. It's said a picture is worth a thousand words, so God bless digital photography!
DeleteCheers
JJ
Wow! A superbly planned and presented game thoughtfully written up - Outstanding in all respects!
ReplyDeleteHey thanks Sparker, much appreciated, glad you enjoyed the read.
DeleteCheers
JJ
Absolutely awesome! That's how a wargame should look!
ReplyDeleteHi Rodger, thank you. Yeah I know what you mean. It's what I think of when I hear the phrase "old school". Wait till we get the whole thing up and running. I'm not sure if the table legs will be able to take the weight!
DeleteCheers
JJ
A wonderfully balanced account that includes plenty of exciting detail without losing the pace of events. What all wargames and wargames should aspire too!
ReplyDeleteHi Rupert, thank you. This game produced great drama with swings of fortune throughout, and the amusement, particularly for me, was to see the players struggling to deal with and manage the events as they popped up. When you get a game like that it makes it a lot of fun to write up. I'm glad you enjoyed the read.
DeleteCheers
JJ
Very very impressive report! Love the team presentation, the splendid armies...A fabulous AAR!
ReplyDeleteThanks Phil, much appreciated, It was a good warm up for the full game.
DeleteCheers
JJ
Absolutely brilliant Jonathan what a cracking battle!
ReplyDeleteThanks Paul. It really was and the swings of fortune made it quite difficult to call throughout the day, that made it totally enthralling to see who could finally get a hold on it.
DeleteWow, excellent job. It's been especially fun having followed along as you've worked your way up to this point and therefore I can really appreciate the amount of work you've put into this whole project. Always an inspiration.
ReplyDeleteCheers Adam, well there is still a few more battalions and cavalry regiments to go to get the full line up ready, but as a warm up game for the big one this was a good test and the system stood up to the test perfectly.
DeleteThat is just gorgeous. I really enjoy your battle reports!
ReplyDeleteHi Leon, thank you and really pleased you enjoyed the read.
DeleteJJ
WHAT A GREAT GAME MUST HAVE BEEN... A WONDERFUL BATTLE REPORT- ALSO VERY CLOSE TO HISTORICAL BATTLE !
ReplyDeleteThank you. We all enjoyed the day very much and the game was hard to call right to the end which always make things more interesting.
Delete