 |
| "Let the men cross" - Wine barges pictured in the 2014 recreation of the Second Battle of Oporto |
We first recreated the Second Battle of Oporto way back in 2014 when I put together a model of the famous gorge created by the River Douro, flowing past the Bishops Seminary high above the river on the outskirts of the city.
Not everybody wants to go to that extent to re-fight this famous assault crossing and so in this recreation of it for our Over the Hills play-test we had to redesign the table without over compromising on the ground scale and layout of the original game.
In addition, we wanted to create a scenario that captured the historical narrative with the chance for a variation to that narrative to play out, whilst also testing the result against the battle itself.
This scenario proved the most challenging of all those played so far and, in our determination to work it through, required two play-tests to balance the various components which sees the French having to change posture from an all out attack to defence and withdrawal in the same game. This alongside variable arriving British columns, restricted order options and off table units able to fire onto the table
Game I
 |
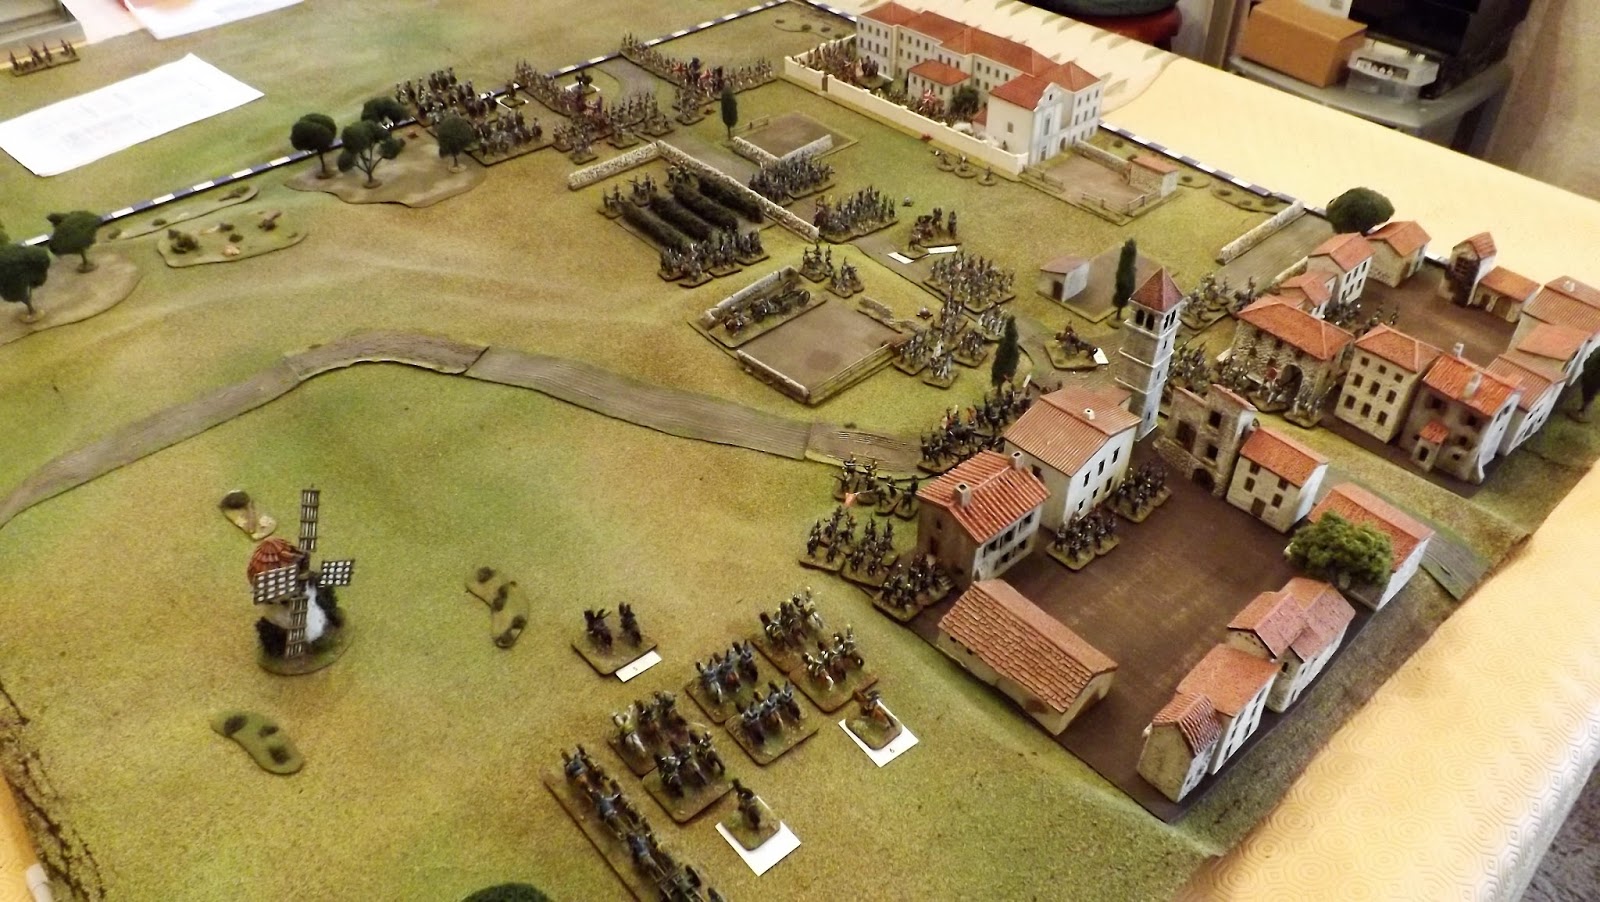
| Oporto outskirts with the Bishops seminary. The edge of table right is where the cliffs start above the River Douro |
So the table presented here is what you might call "Oporto Light" with the key features readily identifiable as with the on and off table forces, but with the boundary to the table focusing the action around the seminary and the town outskirts perched on the hills on the road north to the Spanish border.
 |
| Looking from the foothills above the town with the road leading north to the Spanish border, left centre |
 |
| The road leading along the Douro from the ferry crossing at Barca d'Avintas, with Murray's infantry and Cotton's cavalry brigades set up to enter later in the game |
These few pictures are from the first run through of the game that revealed immediate changes to the draft set up, but also that the concept and framework provided enough scope to build upon.
 |
| General Foy's brigade set up on the outskirts of the city close to the seminary |
 |
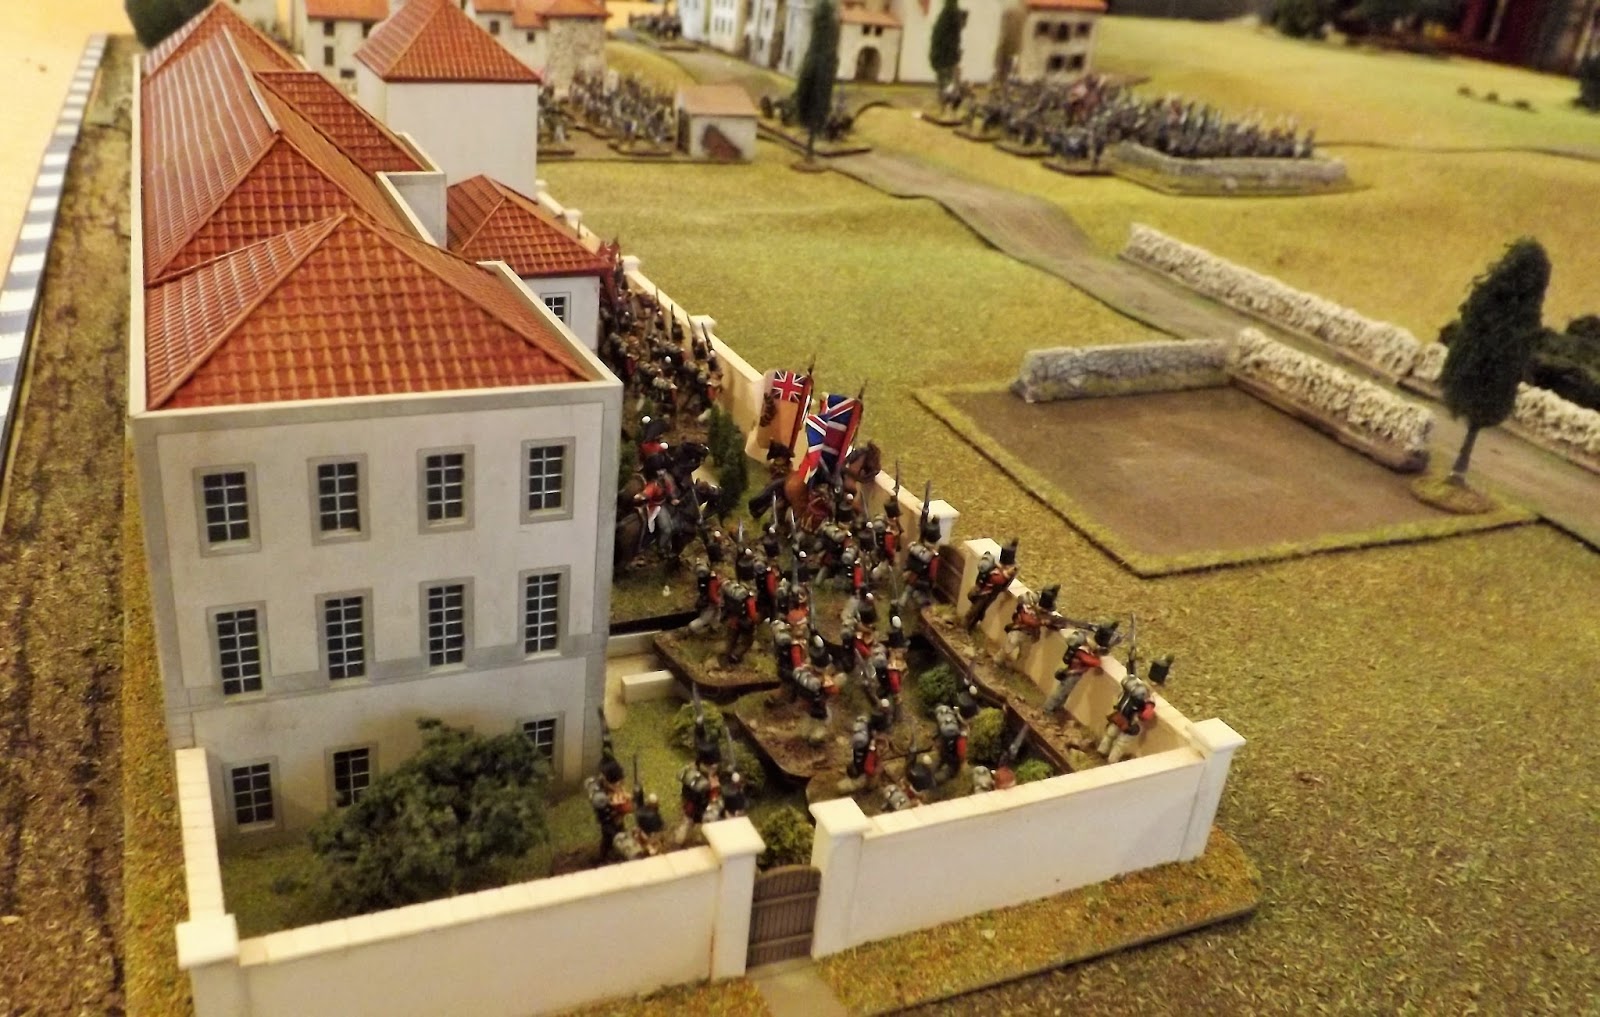
| The 3rd Buffs and 48th Foot occupy the seminary, loopholing walls and erecting fire-steps |
The first challenge was developing the rules around the seminary and the fight between Foy and Paget's garrison which the historical accounts talk of it being carried out with great elan by the French troops and seeing General Paget lose an arm in the fighting.
 |
| The two battalions of the 70me Ligne, part of Foy's brigade |
".... the drums beat to arms, shouts arose, the citizens, vehemently gesticulating, made signals from their houses, and confused masses of troops rushing out from the higher streets threw forward swarms of skirmishers, and came furiously down on the Seminary."
Lt Gen. Sir William Napier, English Battles and Sieges in the Peninsula
 |
| 15me Ligne occupying the residential and waterfront areas of the city |
Any wargamer playing the French and seeing massed redcoats lined up behind stout walls with a fire-step has nightmares of Hougoumont and other such like encounters flashing through their mind and thoughts of why should I attack that thing when I know we will be withdrawing soon.
Off course poor old General Foy didn't have the benefit of hindsight and at this stage of the Napoleonic Wars, French infantry had a pretty high opinion of themselves and their capabilities, and rightly so after their string of victories against equally well emplaced capable enemies.
 |
| Across the road the 4me Legere garrison the northern outskirts of the city |
To recreate Foy's estimation of the situation and his decision to press an immediate attack to eject the redcoats from the seminary we have him on 'attack' orders from the start with only Marshal Soult, on his arrival on table, able to countermand his decision and start the process of getting his army clear of the threatened encirclement of his diminished force.
 |
| The French brigades await the order to withdraw unaware of the threat developing in the seminary |
 |
| The 3rd (Buffs) and 48th Foot occupy the seminary, building a fire-step along the boundary wall |
The battle for the seminary was hard fought and General Paget commanding the brigade ensconced behind its perimeter lost an arm during the combat that would see him out of the war until his return in 1812 only to be captured by French cavalry whilst conducting a forward patrol. A very capable general, he gets additional command benefits in this game but due to his nature of being in the front is liable to be severely wounded and needing to be replaced by General Hill.
In the first run through the fighting was also very heavy with several rounds of French artillery fire hitting the defences, degrading them and together with the hand to hand fighting leading to several fires breaking out plus Paget's wounding in the process. All this before the 66th Foot had been able to land and bring the brigade up to full strength behind the walls.
 |
| The alarm is raised as General Foy orders the 17me Legere and artillery to attack the seminary garrison |
 |
| As the first French troops go into action messages are sent to Marshal Soult to alert the rest of the army |
As General Foy's infantry fell back from it's second attack Murray's and Cotton's brigades made their appearance on the eastern table edge and still Marshal Soult had failed to respond to General Foy's aide, desperately trying to convince the general that the observed redcoats were not the Swiss bathing in the Douro.
 |
| General Foy now able to bring the 70me Ligne into the attack launches an all out assault causing fires to break out |
 |
| The attack is made with great elan but also heavy casualties |
As General Foy made preparations to receive Murray's and Cotton's troops whilst warily observing the troops in the Seminary for any sign of offensive activity from them, Soult finally reacted with orders issued to the other brigades to begin the withdrawal.
 |
| As the fighting grows heavier still, General Paget is seen to fall with a severe wound to his arm |
 |
| And still the French keep coming |
 |
| With the battle for the seminary still raging, Soult orders an evacuation with Franceschi's cavalry arriving north of the city to cover the road out |
As both armies started to amass on either side of the table and the French busied themselves with a rapid change of posture, we stopped the game due to time constraints but decided to replay the scenario to a conclusion to determine how the second half of this game would look whilst replaying the opening with all the modifications written up from the first test.
 |
| The British threat develops with the arrival of Cotton's and Murray's brigades, having crossed the river lower down stream |
 |
| Marshal Soult arrives to order Foy to break off the attack and to cover the retreat |
Game II
In our second play-test Steve and I reversed our roles and I took command of the French and as in the first run through, threw my regiments at the seminary although not as successfully as Steve, failing to start fires or wound their illustrious commander and then encountered the 'perfect storm' of events with Murray defying history and turning up as early as he could with Cotton's cavalry.
If that wasn't bad enough Soult was dragging his feet responding to my ADC and so we ended up with perhaps the worst position for the French to be in, other than Soult taking another turn to react which as you will see would have made things even more of a challenge.
 |
| The French forces under Foy assault the seminary wall, with casualties mounting on both sides |
 |
| This time the early approach of Murray's KGL brigade prompts a relocating of the artillery and voltigeurs to cover the flank of the French attack |
 |
| Foy's men are repulsed from the wall and come under British artillery fire from across the Douro |
As it was the sight of all that KGL infantry and British light cavalry forced Foy's brigade to fight on two fronts with the voltigeur battalion and foot guns repositioned to challenge the new arrivals whilst my infantry rallied off the effects of the combat they had had on the walls of the seminary.
 |
| General Murray's brigade arrives as Foy's men fall back from their second assault |
 |
| Marshall Soult arrives to order Foy to break off as the retreat from the city commences |
As soon as Soult arrived on table he joined Foy and gave him his new orders to withdraw and act as rearguard to Reynaud's brigade whilst Franceschi's cavalry division was ordered to hold the road exit open on the northern heights.
 |
| Now with Cotton joining Murray and the brigade in the seminary at full strength, the French are under pressure to get clear of the city |
At this stage, the game was perfectly poised, as General Paget prepared to leave the confines of his fortress and direct the British offensive, whilst Soult and his general officers started to sort out the congestion of traffic starting to fill the road north whilst directing the units detailed to defend the retreat route.
 |
| As the waterfront area is relinquished by the French the Portuguese citizens set off in boats to bring yet more British troops across |
There is something really satisfying about this type of game, quite different from the usual attack and defend battles we have all played, and the mental challenge of organising a retreat in the face of a large and pressing enemy force really gets the adrenalin going, as both sides strive to get an advantage.
 |
| The road north starts to fill with French troops |
 |
| General Foy has the unenviable task of now acting as rearguard as his troops revert from the offence to the defence |
General Foy's men had taken a terrible battering not only from the seminary battle but also by a gradual accumulation of hits from British artillery units from across the Douro.
 |
| The retreat well underway as French officers try to maintain discipline and order |
Their selection as rearguard was almost by default as by any merit for the role as they were where they were needed and, with the help from the French cavalry who managed to prevent any disasters from rapid British cavalry attacks, they by forming squares amid the cavalry along the road, prevented Cotton's men from closing off the escape route.
However the British artillery kept on plugging away at my tail end units and it only took one to tip into a rout to cause me to lose two more of my rearguard battalions as they tipped over from wavering into rout themselves reacting badly to the sight of their comrades in panic.
 |
| Murray and Cotton contest the road with Franceschi's cavalry forcing the French infantry and guns to divert behind them in their effort to get clear |
By this stage with just a couple of turns to get the required number of units off the table, Foy's brigade was broken but that only caused the remaining good order units to carry on retreating alongside the rest of the army.
 |
| Foy's men form square alongside the cavalry to protect the men marching to their rear |
 |
| The pressure becomes to great for some of Foy's hard pressed battalions and they break and rout towards the north threatening to panic other French troops |
As Murray's infantry caught up with Foy's men closely followed by the seminary garrison the French position was looking more and more precarious, however the infantry were still managing to inflict casualties on the pursuers getting them close to the point where they would prevent an immediate British pursuit thus improving French chances of getting a positive result.
 |
| Cotton's cavalry charge in to the mass of French troops to be met and pushed back by French cavalry operating among the squares |
 |
| The rear of the French column can see salvation in sight as they near the northern edge and with fatigue growing in British ranks |
 |
| Soult and his generals oversee the withdrawal of the rearguard as the battle draws to a close |
With Reynaud's brigade off the table bar one battalion and the artillery battery, Cotton's dragoons made a last ditch charge to close the road and break the French army morale. In response the French 1me Hussars and 8me Dragoons met the attack and succeeded in driving the enemy back and taking the British over their fatigue threshold but also seeing the French army teetering on a rout as the last turn was completed.
 |
| The French rear of their column has got clear of Pagets brigade from the seminary and marches north |
The pictures above and below shows the positions of the two armies at the close with the French rearguard contesting the road north but with the bulk of French forces now marching away from the city and the battles ahead, avoiding Portuguese guerrillas and Beresford's Anglo-Portuguese column to be followed in turn by the rest of Wellesley's army.
 |
| The French have held the line of the road as the battle closes |
When I say the French were teetering on a rout, the card below shows just how close, with one fatigue point remaining. That said Reynaud's brigade, force card 2, escaped practically unscathed and the French cavalry were still in good fettle to protect the rear.
 |
| The numbers tell the story with Soult's hard pressed army just one point away from breaking |
 |
| Brigade 3 is General Foy's command broken and withdrawing at the rear of the army, following their all out attack on the seminary earlier |
The British cards reveal a force still full of fight if a little battered with the Seminary brigade on just 7 fatigue points remaining and the army morale, force card 1, reduced by over 25% by the action.
 |
| The British were in better shape, but having lost over 25% of their army break points were deemed to have halted to replenish in time for a pursuit the following day. |
So that concludes the second of these four remaining scenario play-tests and a game both Steve and I thoroughly enjoyed by taking it right to the end as neither of us could call it until it was over.
Next up the rearguard action that preceded the Second Battle of Oporto as Wellesley's main army try to encircle the French troops south of Oporto as they fall back before his advance.


Brilliant as usual
ReplyDeleteThanks Ady, really pleased with how this one turned out.
DeleteCheers
JJ
Great battle report
ReplyDeleteThanks Mark, much appreciated.
DeleteJJ
Excellent looking game!
ReplyDeleteThank you. Like Talavera, Oporto was a game I always wanted to play and the small table version turned out a good compromise.
DeleteThanks JJ, I enjoyed that very much.
ReplyDeleteJames (olicana)
Thanks James, appreciate your comment.
DeleteJJ
Very nice reports!
ReplyDeleteThank you, glad you enjoyed the read
DeleteJJ
lovely looking battle
ReplyDeleteHi John, thank you.
DeleteWell as you know I really enjoy the aesthetics of our great hobby otherwise we would be board gamers.
Cheers
JJ
Great stuff. Has it really been since 2014? I remember reading the original post on this battle using C&GII. Wow time flew by! Sure doesn't feel that long ago.
ReplyDeleteHi Adam,
DeleteCheers mate.
I know, shocking isn't it. I was looking back at the Miniature Wargames articles I put together for Henry Hyde. The terrain is all safely packed away so it was nice to get my Seminary out again made for me by James at Oshiro Model Terrain.
You'd better start playing all those games you planned before it's too late.
JJ
Well up to the usual standards Jonathan, many thanks again.
ReplyDeleteCheers Tony that's very kind.
DeleteJJ
Outstanding game! I enjoyed the write-up. The troops look great, of course, but I am also very impressed by your villages.
ReplyDeleteThanks Scott. Well I always think of the figures as the actors and the table and scenery as the stage. None of the games illustrated are beyond the capabilities of most wargamers should they choose to replicate these games, simply using a mat and styrene formers for hills together with, in the main, buildings from terrain suppliers.
DeleteI have put up tutorials to illustrate how to paint the figures and terrain to encourage everyone to have a go and to reiterate that with a little effort anyone can turn out an easy on the eye game.
Cheers
JJ