

Summer has officially arrived here in 'Blighty', though you might not have guessed it given the rather disappointing weather consisting of a continuation of the April spring showers mixed in with temperatures that don't exactly encourage the shorts and T-shirts.
This summer, I and longstanding wargaming pals made the pilgrimage to Chez-Chas in deepest darkest North Devon to play yet another major clash of arms that are the headlines of historical human conflict, that has over the years been occasionally interspersed with the odd bit of classical Tolkienian fantasy, as well as to enjoy some convivial relaxed banter and the occasional beverage to wet the whistle.

However in this, the eightieth anniversary year of D-Day, it would have been remiss of us not to celebrate the achievements of 'The Greatest Generation' by turning the pages back to the dark days of 1944 when hope was beginning to rise that the nightmare of an Axis victory was fading beyond sight and that the Blue Birds would indeed fly over the white cliffs of Dover once again at the dawn of a new world free from tyranny.
 |
| Original plan for the Perch Operation in June 1944 before it has been changed - Map by MattMoissa Note our game battle area just north of Tilly-sur-Seulles. |
The leading elements of the Panzer-Lehr Division arrived during the night of 9 June at Tilly-sur-Seulles, having lost up to 200 vehicles to aerial attacks during its 90 mi (140 km) drive from Chartres, having been diverted from facing the British I Corps north of Caen due to the success of the 50th Northumbrian Division. Parts of the 12th SS-Panzer Division, the 21st Panzer Division and the remains of the 716th Static Infantry Division were moved to Caen, facing I Corps.
 |
| Our battle area in detail with the River Seulles to the west table edge |
Overview
Our game was designed to represent the advance on Villers-Bocage. In particular points 102 and 103.
 |
| View of the battle area from the south east on the German side of the table |
Game Set Up
The table will be 12' x 5 '. Allies will set up on North table edge (12' length). Germans South table edge.
Victory Conditions
Allies are attackers.
Game length, until one side orders a withdraw (4 FUBAR) for each table.
Victor is the side that collects most victory points.
 |
| A similar view from the German side of the table but from the south west beyond the River Seulles and the village of Chouain held by remnants of the 352nd Division |
Allies will consist of four players.
Player 1, C-in-C, (Chas), in overall command. Dice for orders and allocates orders.
Also responsible for allocating reinforcement and artillery support.
Player 2, (Andy), Battalion Commander, DLI Left side (East).
Player 3, (John), Battalion Commander, Dorsets Right side (West).
Player 4, (JJ), Reconnaissance and Tank Commander, 4/7 Dragoon Guards & 21st Lancers.


British Forces

8th Durham Light Infantry with 61st Reconnaissance and 21st Lancers. (West Table)

1st Dorset Regiment with 4/7 Dragoon Guards (East Table)
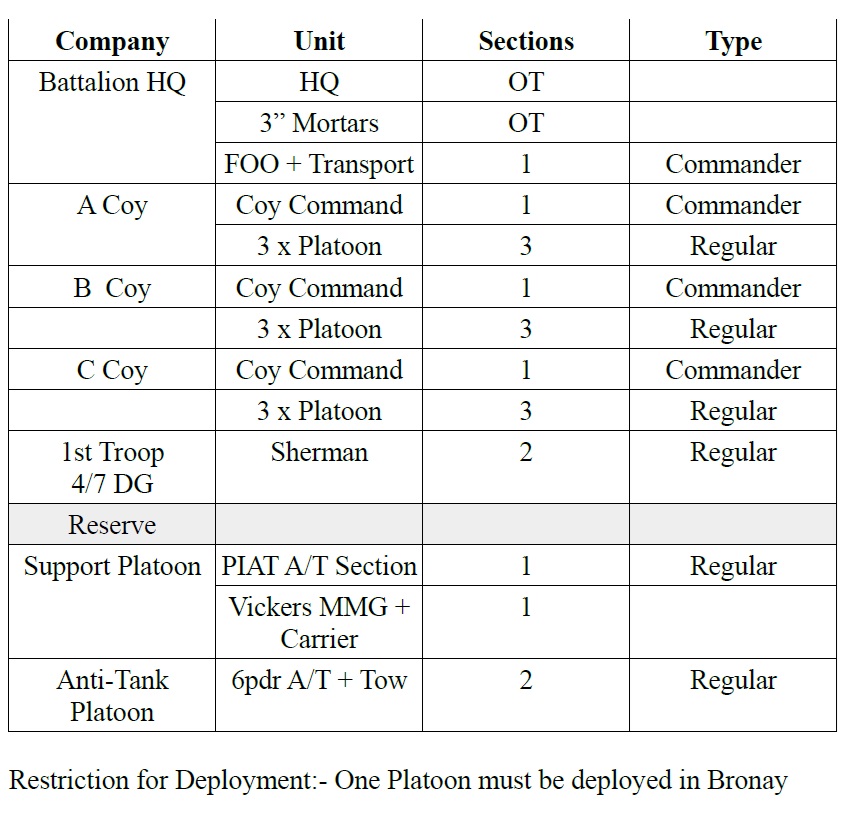
Divisional Reserves (2 HQ Orders)

Germans will consist of three players
Player 1, C-in- C, (Vince), in overall command. Dice for orders and allocates orders.
Also responsible for allocating reinforcement and artillery support. In addition will control Tank force.
Player 2, (Steve M.), Battalion Commander, Panzer Lehr and 352nd Inf, Division, Left side (West).
Player 3, (Clive), Battalion Commander 12th SS Hitlerjugend Panzer Division, Right side (East).

German Force

Panzer Lehr (II/902 Panzer Grenadiers), Elements Kampfgruppe
Meyer (352nd Division). (West Table)


Divisional Reserves (2 HQ Orders)

 |
| With the briefing complete, time to look at the terrain before gathering into O-Group meetings to discuss and agree the plans of attack and defence. |
So our game set up is as you see above and we gave ourselves a full day to play, with a quick pre-game briefing about the objectives and game house-keeping before we separated off into our respective teams to discuss the plan, with me joining Andy and John in the British O-Group and my role to provide armoured support to effectively shoot the infantry I was supporting onto their respective targets.
 |
| The British plan drawn up with first phase line and objectives together with battalion and company boundaries. |
As the map above shows we sorted out the respective battalion boundaries and the first phase line to be achieved and a plan to push forward a strong line of forward patrols including recce groups for the 21st Lancers with their supporting Bren carrier teams and Daimler and Humber armoured cars to add a bit of stiffening out on the right flank beyond the River Seulles, which Andy leading the Durham Light Infantry intended to use to refuse the right flank and focus on taking Hill 103.
 |
| First things first as the various company headquarters units get set up prior to the placement of forward patrols. |
Only too well aware of the vulnerability of the Sherman to just about any German anti-tank capability I made it quite clear to my infantry colonels that my 'tankies' would not be expected to press on towards cover without it being adequately controlled by forward patrols, and that such cover once controlled would be vital for my armour to take up a secure position from which to bring their fire to bear on enemy points of resistance as they were encountered.
 |
| With company HQ's positioned the two sides start to mark out their forward line of advance as the first patrol groups are pushed forward |
So the methodical game that O-Group produces began as the British and German screens met in the wake of the British pre-assault artillery barrage that left the German 12SS Panzergrenadier company of the German right hesitant in the first turn and the German force less one platoon to use in the upcoming battle.
 |
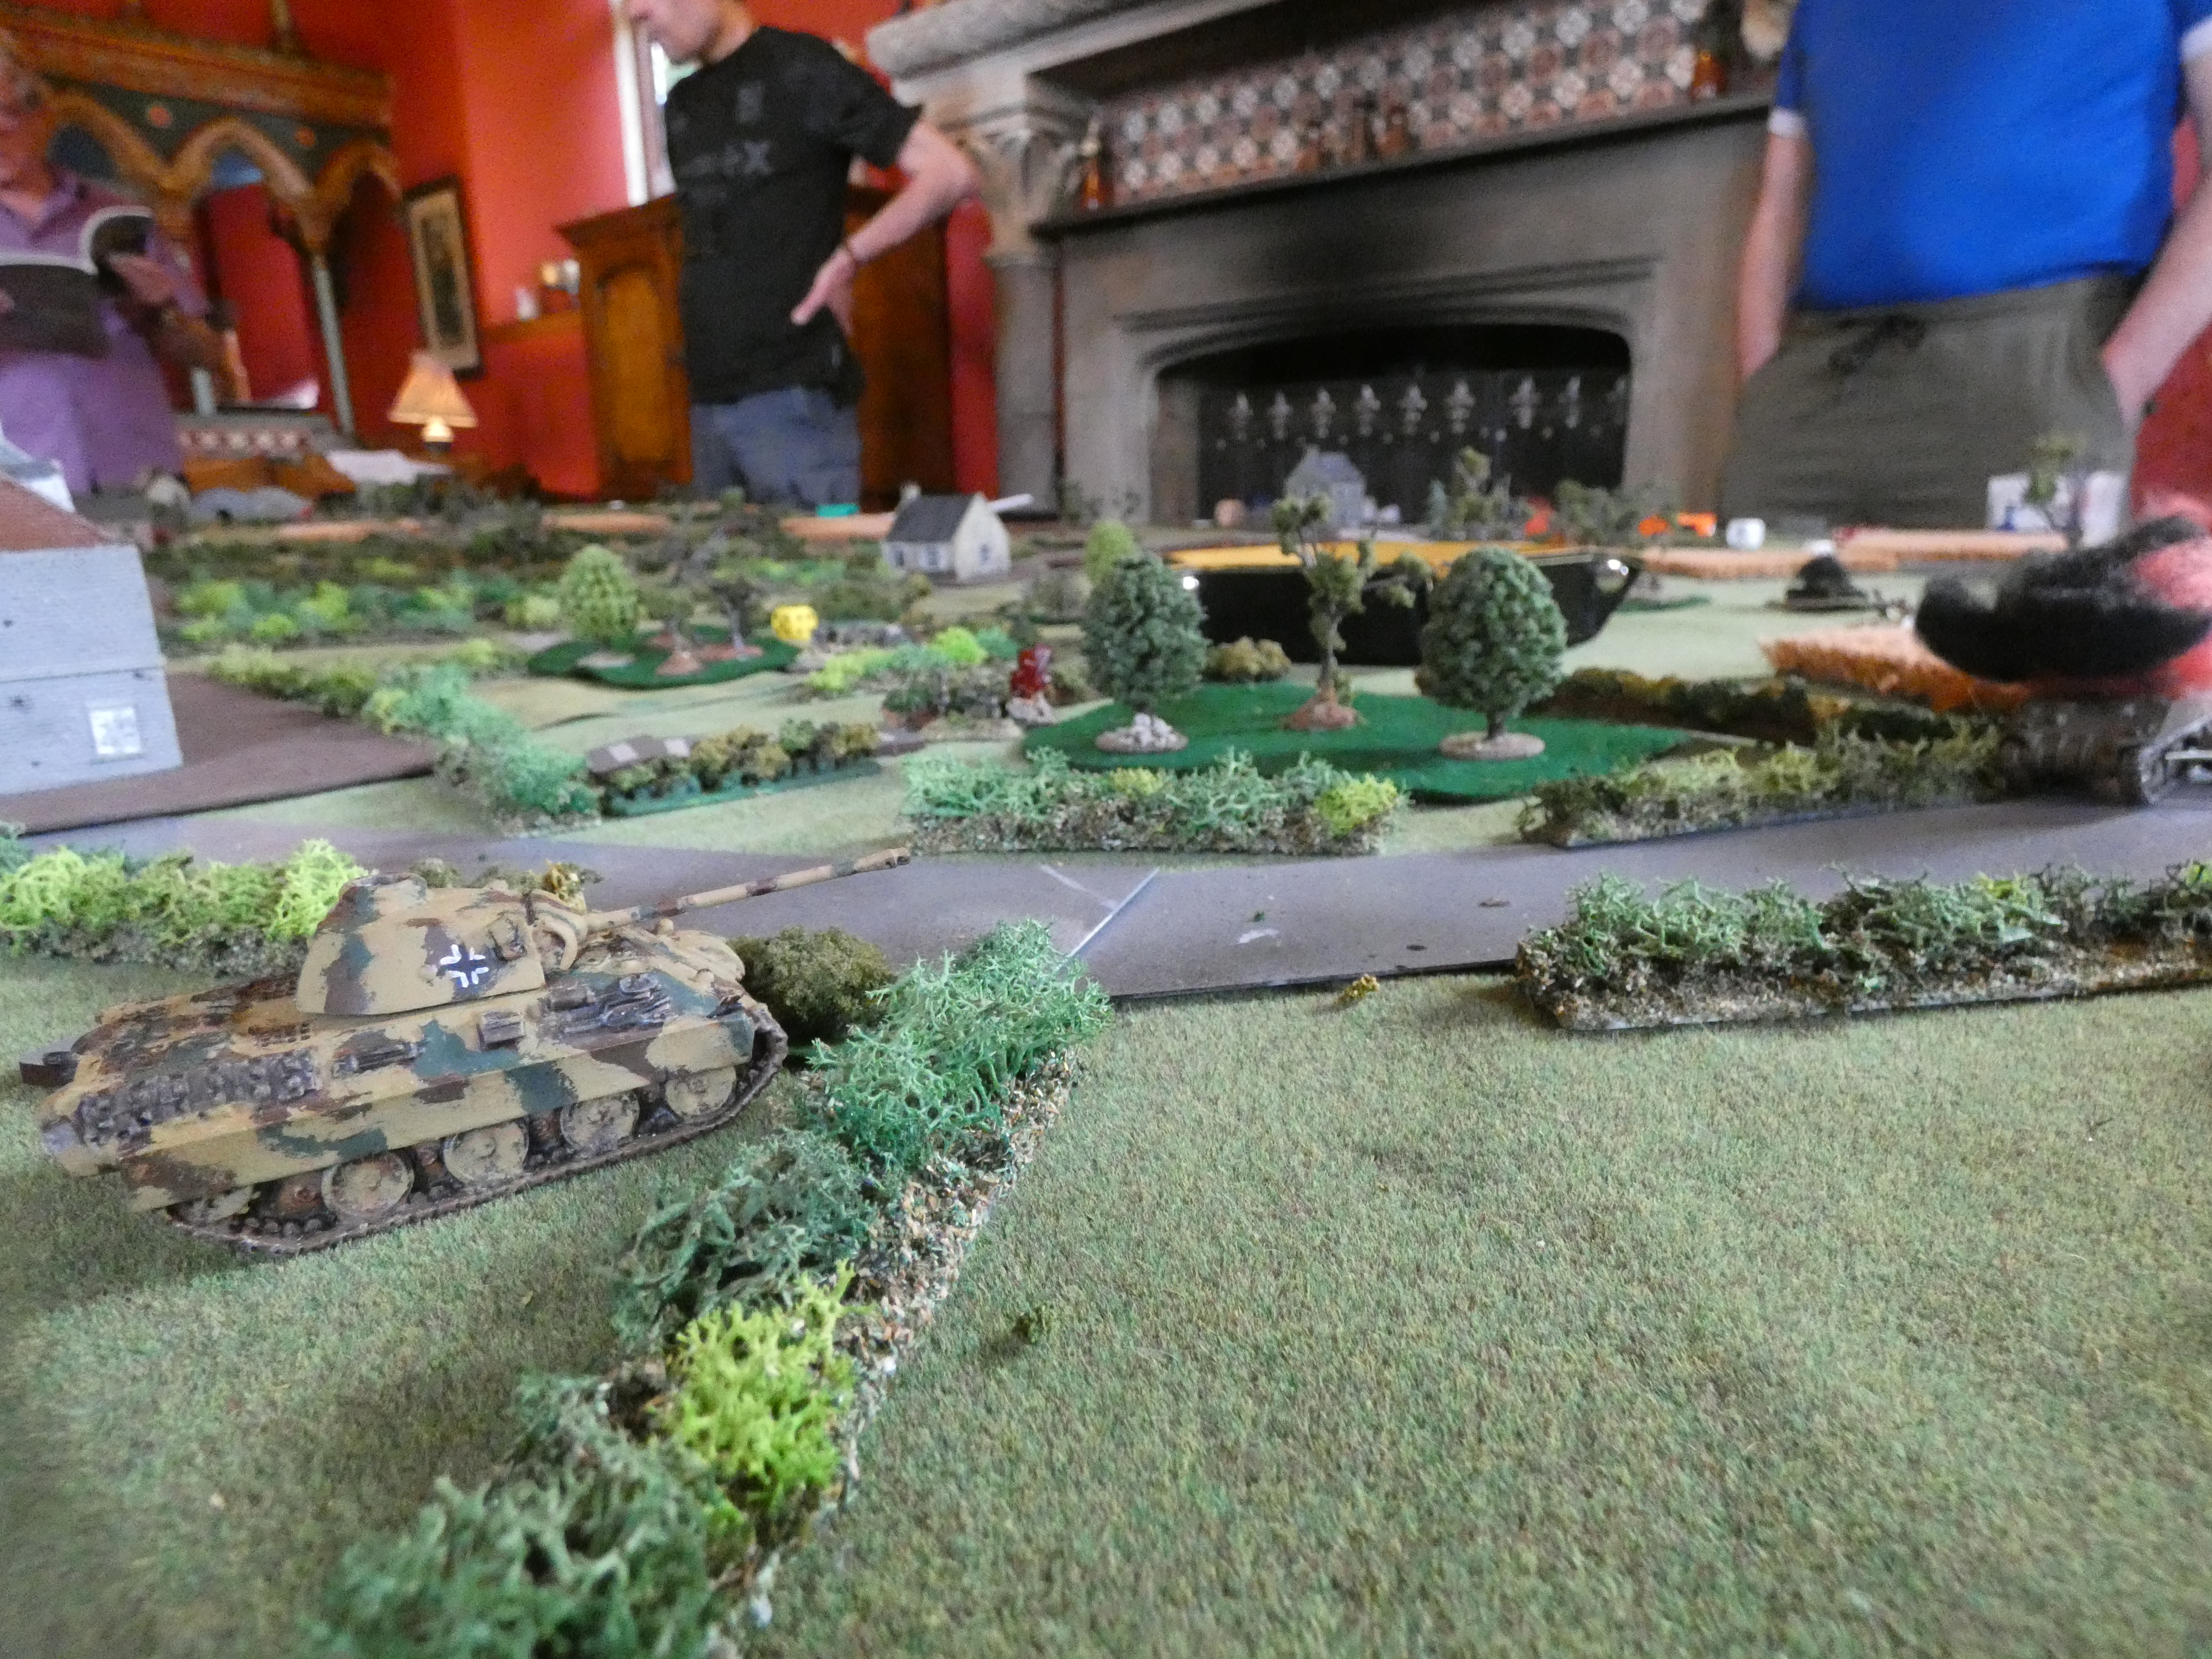
| Sherman tanks of the 4/7 Dragoon Guards like debutants at their coming out ball, cautiously advance onto the table in the wake of the infantry and recce patrol groups. |
Slowly but surely the British forward patrols supported by their closest infantry and eventually my tanks and armoured cars pushed the German forward line back and the first strongpoints containing their infantry and heavy weapons began to reveal themselves, all this against a back drop of continuous German sniper attacks that attempted to stymie the British advance on key terrain features.
 |
| German patrols move out to meet their British counterparts providing potential jump off points for deploying main force units. |
The game O-Group produces is very evocative of the British infantry attacks recounted in the histories of the fighting in Normandy with the 'Tommies' leaning in to their creeping artillery barrage hoping to get onto their phase line objectives and take advantage of any German disruption, whilst the tanks hover in the background taking out tough resistance points and heavy machine guns; with both sides popping away with snipers and mortars, all against a bigger backdrop of getting the initiative and maintaining it particularly at those critical moments when units are in position to make a final assault but needing to get the jump off ahead of any enemy pre-emptive action to stop it, usually in the next turn of play.
 |
| With British briefing making it clear that any ground beyond six inches onto the table had to be assumed to be hostile the approach towards features such as woods was made carefully, with the tanks here waiting for the trees ahead to be scouted out for potential ambush groups. |
Little moments of drama highlighted the play as on the German right flank they revealed their teeth against the British supporting tanks taking out two troops of Shermans in rapid succession as the attack went in against Le Hamel and Panzerschreck and PaK 40 fire left multiple burning hulks around the hamlet, but seeing the Dorsets move into the buildings and mopping up the final pockets of resistance to use the village as a jump off point for the push on towards Christot.
 |
| As the first objectives were reached on the battalion phase lines, platoon sized groups started to deploy in preparation for the assault, however snipers and machineguns took their toll as the markers indicate. |
 |
| Suddenly as the British tanks pressed their support to shoot the infantry onto the first target, the village of Le Hamel, an SS Pak 40 team opened fire from the hedgerows out on the company boundary. |
In the centre, the age old lesson for the infantry of not getting close to tanks, which inevitably draw German artillery barrages was proven to good effect, as German 105mm howitzers pummelled a platoon of Durhams, a squadron of Dragoon Guards Shermans and a company command post too closely grouped around covering terrain, which left everyone somewhat chastened and much wiser in the need to spread out.
 |
| First blood to the Pak crew |
 |
| The 'tankies' were soon drawing fire as German forward units attempted to denude the 'Tommies' of their armoured support. |
 |
| The SS infantry in Le Hamel fought doggedly to resist the attack of the Dorsets, taking out another Dragoon Guard tank with a Panzerschreck deployed in the hamlet ahead. |
Whilst on the British right flank the Sherman tank showed what an excellent gun it had in the short 75mm for dealing with German infantry as a similar squadron closed in on two platoons of 352nd infantry supported by HMG's lining the River Seulle attempting to flank fire on the Durhams assaulting Hill 103, to find themselves quickly decimated by direct high explosive fire.
 |
| Meanwhile on the British extreme right, the 21st Lancers reconnaissance teams were battling with elements of the 352nd Infantry Division as they attempted to pin enemy units on that side of the river as the DLI advanced on Hill 103; and their Bren carriers and Daimler armoured cars were kept very busy laying down suppressive fire. |
By lunch time the British had just about got control of their first phase line leaving all to play for in the afternoon session as both sides pushed or resisted to secure a final victory.
 |
| The fighting was a grinding battle of attrition with British pressure forcing German infantry and their attached assets to deploy to try and push the attacks back, with no 'big cats' encountered as the British fed in their armour to shoot the infantry forward. |
The Durhams were now in a position to launch an attack on Hill 103 using their artillery support to wear down Panzer Lehr hunkered down on its crest and in the tree line below, whilst 352nd Infantry attempted to intervene with harassing fire from Chouain and Le Pont Roc bridging the River Seulles.
 |
| Panzer Lehr grenadiers were prompted to deploy into the tree line at the foot of Hill 103 as the Durhams with tank support closed in taking heavy German artillery fire on the approach. |
The Dorsets were also ready in their acquired jump of point at Le Hamel to push up the road to Cristot with supporting armour, but with much caution in the British camp that the Germans had still not had to call on any armour support themselves.
 |
| With the fall of Le Hamel in the afternoon, the British were able to use the village as a forward jump off point to press the attack up the road towards Christot, a key objective for the operation. British forward armour has just been dispatched by a Panther in ambush, forcing the deployment of yet more armoured reserves to counter it including a firefly troop. |
When the Panzers made their debut it was with some gusto as a 12th SS Panther platoon deployed in bocage to the right of Christot and quickly dispatched two troops of Dragoon Guard Shermans as the remains of the SS infantry fell back towards the edge of the town.
 |
| The forward units of British armour finally provoked an anticipated response as the reeling SS Panzer Grenadiers were covered in their withdrawal by a Panther that took appropriate action to stymie British advances |
It was at this point that I had to make my apologies and head home, but fear not, for I was later updated on the final stages of our big-battle.
The attack on Christot was somewhat stymied by the 12th SS Panther zug, but to compensate for this setback the Dorsets pushed on nearer the centre to liberate the village of Audrieu under cover of a smoke barrage, taking out an MMG and capturing prisoners.
 |
| A big cat, by no means the biggest, makes its presence felt, as the approaches to Christot is littered with burning Sherman tanks. |
On the British right flank the Durhams continued to batter Panzer Lehr taking out two platoons of grenadiers in quick succession and with a forward platoon of Durhams managing to liberate Le Haut d'Audrieu, taking punishment for their temerity but holding on and taking prisoners.

In the final analysis, despite dogged and determined German resistance and with the capture of the villages mentioned, together with accumulated FUBARs and prisoners taken, the British managed to secure enough victory points to claim overall victory, which is just as it should be for a D-Day eightieth anniversary game.
I really enjoyed playing O-Group, with this only the second time I have played them since taking part in a playtest reported about here on JJ's, and they have a large following in the Devon Wargames Group and it is easy to see why as Dave Brown has produced a solid set of rules that nicely capture the feel of a WWII land battle at this level of command.
However the best outcome from our game was the day we enjoyed regressing from the old-codgers quite a few of us are now, to the boys we once were, simply enjoying a day with the toys on the table and celebrating what's so good about our hobby, namely good fellowship, good times wrapped up in a respect for history and the endeavours of others less fortunate than us.
I have tried to capture what it's like to participate in a game like this and the relaxed style of play that characterises the way our games go, and present some video clips from our day to better illustrate the play we had using O-Group.
Thank you to Chas and Clive, who did the heavy lifting in pulling our game together and to them and Vince, Steve M, Andy and John for creating all the fun, and another game to add to our North Devon catalogue.
No comments:
Post a Comment