Tuesday, 18 August 2015

Piri Piri Chicken - The Taste of Portugal

One marinaded spatch-cock piri piri chicken
One of the really great aspects of having an interest in military history is getting to combine that interest with all the other aspects that go with it. Namely reading, writing, painting, travelling and getting to know the countries where all that history happened.

Part of that getting to know, is all about trying the food. When I'm touring in Normandy, its the Camembert and Calvados, when in Belgium its the Moules et Frites and when in Portugal its got to be Piri Piri Chicken, and I don't mean that stuff they serve in Nandos, I mean proper Piri Piri Chicken.

sealed on the griddle
Imagine my delight when following a post by Sara Seydak on her blog "My Neighbor Wellington" about Portuguese Sweets and deserts, she was kind enough to follow up on my comment and take a look at my favourite dish and the Portuguese way of preparing Piri Piri, together with its historical connection to Portugal.
http://myneighborwellington.blogspot.co.uk/2015/04/piri-piri.html

Then finished off in the oven
Once Sara's post was up I was equally up for getting hold of some authentic ground Portuguese piri piri and mixing it with my oil to have it sat in a cupboard for about six weeks exuding all its loveliness into said oil. I then took a crash course, courtesy of the BBC cooking web site, in spatch-cocking chickens and put two of them in the fridge overnight marinading in my piri piri oil

Looking good
After a spell on the griddle and principle cooking time in the oven I finished off both chickens on the barbecue to add that cooked out doors final touch.

On the BBQ for that outdoor flavour finish
We really enjoyed the flavour and after kick of the piri piri which brought back a lot of memories of previous Portuguese holidays. Great fun.
If you want to have a go at Piri Piri Chicken, check out Sara's post in the link above and have a read of her blog that covers some really interesting historical facts and information about the history of the Peninsular War from a Portuguese perspective.

Friday, 14 August 2015

3/96e Regiment de Ligne


1/96e Regiment de Ligne
2/96e Regiment de Ligne

Subject of the recent painting tutorial on French Line Infantry, the finished third battlion of the 96e Ligne completes my second regiment of French line infantry in Marshal Victor's I Corps at Talavera and completes the infantry units in General de Division Ruffin's 1e Division.


In my post on the other line regiment in Ruffin's division I covered off not only the action of the 24e Ligne but the other units including the 96e Ligne, so don't propose adding to what was covered in that previous post. Follow the link below to see the post on the 24e Ligne at Talavera

24e Regiment de Ligne at Talavera


The 96e Ligne was the most junior regiment in General de Division Riffin's 1e Division, alongside the 9e Legere and 24e Ligne.


The regiment avoided serious casualties in the night attack on the 27th by becoming lost on the approach march on the left flank of the attack and forcing it to abort and return to French lines.


However the regiment would not be so fortunate on the 28th July when during the dawn attack by the division it was the follow up reserve regiment and became the subject of an attack by the 5th and 7th KGL Line battalions as General Sherbrooke, realising the French troops opposite him were not supporting the attack by Ruffin's division, wheeled the German battalions back to allow them to pour their volley fire into the exposed flank of the 96e Ligne. This may have been the occasion when Colonel Cales was wounded for the second time during his service in Spain.


The casualties suffered by the 96e Ligne during the Talavera fighting bear testament to their being in the thick of it, suffering the most casualties in Ruffin's division, 606 men versus 567 for the 24e Ligne and 457 for the 9e Legere.

Of that total, 39 men including 3 officers were killed, and 567 men including 19 officers were wounded.

My 3/96e Ligne are composed of figures from AB and the third battalion fanion is from GMB Flags.


The 96e Ligne with Colonel Cales at their head completes my second regiment of French line infantry
Next up work moves on to the line regiments in General Lapisse's 2e Division starting with the most senior French line regiment at Talavera, the 8e Regiment de Ligne.

Wargame Bloggers Quarterly Vol 2, No 1


Wargame Bloggers Quarterly Vol 2 Issue 1

A great free bit of summer reading is ready for downloading

Monday, 10 August 2015

French Line Infantry Painting Tutorial Part Three - The Second Highlight

Warlord Games box art really captures the look of French line infantry pre 1812
French Line Infantry Painting Tutorial Part One

French Line Infantry Painting Tutorial Part Two

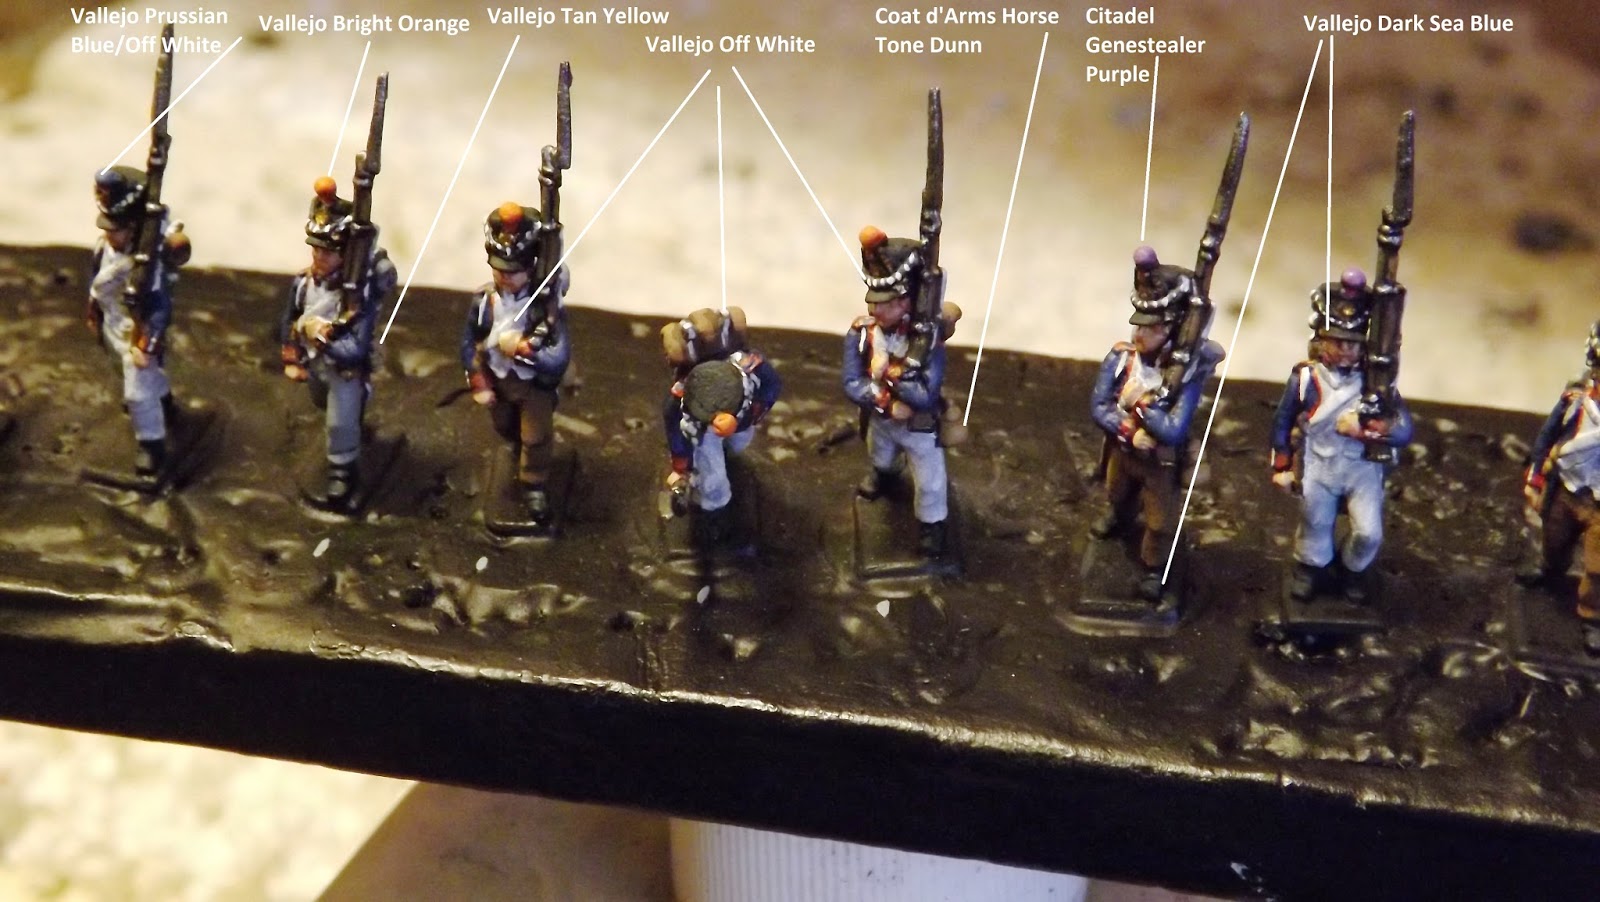
So finally we have reached stage three which is the best stage in my opinion, as this is where we get to really bring out all the detail and accentuate the character of the figures, helping to show off what the sculptor put into the originals.


The object again is not to cover the two previous shades, but simply to apply small amounts of the highlight to those areas that are nearest to the light. So for instance, note how the Prussian Blue/Off White mix is used along the outer most areas of the sleeves of the jackets in the figures above and by carefully brushing of the folds in the elbows we can show off the creases.

Likewise I have only applied the silver to the bayonets, not the rest of the musket metal work, because in the glint of the peninsula sun, the eye would be drawn to the bayonets of the infantry.


The tops of the shakos and the heels and soles of uplifted boots can be brought to life with a few careful lines of dark grey to draw the eye to these exposed areas of black leatherwork.


The application of the third colour choice can really make the figures pop and take them to another level with very little work. The white straps and lapels have a subtle shading by applying the full white to the tops of the belts and creases thus accentuating the darker shades around them.


With Napoleonic infantry the two things that can really make or break all your hard work are the Colours or flags and the basing. They are like frames to a picture and will repay you in heaps for applying attention to them

Note the shorter edges are cut into to record the outer cut markings, before cutting the longer edges

I really like the GMB range of flags and the French fanions are perfect additions to my second and third battalions.

One thing I have adopted as a habit when cutting these out is to cut in on the shorter end marks, before cutting fully along the long edge. This is because as soon as you cut the long edge, you will loose the guide marks for the short edges and by putting cuts on both sides it is easy to cut them completely, still following the original marks.

Once carefully folded, edge to edge it should look like the one below.


With a little application of PVA glue to the centre the cut flag is easily positioned on the staff and pressed firmly together. The next stage is to apply a suitable wave in the shape and allow it to dry.

One thing that will really let your flags down is not painting the edges. I am always amazed when I see this and in this case a simple application of gold along the edges covers any white paper and completes the look.


I covered off basing and how to do it in a previous posting and the links are below, covering my preferred bases and the texturing of them when I did a regiment of Portuguese dragoons.

My Basing Standard

Basing Tutorial

This process is the final but no less important stage, as a great looking base will show off a nicely painted figure and hopefully the composition of your groups will stand out, having arranged your figures in the order of painting on the sticks, as mentioned earlier.

For example, the figure falling forward has been placed next to a fusilier who is glancing to his right as if acknowledging the shock of seeing his comrade falling wounded. Likewise all the different shades of trousers and greatcoats are mixed on each base to give that uniform lack of un-uniformity.

Figures arranged and glued to the bases
The base groundwork applied and drying
The bases have had all three shades applied and now just need a bit of static grass to bring then to life

Et voilà, the finished battalion, ready for its parade shots and mustering with the other two battalions in the regiment. With better lighting you will be able to see more fully the fruits of the work, so I will be posting the parade shots of this battalion when I look at the role of the 96e Ligne at Talavera.

All done and ready to face their first battle
So this battalion completes the sixth battalion and marks a landmark with 25% of the work on the French infantry finished. I hope these three tutorials are helpful, certainly the feedback would suggest they are. I still have some allied infantry units to do, so I may do something similar for the Spanish and British. Let me know what you think.

Sunday, 9 August 2015

Probe at La Cambe - Chain of Command


Yesterday I was down at the Devon Wargames Group running a Chain of Command game taken from the Pint Sized campaign covering the US 29th Infantry Division and its push along the road to Isigny in days following the landing at Omaha beach. I was fortunate to have the input from Jason and Nathan, to friends who know the rules a lot better than me, and so the game rolled along with lots of action.


I bought Chain of Command when the rules were first published and have picked up the campaign supplements as they have come out, but due to my commitment to the Napoleonic project have spent little time on getting to grips with them.

Yesterday confirmed my opinion that these are a very clever set of WWII rules and really take the game/simulation combination to a new level with their simple but detailed simulation of platoon level WWII combat. I am looking forward to spending more time in future playing them and think I will put together a purpose based set of figures to compliment the orders of battle.

As a bonus the game produced a nail biting finish that made a great afternoon at the club. If WWII gaming is your thing and you haven't checked out Chain of Command or the next level up, I Aint Been Shot Mum, then I would recommend both sets of rules to you.

You can read how the game went on the Devon Wargames blog.
http://devonwargames.blogspot.co.uk/2015/08/probe-at-la-cambe-29-lets-go-chain-of.html

Saturday, 8 August 2015

Summer Dragonfly


As you know JJ's Wargames likes to include other interesting things alongside the wargames stuff, so I thought you might like to see these pictures I grabbed last night after getting back from a quick bike ride.

On entering our back garden this amazing creature came swooping past doing circuits of the back lawn seeming to be catching a mass of flying ants that had decided to take to the sultry summer evening air

http://www.british-dragonflies.org.uk/species/common-hawker


Every now and then, as if to catch its breath, the insect would hover as it selected a suitable perch in preparation for another sortie among the myriad of black flying ants that floated over the grass.

Carolyn and I were transfixed watching the amazing flying attributes of this master of winged combat. On one of its final landing stops I managed to get it in the viewfinder of the camera on maximum telephoto as approaching it too closely was impossible, as was trying to capture it in flight.

I know nothing about one dragonfly from another so went to the link above, basing my pictures to be of the most likely suspect, a Common Hawker Dragonfly. It was a real treat to see this fantastic insect showing off its flying skills.

Next up, I'm off to the DWG to run a Chain of Command game on the push in from Omaha Beach and the 3/96e Ligne are done and ready for basing so we will get the third and final tutorial post up plus the history of the 96e Ligne at Talavera.

Wednesday, 5 August 2015

French Line Infantry Painting Tutorial Part Two - The First Highlight

Fusilier, Grenadier and Voltigeur
The box art from the HaT French infantry 1808-12 gives an idea of the look of the French
 line infantryman on campaign. Note the variations in trousers, water canteens and great-coats.
The rigours of Spain would produce even greater variation, but Fusiliers were still required to remain clean shaven.
Detailed highlighting requires a good brush
French Line Infantry Painting Tutorial Part One

Sorry for a delay in producing this second post, life has demanded more of my time with starting a new job, wedding anniversaries to celebrate and entertaining friends whilst the weather has enabled more out door living. The good news is that in between all that fun I have been putting in the odd hour or two to move this project forward, so on with the post.

So the next stage of the paint job is to apply the fist highlight colours to all the block colours you have already applied.

The one thing you really need for a job like this is a reliable brush that you can use again and again and get a good job particularly with fine work such as applying the top lip highlight under the nose of the 18mm figures as seen with the third figure from the left above.

To do this level of work you need to have a good point to your brush and I first highlighted these Tamiya detail brushes back in 2012. They are quite literally the best ever brushes I have ever used and I would strongly recommend them without reservation
http://jjwargames.blogspot.co.uk/2012/12/tamiyas-small-pointed-brush.html


I started this next stage in the same order as the first, so in these first three pictures you can see the figures after I have applied Citadel Kislev Flesh, picking out the nose, cheeks, top lips, chins, tops of hands and exposed fingers and thumbs. With the voltigeurs and grenadiers some of them are sculpted with a moustache as with the second right figure above and I generally leave the base colour showing for the top lip whiskers.


The other main colour I started with was the blue jackets and here I have highlighted with Vallejo Prussian Blue, those surfaces exposed to the light looking to leave seams and folds with the darker base colour. The backs of the figures above really show how effective just one shade up can bring out the folds around the turn-backs, straps and shoulder lapels on the fusiliers above.

The next major highlight to do is the light grey, specifically Coat d'Arms Uniform Grey to pick out the top folds of the grey great-coats, grey shako covers and those figures selected to have grey trousers/overalls as opposed to those I will have in their whites which usually form the majority of the soldiers.


Probably the biggest job in this next stage is applying the off white to all the dark grey areas. The idea is to apply a white that is thin enough (you are looking for the consistency of skimmed milk when mixing with water) to allow the grey base to show through in the creases and folds of all those belts laid across the front lapels. This application needs to be done as accurately as possible, so don't load your brush with too much paint. However the good news is that you can cover all the grey without worrying about leaving any of it exposed.

The other paint work requires a more accurate application, including the white straps on the blue uniform areas and around the back-packs, great-coats and musket slings. I would suggest mixing the white in a 50:50 with water to get a more controllable and thicker application, but leave areas around loops and buckles with the grey showing, to imply those buckles and around straps in folds of the uniform to create the shadow of straps going under arms.


The art of highlighting is to apply the next shade up taking care not to cover all the first shade but to leave it showing around the edge of the highlight. This effect fools the eye by giving your colours depth. For example, look at the picture below and see how the dark sea blue applied to the top edges of the shakos and to their peaks emphasises those areas exposed to the light.


Similarly the tops of the shakos with dark around the top rim highlights the crown and draws the eye.


This stage is also where I start to apply the lacing edges to turn-backs and collars. Try and be as accurate as possible (this is where a good brush pays you back for the investment). By adding the colour now you can correct any miss-application with the third and final highlight, although I will also take any excess paint off using water (the beauty of using acrylic paint).


The idea of allowing the base coat to show through is demonstrated with the plumes on the elite companies where you can see the base green, yellow and red showing through in the recessed areas of those raised plumes and chords. Like wise, the dark brown helps to provide depth to the brass scales and shako plates.


So there is the second stage completed with a highlight colour applied to all the first colours used. Some people are happy to just go to this stage and varnish. I would suggest the third and final highlight will really make things pop and we are using less paint as we work up to this point so the effect requires less work but will reward you with figures that will stand out on your table.

As always, if you are not clear on any of the stages illustrated or my colour preferences then drop me a comment and I will get back with an answer.

Next up, Part three, the third and final highlight and basing process.