

At 1004, on the 14th February 1797, the day having dawned fine but misty, the British frigate La Minerve signalled that there were twenty sail, bearing south-west. This was followed at 1030 by a conclusive report, proving that the main Spanish fleet was present, when the Bonne Citoyenne signalled 'Strange sail seen are of the line'.
 |
| Admiral Sir John 'Jervie' Jervis Aged 64, a veteran of fifty years by the time of Cape St Vincent and a 'fighting admiral', having masterminded the naval side of the combined operation to capture Martinique in 1794. JJ's Wargames - By Fire and Bayonet, Grey's West Indies Campaign A hardworking disciplinarian, expecting the same dedication from his subordinates, but with a softer side having replaced £6 in spoiled notes at his own expense (five months pay) to a sailor who had left them in his washing. |
As all the signals arrived on the flagship, HMS Victory, they were passed on verbally to Admiral Jervis by his Captain of the Fleet, Robert Calder, leading to a famous exchange:
'There are eight sail of the line, Sir John.'
'Very well, Sir.'
'There are twenty sail of the line, Sir John.'
'Very well, Sir.'
'There are twenty-five sail of the line, Sir John.'
'Very well, Sir.'
The hesitant Calder persisted:
'There are twenty-seven sail of the line, Sir John.'
Then adding to emphasise his point,
'Near twice our own number.'
'Enough Sir!'
came the sharp rebuke,
'The die is cast and if there are fifty sail I will go through them!'
Last Saturday I joined friends at the Devon Wargames Group to play a game that I have long wanted to have a go at running, the Battle of Cape St Vincent, the climactic battle between the navies of Great Britain and Spain fought off the Portuguese south-western cape that lends its name to the battle.
 |
| The Beatles and the Rolling Stones of their day. Sir John Jervis cleared out the 'dead wood' under his command of the Mediterranean Squadron and formed the nursery of the future commanders of the Royal Navy which helps illustrate why this British fleet was the elite in the navy of that time. |
To provide background to this game I have uploaded a series of posts in recent days looking at the wider campaign situation that resulted in the battle together with my planning and preparation for the rules and the translation of the historical set up to the tabletop and if you missed those posts you can follow them in the links below.
This game is a big one when it comes to this period of naval warfare, and the challenges of size increase when you decide to play it in 1:700th, but I think when you see the models on the table, the scale offers so much in terms of the visual effect of naval gaming in the 'grand manner' to use my favourite 'Gilderism'.
The planning and prep for the game included the map work seen below which I translated on to my table at home, so I had a pretty good idea how the set up should look, but I wasn't entirely sure of the table dimensions and took along two 10 x 5 foot cloths to permit 'going large' to allow for the full deployment of the British fifteen ship approach column.

In the end we set up a 12 x 6 foot table and spread both cloths over it to give as much width as the human arm could manage and a bit extra on the ends for table space for dice, rules and marker as seen below once everything was set up.
 |
| Our 12' x 6' table laid out and ready to go |
 |
| The table seen from the south with the Spanish set up nearest to camera |
Our usual club routine sees as starting setting up at about 10.30am and playing through to about 16.30 to 16.45 leaving plenty of time for a pint afterwards, but for this game we had the building opened up by 09.30, started at about 10.00 and played through until about 17.45, and had a late pint in the pub.
 |
| Bob gets our game underway as Vice Admiral Moreno aboard Principe de Asturias and getting the first movement chit out of the bag, and immediately turns to starboard in accordance with the signal received. This as Cordoba greets HMS Culloden with a ranging shot. |
The first stage of an historical scenario is always interesting to see what the players will do with the positions handed to them by, in this case, Messrs. Jervis and Cordoba, and as soon as the first orders chits appeared, both commanders took the opportunity to run their signal flags aloft to inform their respective juniors of their new headings and objectives.
 |
| Likewise Cordoba and Morales in the leading group, turn onto the heading for Cadiz. |
| Jervis on the other hand had decided to dispatch Parker with his Van Squadron to deal with Moreno as he led the rest of the fleet towards Cordoba's approaching gaggle.. The lead British ship, Culloden has just turned onto her new heading, south, centre top of picture. |
The respective positions of the various squadron groupings that would come to characterise our recreation of this famous battle started to take shape within the first three turns as Rear-Admiral Parker had his leash slipped by Jervis and happily obeyed his signal, 'Engage the Enemy more closely' freeing him to wade in among Moreno's group of five opposing Spanish with his squadron of three, Culloden 74-guns, Blenheim and Prince George, both 98-guns.

Likewise the Spanish commander took an early decision to order a new heading for the fleet to the NW and on to Cadiz, thus bludgeoning his way through the British that were in the way, bringing on a general engagement across the battle area as the groups met earlier than in the historical fight.
 |
| The two main fleets approach as in the background Parker and Moreno's lead ships have opened fire on each other |
 |
| The battle commences as Captain Troughbridge orders HMS Culloden 74-guns to open fire on Moreno's flagship, Principe de Asturias 112-guns as the Oriente 74-guns on her starboard side replies with San Firmin 74-guns close astern. |
Perhaps the rather aggressive stance taken by both opposing command teams is typical of wargamers, but the need to wear down an opponent with accurate gunnery, before closing to melee or boarding as it would be known at sea, applies equally to land and sea battles of this period.
Thus the Spanish may be of poorer quality in combat terms, but there are a lot of them and the task is not to beat them all but to beat enough of them to make the others sail away in disorder, thus making it easier to defeat the trailing retreaters individually.
 |
| The map above helps show the progression of our game as the Spanish made an early change of course NE as Jervis split his squadrons to attack each group only to see the wind shift and the swell to increase as the battle developed. The most badly damaged ships at the close are illustrated with the San Fermin having struck after being boarded. |
So for example, Admiral Parker found Admiral Moreno more than ready and able for the little battle that developed in the south, and although the San Fermin fell to boarding, the British prize crew soon found themselves desperately looking to get ready to defend their prize at the close because Moreno was not forced to break off and was still very much in the fight.
 |
| The Spanish have turned as Jervis splits his squadrons to tackle each of their groups |
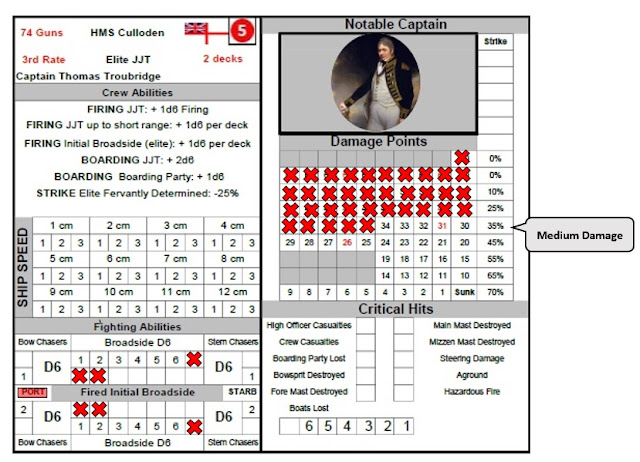 |
| HMS Culloden in Rear-Admiral Parker's squadron (Jack) bore the brunt of the initial exchanges as born out by the damage she had taken by the close. Three gun boxes knocked out on her starboard side indicate the direction of the fire she received from Principe de Asturias. Her port (larboard battery have used their initial broadside (red box on 'PORT'), in her firing back at the line of Spanish 74's that passed her on the other tack. |
In the main central battle, the decision to sail the British squadrons down either side of the Spanish gaggle meant that the lead British ships were subjected to fire from fresh enemy opponents as they moved slowly along their line, causing ever increasing levels of damage as they got nearer to the big Spanish three deckers at the back.
Yes the Spanish were suffering as well but the battle had turned into one of attrition allowing Spanish numbers to have an effect they would not have had, had the British attack simply fallen on a specific part of their gaggle, quickly disposed of several of their ships, and broken the fleet morale to resist further attacks.
 |
| The fight between Parker and Moreno developed into a separate little battle in its own right |
 |
| Moreno's flagship, shows the benefit of the sturdy three decker's ability to absorb damage, with 29 hull hits but still only well in the light damage category of the 15% morale loss level on her Damage record. |
 |
| The firing becomes general and close in. |
With both fleets committed to their orders the attritional battle, typical of an AWI action started to play out, only made worse from a British perspective by a change in wind further round to the north that forced the British to tack, or for those with smashed bowsprits, turn away, followed later by a 'Turning Choppy' chit that saw the test produce an increased Atlantic swell forcing the lower gun ports to close.
 |
| The San Firmin, one of the three 74's in Moreno's group bore the brunt of R. Adm. Parker's attack and in her desperate state was an easy target for boarding, once softened up. Note both her batteries have used their initial broadsides in her desperate defence. |
The effects of the swell on the gunnery was probably the worse thing to happen from a British perspective, further reducing their gunnery advantage, seeing the two-deckers gunnery dice halved and the three deckers reduced by a third.
 |
| Admiral Jervis (Lawrence) on HMS Victory 100-guns, closest to camera leads the fleet against Vice Admiral Cordoba's (Paul) main group of ships as Irresistible 74-guns and Goliath 74-guns, immediately ahead open fire. |
If that wasn't bad enough, the Spanish then decided to start rolling their d10's in such away that the most outrageous critical hits were being scored against their British opponents, just as the British started to miss with their responding d10's, which saw several British masts and wheels go over the side, and unbelievably a gun-burst on one British ship causing it five damage points rather than any hurt to the enemy.
 |
| Captain James Saumarez, commanded HMS Orion that was in the van position of Jervis's squadron as it proceeded down the starboard side of Cordoba's main group of ships exchanging fire at medium to long range in an increasing swell that forced the closing of the lower gun-ports on her starboard side. |
 |
| The frigate HMS Lively 32-guns, tacks as Vice Admiral Thompson's (Steve M) squadron obey Jervis' signal to cross the Spanish and turn alongside their larboard side, under Vice Admiral Morales (David) with HMS Egmont 74-guns leading Goliath 74-guns and Thompson's flagship Britannia 100-guns following. |
The reduced gunnery also affected the rate of damage being inflicted particularly at the close ranges, and in situations where potentially Spanish ships may well have struck in more normal seas, they were able to sail on with more moderate damage and continue the fight.
 |
| HMS Colossus was the second ship in Jervis' squadron behind Orion and displays a similar damage profile, all be it an unfortunate critical hit at medium range from the Spanish return fire that took down her fore mast and has reduced her speed accordingly, although the bow wind meant the British were moving slowly anyway. |

Thus it was that our British commanders were looking a little punch drunk and on the ropes as our Spanish commanders were not quite believing their luck, and with the battle very much on but very much undecided as the last few hours of our day approached.
 |
| HMS Irresistible was the third ship in Jervis' line with Victory close astern and took the brunt of Spanish fire, once they had got their 'eye in' practicing on Colossus, again causing a critical hit on the British 74 removing her bowsprit and inflicting high officer casualties on the quarterdeck. The lost bowsprit meant no tacking which limited the her choices of manoeuvre. |
 |
| Intermingled ships as Moreno and Parker grapple each other and the San Firmin falls to British boarders |
 |
| The Prince George was in the thick of the exchanges between his and Moreno's small squadron and the firing was very close which minimised the effects of the closed gun ports caused by the heavy swell. As with Moreno's Principe de Asturias, the three decker shows her ability to absorb the knocks that would stagger a 74-gunner. |
However a closer look at the state of the respective fleets and the damage caused at the end revealed an interesting picture that would have rewarded a second day playing our game to a conclusion.
The morale states of the respective fleets meant that despite their numbers Spanish morale is brittle with an 11 PPV (Preservation Point Value) for the fleet as a whole versus 19 PPV to the British, meaning that with the loss of three three-deckers (9 PPV) and a two decker (2 PPV) the Spanish would likely break off the battle long before the British reached a similar state.
Broken down by command, it shows Cordoba's group likely breaking off on the loss of three three deckers ((9 PPV) or five two deckers (10 PPV) or a combination of the two and Moreno's group only losing a three decker (3 PPV) or two of its two deckers (4 PPV) to cause a test to break off, which would effect Cordoba's group.
Moreno had already lost a two decker at the close and boarding attacks were in play on others of his command, whilst Nelson and Collingwood were ranging in on the battered third-rates of Cordoba's group as our game ended
 |
| Moreno's ships attempt to use their numbers to make up for their lack of quality by massing against Parkers little group of three ships, with their five which includes two three deckers on both sides. |
 |
| The battle in the centre becomes general and British masts and bowsprits start to fall as Spanish fire proves unerringly accurate. |
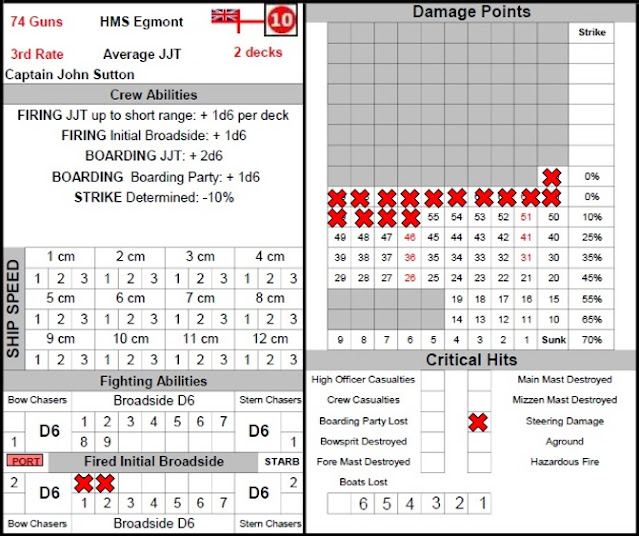 |
| HMS Egmont 74-guns was the lead ship in in Vice-Admiral Thompson's line as it passed along the larboard side of Cordoba's main group. Arriving later into the fight than Jervis' squadron ahead in the line, she shows less damage than Orion, Colossus and Irresistible, but bears the mark of the Spanish gunnery in our game with her helm dismantled early in the first exchanges of gunfire. |
 |
| The mass of Spanish ships seen from the larboard side of Cordoba's and Morales' main group with the British attack developing along each side seen ahead. |
On further consideration of the state of play at the close of the game, I was able to do a victory point calculation based on a simple, 'how well have I done', victory check I had prepared should we have ended the game with or without a conclusion.
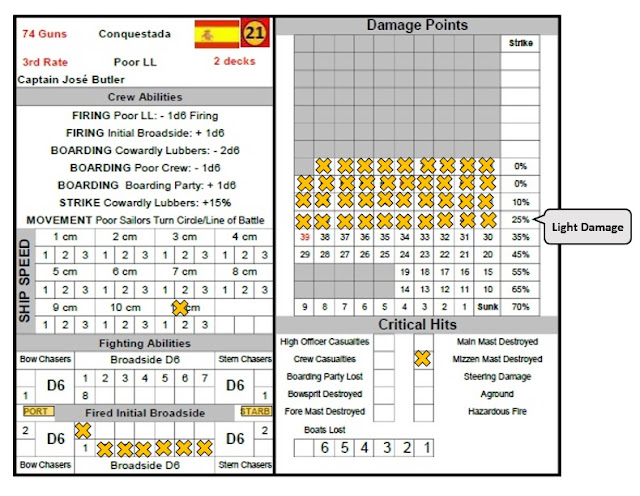 |
| The Spanish weren't having it all their way as the damage log for Conquestada 74-guns leading the starboard group in Cordoba's gaggle of 17 ships and taking on the leading three 74s of Jervis' squadron. Her larboard gun battery is smashed up and her mizzen mast is gone, testament to the accuracy of the British fire |
 |
| Close astern of the Conquestada was San Ildefonso which was next to receive British softening up, slightly less damaged than her comrade. |
 |
| It's the end of the day for us at about 17.45 and the table is tidied up to show where our game was stopped, with battle well and truly underway but sadly no more time to conclude matters. |
 |
| The Terrible was tucked in close behind the Conquestada and San Ildefonso and has had her guns take apart by British fire as well as losing her helm early on in the exchanges of fire. |
 |
| Our end table seen from the north and the main battle. The two British 74's seen heading south-east (left of picture) are Nelson's Captain, followed by Collingwood's Excellent looking to head off the escaping though battered Spanish ships, Conquestada, San Ildefonso and Terrible. |
 |
| The leading Spanish ships though damaged look likely to be able to break off should they choose, but the British lines on either side are working their way toward Morales and Cordoba's flagships and Nelson and Collingwood are preparing a greeting for these chaps in the centre of the picture. |
That victory point calculation revealed the following:
 |
| My victory assessment awards a value for each ship in the battle based on its hull size x 5 and then adds or deducts points for being outnumbered, damaged or running away, based on a sovereignty rating to deduct points for disgrace |
 |
| The damage recieved and the loss of the San Firmin reduced the Spanish tally by 55 points |
 |
| Despite their problems the British were making progress increasing their points tally by 22 thanks to the taking of the San Firmin, but with still plenty of work to be done. |
 |
| Still very much undecided at game end, the battle between Parker and Moreno. |
I know it is often felt unsatisfying to leave a game with the decision point undecided and I may well come back to this game and refight it over two days at Chez JJ when time permits, but on the other hand I rather like the way this shows how very much a battle like Cape St Vincent could have turned out very differently had not Jervis played very much to his strengths and to the enemy's weakness.
That and a good helping of Nelsonic genius.
The Spanish were not the power they had been in previous centuries, but in large numbers were still a force to be reckoned with as most British commentators of the time have remarked, noting how determined Spanish crews were to defend themselves when under attack.
Our game was definite tick on the 'old bucket list ' of games I have wanted to do for a very long time and I can only thank my friends and fellow DWG club members for making it such a memorable and well played game that typifies how the club like to play.
Thank you to Paul (Vice Admiral Cordoba), David (Vice Admiral Morales), Bob (Vice Admiral Moreno), Lawrence (Admiral Jervis), Jack (Rear Admiral Parker), Steve M (Vice Admiral Thompson and Waldegrave's Squadron) and John (Commodore Nelson) the latter having a very quiet game, only getting into action right at the end and who I now owe a very special place in the next game to make up.
If you would like to watch a ten minute compilation of pictures and video clips from our game illustrating how the models were being activated, fired and moved, using Kiss Me Hardy, then just click on the link below.
Cheers
JJ
Looks to have been a tremendous game , rewarding the time and effort which must have been put into it . The Dons seem to have acquitted themselves well, this time . 👍
ReplyDeleteHi, and thank you, we had an enthralling game with lots of laughs and drama and a very full day of gaming, so lots of great memories.
DeleteYes indeed, the Dons, the wind and the sea all combined to push the British resolve in our game and it left a very tantalising end to our game with no clear indication at the end which way the result would have gone.
Cheers
JJ
Stunning battle report!! Thanks to share all this data and those amazing pics!!
ReplyDeleteHi Marco,
DeleteThank you for your comment and you're welcome. Glad you enjoyed the read.
Cheers
JJ