It part one of this three part series looking at my preparations for playing the Battle of Cape St Vincent in time for the 225th Anniversary of the battle, I looked at the time line of events leading up to the Battle of Cape St Vincent which you can refer back to in the link below:
In part two I covered the process I went through, and am still working on, to shape Kiss Me Hardy (KMH) into a set better able to allow me to fight both large battles from this era like Trafalgar and Cape St Vincent, whilst also taking into account the needs for the rules to better facilitate playing the smaller actions often between unrated vessels, bringing together all the ideas and rule changes that have been developed since their publication back in 2003. See link below if you want to check out that post
In this post I'm looking at what I consider perhaps one of the most enjoyable aspects of historical wargaming, that is translating a particular battle or action to the tabletop with a collection, and my process of deciding how best to prepare a game that challenges the players to deal with a situation created by their historical counterparts and to see if they can come up with a better outcome, which of course has nothing to do with 'winning or losing' in the traditional meaning of that phrase .
I stress that latter point because it never fails to amuse me that some folks find the intellectual challenge of playing a game where winning the battle is not necessarily the objective that is being posed, but rather a fascinating opportunity to experience in a small way some of the challenges presented to both commanders and for the players to come up with their own solutions to them.
Indeed if you consider the fact, most historic battles were not 'balanced', to use a wargaming term, as most military/naval commanders went out of their way to ensure that they definitely weren't, and, if they could help it, in their favour, with often a miscalculation by one of the parties leading to a fight they might not necessarily have chosen.
However despite these facts about historic battles, there is a great opportunity to explore why events happened the way they did and the possible 'what if' situations brought about by the ingenuity of players operating within the given context but perhaps making different choices, and I find these kind of games only enhance the understanding of a battle that you had only previously read about or in the case of a land action, perhaps walked the battlefield.
 |
| Why would you want to play Trafalgar? |
Nevertheless explore the comments of any wargaming forum and you are bound to find such throw away statements as;
'Why would you want to play Trafalgar when you know the British will always win?'
To which my answer would be;
'Not necessarily, if the objective of each commander was to get a better result from the game than either Nelson or Villeneuve achieved on the day; perhaps a very tough ask for Nelson, but then achieving a similar level of victory and surviving might be a simple ask for a British player.
Likewise that might indeed see the Combined Fleet thoroughly defeated, but if the surviving Franco-Spanish ships number more than the historical outcome, with Villeneuve escaping the debacle and grabbing the odd British prize in the process, then you could consider the result as a decisive win for the latter which may well have kept his reputation intact, and himself alive with Napoleon.'
Then if you throw into the mix, the performance of certain characters, that stand out in any given battle, other objectives become apparent that could impact on the overall assessment of a game result, with a little bit of thought beforehand.
Therein perhaps lies the difference in looking at wargaming as an intellectual challenge from the pages of history rather than a simple zero-sum game of win or lose, and where all the banter and chat in the post battle meet up in the pub, simply adds to the enjoyment.
So with that basic principle laid out as a foundation to my approach to planning any historical battle, let us turn our attention to the climactic Battle of Cape St Vincent and what we know.
Fortunately a lot of the initial work on a framework and basic structure of the game is mapped out by Nick Skinner himself with his scenario for running the battle, entitled Nelson's Valentines Day Massacre and published the 2008 Christmas Lardy Special available on the Too Fat Lardies web shop, and I was able to use this to compare and contrast with other scenario plans for other rule sets together with various written sources covering the battle.
However Nick's scenario plan for this game and his suggestions for setting up the respective fleets were my starting point and with further delving into my other references it proved quite an interesting exercise trying to find broad agreement particularly about which Spanish vessels were at the battle and where they were.
 |
| The set up map from the 2008 Christmas Lardy Special |
My experience planning Trafalgar and other large games informs me that where you decide to start the game is important as often playing time is limited and the object of the scenario is often to pose the question to players:
'This is what your historic predecessor decided to do and the likely problems he faced. So what are you going to do from here?'
Thus position at or just beyond extreme gunnery range seems a good place to begin, posing an immediate challenge to both commanders likely to be presented with an early opportunity to fire and potentially inflict damage at extreme or long range, but, if doing so, losing that all important first broadside capability that can make the difference at short and point blank ranges.
So when I sit down to work out an initial set up those factors are front and centre of the placement planning process, which often necessitates knowing the ranges that various ships opened fire at at any time to get an idea of placement to commence the game, with the imperative to start matters close to or as near as the moment the fleets had the opportunity to open fire, this to save game time simply moving models on the approach.
In a well documented battle such as Trafalgar this plan presents less of a challenge than does Cape St Vincent where the best source I came up with was Adkin's in his 'Trafalgar Companion' who has put together an excellent series of plans showing the progression of the two fleets into the opening exchanges of fire with timings.
 |
| Adkin's excellent maps for all of Nelson's battles leading up to Trafalgar are a game planners dream when other sources are contrary and incomplete. |
The timing is important because I wanted to begin the game with the British column bearing down on the Spanish gaggle of two distinct groups at that extreme to long gunnery range, giving that 'to open fire' challenge to both sets of players early on.
The map above shows the moment leading up to the British cutting the Spanish line and the battering of the Principe de Asturias, but I needed to move things back to allow for the run in that commenced about 12 noon and culminated in the eventual close action shown in Adkin's plan below as events evolved over the following two and a half hours.
 |
| Adkin's second map shows the battle unfolding, a stage of the scenario that will be left to the respective players |
At an approximate ground or perhaps that should be 'sea' scale of two minute moves in KMH, with the British sailing with a bow wind giving their squadrons an approach rate of 10cm minus 1d6 of movement each turn (based on the slowest ships in the British fleet, namely the first-rates Victory and Britannia), and allowing about twenty of the thirty minutes to get HMS Culloden at the turning point ahead of Principe de Asturias, assuming an average move of 7cms per turn, I estimated the start position for Culloden to be about 90cms away from the Santisima Trinidad which I reduced to 75cms to be on the safe side in reducing the run in time.
 |
| Ship Record Sheet for HMS Captain and a certain Commodore Horatio Nelson, seen in his portrait from 1797 as a newly minted Rear-Admiral, commanding an elite Jolly Jack Tar crew who are potentially 'exemplary' and a model to the fleet, with this one ship a very distinct threat to our player Vice Admiral Cordoba getting a result out of this game, i.e. doing better than his historical predecessor. |
This potentially creates 12 (extreme worst case) to 8 (best case) and 10 (average) turns of movement to break the Spanish Line (see what I mean about KMH and friction!) not forgetting Nelson's ability to pre-empt matters with a little manoeuvre of his own that is covered in the scenario rules (You'll have to get a copy of the 2008 Christmas Special to see how that works). Of course playing will clarify the game plan and it might still change, hence 'approximate' measures on the set-up map.
The distance set out between the two Spanish groups is as per Nick's original scenario plan and on setting up the table, looked about right with the Spanish struggling forward equally in a bow wind, all be it slower because of their large number of 'Poor Sailors'.
The result of this first stage of the plan produced the set-up map you see below.
 |
| My set-up map based on Adkins primarily, with Nick Skinner's scenario plan at top |
The next step was to sort out what ships were present at the battle and where they might have been as the two fleets closed on each other.
To this end I am referring to the Spanish, as the British sailing order and order of battle are agreed by all the sources, but the Spanish are another matter and again I have taken Adkin's as a principle guide.
 |
| Another view of my table plan based on my set-up map to get a visual plan of the set-up |
In Nick's original scenario plan the Spanish fleet is listed thus:
Spanish Fleet:
The Spanish fleet are all classed as Landlubbers and are organised as follows:
Zone 1 Spaniards: [Cordoba’s Squadron]
Teniente General Jose de Cordoba y Ramos aboard the Santìsima Trinidad
Santìsima Trinidad 130 (poor)
Mexicano 112 (poor)
Purìsima Concepción 112 (poor)
Salvador del Mundo 112 (poor)
San José 112 (poor) Admiral F. J. Winthuysen
San Nicolas 84 (poor)
Atlante 74 (poor)
Conquestada 74 (poor)
Soberano 74 (poor)
Firme 74 (average)
San Genaro 74 (average)
San Ildephonso 74 (average)
San Francisco de Paula 74 (poor)
San Ysidro 74 (average)
San Antonio 74 (poor)
San Pablo 74 (poor)
Neptuna 74 (poor)
Bahama 74 (poor)
San Domingo 74 (poor)
San Juan Nepomuceno 74 (average)
Terrible 74 (poor)
Zone Two Spaniards: [Moreno’s Squadron]
Commander Admiral J. Moreno aboard the Prìncipe de Asturias
Prìncipe de Asturias 112 (average)
Conde de Regla 112 (poor)
San Fermìn 74 (poor)
Oriente 74 (poor)
Glorioso 74 (poor)
Infante de Pelayo 74 (average)
 |
| The two Spanish groups set up with the British column placed 75cm away on the approach |
From the sources I consulted I have changed the order of battle by removing four of the listed Spanish ships.
The two 74's, Infante de Pelayo and San Pablo were detached early on the 14th February when the Spanish heard British frigates signalling with gunfire in the morning mist, that they had spotted the Spanish fleet, and the two ships were sent off to investigate at 08.00, leaving Cordoba to fight the upcoming battle without them.
 |
| The map showing the movement of the various units during the St Vincent Campaign shows the passage of Cordoba's fleet from Malaga and through the Gibraltar Straits |
The other two, Bahama and Neptune, were detached on the 5th of February as Cordoba collected the four Spanish mercury carrying merchantmen or urcas at Malaga, that he was ordered to escort to Cadiz on his way, with further support from a group of gunboats at Algeciras who were to provide escort through the Gibraltar Straits but needed escorting back to Algeciras once the fleet was clear; and thus Bahama, Neptune and Terrible were detailed for that particular job, with only Terrible returning to the fleet prior to the battle.
Thus with my Spanish order of battle refined I then turned to initial placement as the two fleets closed for battle, with only certain vessels specifically identified in various maps but by no means all the Spanish precisely indicated, rather highlighting the mess they had got themselves into during the turn to a NW heading that Cordoba ordered at 10am, as he set a course for Cadiz as the British double-column approached on his now starboard side
 |
| My new Spanish order of battle, with the various ships shown in the original squadrons by the use of *1st of Centre Squadron - Cordoba, ** 2nd or Rear Squadron - Morales and *** 3rd or Van Squadron - Moreno. Of couse the positions changed as the squadrons reversed course at 10 am. |
This placement required a bit of educated guesswork using the original organisation lists for Cordoba's fleet that shows which ships were part of which of the three squadrons, namely the rear under Morales aboard the Purisima Concepcion, the centre under Cordoba aboard the Santisima Trinidad and the van under Moreno aboard the Principe de Asturias.
The order of battle is indicated in my fleet listing for the game seen above, and using this together with the known positions of various ships during the battle I started to place all the ships among the two Spanish gaggles based on their previous order of sailing prior to the turn at 10 am and so Cordoba's group have Morales's squadron to the front and Cordoba's behind, with any of Moreno's squadron not with him in his trailing group placed to the rear of Cordoba's lead group with my map showing the planned layout.
 |
| Close up of Cordoba's lead group - I like the table and the ship bases to be as uncluttered as possible and the small pennant numbers on the back of the ship bases have worked well in previous games to allow an unobtrusive way for players to quickly identify a particular ship and for me when looking at pictures to do the same when writing a game AAR. If you want to check the efficacy of this you can refer to the order of battle above to identify the ships in view and the set up map to confirm the positions. |
Finally I decided to use the KMH Command and Control Signalling rules for our game, with a few adaptations that sees a slight change to the rules in Nick's article 'I Wish to Amuse the Fleet with a Signal' published in the 2009 Lardy Christmas Special.
The principle change sees commanders having a command range that allows their signals to be seen and interpreted by any ship in their command that falls within that command radius, which is further extended by repeater frigates. Thus frigates have been positioned among the fleets to allow for signalling at the start of the game, as new course headings and tactics will need to be communicated to the respective commands during the game, which should add another level of fun to the proceedings.
 |
| Cordoba's lead group - Note the repeater frigate placed bottom left of picture, just in range of Santisima Trinidad, extreme bottom right and in range of the ships in front of it up to the next frigate beyond, extreme left, centre top of picture. Cordoba has a poor rating and small command radius and the command and control of his fleet may well be tested to breaking point as the battle develops, with ships left to fend for themselves in an uncoordinated way. |
With the fleet break point rules in play, the game will change at some point from a battle where both sides are intent on contesting the space to a different game where one side, likely the Spanish, is looking to extract itself and the other is looking to take advantage of the situation with the signalling ability of both fleets being an important component.
So the plan is to play as much of this battle at our club meeting this Saturday and to see if we can get our game to any sort of a conclusion with a follow up post covering all the fun of the day and the drama created together with some thoughts about what worked well and stuff not so well.
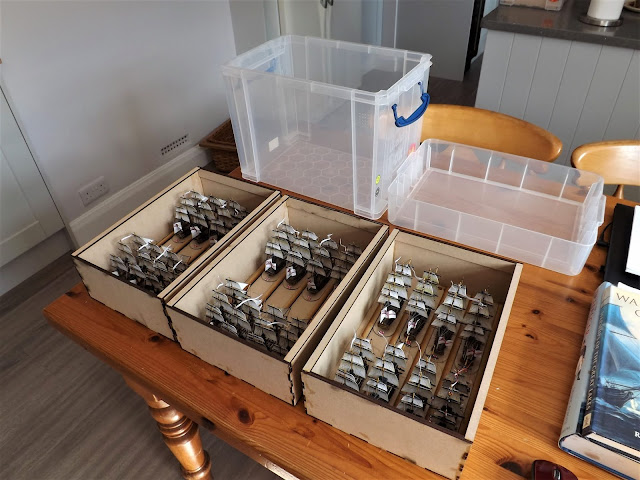
Finally, as touched on in my Xmas post, storage and transportability of any collection of models and required sea cloths is important and, if you missed it, you can check out my post in the link below that covers off those key aspects of putting on a game.
This aspect of game management was well tested last year with my trip up to Warlord Games in Nottingham to run the Trafalgar Anniversary game and the trusty RUB's and inserts are proving their worth yet again for this weekend's game.
 |
| A final check against the fleet list for the Spanish before being put into the boxes. |
I now have the kit and collection together with a workable set of rules that should facilitate the big games I want to play and tick off the bucket list

A case of have game - will travel, and I am keen to explore different venues and play with other gamers interested in these big Age of Sail battles.
More anon
JJ
Sources Consulted:
The Trafalgar Companion - Mark Adkin
1797 Nelson's Year of Destiny - Colin White
Naval Warfare in the Age of Sail - Tunstall & Tracy
History of the Royal Navy Vol IV - Clowes
Naval History of Great Britain Vol II - James
Next up to conclude this series of posts I will post an AAR of our Anniversary Game at the DWG later this week, so lots to look forward to.


No comments:
Post a Comment