Wednesday, 25 September 2013

British & French General Officers - Vimeiro

As part of finishing off the forces for Vimeiro, I've needed to put together a few extra command figures. Probably the most important one was General Junot himself. As far as I am aware there are no 18mm or 28mm models of Junot, which is surprising, as the General is often depicted in his General Officer of Hussars uniform and is very much the epitome of the Napoleonic beau sabre.

General Jean-Androche Junot
One of Napoleon's most colourful subordinates, General Jean-Androche Junot, Duc d'Abrantes was a law student at the beginning of the Revolution. He joined a volunteer battalion, was twice wounded and owed his first advancement to an incident at Toulon when, as a sergeant, his cool courage under fire while taking dictation from Napoleon impressed the young officer.

He served as Napoleon's ADC in Italy, receiving a head wound at Lonato which may have contributed to his later mental problems.

General de brigade from January 1799, he survived the Egyptian campaign but was wounded in a duel and was captured by the British as he tried to return home. On that return, he was appointed commandant of Paris and General de division in November 1801.

One version of General Junot's appearance
After serving as ambassador to Portugal and as Napoleon's aide in the 1805 campaign, as governor of Parma and Piacenza and of Paris, Junot lead the invasion of Portugal in 1807. early success was rewarded with a dukedom of Abrantes, though Junot greatly resented not being appointed as a Marshal; and it was followed by defeat at Vimiero.

The inspiration for my interpretation came from the excellent showcase of large scale models one of which shoes General Junot.
http://www.leforumlafigurine.com/t6910-vitrine-du-duc-de-abrantes


My figure is based on one of the AB French ADC's that I picked up from Ian Marsh of  Fighting 15's  at Colours a week ago. It required a head transplant from a French hussar and a few additions of Milliput, and overall I am quite pleased with the look.


I have modelled the general with an Imperial ADC and an officer from the 1st Hussars, Junot's regiment, when he joined the cavalry.


In addition, although Junot "side-lined" his divisional commanders at Vimiero, I will need four French Divisional commanders just in case our Junot stand in chooses not to, and these three gentlemen bring the French army up to strength. Again these are from AB and really look the part.


Next up was Sir Arthur Wellesley himself plus some extra Brigade commanders


The model of Wellesley and his ADC's are Warmodelling figures from Warmodelling uk. The model depicts Wellesley as he would have looked as Duke of Wellington with his ostrich feather bedecked bicorne. At Vimiero as a junior Lieutenant General, I imagine he may well have been dressed in full dress uniform, as above, after his meeting the evening before with his recently arrived boss, General Sir Harry Burrard.

I, however, plan to use this figure in future games where the "Duke" will need to be more appropriately dressed as the supreme allied commander.


One particular brigade commander I wanted to model, was Lt Colonel Taylor of the 20th Light Dragoons who effectively commanded the Allied cavalry of British and Portuguese light dragoons.
For this commander I adapted the AB Royal Horse Artillery officer.


Saturday, 21 September 2013

Vimeiro - Full Fat, WIP

For regular followers of this blog, you will be aware that I have referred to "when I run the Vimeiro full fat game", i.e. the big one. Well in case you were thinking it was a fantasy, a game from myth, I thought I would provide some reassurance that the plan progresses, to run this game, probably next month.


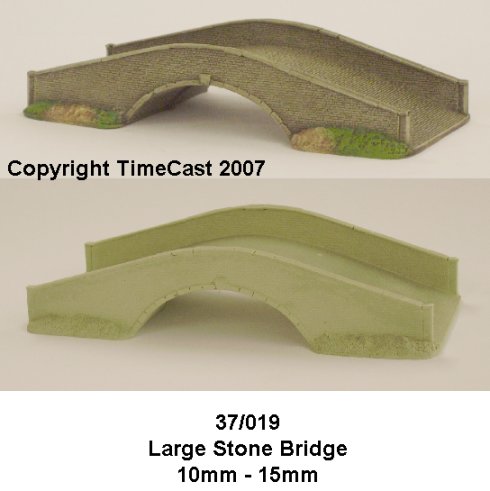
As I write this post I am adding the final commanders to the order of battle including a scratch build of General Junot himself, based on an ADC from the excellent set from  AB - Fighting 15's  and, as you will see from the pictures below, working on the final piece of terrain to add, that being the River Maciera which flows behind Vimeiro Hill and through the village towards the sea. In addition I am waiting for a stone bridge on order from Timecast to complete the two bridge crossings over the river, these being important crossing points particularly for the British.


So the pictures below give my interpretation of the whole Vimiero ridge position based on the map above. This is the map from the Vimiero full fat scenario I have posted in my downloads section. The scenario is constructed for Carnage & Glory II but would easily convert to other rule sets. The ground scale is one inch to fifty paces (37.5 yards) a pace being 27 inches.

The view looking along the Eastern ridge with Ventosa Farm in the foreground

Looking North with Vimiero Hill and Vimiero village nestled below the Eastern ridge. Note the River Maciera has still to be modelled.

View from behind Vimiero in the British lines. Note the rocky out crop on the reverse slope of the Western ridge that restricts any movement off it.

The road along the Eastern ridge that Junot attempted to use, to turn Wellesley's position

The view up to Ventosa where Junot's first flanking column mistakenly approached the Eastern ridge

The hamlet of Toledo with Vimiero behind. The main area of Junot's attack


This will be the first battle that will use the whole table. The table being constructed back in the Easter holidays with my eldest son Tom. It is also the first time I have used sculpted styrene as an under lay to capture the rolling nature of the terrain. I'm really pleased with the result and think it helps simulate the lines of sight the commanders on the day had to cope with.

We will be trying out "blinds" for the first time to add to the confusion during the approach to battle, so I will be trying out several new ideas.

In addition to trying out new things, I will update the scenario briefing based on my play test and add some terrain notes that I have thought of since I wrote the first version.

Charging against Wellington- Book Review


I finished reading this book a few weeks ago and thought I would share my thoughts about it.
 
I have to say, congratulations to Robert Burnham, I'm really pleased I bought this book and added it to my library. The information contained within is priceless for the Peninsular War enthusiast keen to understand the organisation and command of French cavalry units during this long campaign, during which the French army went through different phases. The war started with the French very much on the offensive and, with the arrival of Napoleon himself, a rapid increase in the number of cavalry units and effective commanders. As the war continued and the Emperor left for other campaigns, never to return, the cavalry was gradually denuded of units and, just as importantly, able commanders. This at a time when the French strategy was changing to one of pacification and policing where cavalry had a vital role to play, particularly in a land mass as large as the Iberian Peninsula. Then as the war turned against the French on all fronts the decline in cavalry numbers increased with the withdrawal of French armies back to France.
 
Thus the information about the units available to commanders in the theatre are described against this backcloth of events. The description of Provisional Cavalry Regiments was very instructive, particularly for me as I am constructing orders of battle for the Vimiero campaign and deciding on how to grade the morale and efficiency of these kind of units. The book clearly describes how these units were put together with men and NCO's the Regimental commander chose to leave back in the depot. They were designed to be able to take on much inferior opponents and could perform adequately against their Spanish and Portuguese opponents, but would be found out when up against the British, Sahagun in 1808 during the Corunna campaign a classic example.
 
This book is not a rollicking read of stories and anecdotes about the exploits of the French cavalry. If you are looking for that I would suggest there are plenty of other books out there that will fulfil that role. What this book is, is a gold mine of statistics and facts about the commanders and units together with an overview of the role and deployment of these men during the war.
 
The back cover gives some excellent examples of the information contained within.
 
  • "Of the 80 generals who commanded cavalry between 1808 and 1813, 34 of them were killed, wounded or taken prisoner - a casualty rate of 43%".
 
  • "Nine cavalry generals were relieved for incompetence, insubordination, corruption or for other reasons while they were in the Peninsula. Two of them were among the best known generals - Louis Montbrun and Francois Kellermann".
 
  • "After retreating from Portugal in the spring of 1811, the cavalry of the French Army of Portugal could muster close to 5,300 men and 4,700 horses on 1 April. The number of horses fit for campaigning was significantly less. A month later it could only field 2,200 mounted troops at the battle of Fuentes de Onoro".
 
  • "Casualties among the regiments varied. Between 1st May 1811 and 10th July 1813 the 13th Chasseurs lost in Spain 201 men either killed, died from disease, made prisoner, or deserted. The regiment also had 982 horses die. The 9th Dragoons had 52 men die in combat between 1808-1811".
If you are interested in the French Army in the Peninsula and want to build war gaming units with a basis in the history of the campaign then I would say this book is invaluable and well worth picking up. Needless to say, I am now re-evaluating the stats I have previously given my French cavalry units, in scenarios I have constructed, based on the information in this book.
 
Recommended reading.

Wednesday, 18 September 2013

Today in 1944 - Monday September 18th, Dad's War.


"The first radio contact between the Americans and a patrol of the Guards Armoured Division is made at 11.15hrs and they make physical contact in Woensel at about 12.15hrs.
In the late afternoon the army arrives in the southern outskirts of Eindhoven"

"The vanguard of the Guards Armoured Division entered Eindhoven at midday; the main force did not arrive until late afternoon. It was in Eindhoven that the advance was inadvertently hindered by the local Dutch people, who blocked all the streets as they celebrated their liberation".

Dad, pictured front right in the drivers hatch, looking very serious despite the joy of the Dutch. An official from PAN, with the armband oversees the crowd. Note the pennant next to Dad indicating this is the Commander Q Battery. The Markings on the toolbox, front hull RC74 are the arm of service marking, and the Guards Armoured Eye badge is visible below the spare bogey wheel. I wonder if Dad had that placed for when he was driving? 
I have on my mantelpiece an original, of what has become quite a well known, picture of an OP tank operated by the Guards Armoured Division during Operation Market Garden. The picture with another of the same vehicle driving off through Eindhoven are held in the archive of the Imperial War Museum, here in the UK. It has an official caption detailing the unit and where the picture was taken.

However there is a further story behind this picture that the Imperial War Museum don't have recorded together with the name of the Sergeant (his tapes are just visible on the bent right arm) pictured in the drivers hatch. That man is my Dad.

In 1943 my Dad, Herbert (Herby) Jones, volunteered  for service in the Army and was recruited into the Royal Artillery, joining the 55th Field Regiment, West Somerset Yeomanry, part of the newly formed Guards Armoured Division.

He joined the crew of an Observation Post (OP) tank and started his training in old Valentine Infantry tanks learning the vital role as an observer for the field guns he would be directing in action . I was able to see a Valentine in running mode at an open day at Bovington Tank museum. When I explained my interest to the driver, I got a close up inspection of the interior. The tank was primitive, with cables running through and below the turret step and the minimal of crew comforts. No wonder Dad was so happy when they were issued their new Sherman Vs. He always said that the Sherman would never break down and was totally reliable and that they were more manoeuvrable and faster than their German opponents.

In June 1944, two weeks after D-Day, Dad was part of a forward party that prepared for the landing of the whole of Guards Armoured Division in July and their subsequent baptism of fire during Operations Goodwood and Bluecoat.

I was able to speak to a former subaltern, Dr Tony Bailey, who had commanded a troop of four (Sexton) Self Propelled guns with the 155th Field Regiment, Liecestershire Yeomanry, the sister regiment in Guards Armoured. When I showed him the picture of Dad in Eindhoven, he shook his head knowingly and said what a brave bunch of chaps the OPs were. His regiment lost six OPs in Normandy. He went on to say that one minute you would be scribbling down co-ordinates, and the next it would be just a hissing static as the radio went dead.

Dad (centre) with mates guarding the rations!
Dad, like many of his generation, didn't talk a lot about the war. They were a generation for whom it was considered "bad form" to spend time talking about ones exploits. My childhood memories were of family holidays to the continent, and I remember snippets of Dad's remarks as we drove over the open fields above the old Colombelle steel works near Caen. He remarked about what a bad time they had had in those open fields, with me not really understanding then what I know now.

We were looking at the killing fields of Normandy and the charge of the armoured divisions during Goodwood. The casualties were much less than the Epsom offensive a few weeks before, but the "tankies" paid a high price for the ground they gained in those July days in 1944.

Another memory is of standing with my younger sister and having Dad point to a railway road crossing and explaining that they had had a big battle with a very large German tank on that very crossing. I researched that battle with the help of the Guards Armoured official history and knowing the area was close to Leopoldsburg read about the fierce fighting that occurred there and that Dad's CO and boss on the tank was killed there in that fighting about a week before the photo in Eindhoven was taken.

Captain Wilfred Good was loved by all his men and Dad took his loss greatly, which might explain the very serious looking young man in the picture. I discovered his grave on the Commonwealth War Graves site and remembered that Dad said he was like a father figure to the crew and was greatly missed.


25lbr Field Guns of the 55th Field Regiment, West Somerset Yeomanry, Royal Artillery


The 55th in action

From the fierce fighting in Normandy the Guards were in the vanguard of the "Great Swan" as the pursuit of the German Army into Belgium became known to British troops. The Germans were chased up to and out of Brussels. The advance was rapid and in great contrast to France where the smaller gains of territory was slow and often at great cost. The veterans of Guards Armoured always remark about the welcome they received from the Belgian people and the city of Brussels in particular. Dad stayed with a family there and I remember going to visit them briefly in the 70s.

The tank Dad is pictured on is an OP version of the Sherman V and is armed with nothing more than two fixed machine guns. That fearsome looking 75mm main gun is in fact a section of telegraph pole. I found these pictures, somewhat revealing, of a similar vehicle, used by 7th Armoured Division, knocked out in Villers Bocage during Micheal Wittman's famous attack. The fake gun can be seen lying in front of the vehicle next to the blown off gun mantlet. The blackened hole to the left of the gun aperture testimony to what an 88mm AP round from a Tiger could do to these tanks.
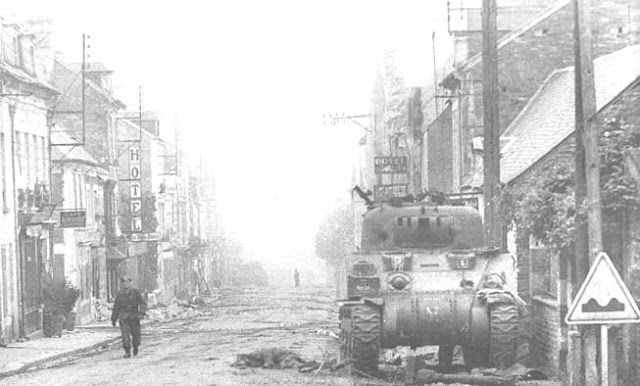
An OP tank on 7th Armoured Division, knocked out in Villers Bocage

The same tank close up with the knocked of telegraph pole gun!

An illustration showing the map scrolls that filled the turret of an OP tank instead of the normal breach of a 75mm or 17lbr gun.
The picture in Eindhoven brings the story up to the 18th of September 1944, and was only identified when, in the early 80's, I happened to show Dad the Osprey book the picture was in, highlighting the fact that it was of Dad's unit. Imagine his and my amazement when he exclaimed, "that's our tank!" I suddenly realised who was staring out at me from the pages of history.


When the film "A Bridge too Far" came out Dad was able to see the part his unit played in a very famous campaign recreated on the big screen. He seemed quite impressed with the level of detail, particularly in the recreation of the initial attack up "that road". The most memorable part of that film for me is when Micheal Caine, playing Lieutenant Colonel J.O.E. Vandeleur orders the advance to begin and, as I think of them, the towed 25lbrs of the 55th Field Regiment commence the creeping barrage that led off the attack.

Order of Battle - Guards Armoured Division. Under the Commander Royal Artillery (third column) you can see the 74 over a Red over Blue square arm of service badge seen of the front of Dads tank.

Joe's Bridge where the run up to Eindhoven started on the 17th September.
Thankfully Dad survived the physical and mental hazards of war and married mum in 1948, she too having an interesting wartime experience after volunteering for service in the W.A.A.F. Her experiences are covered in a posting to the BBC WW2 People's War site.
http://www.bbc.co.uk/history/ww2peopleswar/stories/70/a2864270.shtml

After a successful career in sales he later retired to Devon, passing away in 2003.
Mum and Dad in happier days after the war
 
Needless to say, when I field my Guards Armoured Battle-group and an OP is required the OP Tank with the Captain and Sergeant reconnoitring ahead  should now need no introduction. However I made this model a few years ago, and I now see I need to add the obligatory muzzle cover!


Sunday, 15 September 2013

Colours 2013

This weekend has been a bit of a war-games fest for me with a day at the Devon Wargames Group yesterday, (the posts from yesterdays games are now up, so just follow the link from my previous post), followed by a trip up to Newbury with friends to attend Colours 2013.

I have been going to Colours since the early 80's when it used to be staged at the Hexagon in Reading. I really like the show, with a great selection of traders and games on show, and with Salute in the spring and Colours in the autumn, these shows are landmarks in my war-gaming calendar.


I went to Colours today with a very specific shopping list of items required to bring my Big Vimiero game to the table. In the process I chatted to Henry Hyde, editor of Miniature Wargames and reminded him on behalf of all those podcast listeners out there how we were all looking forward to some more chat on "View from the Veranda", which he assured me was on the way. They might even get around to discussing points systems!!


So my shopping bag was bulging at days end with French and British command figures from Fighting 15's, small river sections from TSS, figure bases from Warbases, stone walls and 50mm brass wire spears from Coritani/Magnetic Displays, 15mm Napoleonic baggage from Black Hat Miniatures, Musket & Tomahawks rules from Caliver Books and Jena Auerstadt - The Triumph of the Eagle, from David Lanchester's Books.

In addition, I discovered a lovely new range of 15mm gabions and field emplacements on show from Last Man Last Bullet which would come in very handy for Talavera and a few other Spanish scenarios I have in mind.


However, as you probably have guessed, this blog is an homage to great games and "eye candy" and the day would not have been complete if I hadn't taken the camera to grab some pictures of the games that grabbed my eye.


The first four pictures are of a fantastic 15mm Barbarossa game staged, I think, by the Loughton Strike Force club complete with diving Stuka and patrolling Russian biplane recon/light bomber. I love the attention to detail in this game which really captured the feel of the Eastern Front in WWII.


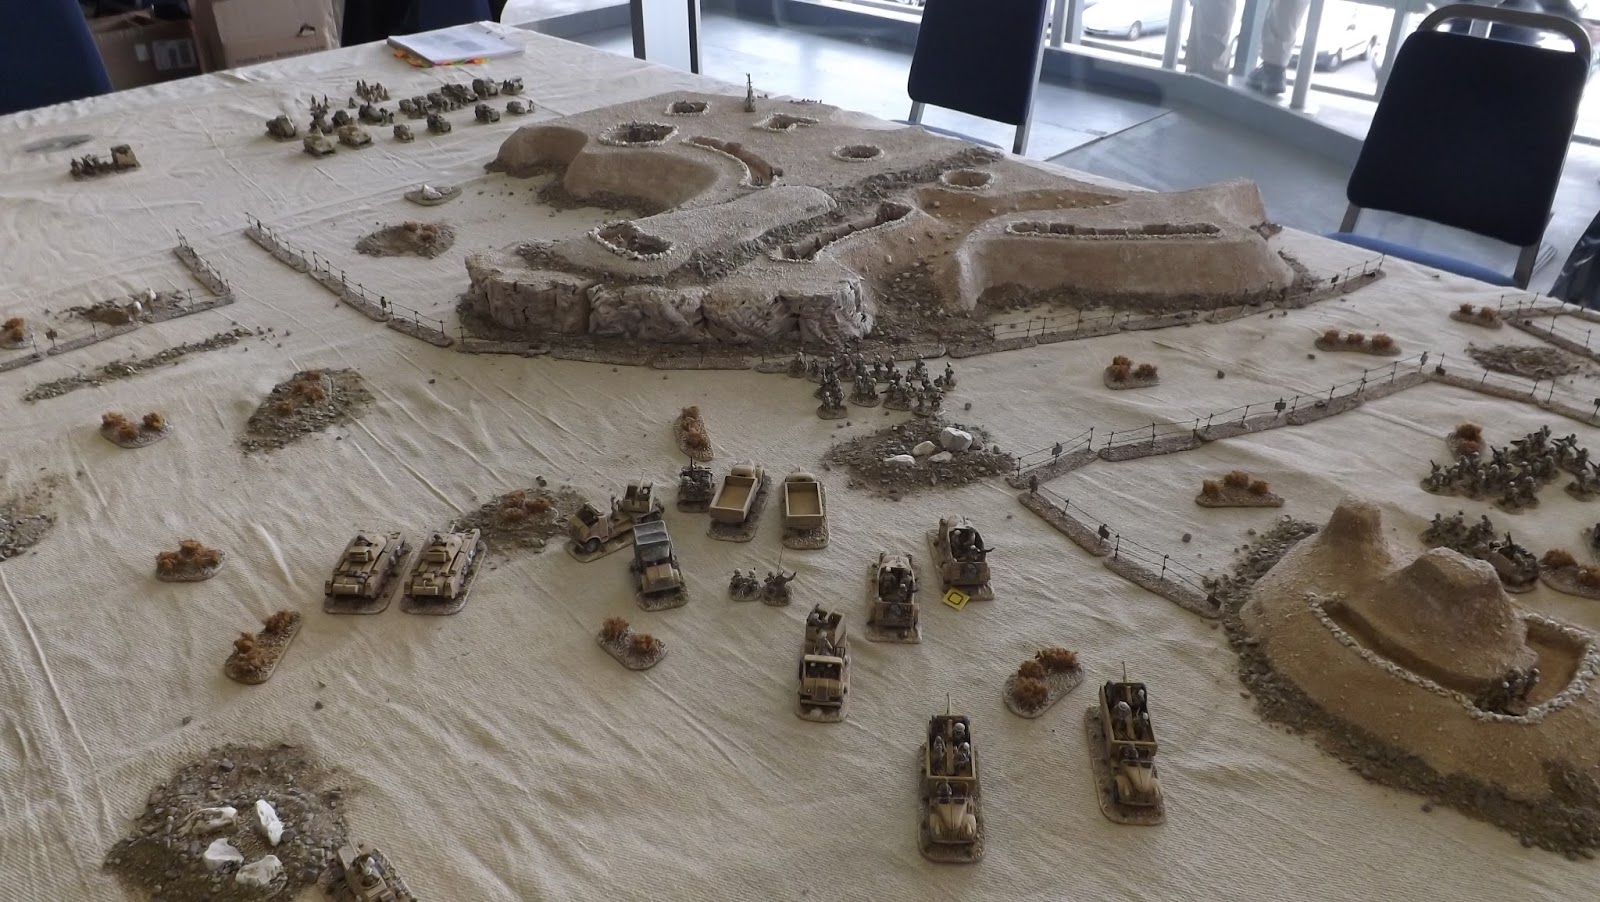
The other game that made me stop looking at trade stands and focus on some great modelling was a 20mm desert affair put on by The Society of Gentleman Gamers. I have featured another of their WWII games earlier this year at Plymouth when they ran a gorgeous Pegasus Bridge game.


The games are set up for Rapid Fire and today's game was based on Naqb Rala which was a feature that formed the southern flank of Rommel's defensive line at El Alamein. Because of the view offered to the Axis of Allied positions the feature had to be taken and the 1st Fighting French Light Division under General Koenig were tasked with its capture.


The game certainly had the "Wow" factor me and the attention to detail on the terrain was evident, based as it was on Italian troop position maps from the period.