
 |
| Sourton Down - A surprise night attack is countered by a daring cavalry attack on an enemy column of march |
Battlefields in Devon - Battle of Bindon
Battlefields in Devon - Battle of Bovey Heath
Battlefields in Devon - Battle of Lydford
The fact that this battle lies on one of the modern roads and major routes through the county indicates why this battle occurred in the first place, and unlike the other English Civil War battle site Will and I checked out at Bovey Heath, occurred at the start of the war when Royalist fortunes were in the ascendancy in the south west as the King and Parliament scrambled to assemble their forces and grab important areas of the country.
 |
| Battlefields in Devon - explored too date |
 |
| King Charles I holding council before the Battle of Edgehill - Charles Landseer 1845 |
Sir Ralph Hopton, 1st Baron Hopton
The County of Devon was England's third largest county and one of the wealthiest which caused it to be a principle target for the King's forced loans that was a principle cause for its leaning towards Parliament. The Devon Parliamentary Committee aware of Royalist mobilisation in Cornwall quickly set about securing and strengthening the defences of Plymouth, Exeter and the north Devon ports and suppressing potential Royalist sympathisers in south Devon.
 |
| Sir Ralph Hopton, leader of the Royalist forces in Cornwall |
In the November of 1642 Hopton, encouraged by promised support from Devon Royalists made his first attempt at taking the cities of Plymouth and Exeter, but was let down by his expected reinforcements and after several months of inconclusive skirmishing, failed to take either and found himself back in Launceston in Cornwall by January 1643.
 |
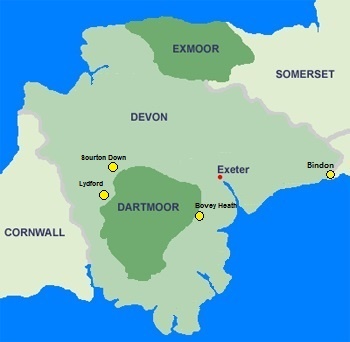
| Map to illustrate the principle towns in Devon with the three key routes into the county from Cornwall via Plymouth, Tavistock and Okehampton |
Ruthven's force of 3,500 men was met by a revived Royalist army of perhaps 5,000 men and was defeated at the Battle of Braddock Down on 19th January 1643, losing twelve hundred men captured and about two hundred dead. The defeat ended all possibilities of Parliamentary control of Cornwall and re-opened the opportunity for the Royalists to re-invade Devon.
Battle of Braddock Down
 |
| Colonel William Ruthven |
A truce was agreed in March 1643, later extended until the 22nd April, with Hopton's forces once again pulled back west of the Tamar. Both sides used the opportunity to recruit and build up their forces prior to renewing hostilities.
By the 22nd April Parliament now had a field force of about fifteen hundred foot and two hundred horse under the energetic twenty-five year old Major General James Chudleigh. The Royalists had superior numbers but were handicapped by being forced to spread their numbers guarding the various crossing points along the Tamar.
Major General James Chudleigh
The main Royalist field force of about twelve hundred men was based at Launceston and it was from there that on the 23rd April Hopton learnt that Chudleigh's force was across the Tamar and advancing on him. The two sides advanced on each other to the east of Launceston and the fighting saw the Royalists gradually receive reinforcements throughout the day as outlying forces arrived to enable them to push Chudleigh's men back over the Tamar. The losses were light on both sides with Chudleigh's force losing about ten dead and forty wounded.
 |
| The Battle of Sourton Down, 25th April 1643 - Hopton's Royalists in column of march moving east towards Okehampton are surprised by Chudleigh's Parliamentarians charging down hill |
The Royalist pursuit of Chudleigh was poor as a mutiny broke out among the Cornish regiments, to quote Hopton:
"The common soldiers, according to their usual custom after a fight, grew disorderly and mutinous, and the commanders were always short of means either to satisfy them or otherwise to command them"
Battle of Sourton Down
When order had finally been restored in Royalist ranks, Chudleigh had fallen back to Okehampton, and it was not until the 25th of April that Hopton was able to exploit his position by launching a dawn attack on the Parliamentary force.
The Royalist force set off on its night march crossing Sourton Down in column led by one hundred and fifty dragoons, then came half the foot followed by the artillery, followed by the remaining foot and three hundred horse and dragoons bringing up the rear.
 |
| The view, sadly obscured today by the modern A30, of South Down Hill, with the heights of Dartmoor beyond, down which Chudleigh launched his surprise charge. |
"By the intolerable neglect of our lying deputy Scout Master, we were surprised by the whole enemy body of horse and foot.... and by the incomparable dullness of Sergeant Major Price, the carriage of our Ammunition and artillery was dismissed, contrary to orders express against it, so that I was forced to this sad Dilemma, to loose the Ordnance, and all that we had here (which in all probability would have been the ruin of the whole Kingdom) or to hazard a desperate Charge (which for ought I knew might have routed the whole army)."
With limited options to deal with the impending threat, Chudleigh decided to fight, to give his force the best chance of escaping the trap.
Leaving his infantry to form up as quickly as they could and follow on, he lead three troops of horse, totalling one hundred and eight men out onto Sourton Down, splitting his force into six squadrons numbering just eighteen men each and spreading them out across South Down Hill, making best use of the darkness and cover.
 |
| The Royalist column of march would have been struck along this road, where the main fighting occurred |
"blissfully unaware of the imminent threat, never they conceived, in better order, nor in better equipage, nor ever, (which had like to have spoiled all) in less apprehension of the Enemy."
Hopton, Colonel Thomas Bassett and Sir John Berkeley were riding at the head of the column when Captain Thomas Drake (a good sounding Devon surname), came galloping out of the darkness, firing at Hopton's dragoons and yelling, "Fall on, fall on, they run, they run!"
 |
| Chudleigh's dragoons, produced a crashing volley that disrupted the Royalist ranks before moving to block the road to Okehampton |
Chudleigh, seeing the success gained and the confusion in the enemy ranks, sent off a messenger towards Okehampton to order his infantry to join him immediately, to exploit the chaos they had caused.
 |
| The fields behind the service area show slight undulations where the prehistoric earthworks gave the Royalist a rallying point |
Meanwhile, Hopton, still unaware as to the size of the force that opposed him, reformed off the road (around the modern day service area) and then probed forward towards the hill, discovering how weak the Parliamentary force was and ordering an immediate counter-attack that pushed Chudleigh's men further up the hill.
As his counter-attack developed Hopton's attention was drawn to the approaching Parliamentary infantry marching up the road from Okehampton. Still unclear about the size of the force that opposed him and fearing that the aggressive posture of the enemy suggested they had been reinforced, he decided to pull his men back towards the prehistoric earthworks on the other side of the road to the north.
 |
| The service area occupies the centre of the battlefield |
Chudleigh realised that they were firing towards the dull red glows of the infantry musket fuses, which they quickly began to extinguish. The order to stop was given and Chudleigh had his men drape their fuses over the surrounding gorse bushes before retiring his force back to their warm billets in Okehampton, leaving the Royalists to spend a very uncomfortable night on the rain sodden, wind swept slopes of Dartmoor. (I have stopped at this service area many times to fuel the car and there is no place in the West Country more exposed to the elements than Sourton Down).
The next morning Hopton realised he had been duped, but seeing the bedraggled exhausted state of his men ordered a retreat back to Launceston to recover.
This skirmish, rather than battle, typified the type of actions that featured in the early civil war in the South West with probably no more than about 3,500 men in Hopton's force against 1,200 men in Chudleigh's, but despite the size of the opposing forces, the factors that occurred with the surprise attack in darkness against a column of march would make this an interesting encounter to model on the table.
Hopton would return and win a decisive victory at the Battle of Stratton the following month, tipping the balance of power in the South West back in favour of the King, not to be seriously challenged until the arrival of Sir Thomas Fairfax, Oliver Cromwell and the New Model Army in 1645-6, which I covered in the post about Bovey Heath (see link above).
Battle of Stratton
Other sources referred to in this post:
Battlefield Walks Devon - Rupert Matthews
The Civil War in the South West - John Barratt
Very interesting! Thanks for sharing. Too bad there is a service station smack in the middle of the battlefield. I always feel a pang of regret when I see that element of history swallowed by modern growth.
ReplyDeleteThanks Adam, yes the progress and developments of time are a bit of a mixed blessing to those of us interested in these dramatic events from the past, but, if you will excuse the pun, we have to choose our battles.
DeleteThere are some places that really should be beyond 'development vadalism' and I have used this blog to promote their saving for future generations, such as the farm at Quatre Bras and the threat of a golf course car park development on the Wars of the Roses site of the Battle of Northampton.
Hopefully if we band together and write and campaign loudly enough we can make a difference to protect really important sites of historic significance and save them for future generations to be able to walk over.