As regular readers of this blog will know, me and my old pal Mr Steve are very prone to taking a day or two, jumping in the cars and trekking off into the Great British Outdoors to explore the history and culture that our homeland is famous for, and as well as sharing the experience together it is also fun sharing it with the like minds that tend to read the blog.
This year we decided to head off to the historical cockpit of England, situated in and north of the Thames Valley straddling the counties of Oxfordshire, my home county of Royal Warwickshire and Northamptonshire where armies coming from and going to London and all parts north and west have traditionally made their way and very often encountered their opposition coming in the opposite direction.
 |
| This time last year Steve and I were enjoying exploring the Wars of the Roses and the battlefields of Blore Heath and Ludford Bridge. JJ's Wargames - The Battles of Blore Heath & Ludford Bridge |
In addition we have a great literary and cultural heritage in these parts ranging from the great bard himself, William Shakespeare, to the greatest author of the twentieth century much to the chagrin of the 'Great and Good' of the arts and literature world, John Ronald Reuel Tolkien who through his poetry and writings invented the modern day genre of Fantasy in his early attempts to create a mythology for England that has since become the greatest film trilogy ever made and likely to remain so for some time to come, Lord of the Rings, fast coming up to being a 25 year old masterpiece.
Of course anyone who has done any exploring of the Great British Outdoors will know that the activity is very much governed by the Great British Weather and our two day odyssey ended up becoming the Tale of Two Days and an exercise in flexible planning which as wargamers we are very used to, being very familiar with the maxim of 'the plan changes on first contact with the enemy' and a look at the sky in the following pictures of our two days will well illustrate the complete contrast we experienced in the space of twenty-four hours.
Day One
As you will often see with any exploring north of Bristol, one of the favourite places to meet up for a natural break and a hearty Gloucestershire breakfast has to be the Gloucestershire Services on the M5 otherwise known as the Hobbit Hole, referring to its unique and notable rounded grass covered roof, and our day started here at Point 1 on the map illustrating our route plan for the day.
The Rollright Stones
The Rollright Stones were our first port-of-call, a Neolithic and Bronze Age complex of three monuments near the village of Long Crompton on the border of Oxfordshire and Gloucestershire and thought to have influenced J. R. R. Tolkien with his imagining of the Barrow-downs in his Lord of the Rings story.
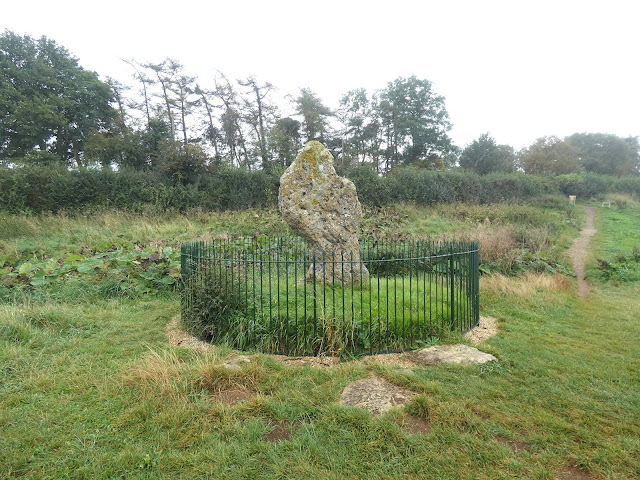
The three separate monuments are a dolman, named 'Whispering Knights', a neolithic/bronze age burial place or cairn, the second named The King's Men', a similarly dated stone circle and the 'King's Stone' a single monolith.
As regular followers of the blog will know, Devon and Dartmoor in particular is blessed with many similarly aged stone circles, cairns and stone rows, and it was fun seeing these variations on the theme and imagining the significance they still seem to carry for locals and visitors alike if the various tributes of jewellery and coins left on them were any indication.
 |
| The King's Men Stone Circle - see what I mean about the weather and this was the best half of the day! |
The Whispering Knights burial chamber is a marvel when you consider the technology to move and build with giant stones like this and we are looking at a construction dated to around 3,800 to 3,500 BC.
 |
| Tolkien's Barrow-downs come easily to mind with a view like this, particularly amid the rainy haze on the day we visited. |
Battlefield of Edgehill and Radway Village Church
So if you have read this far you will recall my remark about 'the plan changes on first contact with the enemy' and this is the part of the day where it started to take a major detour as the weather started to close in and the expected views out over the English Civil War battlefield that Carolyn and I enjoyed back in 2017 were non existent and so I have included a link to the post I wrote back then to show you what we were hoping to see on a battlefield that is not that easy to explore at the best of times with an MOD depot site slapped across it.
 |
| JJ's Wargames - Battle of Edgehill 1642 |
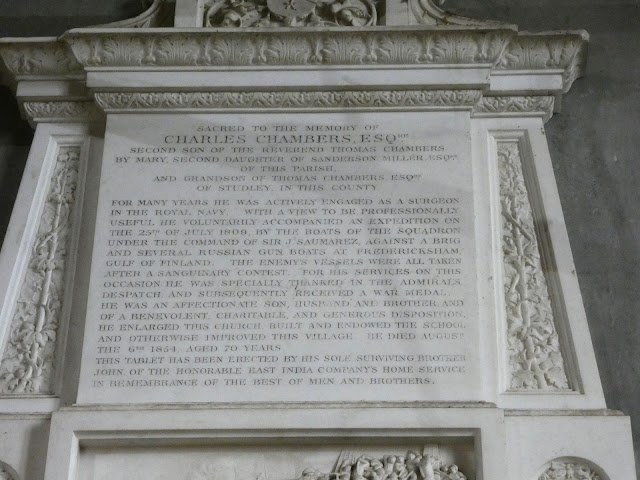
So we contented ourselves initially to checking out the battlefield display in Radway Church, which is always worth a look together with some monuments I saw on my first visit and recorded in my post from then and one I didn't spot at the time but equally interesting recording the exploits of Charles Chambers esquire, Surgeon in the Royal Navy.
Radway Village, as seen on the map above, is a pivotal landmark when it comes to orientating oneself around the battle site and has a some very interesting parts to the village which were in existence at the time of it, but first we went and had a look at the battlefield display in Radway Church.
 |
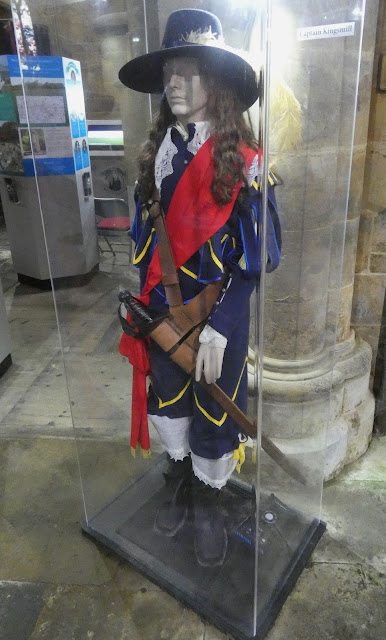
| The Tomb of Captain Henry Kingsmill killed at Edgehill who is buried at the Old Radway Church |
I always like to check out individual memorials in English churches, that often have historical stories linked to the individuals concerned, and so it was when I spotted the memorial to Charles Chambers Esquire.
As a surgeon in the Royal Navy in 1809, Charles Chambers participated in the Anglo-Russian War of 1808-1812, a mainly naval war fought in the Baltic between Britain and Russia after the latter signed the Treaty of Tilsit with Napoleon on the 7th July 1807 that ended the war with France.
 |
| HMS Salsette a 36-gun teak built frigate constructed for the Royal Navy by the East India Company seen here in action with the Russian cutter Opyt |
The threat posed by Russia to Britain's trade with Finland for vital naval stores of Baltic timber were of critical importance to the Royal Navy, this threat only raised by the Russian occupation of the Swedish possession, Finland, following the refusal of the latter to join in with Napoleon's Continental blockade on British trade.
Britain's response was to send a fleet into the Baltic under the command of Sir James Saumarez in 1808 to operate along side the Swedish navy.
The action in which Chambers participated was recorded by William James in his Naval History of Great Britain Volume V;
'On the 25th of July Captain Charles Dudley Paten commanding a British squadron, composed of his own ship the Princess-Caroline 74, the Minotaur, of the same force, Captain John Barrett, 18-pounder 32-gun frigate Cerberus, Captain Henry Whitby, and 18-gun ship-sloop Prometheus, Captain Thomas Forrest, permitted the latter to lead the boats of the squadron, 17 in number, to the attack of four Russian gun-boats and an armed brig, lying at Fredericksham, near Apso roads, in the gulf of Finland.
Naval General Service Medal with 'Boat Service 1809' clasp awarded to able-seamen David Hume of HMS Princess Caroline 74-guns, a Danish prize captured in 1808.
After dark the boats, commanded by Captain Forrest, who was assisted by, among other officers, Lieutenants James Bashford of the Princess-Caroline, John James Callenan, and Lieutenants of marines William Wilkin, of the Minotaur, Lieutenants Robert Pettet and John Simpson, of the Cerberus, and Gawen Forster and Thomas Finnimore, of the Prometheus, pushed off from the squadron, and at 10 h. 30 m. p.m. commenced the attack. After a most desperate and sanguinary conflict, three of the gun-boats, mounting two long 38-pounders each, and having on board between them 137 men, besides an armed transport brig, with 23 men, were captured and brought off.
Costly, indeed, were the prizes. The British loss
amounted to one lieutenant (John James Callenan), one second lieutenant of
marines (William Wilkin), one midshipman (Gordon Carrington), and six seamen
and marines killed; Captain Forrest himself, one lieutenant (Gawen Forster),
three midshipmen (George Elvey, Thomas Milne, and John Chalmers), and 46 seamen
and marines wounded.
 |
| A 1794 map illustrating the position of the Aspo Roads, Fredericksham in the Gulf of Finland |
The Russians, on their side, acknowledged a loss of 28 killed and 59 wounded; making a total of 47 men killed and 110 wounded, in obtaining possession of three gun-boats. One of these gun-boats, No. 62, was so obstinately defended, that every man of her crew, 44 in number, was either killed or wounded. before she surrendered: the killed alone amounted to 24. The result of this enterprise was a defeat to the Russians certainly, but under circumstances that reflected the brightest honour upon the character of their navy. For the gallantry, he had shown on the occasion, Captain Forrest was promoted to post-rank.'
On our way through the village to the suspected location for the old church we passed Radway Grange, the stately pile once owned by John Washington at the time of the battle and the paternal great grandfather of George Washington, the first President of the United States of America.
 |
| Radway Grange owned by the John Washington at the time of the Battle of Edgehill. He was a Royalist and a merchant and would emigrate to Virginia in 1656. |
Walking up the slight hill past the Grange and with a little help from a passing local we found the narrow path that took us to the site of the old Radway Church as seen in the illustration below
 |
| Colonel Frederick Miller's portrayal of Radway Village Church seen here in 1857 |
The old church may be gone but it is certainly not forgotten by the village or its important historical significance.
 |
| The Miller vault can be seen in the plan of the old church marked in blue hash lines, and the grave sites of certain individuals such as Charles Chambers and Elspeth Eritage. |
The principle feature to be seen is the Miller vault, the family who first established Radway Grange as seen above and whose family vault was constructed with the extension to the church in 1739.
The vault contains the remains of Lieutenant Colonel Fiennes Sanderson Miller CBV, JP, DL (1738 - 1862) of the 6th Inniskilling Dragoons, and his wife Georgiana Sibella Miller.
Colonel Miller took part in the charge of the Union Cavalry Brigade on the 18th of June 1815 at Waterloo, the three regiments in it being the 1st Royal Regiment of Dragoons, 2nd Regiment (Scots Greys) of Dragoons and the 6th Inniskilling Dragoons, representing regiments from England, Scotland and Ireland, and the charge resulting in the capture of two French eagles and the halting of the attack by D'Erlons 1st French Corps.
 |
| The Miller vault |
Lieutenant Colonel Frederick Miller VC, seen below is named on the vault but he would die in Cape Town, South Africa, in 1874 aged 42 from an unknown illness and where he was buried.
 |
| Grenadier and Coldstream Guards in confused close combat against men from the Russian Taroutine Regiment at the Battle of Inkerman - Graham Turner |
His citation read;
'For having, at the Battle of Inkermann, personally attacked three Russians, and with the gunners of his Division of the Battery, prevented the Russians from doing mischief to the guns which they had surrounded. Part of a Regiment of English infantry had previously retired through the Battery in front of this body of Russians.'
 |
| Lt Col. Millers surviving medals, part of the Lord Ashcroft Medal Collection are now housed in the Imperial War Museum. |
 |
| The oldest surviving headstone from the church graveyard of St Peter's, Radway, Elspeth Eritage who died 4th January 1646. |
With our inadvertent change of plan to explore the old Radway Churchyard, we decided to take a chance on the weather holding off despite the ever darkening skies and head over to the Wars of the Roses battlefield of Edgcote, or at least its suspected location, this little trip taking us via the English Civil War battlefield of Cropredy Bridge.
 |
| JJ's Wargames - Battle of Cropredy Bridge 1644 |
We didn't include Cropredy Bridge in this trip so if you want to check it out you can follow the link above to Carolyn's and my visit back in 2017.
 |
| The walk towards Edgcote Hill beyond, with the skies warning of what was to come! |
Parking the car in the little village of Upper Wardington, Steve and I donned the walking boots and waterproofs and headed off across the fields seen in the picture above following the footpath that leads across the field and up Edgcote hill beyond, in between the gap in the trees on the horizon at the top of the hill.
Pressing on despite the ever glowering skies above, we reached the gap in the trees only for the heavens to open, forcing us to take shelter under the trees and see if it was to be just a passing shower. Sadly it wasn't and as the intensity of the rain increased we decided to call it a day and trudge back through the torrent to the cars and off to our accommodation for the night in the village of Kings Sutton and a well earned beverage in one of its local hostelries.
 |
| Sleepy little King's Sutton, here and below, proved a very pretty place to stay after our drenching on Edgcote Hill. |
Day Two
Battle of Edgcote
Our second day couldn't have been more different, weather wise, than the day before with bright sunshine heralding the start of it and barely a cloud in the sky, encouraging a drive back to Upper Wardington and a trek across the top of Edgcote Hill to see where Lord Herbert, Earl of Pembroke and his men might have seen the approach of Ogle's Northern Rebels on the opposite heights above Danes Moor.
The map below is taken from 'Blood Royal' by Hugh Bicheno as he states in his chapter in the lead up to the battle;
'The stage was set for one of the most fiercely fought battles of the Wars of the Roses after Towton, which it uncannily resembled in terms of battlefield evolution. It may well have been even bloodier as a proportion of the men engaged, and its impact on English history may have been greater.'
The battle is perhaps one of the more enigmatic actions of the Wars of the Roses, with poor sources and documentation often giving conflicting accounts, with uncertainty as to where the fighting actually took place, to who was actually present, and in what numbers, so take this account with usual pinch of salt when looking at battle sites that have not had a thorough archaeological assessment to validate the several theories of what occurred on a date that even that is up for discussion, with two favourite options being the 24th or 26th of July 1649.
 |
| Standing in what would have been the Royalist positions of Herbert's line looking south-west as per the map above |
An early version (Edward Hall's, published in 1550) of this battle sees the Royalist forces of Herbert (Earl of Pembroke) and Stafford (Earl of Devon) on the march to join forces and reinforce King Edward IV, keen to put a quick stop to a minor rebellion that started in the north and with those of Ogle's to join with Warwick's Northern Rebels, hoping to force an action with the king somewhere north of London as part of a coup to overthrow Edward by Warwick and the king's brother, George Plantagenet, the Duke of Clarence.
Bicheno suggests Ogle changed his southern march towards Banbury when he discovered that Herbert and Stafford had separated, with the latter Stafford continuing their previous joint march along the old Fosse Way, with much speculation as to why this happened, but with Bicheno discounting the earlier suggestion that Stafford took the bulk of the experienced archers away from Herbert's force, compellingly arguing that Herbert, the victor of Mortimer's Cross using arrow storm tactics, would have been very unlikely to have been marching without a full contingent of highly competent Welsh longbowmen accompanying his corps of Welsh retained nobles.
According to Bicheno, the two opposing armies closed on each other on the 25th July with Ogle marching south from Daventry and camping on the Byfield Plain (see map above) next to a ford over the River Cherwell and formed up on a hill between two rivulets, about a mile away overlooking Danes Moor, or just beyond the HS2 constructions seen in the picture above, with and estimated strength of between 3-6,000 men.
Similarly after camping over night in and around Banbury, Herbert marched the next morning on the 26th July to crest the summit of Edgcote Hill, to overlook Danes Moor and the rebel army of Lord Ogle beyond, having a similar number of men with Bicheno opting for the higher number of 6,000 men for both sides.
 |
| Likewise standing in what would have been the Royalist, Yorkist positions of Herbert's line looking north-east as per the map above |
Bicheno dismisses the beloved version of Ogle's superior archery forcing Herbert to descend from his lofty position, rather suggesting that if anything Herbert may have had the superior archery component and emboldened, sought to come down the hill with a short charge and close to combat, likely met by Ogle's men making a short charge from their slight hill to meet them, about where the railway workings can be seen in the picture.
'The Earl of Pembroke behaved himself like a hardy knight and expert captain, but his brother , Sir Richard Herbert so valiantly acquitted himself that with his poleaxe in hand (as his enemies did afterwards report) he was by fine force passed through the battle of his adversaries and without any mortal wound returned. If every one of his followers and companions in arms had done but half the acts which he that day by his noble prowess achieved, the Northmen had obtained neither valour nor victory.'
Hall's suggestion of 5,000 casualties among Herbert's men seems a likely gross exaggeration, with more credible reassessments suggesting in the order of a still heavy loss of some 2,000 men and the more likely of Hall's figures of 500 men lost to Ogle and Clapham.
Both Steve and I are admirers of Tolkien's works and, if the signs in Wolvercote Cemetery are anything to go by, directing visitors to the grave site of him and his beloved wife Edith, we are not alone in wanting to make the pilgrimage to Oxford to pay our respects to the great man and his legacy.
However with victory in the grasp of Herbert's men, the reference to Towton relates to the Northmen being saved at the point of annihilation by the last minute arrival of reinforcements, to quote Hall;
'When the Welshmen were at the very point to have obtained the victory (the Northmen being in manner discomforted) John Clapham Esquire, servant of the Earl of Warwick, mounted up the side of east hill accompanied only with 500 men gathered of all the rascals of the town of Northampton and other villages about, having borne before them the standard of the earl with the white bear, crying 'a Warwick, a Warwick'. The Welshmen thinking that the Earl of Warwick had come on them with all his puissance, so that the men amazed fled: the Northmen then pursued and slew without mercy for the cruelty they had shown Lord Latimer's son. So that of the Welshmen there was slain about 5,000 besides them that were fled and taken.'
Hall's suggestion of 5,000 casualties among Herbert's men seems a likely gross exaggeration, with more credible reassessments suggesting in the order of a still heavy loss of some 2,000 men and the more likely of Hall's figures of 500 men lost to Ogle and Clapham.
Both William and Richard Herbert were captured in the rout and brought before Warwick in Northampton and, despite William's pleas for the sparing of his brother, saw both men beheaded without the pretence of a trial.
The fate of the rebellion against King Edward by Warwick and the Duke of Clarence, Edward's younger brother, would fail to gather popular support and despite a short term of custody in Middleham Castle in August, Edward was released and back on the throne by September.
The decision to make an early start to our second day had been rewarded with an excellent walk over Edgcote Hill to enjoy perfect sunny condition for looking at battlefields, in stark contrast to the day before, and so we retraced our tracks towards Oxford and with the focus shifted towards one of the greatest authors of the twentieth century, John Ronald Reuel Tolkien, a Warwickshire man forever associated with Oxford and it's University, and most notably some of its pubs.
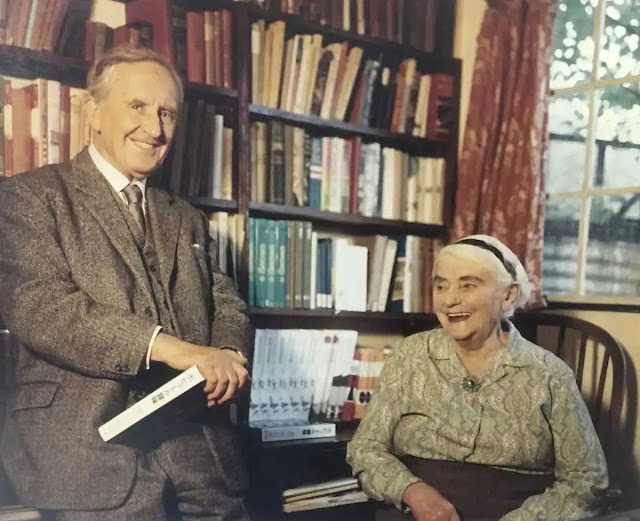 |
| Professor John Ronald Reuel Tolkien and his wife Edith in later years following the publication of his great works, The Hobbit and The Lord of the Rings. |
Both Steve and I are admirers of Tolkien's works and, if the signs in Wolvercote Cemetery are anything to go by, directing visitors to the grave site of him and his beloved wife Edith, we are not alone in wanting to make the pilgrimage to Oxford to pay our respects to the great man and his legacy.
Indeed on the day we were not alone, helping guide some tourists all the way from Los Angeles to the grave site, and exchanging thoughts about other related locations they might have wanted to check out which was great fun.
Having read the books several times, including the Silmarillion, which unlike many, I started with and enjoyed, the reference to Luthien and Beren on the grave stone was immediately understood and appreciated and my mind was cast back a year ago with memories of Carolyn's and my trip to New Zealand and the places visited that related to Sir Peter Jackson's great realisations of Tolkien's books to film, with a link below to my post covering our trip.
 |
| JJ's Wargames - A Wizard in my Suitcase |
Oxford was of course the creative home of Tolkien for many years, shared with his friends in the literary discussion group, The Inklings, in the decades of the early thirties and up to late 1949, keen on fictional writing and fantasy in particular and including among its ranks other notable members such as C.S. Lewis and Tolkien's son Christopher.
Two of the pubs most famously associated with their regular meetings and discussions of each others works are still to be visited in the city today, but sadly with one of them, The Eagle and Child, closed for business, a sadly common site among British pubs these days that has seen a marked contraction in this area of British social life.
Happily the other establishment still open to the public, the Lamb and Flag pub is still a going concern and so we decided to refresh ourselves there after our morning exertions.
 |
| Saruman the White, my holiday treat from my visit to Weta Studios in Wellington |
Steve mused with me what the elvish writing over the door could possibly be, to which I absently replied, probably one of his most famous pieces of Elvish 'speak friend and enter' as seen on the entrance to the Mines of Moria.
 |
| Steve and I enjoying soaking up the atmosphere and the odd beverage in the Lamb and Flag, Oxford. |
Whilst in Oxford we decided to pop along to another great institution in the city, The Ashmolean Museum, that I last visited back in 2014, with stuff in their that I still need to go back to have a proper look at.
 |
| The Roman Emperor Augustus pictured on my visit to the Ashmolean Museum, Oxford, back in 2014 JJ's Wargames - Ashmolean Museum 2014 |
Time was short and as we still had lots to fit in for the rest of the day, I headed back to the Roman exhibits and grabbed some pictures of friezes from the Arch of Trajan on the Via Traiana, Beneventum, erected in 114 AD on a road designed to shorten the route from Rome to Brundisium.
My favourite Roman period is the first century from the Year of the Four Emperors and the rise of Vespasian to Hadrian with a great interest in Trajan and his war with the Dacians and so I was immediately drawn to this depiction of the Emperor shown recruiting troops for the campaign.
 |
| Another passion, the Romano-Dacian collection in action with only half of the units completed, and another project to come back to when the inspiration grabs me, which it will. JJ's Wargames - Augustus to Aurelian, River Crossing |
By the time we came out of the Ashmolean, a lunch time stop was on the schedule, and another literature, TV inspired one at that, for those who were followers of the British TV police detective series, Morse and his colleague detective-sergeant Lewis, known to enjoy a liquid refreshment or two around Oxford following a particularly harrowing or difficult case to solve.
 |
| Morse and Lewis indulging in a 'post case, wash up meeting' rather similar to a Devon Wargames Group 'post game analysis session', but slightly less intense. https://morseandlewisandendeavour.com/2017/06/30/inspector-morse-pub-crawl-including-downloadable-pdfs-of-pub-locations/ |
Our chosen pub for lunch was the delightfully situated Trout Inn that featured in the episode 'Second Time Around'.
The memorial was set up in the wake of a fatal crash involving two airman of the newly created Royal Flying Corps, formed in May 1912, in the very early pioneering years of aviation.
The aircraft involved was a Bristol Coanda Monoplane 263 of 3 Squadron, RFC, that took off from the nearby Larkhill airfield at 07.00, September 10th 1912, as part of the RFC's first involvement in that autumns army manoeuvres, testing out theories of army cooperation flights.
 |
| Bristol Coanda Monoplane 263 |
At the controls was Lieutenant Edward Hotchkiss, aged 28, chief test pilot for the Bristol Aeroplane Company and with him a South African, Lieutenant Claude Bettington, recently of the Royal Artillery, but, with a fascination for the possibilities of using aircraft in an observation and reconnaissance role, who had recently qualified to fly and immediately transferred to the newly formed RFC.
It was great to see that the people of Oxford had come together to mark the centenary of this accident which in 1913 saw 2,000 people contribute to the fund to establish the memorial, after the two men were laid to rest the previous year atop artillery gun carriages, accompanied by soldiers of the Oxford and Buckinghamshire Light Infantry on a parade through the city of Oxford with streets lined by thousands of people wanting to pay their respects.
Their contribution to British military flying was remembered on the centenary of their deaths in 2012, with a ceremony organised by the Wolvercote Local History Society and Oxford City Council, with a bugler sounding the last post.
Suitably refreshed at the Trout Inn it was time for Steve and I to head off to our final destination on our two day history beano, and this time on our way home calling in at the oldest bridge on the River Thames at the militarily important crossing point of Radcot.
The importance of the crossing point at Radcot is illustrated throughout the long history of the area with battles to control it fought in the medieval period and the English Civil War as armies have contested the approaches to London along the Thames Valley with marks left on the landscape that includes a Norman castle from the time of Empress Matilda and the most recent anticipated threat leaving its historical imprint with a WWII bunker in situ in the pub carpark.
Parking our cars at the nearby Swan Inn we planned our walk from the banks of the river in the beer garden, making the best of the second day's weather, the pub notable for as well as offering a fine selection of refreshments has a great display commemorating the local history.
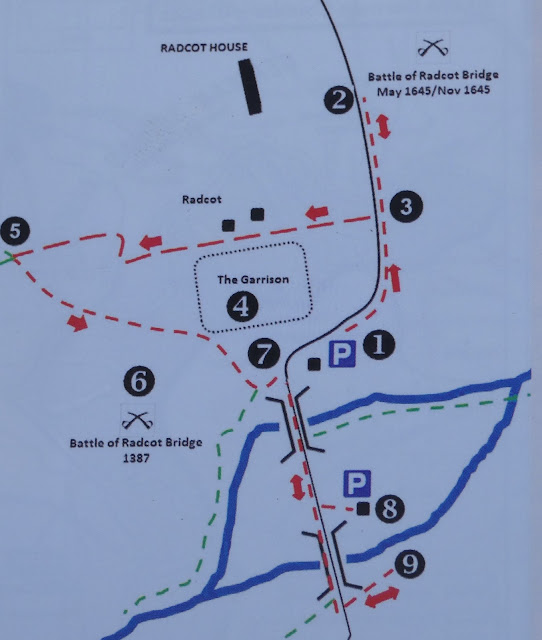
As with most of our little adventures Steve and I like to do a bit of pre-trip prep work, gathering our sources of information and of course maps, with in this case, one I grabbed prior to the trip seen below and one we actually used on the day, seen above.
 |
| The displays to be seen in the Swan Inn |
The so-called Battle of Radcot bridge on the 3rd of May 1645 was in fact no more than a cavalry skirmish between the opposing forces led by Lord George Goring and Lieutenant General of Horse Cromwell and was the culminating action of the latter's raid around Royalist Oxford in the spring of that year, that saw a lightning strike at Royalist garrisons around the city that included the rounding-up of as many draught horses as he could in order to hinder the movements of the king's artillery chain, with plans afoot to relieve the siege of Chester and prosecute the Royalist siege of Taunton in the west.
In addition Cromwell's audacious handling of his force of horse saw him bluff the Royalist garrison at Bletchingdon House to surrender, despite him having no artillery, this after routing a brigade or Royalist horse at Islip Bridge, compelled Sir Henry Vaughan's regiment to surrender at Bampton Castle, catching them by surprise, then crossing the Thames and occupying Farringdon but being rebuffed by the garrison of Farringdon House after summoning them to surrender, forcing a lull in the raid as Cromwell rode to Newbury to consult with the new commander of the New Model Army, Sir Thomas Fairfax.
 |
| JJ's Wargames - Battle of Langport, 10th July, 1645 |
It was while he was at Newbury that Cromwell learnt of a Royalist force approaching his at Farringdon, an opposing Royalist force of horse led by Lord George Goring, a very competent and able commander, thus setting the scene for a night time skirmish around Radcot Bridge, that would see Cromwell's men driven back over the Thames and Goring's reputation so enhanced by his success that it would lead to disastrous results for the Royalist cause later that year with Goring's final defeat at Langport sealed by the very man captured at Radcot Bridge, Major Christopher Bethel, the story of which I covered in my post from 2016 looking at the Battle of Langport, link above.
 |
| Map - Gregg Archer |
 |
| Map - Gregg Archer |
 |
| Point 2 |
 |
| Pdf link to the Battlefield Trust E-Journal Publication 'Battalia, Vol I , 2017' The Battle of Radcot Bridge, 2-3 May, 1645 https://www.battlefieldstrust.com/cms/viewdoc.asp?a=128&b=477&c=407&d=547151098 |
The Time Team tv show, Series 16, Episode 4, did an exploration of this site a few years ago in 2009, which can be followed up here.
 |
| The Garrison or Matilda's Castle |
In addition there is evidence of earlier Roman remains on the site, together with later English Civil War ramparts likely built by Parliamentary troops to house artillery pieces used by them to bombard the Royalist garrison in Radcot House.
A description of the action recounts;
'De Vere's army arrived at the twin Thames bridges, only to find the first sabotaged and the second guarded by Derby's troops. Gloucester's men were still closing in from the north. The Royalists turned and deserted at the first shock of Bolingbroke's pikes. They could only surrender or else make desperate rushes over or through the river in an attempt to escape. Mounting a fresh horse, De Vere pushed forward but, with Pidnell Bridge demolished, the terrified Earl was forced to have his mount leap into the river and face up stream. Hugging the bank, he lightened his load by dropping his gauntlets, sword and casque. At Radcot Bridge, stood a company of archers. Dodging their deadly arrows through the stream again, he sought a ford but none was to be found. As night came on, he slipped from his horse, put off his cuirass, plunged into the stream, and swimming across, escaped with the loss of everything but life and limb.
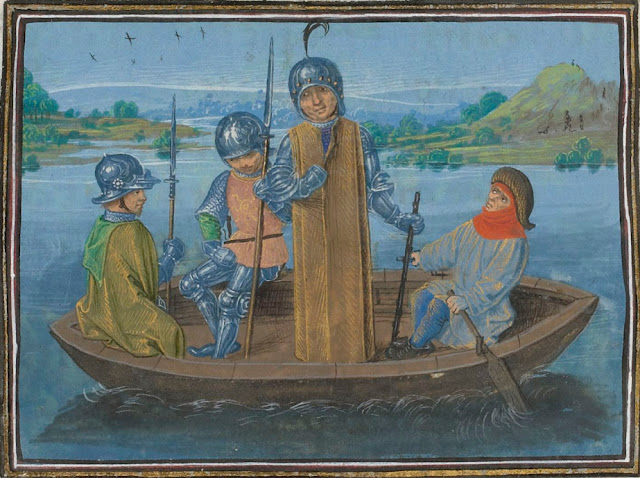 |
| A rather stylised 15th century depiction of De Vere's crossing of the River Thames if the written account is to be believed. |
Hiding in the woods by day, De Vere stole away into the western shires where, for a while, he was safe. His enemies believed him dead. Horse, casque, sword and cuirass being found next morning by the riverbank, his pursuers fancied that he had been drowned. However, he eventually managed to flee to France, where he died in exile. With their victory at Radcot Bridge, the 'Lords Appellant' were able to gain a short-lived control over the country. This culminated in the Merciless Parliament in which King Richard's main allies were condemned.'
 |
| Point 6. Suitable ground perhaps for De Vere's men to try their pikes with Bolingbroke's rebels |
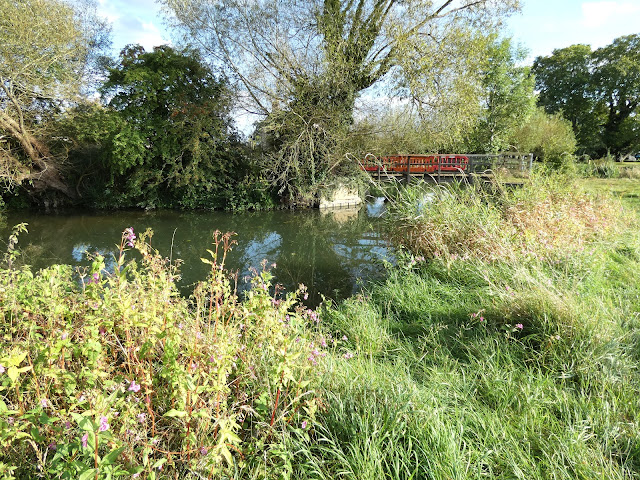 |
| Point 7 and on our way back to the bridges and perhaps the place where De Vere took a dip dodging rebel arrows. |
 |
| Point 8, the converted WWII bunker under new management. |
 |
| Point 8. Radcot Bridge, the oldest bridge on the River Thames. |
With our walk around the multiple historic sites at Radcot Bridge complete it was time to make our way home having successfully adapted the initial plan following contact with 'General Weather' and, I think, illustrating the amazing variety of historical places to see, no matter what the conditions, with a little bit of flexibility added to the mix.
Great fun and here's to our next adventure
JJ
Next up, British 74's for Camperdown are in the rigging yard next week and fast approaching completion, I have a book review to do and the Antipodean adventure continues, more anon.










No comments:
Post a Comment