
 |
| The final 'table test', seeing how the completed model looks on the terrain mat |
OK, so picking up where we left off in part one of this series of two posts looking at creating breached wall sections from Warbases excellent range of MDF Roman walls we now move on to finishing off the prepared breaches together with the bases for them and the rest of the wall sections and gate house designed to marry the whole thing together.
Terrain Build Uupdate - Breached Walls Part One
This next part of the construction uses all the skills and techniques covered in other posts I have done recently, looking at creating scatter terrain and modular sloped hills, namely the application of and sealing down of the coats of ballast and scatter that create the final terrained look and just as importantly sealing the whole model against constant handling by wargamers.
I will just cover off the basics here in this post but if you want to get a fuller description then you will need to go to my Labels tabs in the right hand column and find 'Terrain' and start with my series of posts looking at trees and scatter terrain from December 2018 entitled similarly to this post 'Terrain Build Update' and follow the series where I go into the basics of terrain work.
 |
| Ballast and sand added to the breaches to create the rubble look |
So with the breached sections carved into shape, bits of large chunks of masonry added and a coat of plaster smeared on to lessen the larger, stranger looking air pocket holes formed in the expanding foam it was time to add the different sized pieces of sand and ballast to the coat of watered down PVA and allow the the whole thing to dry thoroughly.
 |
| It is now that the large pieces of masonry start to stand out and add that extra level of detail |
 |
| In addition to the breaches the wall section bases got their texture added to their bases |

As well as working on the breaches I needed to add texture to the bases on the other wall sections designed to help marry the whole thing together.
Note the little areas of grittier ballast designed to allow me to leave areas of the ground work showing through the turfed areas - I don't want this to look like a golf course when its finished!
 |
| Strictly speaking you would expect a gate house like this to have a 'cobbled stone' entrance but that would have required laying down a textured approach and sanding back the bottom of the gates so I decided on sticking to a more 'new build' look and plenty of dirt. |

Once the ballast has dried thoroughly it was time to apply my trusty mix of PVA/water/chocolate brown house paint to apply the first sealing coat to the model and to provide a nice shadowy undercoat to the rest of the paint job.

You can be quite liberal with the brown and not worry about covering the detailed bits of masonry as all that detail will still get picked out by the next paint coat and areas of brown left give an impression of shadow in the recesses and great depth to the overall look.


Once the brown undercoat is dried thoroughly it is on to the first west-brush coat of highlight for the breaches where a going over of dark grey, dry brushed light grey was the first step.
Then the lighter chunks of stonework were picked out with the Coat d'Arms Field drab, highlighted Horse Tone Roan, as for the wall tops and pavement stones and I used a bit of both those colours to lightly dry brush areas of the rest of the breached rubble to add variety to the grey colour overall.

 |
| Dry brushing the detail into the rubble and the facing stonework just showing at the edges of the cracked plaster |
Finally some of that lovely creamy white wall plaster would likely show especially at the outer reaches of the rubble spill where the top of the wall would have fallen out furthest from the rest of rubble spill.
Not too much though as most of it would be in among the core stone rubble.
This is also an opportunity to dry brush and accentuate the parts of the facing stonework revealed at the edges of the broken plaster which was created using the foam-board in part one.

One other touch that I didn't mention in part one was that I carefully scored crack lines into the MDF around the breached areas implying the stress to the remaining sections of plaster work still standing.
 |
| Note the areas of cracked plaster work showing around the breach, together with a few small pieces lying among the rubble |
Once the rubble work was done I simply painted the wall that remained in the same colours as the standing sections (you will need to refer back to my posts from early 2018 to see the first build of my Roman wall and buildings to see what I did).
After that it was simply a case of dry-brushing the ground work with my light golden brown craft paint as per the scatter terrain posts.
 |
| All the painting done and left to dry overnight ready for the final coats of scatter to create the turf work |

With all the painting done and the sections brought together to be left to dry thoroughly overnight you can already get a sense of how the walls will look once the turf scatter and clump grass tufts are applied.
Needless to say I went to bed satisfied with a good days work and really looking forward to the following day to bring this project to a close.


The next day was all about getting the ground work finished which means applying the three colour ground scatter, grass tufts and sealing with a final spray of PVA and water to lock the scatter down and blend the colours.


Again the detail of doing the scatter terrain work is covered in the post looking at the modular hills, suffice to say I was primarily looking to put the darker shade turf in close to the wall footings, along the border of the road entering the gate and around the broken groundwork.
Once that was done I applied a few areas of lighter scatter around randomly to create some variation to the turf, followed up by an overall finish of the mid green.
The colours when first applied can be quite a contrast, but a spray of water and PVA through an atomiser, the ones women use for perfumes and such like, will cause the colours to leech into each other and bring the whole thing together to create a more natural look.

 |
| Darker shades are applied around the foot of the wall with a few lighter patches randomly applies on the open turf. Then finished off with tufts. Note this turf has just been sprayed and already the colours are starting to blend as it dries. |
One important thing to remember when applying the turf is to let the pieces dry off above any flat surface. The picture below shows all my sections drying on top of paint tins. This is really important as excess PVA/water can run off under the bases and will dry, firmly sticking your sections to the surface they are left standing on if you are not careful.
 |
| A little grass texture was applied to the inside section of the breaches to imply an internal grass verge |
 |
| The base I planned for my gate house did not allow for the steps projecting from the back of the two towers and so I added left over wall capping to make a new layer of paving to go under each step |
Once the turf was on, I allowed the bases to dry out a bit before adding the grass tufts and a few meadow flowers for variety.
The picture below shows all the sections turfed and now dry allowing me to put them out on the table together without any concern for them sticking to each other or the table cover.

Grassing the breached sections was a little different in that the bases had internal parts as did the gate house and I wanted to imply a small grassed area between the outer wall and the internal streets so added a small amount of turf on those internal parts of the base.
However in the wall is not the same as outside it and so I did not put any tufts on the inner parts, implying a better kept area of grass than that outside the wall.


Another consideration is that I intend to run battering rams and siege towers up against this wall and so I decided to be sparing with the grass tufts to allow plenty of room to get models placed on flat ground up against the wall.

My games are all about large scale battle with multi-figure bases and I am not really a fan of the individual figure based rules popular with WAB and some of the fantasy sets.
The breaches will accommodate individual figures placed on them to indicate the struggle when fought over, but are principally designed to show when a breach has been effected and where on the wall it is.


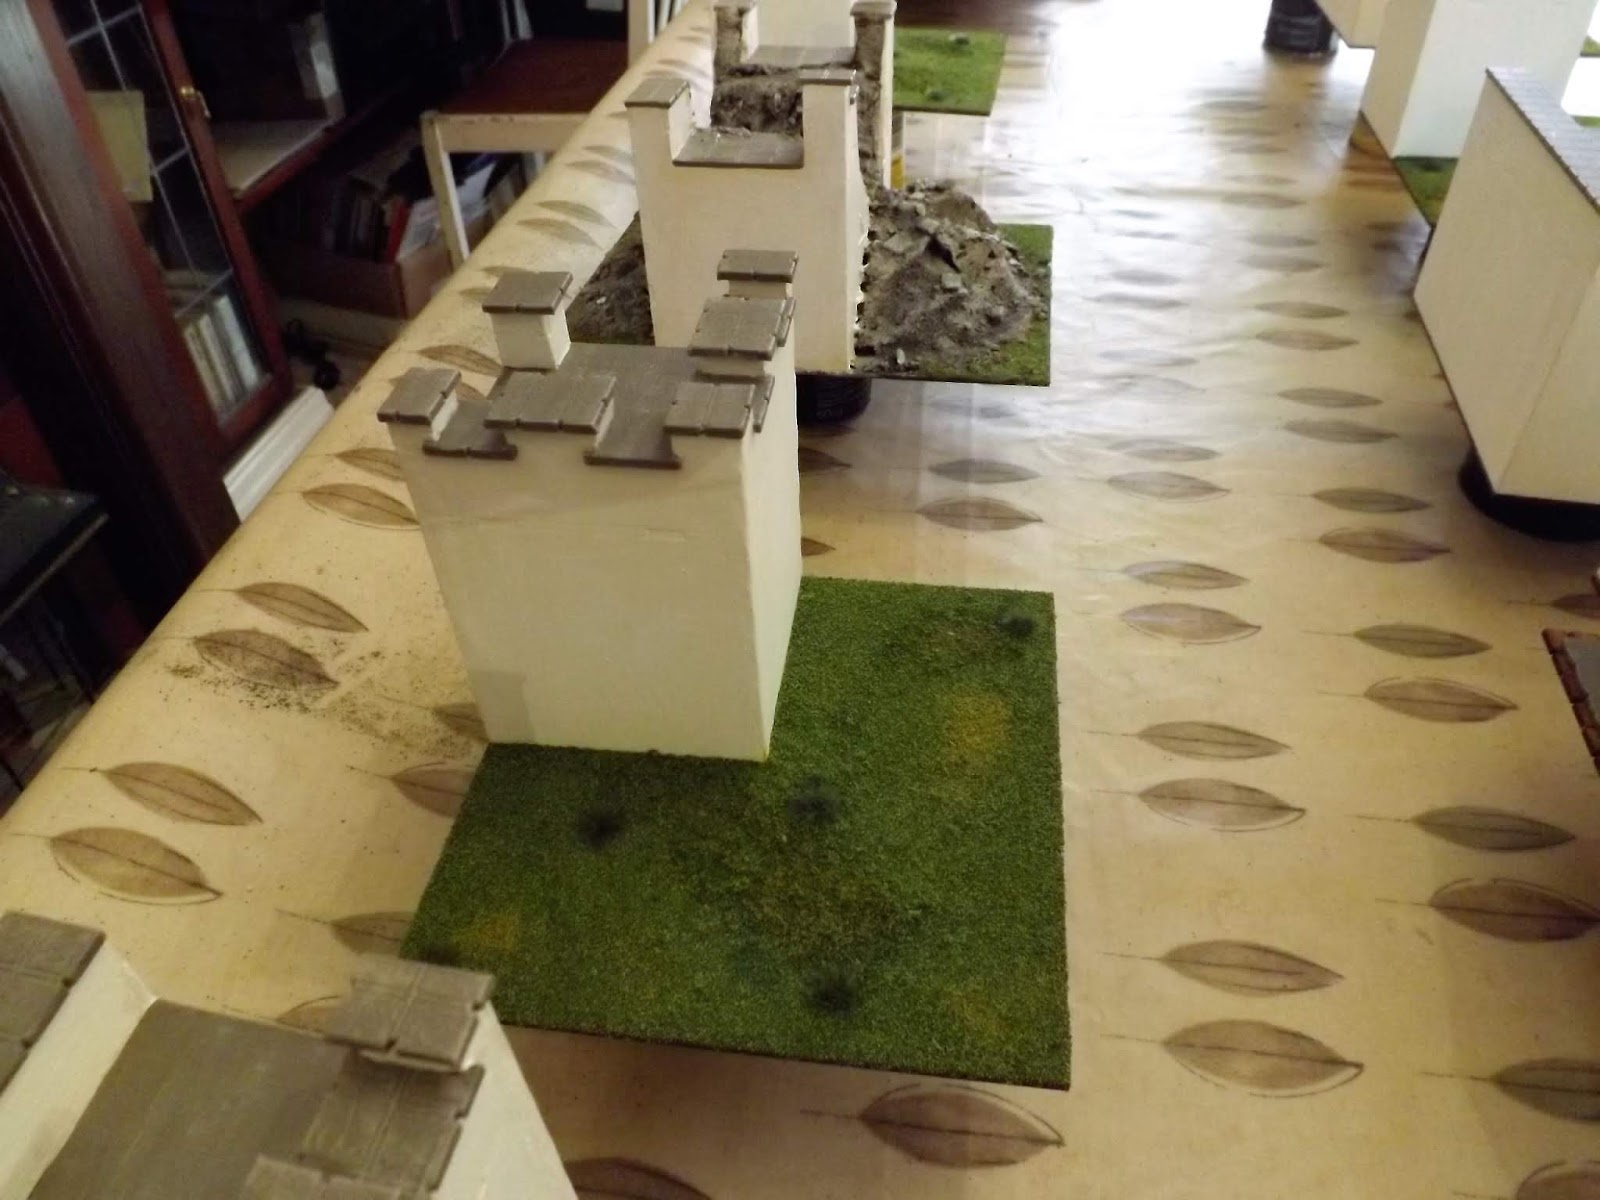
Finally we have the new walls and their bases displayed on one of my mats to show how they will blend into my table set up.

The next stage will be to populate the interior with other suitable buildings most likely from the Warbases range of Roman buildings and I already have an idea on how to create a road surface to place those buildings on, within the walls, to have it looking quite different from the surrounding countryside outside.


I am really pleased with how these walls have turned out and have confirmed my own thoughts when Warbases first released them about how suitable they are for scratch building and conversions, with the price making them very competitive with other resin options.
MDF is a very flexible product to work with but I am a firm believer that to make it look good a little work, preparing it and painting it, is still required just as you would with resin or most other materials.
 |
| The rear of a breach section next to my improvised paving supporting my tower door step. |
With the amazing selection of excellent quality MDF buildings now available and with manufacturers wowing us with even more amazing things they are able to produce and at a price that is very affordable, good looking terrain to compliment good looking armies has never been so possible as it now is.
 |
| The next time you see the walls from inside I hope to show you my new set of internal buildings and internal road base |
So that's the breached walls done and I now have a mind to have a look at other types of hills together with a bridge or two, not to mention some roads I have my eye on, so a few more Terrain Updates to come going forward.
Lots of stuff to come on JJ's with my visit to Taunton and the Museum of Somerset, Steve M and I get some practice reacquainting ourselves with Dux Bellorum and the Battle of Pinhoe 1001 and I and a few of the chaps are off to Crusade in Penarth this weekend so lots to, no doubt, tell you about from there.
This looks really good. Excellent work.
ReplyDeleteI agree- very nicely done.
ReplyDeleteA really outstanding tutorial with excellent photos. Many thanks.
ReplyDeleteP.S. I am guessing that you could use this same technique for peninsular War sieges. Any thoughts of doing this with your Peninsular War collection?
Thanks Chaps, glad you like it.
ReplyDeleteRod - I'm not sure if the expanded polystyrene technique would work other than in this case, a large hollow MDF shape that needs a filling to create the look.
That said if one of the MDF manufacturers developed a 15/18mm Vauban fortification then why not and indeed I might be tempted.
My Peninsular collection is taking a rest at the moment while I focus on building up the 28mm Ancients, and the terrain collection, likely followed by Wars of the Roses, but I am intending to look at scenarios for the Peninsular in conjunction with my trip to many of the key battle sites later this year - more anon.