

You can almost smell the hemp and tar intermixed with the salty smell of the sea, combined with the noise of a busy dockyard as three new British 74-gun, 3rd Rate, Ships of the Line are completed and begin their commissions in his His Majesty Royal Navy.
All at Sea - On the Stocks in JJ's Dockyard, New British Builds, Part One
All at Sea - On the Stocks in JJ's Dockyard, New British Builds, Part Two
 |
| From left to right, HMS Mars, Colossus and Ajax are the three named 74-gun ships to join my British collection |
These are the three named 74's in the Warlord British Fleet Box, HMS Mars, Colossus and Ajax and as in my previous posts on the other additions to my British collection, as well as showing you how these models can look on completion, I thought it might be fun taking a look at the history behind these famous ships in the larger history of the British Royal Navy.
HMS Mars

HMS Mars gave her name to the 'Mars-class' of 'Large 74's' as opposed to the 'Middling' and 'Common 74's, which meant that she and her class sister ship HMS Centaur carried 24-pdr long guns on the upper deck, rather than the 18-pdr guns carried by the other two types.
 |
| Sir John Henslow, 1730 - 1815 Surveyor to the Navy 1784 -1806 |
Designed by Sir John Henslow, a former apprentice to Sir Thomas Slade whose career was described in Part One of this series of posts, and with Cape Henslow on Guadalcanal being named after him, HMS Mars was built and launched onto the River Thames at Deptford Dockyard on the 25th October 1794.
 |
| Deptford Dockyard circa 1794 - Joseph Farington |

After her commissioning, she was assigned to the Channel Fleet or Western Squadron and in June 1795 was part of the squadron under the talented command of Vice Admiral Sir William Cornwallis, brother to Lieutenant General Charles Cornwallis.
 |
| Captain Sir Charles Cotton |
Her captain at that time was Sir Charles Cotton and on June 8th in company with HMS Royal Sovereign 100-guns (Cornwallis's flagship), Triumph 74-guns, Brunswick 74-guns, Bellerophon 74-guns, the frigates Phaeton 38-guns and Pallas 38-guns and the brig Kingfisher 18-guns, the squadron spotted a small French squadron of three 74's and six or seven frigates under the command of Rear Admiral Jean Gaspard de Vence off Penmarck Point, near Ushant.
 |
| HMS Mars of 1794, model held by the National Maritime Museum https://collections.rmg.co.uk/collections/objects/66538.html |
Giving chase to the the French squadron the British force managed to close with the rear most french ships as they sought shelter from guns on Belleisle, close to Brest harbour, taking one of the frigates as a prize and later some French merchantmen, part of a convoy who were supposed to have been escorted by Vence's squadron.

The next few days Cornwallis stayed in contact with Vence's squadron, thinking he had him blockaded close to Brest, however Vence was joined by the main French fleet, which was already at sea on the 15th June led by Admiral Villaret-Joyeuse commanding nine ships of the line, two 50-gun razees, seven frigates and four corvettes.
 |
| The NMM model of HMS Mars showing her stern galleries |
At 10.30 the frigate Phaeton signaled that she had the enemy in sight and that the force was superior to that of Cornwallis, but he was under the false impression that the frigate had mistaken the merchant convoy, that had managed to join Vence, as French warships, and thus he stood well into the bay until at 11.00 when he realised his mistake and stood away making all sail and forming into line.

What followed was a two day chase as Cornwallis sought to escape the larger French force in hot pursuit, during which on the night of the 16th/17th June HMS Bellerophon and Brunswick had to ditch their anchors and large quantities of provisions and stores to increase their speed.
 |
| Cornwallis's Retreat, June 17th 1795 - Thomas Luny |
Cornwallis placed these two ships at the head of his column and followed with the Royal Sovereign , Triumph and Mars bringing up the rear, and it was on Mars that that the French opened fire at 09.00 on the next day, but by noon all the British ships were engaged firing their stern and quarter guns as they bore.
 |
| The NMM model of HMS Mars showing her figurehead in detail |
The British ships went to extraordinary lengths to bring as many of their guns to bear as they could with all five ships cutting away their stern galleries and frames to allow more guns to be brought into action from their stern quarters.
At 17.00 Cornwallis had to form line at the latter stage of the chase as by then Mars was beginning to fall back with the damage she had sustained, but on seeing the Royal Sovereign and her consorts offering their broadsides, Villaret's lead five ships dropped back and contented themselves with long range fire, until they spotted HMS Phaeton signalling to an unidentified British squadron over the horizon and broke contact.
Of course there was no reinforcing British squadron over the horizon, and Cornwallis had pulled off an amazing bluff, that brought him much admiration and would see his career blossom, later becoming the Commander of the Western Squadron.

HMS Mars was again in action on the approaches to Brest when as part of the ten ship squadron under Vice Admiral Alexander Hood, Lord Bridport she was blockading French ships in the French naval base.
 |
| Brest and its Approaches from 'The Influence of Seapower' - Mahan The Iroise Passage and the Raz de Sieine are shown at the bottom of the map where Mars and Hercule engaged |
HMS Mars together with HMS Ramillies 74-guns, were detached to chase two French ships spotted east of the Iroise Passage and soon after another large vessel was spotted to the southeast creeping along close to the coastline, which turned out to be the French 74-gun Hercule attempting to get into Brest. The Ramillies lost her foretopmast in the chase and soon dropped off, but with Captain Louis L'Hertier of the Hercule unable to make much headway against the strong current in the narrow Raz de Sein passage, the French captain ordered the dropping of the anchors and prepared his ship to meet the Mars.
 |
| HMS Mars and the French 74-gun ship Hercule fight broadside to broadside off Brest harbour, 21st April 1798 - John Christian Shetky |
Captain Alexander Hood, commanding HMS Mars and who was a cousin, once removed, of Lord Bridport, also found it difficult for his ship to make headway against the current and at 21.15 he also dropped anchor in an attempt to get his ship into the best position to engage. The Mars however dropped back and her anchor fouled that of the Hercule and the two ships found themselves locked broadside to broadside in a fierce duel that lasted over an hour with both ships ending up so close that they were unable to run out their guns and they were fired from within the respective gun decks.
 |
| Death of Captain Alexander Hood, 1798 |
Badly damaged in the hull and after two failed boarding attempts, the Hercule struck, with her starboard side described as bring 'riddled in many places' and 'burnt black as a cinder' and with her five aftermost starboard lower deck guns dismounted and several others much damaged.
The French casualties were high amounting to 200 of her 680 crew killed or wounded and with Mars losing 30 killed and missing, including her captain among the dead and with 60 wounded out of a total crew of 634.
 |
| Vice Admiral Alexander Hood, Lord Bridport |
Lord Bridport wrote sadly to the Admiralty after the action;
'No praise of mine can add one ray of brilliancy to the distinguished valour of Captain Alexander Hood, who carried his ship nobly into battle and who died of the wounds he received in supporting the just cause of his country. It is impossible for me not to sincerely lament his loss as he was a honour to the service and universally loved.'

Her commander on that day was Captain George Duff, a career sailor who was at sea before his teens and was commissioned a lieutenant at just sixteen. Captain Duff took command of the Mars in April 1803 on the declaration of war following the Peace of Amiens.
 |
| Captain George Duff 1764 - 1805 |
'There was a French ship on each side of the Mars (the Forgueux 74-guns and the Pluton 74-guns) and a Spanish ship (the Monarca 74-guns) on the bow and a fourth ship also within range (the Indomptable 80-guns) ... The Forgueux , was soon disbaled, and it was thought that she had struck, but her colours had been shot away, as she never ceased to fire. The Captain of Marines, on the poop, seeing that ... (she) was getting into a position thatt would enable her to rake us ... came down to the quarterdeck to inform Captain Duff ... who asked him: 'Do you think our guns would bear on her?' He answered: 'I think no, but I cannot see for smoke' ... Captain Duff on that went to the end of the quaterdeck to look over the side. He then told his aide-de-camp ... to go below and order the guns to be pointed more aft, meaning against the Forgeuex. The midshipman had scarcely turned ... when the Forgeuex raked the Mars with a broadside ... (and) killed Captain Duff ... (the First Lieutenant, William Hannah, assuming command).
 |
| Battle of Trafalgar, End of the Action by Nicholas Pocock circa 1808. HMS Mars is depicted in the right foregound across the bow of the captured Spanish ship Bahama. |
When the battle had ceased, and it was generally known ... that (our) gallant Captain was killed, there was scarcely a dry eye among the crew. Everyone felt that he had lost a friend and benefactor.'
HMS Mars would continue in service with Western Squadron taking part in the Action off Rochefort as part of a seven ship squadron that captured four French frigates.
Action off Rochefort 25th September 1806
In 1813 Mars was placed in ordinary and was broken up in 1823.

Typically HMS Mars was armed with 28 x 32-pdr long guns on her lower deck, 30 x 24 pdr long guns on her upper deck, 12 x 9pdr long guns on her quarterdeck and 4 x 9-pdr long guns on her forecastle.
HMS Colossus

There were two 74-gun ships of the line names HMS Colossus that served during the French Revolutionary and Napoleonic Wars.
 |
| Impression of the 1787 built HMS Colossus lost of the Scilly Isles in 1798 |
The first of these two ships was built in 1787 and served throughout the Revolutionary War until her loss on the 10th December 1798 when she took shelter in stormy weather in St Mary's Road in the Isles of Scilly only to have her anchor cable parted and see the ship strike a submerged rock off Sampson Island with only one man lost in the sinking, the rest being brought safely to shore.
 |
| Battle of Groix, 23rd June 1794, Lord Bridport pursued with 14 ships of the line and attacked the rearmost ships of a 12 ship French squadron commanded by Vice Admiral Villaret de Joyeuse after the French were returning to L'Orient following their pursuit of Admiral Cornwallis' Squadron on the 17th June.Three French ships were taken and over 600 casualties inflicted for the loss of 31 killed and 113 wounded. - Robert Dodd |
That first HMS Colossus saw service with the Western Squadron in action at the Battle of Groix off Brest in 1795 and was with Admiral Sir John Jervis during his successful battle with the Spanish off Cape St Vincent on the 14th February 1797.
 |
| Battle of Groix 23rd June 1794 This map of Quiberon Bay and the approaches to L'Orient harbour, clearly shows the island of Groix in the top left corner to which Villaret Joyeuse was retreating as he closed on the base, hoping the nearby shallows and rocks would cause Lord Bridport to break off his pursuit |
The second HMS Colossus was another design of a 'large 74' from Sir John Henslow also launched at the Deptford Dockyard on the 23rd April 1803.

Likewise, being a 'large', Colossus was built to carry upper deck 24 pounder long guns as opposed to the more standard 18 pounders carried by common and middling 74's.

The first notable action in the history of the second HMS Colossus was its involvement with and recapture of the East Indiaman Lord Nelson, taken as a prize off Ireland by the St Malo based privateer Bellone 34-guns on the 14th August 1803.
In a one and a half hour fight, the 32-gun Indiaman fought off its attacker with just its 102 man crew vs the Frenchman's 260 men, fighting off one boarding attempt but succumbing to the second.
 |
| Hull Plan for HMS Colossus-1803, National Maritime Museum |
Once taken, the Lord Nelson was escorted off into the Bay of Biscay by its captor bound for La Corunna, until an encounter on the 20th August with a British frigate forced the two to part company, with Bellone leading the British frigate away from its prize.

The prize crew aboard the Lord Nelson pressed on, seeing off another encounter with a British privateer Thomas and John 14 guns on the 23rd August and a British hired armed cutter of 12 guns some days later.
On the 26th August she was sighted by the 18-gun Brig, HMS Seagull who was on the trail of the Bellone having heard news of her activities off Ireland, and on seeing the Lord Nelson commenced a five hour chase that managed to bring its quarry to action, leaving the Frenchman out of prepared cartridges and prepared to strike, but with Seagull badly shot up aloft causing her to break-off to make repairs.
 |
| The capture of the East Indiaman Lord Nelson 32-guns, off Cape Clear, Ireland, by the French privateer Bellone 34-guns, 14th August 1803 - Jacques Francois Perroud |
Before Seagull could make ready to reengage and with the Lord Nelson now prepared with more cartridges to receive her, the Inshore Squadron of Sir Edward Pellew aboard HMS Tonnant hove into sight led by HMS Colossus, with Seagull signalling her recognition, after which the Lord Nelson struck.

Like her sister ship HMS Mars, Colossus was the sixth ship in the column that formed Vice Admiral Collingwood's Leeward division of Lord Nelson's fleet at the Battle of Trafalgar on 21st October 1805.
 |
| Battle of Trafalgar - John Thomas Serres |
Captain James Nicoll Morris was commanding that day and was among the ships that attacked the French Swiftsure 74-guns and the Spanish Bahama 74-guns so effectively that both struck their colours after suffering heavy casualties; but with Colossus paying the price of 40 killed and 160 wounded to overcome them.
Taking part in the American War of 1812 on blockade duties and helping in the capture of the Emille in 1812 and the American ships Dolphin and Print the following year, Colossus was put in ordinary in 1815 and broken up in 1826.

Typically HMS Colossus was armed with 28 x 32-pdr long guns on her lower deck, 30 x 24 pdr long guns on her upper deck, 12 x 9pdr long guns on her quarterdeck and 4 x 9-pdr long guns on her forecastle.
HMS Ajax

HMS Ajax completes the trio of London built 74's, built and launched by John Randall & Co. at Rotherhithe on the 3rd March 1798 giving her name to the class of two 'large 74's' together with her sister ship HMS Kent launched in January of that year.
 |
| John Holloway, pictured here later in his naval career as an Admiral, was HMS Ajax's first captain |
Similarly armed as Mars and Colossus, Ajax was commissioned in June under her commander Captain John Holloway and was attached to the Channel Squadron.
On 9th January 1800 under the command of Captain Alexander Cochrane she captured the St Malo based French privateer L'Avantageux 9-guns
 |
| HMS Ajax, built in 1798 |
In the period 1798 - 1801 Napoleon launched his campaign into Egypt that saw the destruction of the French naval squadron in support of his operation destroyed at the Battle of the Nile on the 1st of August 1798 by Lord Nelson.
 |
| The Battle of Abukir, 8th March 1801 |
In 1801 HMS Ajax joined the fleet carrying the 16,000 British troops under General Sir Ralph Abercromby, with the fleet commanded by Lord Keith, and participated in supporting British troops making their opposed landing at Aboukir with Captain Cochrane directing the 320 boats that brought the troops ashore, with two sailors from Ajax being killed during the landings and losing a further three killed and four wounded among its compliment sent to join the 1,000 strong unit of sailors from the fleet landed to support the troops ashore under the command of Sir Sydney Smith.
 |
| Map of the Mediterranean from 'Influence of Seapower'- Mahan The key areas of action highlighted in the career of HMS Ajax 1798 - 1807 |
After the Battle of Alexandria on the 21st March, HMS Ajax was among the first allied warships, which included three Ottoman corvettes to enter the harbour of Alexandria.
In 1802 with the Peace of Amiens concluded Ajax returned home.

With a resumption of war in 1803, HMS Ajax was back serving with the Western Squadron covering the Channel, approaches to Ireland and French access into the Bay of Biscay.
In April 1805 HMS Ajax was sent by Admiral Lord Gardner together with HMS Malta and Terrible to join Vice Admiral Sir Robert Calder's Ferrol Squadron only recently reduced to five ships of the line.
 |
| William Brown, pictured here as a Rear Admiral became Captain of the Ajax on 31st May 1805 and was in command during the Battle of Cape Finisterre, 22nd July 1805 https://commons.wikimedia.org/wiki/File:Rear-Admiral_William_Brown.jpg |
In May Captain William Brown took command of the Ajax and during her participation on the 22nd July in what became known as 'Calder's Action' off Cape Finisterre when his squadron of fifteen ships of the line fell in with the combined Franco-Spanish fleet of twenty ships of the line under Vice Admiral Villeneuve returning from the Caribbean.
 |
| Map illustrating the positions of the various British and Allied squadrons, and the number of ships of the line in each, at the time of Calder's Action at the Battle of Cape Finisterre, shown west of Vigo on the Spanish coast |
In a confused action lasting some four hours in patchy fog and failing light, the British squadron captured two Spanish ships, the San Rafael 80-guns and the Firme 74-guns, with a third, the Espana 64-guns also badly shot up but saved from capture when the French Pluton hove up to support her.
 |
| Battle of Cape Finisterre, more commonly known as 'Calder's Action' - William Anderson |
The Franco-Spanish force lost over 1800 men with 1200 captured on the two ships lost whilst Calder's squadron suffered just short of two-hundred men killed and wounded and with Ajax suffering two killed and nine wounded.

HMS Ajax returned to Plymouth for repairs and on the 18th September in company with HMS Thunderer 74-guns and HMS Victory 100-guns under the command of Vice Admiral Nelson with Captain William Lechmere commanding the Ajax, set course for Cadiz.
However Captain Lechmere was soon on his way home, recalled as a witness together with Captain Brown at the court-martial of Sir Robert Calder accused of withdrawing his squadron too early from the Battle of Cape Finisterre.
 |
| Figurehead of HMS Ajax - National Maritime Museum |
Thus it was that HMS Ajax was to be under the command of her First Lieutenant, John Pilfold at the Battle of Trafalgar.

HMS Ajax was seventh in the column led in by Vice Admiral Nelson and HMS Victory, and fired at the Bucentaure 74-guns and Santissima Trinidad 136-guns joining with Neptune and Mars to fire into the Spanish behemoth.
Later in the closing stages of the battle for the centre of the Combined fleet's line, Ajax joined HMS Orion 74-guns in a close action with the French 74-gun Intrepide, part of Dumanoir's division coming back to aid her comrades in the centre, causing the Frenchman to strike.
HMS Ajax suffered two men killed and nine wounded during the battle, and helped to rescue crews from ships in danger of sinking at the close of the battle, and later staying in the area to help conduct the blockade of Cadiz after the battle.

On February 1st 1807, HMS Ajax was sent to join Admiral Sir John Duckworth's squadron at Malta, joining the vanguard division (HMS Ajax, Canopus 80-guns and Endymion 40-guns) under Rear Admiral Sir Thomas Louis in preparation for operations against Ottoman Turkey and the Turkish fleet.
With Russia now an active participant in the Fourth Coalition, France was actively encouraging the Ottomans to declare war against the Russians who were then directing their forces into Poland and East Prussia.
Britain was key to supporting their Russian allies by passing a strong naval force through the Dardanelles and attacking Constantinople and the Turkish fleet in an effort to force the Ottomans into line.
 |
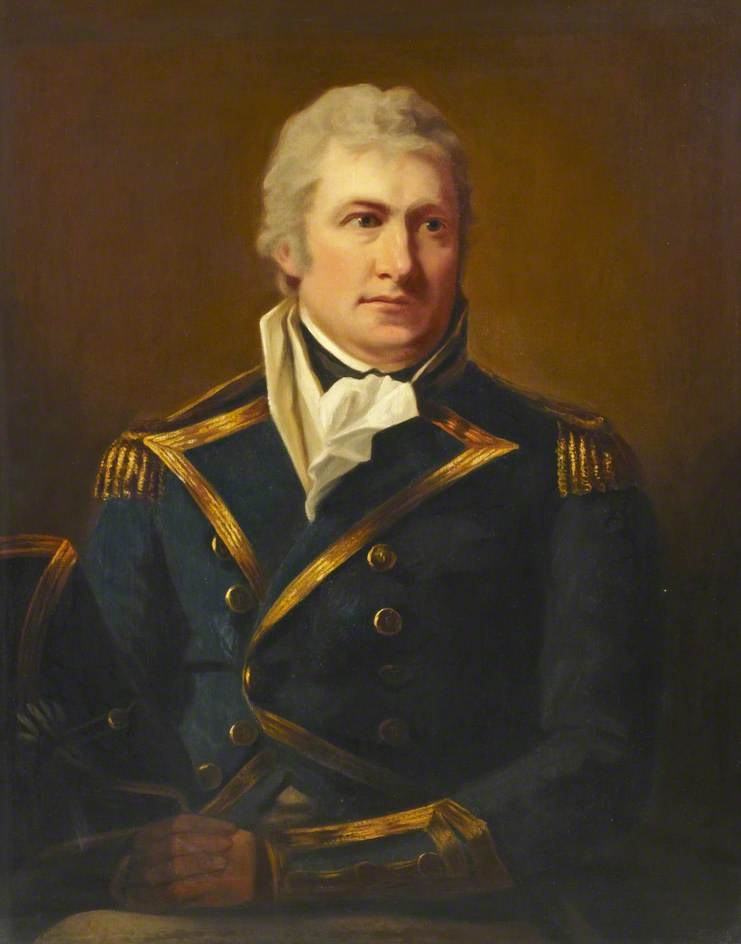
| Captain Sir Henry Blackwood |
HMS Ajax was commanded by Captain Sir Henry Blackwood whose career was briefly described in Part Two of this series of posts in his previous role commanding the frigate HMS Euryalus.
Sir Thomas Louis was sent to Constantinople, arriving on the 21st November, but to no avail, and despite a British ultimatum on the 27th December the Ottomans declared war on Russia on December 30th 1806.
Admiral Louis was on Tenedos by February 1st 1807, to meet with Duckworth and his squadron in preparation for the forcing of the Dardanelles and a direct attack on the Turkish fleet at Constantinople if necessary.
On the 11th of February all was ready and Duckworth made preparations to enter the straits but was prevented by adverse winds, causing the force to remain at anchor off Tenedos.
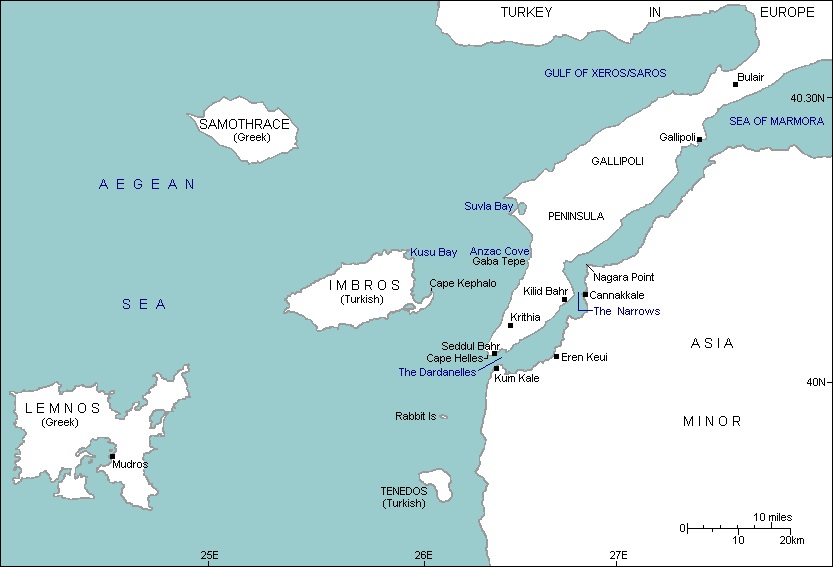 |
| Map illustrating the approaches to the Dardanelles with the island of Tenedos shown south of the entrance at which the British squadron mustered. |
On the evening of the 14th February while Ajax was at anchor a fire started in the bread room quickly getting out of control and forcing the crew to take to the boats and abandon ship.
Although 380 men were saved another 250 were not and the ship was left to drift on shore where she eventually blew up the following morning.
The fire was blamed on the negligence of the ships purser and his assistant for leaving a lit lamp unattended and Captain Blackwood was cleared of responsibility at his subsequent court martial.

Typically HMS Ajax was armed with 28 x 32-pdr long guns on her lower deck, 30 x 24 pdr long guns on her upper deck, 12 x 9pdr long guns on her quarterdeck and 4 x 9-pdr long guns on her forecastle.
Postscript to Post Two
Only after I had posted my second post last week looking at the three named British frigates added to the collection did I notice a glaring error, that nobody else picked up here and on the other forums I posted to, specifically, none of my frigates were carrying their anchors.The picture below is how they should have looked with anchors stowed and ready to go.

This simple error helps illustrate that I am learning with each build routine and you will note that my three 74's have not suffered the same fate for their review, because I have changed my rigging routine, affixing said anchors after the standing rigging and ratlines are finished and before I start the running rigging.
Hopefully this change will prevent such errors in future, time will tell!
Next up, work continues in the ship yard with the completion of a Generic British 1st/2nd rate and HMS Royal Sovereign, before turning to my first Spanish ship of the era, the mighty Santissima Trinidad.
In addition I have a book review coming up together with two posts on my recent Vassal gaming activity covering Slow Convoy 48 on Tonnage War Solitaire and Steve M and my game of Breakout Normandy.
HUgely informative and your modeling skills are phenomenal!
ReplyDeleteHi Anton,
DeleteThank you.
I don't consider anything I do particularly extraordinary and rather hope to encourage others who feel that it is, to know that the folks I have been doing this hobby with for years have seen my abilities, just as theirs, improve over time with constant practice and application at something we do for fun. Even then the stuff you do doesn't always complete the way you'd hoped, as my friends can happily recount, but then you have at least discovered how not to do it in future!
These posts are all about firing up the interest in the history in our hobby and firing people's imagination to get in there and start putting collections together and playing more wargames and having some fun doing it, plus there are plenty of tutorials here and other sites to help in the process.
Thanks again
JJ
Another great informative entry. Superb looking ships too.
ReplyDeleteAnother awesome historical post that took me a while to get through; reading, studying the photos & paintings, going back re-reading, enlarging the maps, re-reading.....
ReplyDeleteThoroughly enjoyable!
Lovely models! I'm debating whether or not to base my Cruel Seas ships - did you make those clear bases yourself?
ReplyDeleteThank you.
DeleteThe bases were created for me by Fluid 3D Workshops. See the link to the post below for more details
https://jjwargames.blogspot.com/2020/02/all-at-sea-on-stocks-in-jjs-dockyard.html
JJ
Excellent - thanks
Delete