It was with much anticipation that I approached the second game of Oporto with all the ideas and discussion still fresh in my mind from the anniversary game last month.
 |
| The table all set up ready to go |
I was up early Sunday morning putting the finishing touches to the set up and my notes for briefing today's players; two friends from the Devon Wargames Group, Vince and Martin who would be playing Wellesley and Soult respectively.
Part of the briefing included a few changes from last month with Cotton's cavalry added to the variable reinforcements and changes to the "Battle for the Seminary Rules" to reward the French for attacking the strong-point. These changes are designed to fine tune the scenario before making it available for others and will enable me to add alternative options to the final brief.
 |
| Foy leads the 17e Legere straight on towards the Seminary |
This game was to prove a quite different affair from last month's right from the start, as Foy decided to get the 17e Legere moving out of the city on turn one and making straight for the nearest part of the Seminary wall. This was audacious in that it immediately put his brigade into contesting the Seminary from turn one but also put two of his battalions into medium range of the British guns.
The French are required to contest the Seminary by having a unit/units within 525 paces of the wall for a minimum of five turns to count as having contested the building. This primarily stops the French from simply ignoring it and retreating.
 |
| Foy's infantry are saluted by the RFA and KGL guns |
This aggressive move by Foy almost seemed to faze Wellesley, and the movement put immediate pressure on General Hill and the 66th Foot as they made their way up the cliffs from the river. The response from the guns seemed to settle the British command as round-shot and shrapnel started to take a toll on Foy's men.
 |
| The Legere start to take casualties from the artillery fire to their flank |
With turn three the 70th Ligne came marching out from their billets and preceded by the Voltigeur battalion immediately pushed through the vineyards looking to threaten the front of the Seminary and drive off the British skirmish line. The 12e Artillerie, deployed on the outskirts, added to the discomfiture of the Seminary garrison by firing at the battalions manning the wall of the perimeter.
The French had been briefed that if they put in a charge against the perimeter regardless of the outcome, that would reduce the number of turns needed to contest the building by one for every charge move made. However because General Foy's command are initially set up on "Defend" orders under C&GII, they can only make a charge move when the General attaches to a unit.
 |
| The 70e Ligne pour out of Oporto to support the Legere |
Foy's Voltigeur battalion were as aggressive as their commander forcing the Light Bobs to give ground as they moved forward firing as they came on. To reinforce the point the 2/70e Ligne moved up behind in column.
 |
| The French drive back Hill's Light Battalion as they look to seal off the Seminary |
 |
| Close up skirmish battle |
The turn also saw the arrival of General Foy's messenger at Soult's HQ and requiring a 4, 5 or 6 to wake the Marshal and start the retreat, the French rolled a 4 and a flurry of messengers went out to alert the garrison for the need to start to withdraw.
The first units to move out and onto the table were General Franceschi and his two cavalry brigades, immediately working their way around the back of the city to move onto Windmill Hill.
The process of monitoring where the French and British off table forces were and how quickly they would appear on the table was by using the Cyberboard map that allowed me to move markers as directed by the two commanders
 |
| The cyberboard map was used during the game to re-position off table commands at the direction of the players. For example Debelle is shown below Soult in the city. Commanding a cavalry brigade he is able to move two squares in any direction including diagonally. On receipt of his orders from Soult he moved directly to 1-1 to appear on table on turn four. The distance from Soult also enables a quick reckoning on how far messengers had to travel. I allowed 600 paces per square moved or 300 paces if occupying the same square. |
 |
| Franceschi's cavalry arrive en mass |
With more and more French troops starting to respond to their commanders orders, Sir Arthur turned his gaze to the road from the east. Where was Sir John Murray, where was Cotton and his cavalry?
As mentioned earlier I had randomised both the commands for their arrival times. I knew that Cotton would not make it in time but kept that information from the British. The KGL brigade was expected on turn six. The lack of cavalry would force the British to play a very different game from last month, and given the much quicker response from Soult to the alarm given by General Foy the pressure to stop the retreat was very much on the British command
 |
| The French start to evacuate the city |
With more French troops starting to make their way into the city outskirts General Foy pressed his attack on the 66th Foot with General Hill commanding. Both generals steadied their men and prepared to exchange volleys and the British fire power soon took effect as the Legere reeled under the fire, and Foy was unhorsed as his mount collapsed from several hits.
 |
| General Hill dresses the ranks of the 66th Foot |
With his men under continual attack from the British guns he was compelled to keep close to the British infantry and take the fight to them. So remounting, he moved ever closer to maximise the effect of his troops firing. The volleys were intense and devastating particularly from the British and Foy went down again, this time with a musket shot to his belly. The wound looked serious and his aides carried him to the rear.
 |
| Sir Arthur oversees the artillery support for on forces on the far bank |
The affect on the men seeing their general wounded was more than enough and the 1/17e Legere fell back to the city outskirts their retreat turning to a rout as they disappeared into the narrow streets.
 |
| General Foy's aide attempts to rally the 17e Legere as they fall back from the Seminary |
As the game moved to the midway stage and still no British cavalry had appeared, Wellesley turned to his Guards to lead the crossing into the now vacated waterfront area and to begin the pursuit through the city.
As he gave his orders for the embarkation, a dispatch arrived announcing the imminent arrival of General Murray and the KGL infantry brigade.
 |
| The French start to organise their units to pull out |
The French had had a perfect start to their game and apart from the casualties to the 17e Legere, Soult had responded immediately and his commanders had followed suit by getting their troops on the march.
Now however, the situation required the French force to move from the offence around the Seminary to a staged withdrawal with an active rearguard keeping back British attempts to disrupt the units attempting to leave.
 |
| The first battalion start to exit the road off |
 |
| Sir John Murray and the KGL double march to attack the retreat route |
 |
| General Hill brings the 66th Foot forward |
As more French units moved through the city the RFA and KGL guns continued to take a toll, but the effort of maintaining this barrage was causing great fatigue to the gun teams, and their accuracy and fire started to slacken. The effect of the artillery on the French units was to have an effect as the game moved in to the last moves, as the French commander felt compelled to issue orders for his men to double march along the road to get off the table.
 |
| General Reynaud oversees his brigades march out of the city. General Franceschi's cavalry are top left on Windmill Hill facing off against the Guards approach. The KGL are top right with skirmish lines closing in on the road. |
As the British guns started to fall silent the allied infantry started to press the rear most French troops bringing them under ever increasing musketry and forcing some to change formation and attempt to hold back their pursuit.
 |
| General Archibald Campbell's brigade pushes on into the outskirts of Oporto. Note the Portuguese Infantry making their on table debut rear top right. |
 |
| 2nd Guards shake out into line, with the Guards Light Battalion up ahead |
A major threat started to develop as the Guards brigade under General Henry Campbell started to move out from the rear suburbs and shake out into line on the forward slopes of Windmill Hill, the British name for the high ground, close to the French retreat route.
 |
| General Henery Cambell leads the Guards out of the city to the top of Windmill Hill |
The French could not allow the British Guardsmen to continue their march and deployed their horse artillery together with the chasseurs and dragoons of General Girardin's brigade on top of the hill.
Meanwhile, on the opposite side of the road, the KGL battalions preceded by Hill's and Murray's light battalions advanced to pressure the retreat; as well as forcing the 1e Hussars and 22e Chasseurs of General Debelle's brigade to move out in line to oppose them.
 |
| General Foy and the 2/17e Legere make their way away from the pursuing British |
 |
| General Hill brings the 66th into the line of pursuing allied troops |
The game was reaching a climax as the French brigades were strung out along the escape road, with more and more British units closing in on it from various directions. The French rearguard units were forced to deploy to buy time for the army to make good its escape.
 |
| The Guards start to attack the French retreat |
The French command were keen to avoid any close engagement by their rearguard units, thus allowing them to give ground gradually, but eventually the pressure told and bugle calls from both French cavalry brigades announced charge moves from the 8e Dragoons against the 1/3rd Guards pressing forward through the cork trees on Windmill Hill and by the 1e Hussars on Hill's Light Battalion which had pressed forward and had become disordered by a well directed open order volley from Foy's Voltigeurs.
 |
| French Horse artillery supported by Chasseurs look to hold off the British Guards |
 |
| The French retreat is fully underway |
 |
| The French 1st Hussars pull out having destroyed Hill's Light Battalion |
The two cavalry charges moved out from the French lines with the Hussars proving irresistible to the British Light Bobs who, turning tail, in a vain attempt to reach the KGL infantry to their rear, were caught and cut down to a man. On the other side of the road, the result was quite different as the 8e Dragoons underestimated the effect of the cork groves would have on their charge reaching the Guards line. The Guardsmen were totally unmoved by the French heavy cavalry struggling to maintain order among the small trees and with the French charge falling short delivered a crashing first volley into their ranks knocking down over 200 of their number and sending the regiment reeling back upon its supports.
 |
| The 66th Foot advance on the French rear guard |
With both sides taking stock of the last combats of the day the French looked to double march as many of their battalions off the table as they could. It was now that the RFA/KGL gunners had their last say in this battle as, together with the heat of the day and the depleted morale and fatigue caused by their barrage on the town, several French battalions bringing up the rear halted and were forced to reorder their ranks.
French general officers including Marshal Soult himself joined the affected battalions in an attempt to get the men moving, but to no avail, and it was decided that several of these units would not escape the final pursuit.
C&GII is really good at bringing in this kind of granularity to a game that other rule sets struggle to model. The fatigue effects really make command in the game a constant balancing act as players have to struggle with doing things they need to with their troops but not overworking them and finding their orders going unheeded. As the game progressed the day was getting hotter and the fatigue effects were multiplying.
 |
| General Foy's Voltigeur battalion hold off the KGL |
The French had had an excellent result in comparison to the actual events with at least half of Soult's units deemed to have got away from the city. In addition, the prompt movements of General Foy's troops had allowed them to contest the Seminary and pull back on turn 6. Thus the French had achieved both of their tactical objectives, with the bonus of General Foy reappearing at his brigade HQ with his wounds dressed and a bloodied uniform that raised cheers from his men.
However the British had responded well to events in the game and their constant barrage of artillery on specific targets together with the musketry brought to bear on retreating French troops; particularly from the Guards and the 66th Foot had seriously dented the French army morale and left a significant casualty bill of around 1500 men. As in the actual battle the lack of cavalry would prevent an immediate pursuit, but with the morale effects on the French force any later pursuit would likely be very damaging.
 |
| The French rear guard seen from Sir John Murray's KGL brigade |
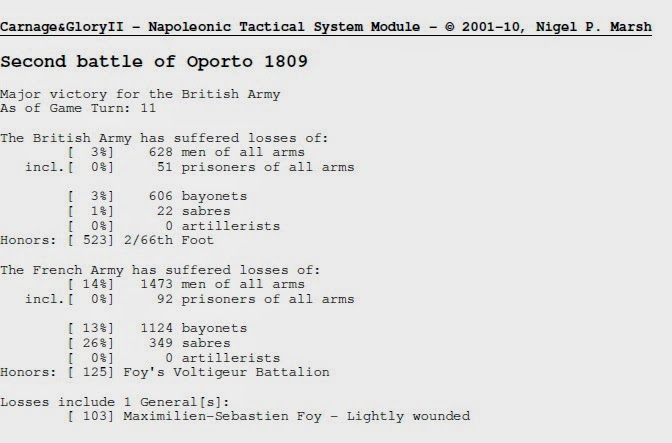
The final result on the C&G score board indicated a Major Victory to the British force, but as the French had successfully contested the Seminary that prevented any improvement to the result for the British, and with the number of French troops getting away by game end, they improved the result in their favour to a Minor Victory to the British.
 |
| Map illustrating principle moves during the game |
[W] denotes No Advance
[R] denotes Halt or Retire
[Y] denotes Routing
[D] denotes Dispersed and removed from the field
Thanks to Vince and Martin for providing the entertainment on what proved in the end a very close run thing.
The post script to this account was the amusement caused to all when announcing the units that gained honours in the battle. All through the day the 66th Foot had become very "sticky" announcing that it would not advance on the enemy unless accompanied by a general officer and requiring morale checks at the end of several moves in succession. It had undoubtedly caused the rout of the 1/17e Legere with its well directed volley fire together with seriously wounding General Foy in the process. The continual "stickiness" meant the General Hill was with the battalion through out the day keeping it moving forward and it was pressing the rearguard to the end, if a little reluctantly. Great stuff, another memory to savour.


Outstanding BatRep and very enjoyable retelling of the battle. Soult performed very well in this engagement and was a little surprised that the British eked out a minor victory.
ReplyDeleteReally splendid looking game.
Great job!
Hi Jon, thanks mate, glad you enjoyed the read.
DeleteYes the French did very well, but you will see from the order of battles at the end of the game that you have a very tired and battered French army especially compared to all those "Fresh" troops listed in the Allied ranks. The fact that the French command did pretty much all they could in a timely fashion but ended up getting a bit shot up in places meant that they did about as well, if not slightly better,as Soult did on the day.
In our after battle "wash up" session, I think we identified that the French might have changed the way they went after the Seminary in an effort to avoid casualties and that they might have attempted to disengage a move earlier than they did. However the way I have set up the variables in this scenario I am hoping one game will be quite different from another.
Next replay is set for July 6th and I am really looking forward to it.
Cheers
Jonathan
Great AAR with beautiful set up and miniatures. Also very interesting with the cyberboard Mao and arrival of troops on the table.
ReplyDelete/Mattias
Hi Mattias, thank you, it's really nice to get the toys out on table in force every now and then. I can really recommend Cyberboard as a great wargaming tool for doing this sort of stuff. As I am running C&G it is simple to have the Cyberboard map open with everything to hand including a die roller when needed. When I put the scenario up for downloading I will include the Cyberboard module as well.
DeleteCheers
Jonathan
This batrep is really awesome, love these splendid pictures, especially the street fights, not easy to photography...excellent work!
ReplyDeleteHi Phil, cheers mate that's very kind. My usual camera was out of action this weekend and so I had to use my original one that is much smaller and made it a lot easier to get the lens in amongst the troops. I might stick with it for the game reports and use the larger one for the parade shots.
DeleteHave to say I am very impressed by the effort you have put into this scenario and the subsequent batreps, both are really top notch. Everything looks just great and the game as an "event" seems totally under control, well done.
ReplyDeleteOn a personal note many thanks for nominating my blog for an award - I have no clue what to do about it, if I can I will nominate yours as it is an excellent and inspiring place to visit. Maybe you can enlighten me?
Very best wishes, Jeremy (warpaintjj)
Hi JJ,
DeleteThank you and well done yourself, I always enjoy checking out those big table games you put together. I think that's the really cool bit about blogs in that you get motivated by seeing what other people are doing.
If you check out my posting below you'll see that you need to pass it on and answer a few questions. I look forward to reading your post!
http://jjwargames.blogspot.co.uk/2014/05/liebster-award-nomination.html
Cheers
Jonathan
Great game and AAR. Truly inspired by all your work and attention to detail.
ReplyDeleteAdam
Hi Adam, thank you, much appreciated.
DeleteReally enjoyed this batrep as well great work! The terrain and figures look great it really is a visual spectacle! :) I especially envy your buildings! Lol :) I think the scenario design is top notch to allow such different games within the same parameters looking forward to the next one already :)
ReplyDeleteHi Robert, thank you for your comments. I decided to do this series of games because I had always wanted to and decided I had better get on with it. The fact that people like yourself like them and take the time to comment is a real thrill and much appreciated.
DeleteCheers Jonathan
As the British player in the second incarnation of this battle, I can say that it was a very close affair & the scenario gave a balanced result.
ReplyDeleteI am no convert to computer rules, (I like to see them thar bones roll) but Carnage & Glory give believable results and flow well.
As usual JJ's preparation & paint jobs were of a high standard.
Not so sure about some of those pom poms though....
Vince
Hi mate, good times and very well played for a dyed in the wool bone roller.
DeleteCheers
JJ
Just seeing your lovely figures on this magnificent terrain is enough, but then you overlay a tension-filled scenario, great photos and an engaging commentary. The French made a much better fist of version two didn’t they, thanks to Foy employing ‘the best form of defense’ and better luck in rousing Soult? All great stuff Jonathan!
ReplyDeleteThanks James. The second play through was quite different and was likely to be given the changes I brought in. I will be doing something different in game three so that when I put out the final scenario I will have playtested options to try out as variations, without losing the core theme which is a withdrawal game.
ReplyDelete